Comments / Questions (17)
![]() ANA wrote:
ANA wrote:
Bom-dia. Tenho uma dúvida acerca das explicações: A primeira explicação é para tricotar todo o casaco de uma vez? Obrigada
03.02.2023 - 12:08DROPS Design answered:
Bom dia, Sim, as costas e as frentes do casaco tricotam-se de uma só vez, numa mesma peça. Bons tricôs!
17.02.2023 - 10:05
![]() Angelique Joubert wrote:
Angelique Joubert wrote:
Bonjour, "À 76-79-82-85-88-90 cm de hauteur totale, tricoter en rangs raccourcis pour le col ainsi, commencer sur l'envers ".....ce ne serait pas sur l'endroit...qu'il faudrait commencer les rangs raccourcis....:( je ne comprends pas....SOS :)
06.04.2021 - 18:21DROPS Design answered:
Bonjour Mme Joubert, vous commencez ces rangs raccourcis sur l'envers (devant gauche) pour tricoter pus de rangs sur les 12-12-13-13-14-14 mailles de la bordure du devant. Pour le devant droit, vous commencerez sur l'endroit. Bon tricot!
07.04.2021 - 07:25
![]() Mirella wrote:
Mirella wrote:
Buongiorno, vorrei sapere se è possibile acquistare questo cardigan. Grazie
01.10.2018 - 13:29DROPS Design answered:
Buongiorno Mirella. Sul sito trova le istruzioni per realizzare i capi proposti. In questa pagina sono elencati i rivenditori Drops in Italia. Può contattare i rivenditori per acquistare il filato occorrente o per informarsi sulla disponibilità di magliaie a cui commissionare la realizzazione del capo. Buon lavoro!
01.10.2018 - 14:32
![]() Ingela Hartman wrote:
Ingela Hartman wrote:
Det står att man ska göra förkortade varv på 12 maskor mitt fram på kragen, var då mitt fram? Har jag tänkt rätt då jag tror att det är längst ut på kragen och inte in mot slätstickningen? Hälsningar IQ-fiskmås
28.01.2013 - 18:16DROPS Design answered:
Ja det är längst ut på kragen :)
29.01.2013 - 09:35
![]() Helle wrote:
Helle wrote:
Der er fejl i opskrift fra start - JAKKE: efter 5 pinde ret hvor der skal tages 4 masker ud over 8 masker, står der først tag ud og sidst på pinden "tag ind"
13.01.2013 - 07:37DROPS Design answered:
Hej Helle. Det har du ret i. Vi skal faa det rettet. Tak for det.
16.01.2013 - 16:47
![]() Annika wrote:
Annika wrote:
Garnåtgången är större än vad som står i mönstret!
23.04.2012 - 08:17
![]() Gry Borge wrote:
Gry Borge wrote:
I denne oppskriften er garnmengden helt feil. Strikkefastheten stemmer men jeg fikk 3 nøster for lite.
12.07.2010 - 23:34
![]() Drops Design wrote:
Drops Design wrote:
Bonjour Corinne, les fournitures nécessaires sont indiquées à droite de la photo : Taille : S – M – L – XL – XXL – XXXL Fournitures : DROPS ESKIMO 750-850-950-1050-1150-1250 g coloris n°01, écru + AIGUILLES DROPS CIRCULAIRE (80 cm) et DOUBLES POINTES n°8 - ou la taille adéquate pour obtenir un échantillon de 11 m x 15 rangs = 10 x 10 cm en jersey.
02.11.2009 - 10:02
![]() Corinne wrote:
Corinne wrote:
Elle est tres belle mais j aurais voulu savoir combien de pelote il faut merci
31.10.2009 - 18:32Waerts J wrote:
La veste est tre belle je voudrais une comme cela en caute englaise merci
04.09.2009 - 22:25
Doreen#doreencardigan |
|||||||||||||
 |
 |
||||||||||||
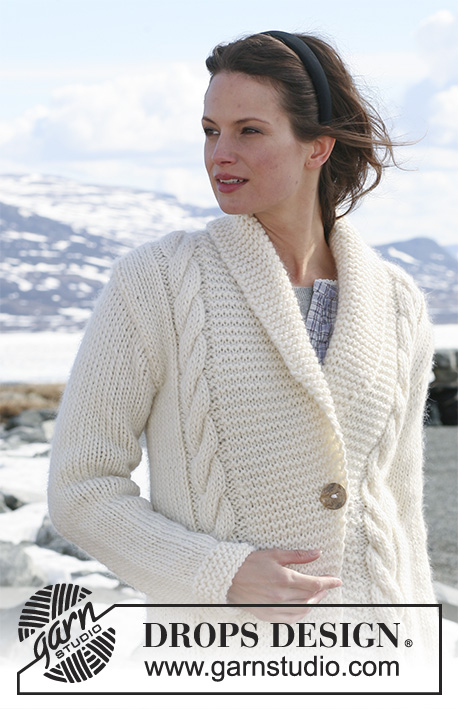
Knitted DROPS jacket with cables and garter st in ”Snow”. Size S-XXXL.
DROPS 117-51 |
|||||||||||||
|
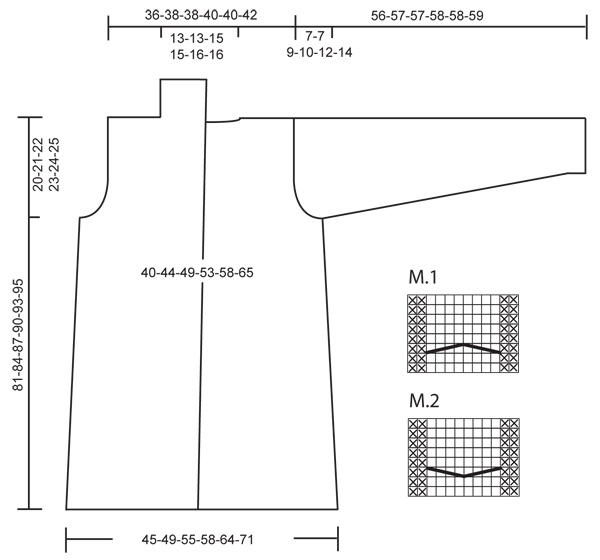
GARTER ST (back and forth on needle): K all rows. GARTER ST (in the round): K 1 round, P 1 round. PATTERN: See diagram M.1 and M.2. Diagrams show the pattern from RS. BUTTONHOLE: Make buttonhole on right front band by K tog 4th and 5th st from mid front and make 1 YO. INCREASING TIP (collar): Inc 1 st by making 1 YO inside 1 st towards mid front each side. On next row K YO into back of loop to avoid a hole. Work inc sts in garter st. -------------------------------------------------------- -------------------------------------------------------- JACKET: Worked back and forth on circular needle from mid front. Cast on 118-126-138-146-158-174 sts on circular needle size 8 mm / US 11 with Snow. K 5 rows. On next row from WS inc as follows: K 15-15-16-16-17-17 sts, inc 4 sts on the next 8 sts, K sts on row until 23-23-24-24-25-25 sts remain, inc 4 sts on the next 8 sts, K remaining sts = 126-134-146-154-166-182 sts. Insert 2 markers in piece, 38-40-43-45-48-52 sts in from each side (back piece = 50-54-60-64-70-78 sts). Work next row from RS as follows: 15-15-16-16-17-17 GARTER STS – see above, M.1 (= 12 sts) – see above, stockinette st on the next 72-80-90-98-108-124 sts, M.2 (= 12 sts), and finish with 15-15-16-16-17-17 garter sts. Continue in pattern like this. REMEMBER THE GAUGE! READ ALL OF THE FOLLOWING SECTION BEFORE CONTINUING! When piece measures 10-10-10-12-12-12 cm / 4"-4"-4"-4¾"-4¾"-4¾" dec 1 st on 1 side (towards back piece) of both markers, and repeat dec towards the front piece and back piece alternately on every 9-10-10-10-10-11 cm / 3½"-4"-4"-4"-4"-4⅜" a total of 6 times (= 2 dec sts each time). AT THE SAME TIME when piece measures 39-40-41-42-42-43 cm / 15¼"-15¾"-16⅛"-16½"-16½"-17" inc 1 st for collar each side inside 1 garter st – see INCREASING TIP! Repeat the inc on every 3 cm / 1⅛" a total of 8-8-9-9-10-10 times. AT THE SAME TIME when piece measures 47-48-49-50-51-51 cm / 18½"-19"-19¼"-19¾"-20"-20"- make BUTTONHOLE on right front band – see above! AT THE SAME TIME when piece measures 61-63-65-67-69-70 cm / 24"-24⅜"-25½"-26⅜"-27⅛"-27½" bind off 4-6-6-6-6-6 sts for armhole each side (i.e. 2-3-3-3-3-3 sts on each side of marker). Now complete each piece separately. LEFT FRONT PIECE: = 41-42-46-48-52-56 sts. Continue in pattern, AT THE SAME TIME bind off for armhole at the beg of every row from the side: 2 sts 0-0-1-1-2-3 times and 1 st 0-0-1-2-3-4 times = 41-42-43-44-45-46 sts. When piece measures 76-79-82-85-88-90 cm / 30"-31"-32¼"-33½"-34⅝"-35½" work shortened rows on collar as follows, beg from WS: * work 2 rows on all sts, work 2 rows on the 12-12-13-13-14-14 garter sts towards mid front only *, repeat from *-*. When piece measures 80-83-86-89-92-94 cm / 31½"-32¾"-33⅞"-35"-36¼"-37" (measured along the cable - adjust to after 1 repeat in diagram) dec 4 sts evenly on cable = 37-38-39-40-41-42 sts. On next row bind off 13-14-13-14-13-14 sts for shoulder = 24-24-26-26-28-28 sts left on collar. Continue with shortened rows until collar measures 8-8.5-9-9.5-10-10.5 cm / 3⅛"-3¼"-3½"-3¾"-4"-4¼" (measured on the shorter side) from shoulder. Bind off. RIGHT FRONT PIECE: Like left front piece, but mirrored. BACK PIECE: = 40-42-48-52-58-66 sts. Bind off for armhole each side as described for front piece = 40-42-42-44-44-46 sts. When piece measures 79-82-85-88-91-93 cm / 31"-32¼"-33½"-34⅝"-35¾"-36⅝" bind off the middle 12-12-14-14-16-16 sts for neck and complete each shoulder separately. Bind off 1 st on neckline on next row = 13-14-13-14-13-14 sts left on shoulder. Bind off when piece measures 81-84-87-90-93-95 cm / 32"-33"-34¼"-35"-36⅝"-37⅜" – adjust to front piece. SLEEVE: Worked in the round on double pointed needles. Cast on 26-28-30-30-32-32 sts on double pointed needles size 8 mm / US 11 with Snow. Work GARTER ST – see above. When piece measures 5 cm / 2" continue in stockinette st. Insert a marker at beg of round. When piece measures 8 cm / 3⅛" inc 1 st each side of marker on every 7-6-6-5-4-3.5 cm / 2¾"-2⅜"-2⅜"-2"-1½"-1¼" a total of 6-7-7-8-9-10 times = 38-42-44-46-50-52 sts. When piece measures 49-50-48-48-46-45 cm / 19¼"-19¾"-19"-19"-18"-17¾" (less for the larger sizes because of longer sleeve cap and wider shoulder) bind off 6 sts mid under sleeve (i.e. 3 sts on each side of marker) and complete piece back and forth on needle. Bind off for sleeve cap at the beg of every row each side as follows: 2 sts 1 time, 1 st 0-0-2-2-4-5 times, then 2 sts each side until piece measures 55-56-56-57-57-58 cm / 21⅝"-22"-22"-22½"-22½"-22¾", now bind off 3 sts 1 time each side and bind off remaining sts. Piece measures approx 56-57-57-58-58-59 cm / 22"-22½"-22½"-22¾"-22¾"-23¼". ASSEMBLY: Set in sleeves. Sew collar tog mid back and sew to neckline. Sew 1 large button to front piece and sew 1 small button on the inside of right front band in line with the large button (to be buttoned through 1 st on left front band to keep front band in place). |
|||||||||||||
Diagram explanations |
|||||||||||||
|
|||||||||||||
 |
|||||||||||||
Have you finished this pattern?Tag your pictures with #dropspattern #doreencardigan or submit them to the #dropsfan gallery. Do you need help with this pattern?You'll find 22 tutorial videos, a Comments/Questions area and more by visiting the pattern on garnstudio.com. © 1982-2026 DROPS Design A/S. We reserve all rights. This document, including all its sub-sections, has copyrights. Read more about what you can do with our patterns at the bottom of each pattern on our site. |
|||||||||||||


Post a comment to pattern DROPS 117-51
We would love to hear what you have to say about this pattern!
If you want to leave a question, please make sure you select the correct category in the form below, to speed up the answering process. Required fields are marked *.