DROPS Kid-Silk
DROPS Kid-Silk
75% Mohair, 25% Silk
from 6.75 $ /25g
DROPS SS24

Melissa

Knitted DROPS jacket with cables and collar in ”Classic Alpaca” or "Puna" and ”Kid-Silk”. Size S - XXXL.

DROPS 115-8
DROPS design: Pattern no AC-010

Size: S - M - L - XL - XXL – XXXL
Finished measurements:
Bust: 88-96-104-114-126-138 cm / 34⅝"-37¾"-41"-45"-49½"-54¼"
Full length: 66-68-70-72-74-76 cm / 26"-26¾"-27½"-28⅜"-29⅛"-30"

Materials: DROPS Classic Alpaca from Garnstudio
650-700-750-850-900-1000 g color no 01, off-white
And use: DROPS KID-SILK from Garnstudio
150-150-175-200-200-225 g color no 01, off-white

Or use:
Materials: DROPS Puna from Garnstudio
550-600-650-700-750-850 g colour no 01, off-white
And use: DROPS KID-SILK from Garnstudio
150-150-175-200-200-225 g colour no 01, off-white

DROPS DOUBLE POINTED NEEDLES AND CIRCULAR NEEDLE (40 and 80 cm / 16" and 32") size 5 mm/US 8 - or size needed to get 17 sts x 22 rows in stockinette st with 1 thread of each quality = 10 x 10 cm / 4" x 4".
DROPS DOUBLE POINTED NEEDLES AND CIRCULAR NEEDLE (80 cm / 32") size 4.5 mm/US 7 – for rib.

DROPS Mother-of-pearl buttons no 522: 5-5-6-6-6-6 pcs.

-------------------------------------------------------

Alternative Yarn – See how to change yarns here
Yarn Groups A to F – Use the same pattern and change the yarn here
Yarn usage using an alternative yarn – Use our yarn converter here

-------------------------------------------------------

DROPS Kid-Silk
DROPS Kid-Silk
75% Mohair, 25% Silk
from 6.75 $ /25g

Pattern instructions

NOTE: This pattern is written in American English. All measurements in charts are in cm. For conversion from inches to cm - click here. There are different terms for crocheting in American and British English. If this pattern includes crochet, click for "crochet terms" here. For this pattern in British English, please click here.
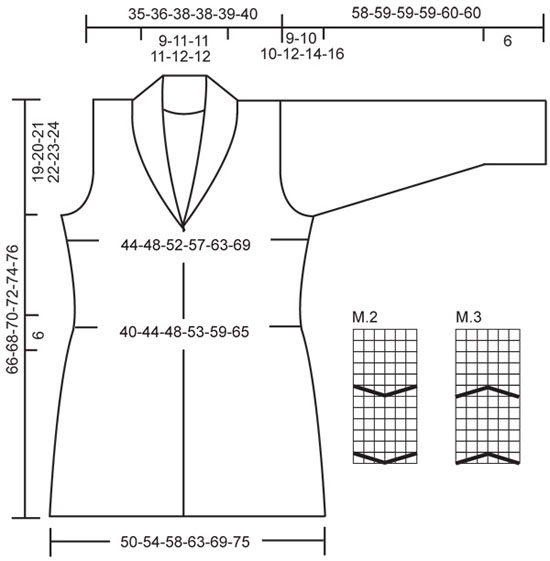
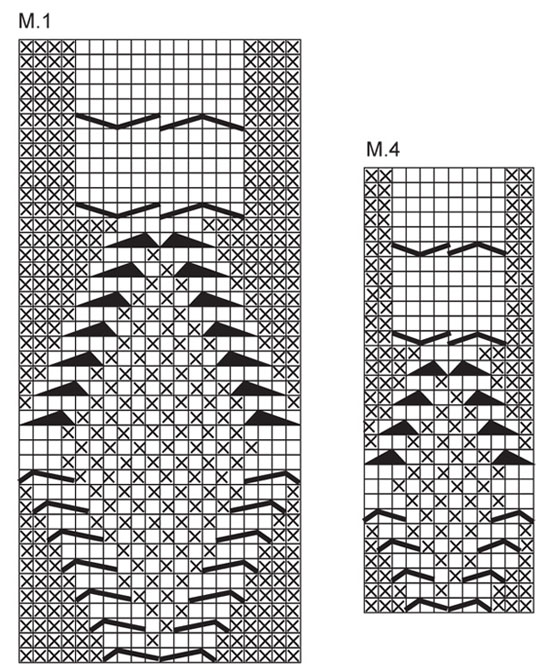
FRONT BAND:
Front band is worked as follows from mid front, as seen from RS: 7 SEED STS - see below-, K1, P1, K1, P1, K1, P1 and K1.

DECREASING TIP:
Make all dec from RS.
Dec 2 sts at the side. Beg 1 st before st with marker, K/P3 tog (acc to Seed st pattern). This 1 st is now st with marker.

PATTERN:
See diagram M.1 to M.4. Diagrams show the pattern from RS.

SEED ST:
Row 1: * P1, K1 *, repeat from *-*.
Row 2: P over K and K over P. Repeat row 2.

INCREASING TIP:
Make all inc from RS.
Inc 2 sts at the side by making 1 YO each side of st with marker. On next row work YO into back of loop to avoid a hole. Incorporate inc sts in Seed st.

BUTTONHOLES:
Make buttonholes on right front band.
1 buttonhole = bind off the 5th front band st from mid front and cast on 1 new st on return row.
Make buttonholes when piece measures:
SIZE S: 10, 18, 26, 34 and 42 cm / 4", 7", 10¼", 13⅜" and 16½".
SIZE M: 11, 19, 27, 35 and 43 cm / 4⅜", 7½", 10⅝", 13¾" and 17"
SIZE L: 9, 16, 23, 30, 37 and 44 cm / 3½", 6¼", 9", 11¾", 14½" and 17¼".
SIZE XL: 10, 17, 24, 31, 38 and 45 cm / 4", 6¾", 9½", 12¼", 15" and 17¾".
SIZE XXL: 11, 18, 25, 32, 39 and 46 cm / 4⅜", 7", 9¾", 12½", 15¼" and 18".
SIZE XXXL: 7, 15, 23, 31, 39 and 48 cm / 2¾", 6", 9", 12¼", 15¼" and 19".
--------------------------------------------------------
--------------------------------------------------------

BODY PIECE:
Worked back and forth on circular needle from mid front. Cast on 230-238-250-270-290-310 sts (includes 14 front band sts each side towards mid front) on circular needle size 4.5 mm / US 7 with 1 thread of each quality (Classic Alpaca + Kid-Silk or Puna + Kid-Silk). P 1 row from WS on all sts and continue in rib as follows: 14 FRONT BAND sts – see above, * K2, P2 *, repeat from *-* until 16 sts remain, K2 and 14 FRONT BAND sts. Continue like this until piece measures 3 cm / 1⅛". Change to circular needle size 5 mm / US 8 and now continue as follows from RS: 14 Front band sts, P 9-10-10-10-12-12, M.1 (= 20 sts), P 5-5-6-11-11-14, P2 tog, M.2 (= 6 sts), 15-17-21-21-27-31 SEED STS - see above - M.3 (= 6 sts), P 6-6-7-12-12-15, M.1, P 4-4-4-4-5-5, K3, 10-12-12-12-14-14 SEED STS, K3, P 4-4-4-4-5-5, M.1, P 6-6-7-12-12-15, M.2, 15-17-21-21-27-31 SEED STS, M.3, P2 tog, P 5-5-6-11-11-14, M.1, P 9-10-10-10-12-12 and 14 Front band sts = 2 dec sts = 228-236-248-268-288-308 sts on needle. Insert 1 marker in st 63-65-68-73-78-83 and 1 marker in st 166-172-181-196-211-226 (= the sides, back piece = 102-106-112-122-132-142 sts).
Continue with K over K, P over P, pattern over pattern and Seed st over Seed st.
When piece measures 6 cm / 2⅜" dec 2 sts each side – See DECREASING TIP = 224-232-244-264-284-304 sts. Repeat the dec when piece measures 9 cm / 3½" and 11 cm / 4⅜" = 216-224-236-256-276-296 sts.
When piece measures 14 cm / 5½" work next row from RS as follows:
14 Front band sts, P2 tog, P 7-8-8-8-10-10, M.1, P 6-6-7-12-12-15, M.2, 9-11-15-15-21-25 SEED STS (marker sits in the middle of these sts), M.3, P 6-6-7-12-12-15, M.1, P2 tog, P 2-2-2-2-3-3, K3, 10-12-12-12-14-14 SEED STS, K3, P 2-2-2-2-3-3, P2 tog, M.1, P 6-6-7-12-12-15, M.2, 9-11-15-15-21-25 SEED STS (marker sits in the middle of these sts), M.3, P 6-6-7-12-12-15, M.1, P 7-8-8-8-10-10, P2 tog and 14 Front band sts = 4 dec sts = 212-220-232-252-272-292 sts on needle.
Continue with K over K, P over P, pattern over pattern and Seed st over Seed st.
When piece measures 16 cm / 6¼" dec 2 sts each side – See DECREASING TIP = 208-216-228-248-268-288 sts. Repeat the dec when piece measures 19 cm / 7½" and 21 cm / 8¼" = 200-208-220-240-260-280 sts.
When piece measures 24 cm / 9½" work next row from RS as follows:
14 Front band sts, P2 tog, P 6-7-7-7-9-9, M.1, P 6-6-7-12-12-15, M.2, 3-5-9-9-15-19 SEED STS (marker sits in the middle of these sts), M.3, P 6-6-7-12-12-15, M.1, P2 tog, P 1-1-1-1-2-2, K3, 10-12-12-12-14-14 SEED STS, K3, P 1-1-1-1-2-2, P2 tog, M.1, P 6-6-7-12-12-15, M.2, 3-5-9-9-15-19 SEED STS (marker sits in the middle of these sts), M.3, P 6-6-7-12-12-15, M.1, P 6-7-7-7-9-9, P2 tog and 14 Front band sts = 4 dec sts = 196-204-216-236-256-276 sts on needle.
Continue with K over K, P over P, pattern over pattern and Seed st over Seed st.
When piece measures 26 cm / 10¼" dec 2 sts each side – See DECREASING TIP = 192-200-212-232-252-272 sts.
When piece measures 32 cm / 12½" inc 2 sts each side – See INCREASING TIP – on every 3.5-4-4-4.5-5-5 cm / 1¼"-1½"-1½"-1¾"-2"-2" a total of 4 times = 208-216-228-248-268-288 sts.
Continue with K over K, P over P, pattern over pattern and Seed st over Seed st.
When piece measures 44-45-46-47-48-49 cm / 17¾"-18"-18½"-19"-19¼" dec for neck and inc for collar as follows:
Dec 1 st inside 14 front band sts (from RS) by P2 tog, repeat on every 4-3.5-4-4-3.5-3.5 cm / 1½"-1¼"-1½"-1½"-1¼"-1¼" a total of 5-6-6-6-7-7 times. AT THE SAME TIME with every dec for neck inc 1 st (from RS) for collar. Inc 1 st inside 7 front band sts by making 1 YO between Seed st and K1 on front band. On next row work YO into back of loop to avoid a hole, then incorporate inc st in the seed st. AT THE SAME TIME when piece measures 47-48-49-50-51-52 cm / 18½"-19"-19¼"-19¾"-20"-20½" bind off 7 sts each side (i.e. 3 sts each side of marker + st with marker) for armhole and complete each piece separately.

BACK PIECE:
= 86-90-96-106-116-126 sts.
Continue with K over K, P over P, pattern over pattern and Seed st over Seed st.
AT THE SAME TIME bind off for armhole each side at the beg of every row: 2 sts 3-4-5-7-9-11 times and 1 st 1-0-0-1-1-1 times = 72-74-76-76-78-80 sts.
When piece measures 64-66-68-70-72-74 cm / 25¼"-26"-26¾"-27½"-28⅜"-29⅛" bind off the middle 16-18-18-18-20-20 sts for neck and complete each shoulder (= 28-28-29-29-29-30 sts) separately. When piece measures 65-67-69-71-73-75 cm / 25½"-26⅜"-27⅛"-28"-28¾"-29½" dec (from RS) 6 sts evenly on K sts in M.1 = 22-22-23-23-23-24 sts. Work 1 row from WS and loosely bind off remaining sts. Piece measures approx 66-68-70-72-74-76 cm / 26"-26¾"-27½"-28⅜"-29⅛"-30".

LEFT FRONT PIECE:
= 54-56-59-64-69-74 sts.
Continue with K over K, P over P, pattern over pattern and Seed st over Seed st.
AT THE SAME TIME continue dec for neck and inc for collar and bind off for armhole at the side as described for back piece. When dec for armhole are complete there are a total of 47-48-49-49-50-51 sts on needle.
When dec for neck and inc for collar are complete there are 19-20-20-20-21-21 sts on front band.
Continue with K over K, P over P, pattern over pattern and Seed st over Seed st until piece measures 65-67-69-71-73-75 cm / 25½"-26⅜"-27⅛"-28"-28¾"-29½". Now dec (from RS) 6 sts evenly on K sts in M.1 = 41-42-43-43-44-45 sts. Work 1 row from WS. Now loosely bind off 22-22-23-23-23-24 sts from shoulder towards neckline = 19-20-20-20-21-21 front band sts left on needle. Work remaining sts on row. Now work shortened rows on front band sts as follows: * back and forth on the outermost 12-13-13-13-14-14 sts only (= Seed st), back and forth on all sts (= Seed st and 7 sts K1/P1) *, repeat from *-* until collar measures approx 5-6-6-6-7-7 cm / 2"-2⅜"-2⅜"-2⅜"-2¾"-2¾" on the shorter side (measured from shoulder). Bind off.

RIGHT FRONT PIECE:
Like left front piece, but mirrored. Remember BUTTONHOLES – see above.

SLEEVE:
Worked in the round on double pointed needles.
Cast on 44-44-48-48-48-52 sts on double pointed needles size 4.5 mm / US 7 with 1 thread of each quality (Classic Alpaca + Kid-Silk or Puna + Kid-Silk). K 1 round. Insert a marker at beg of round (= mid under sleeve). Continue in rib K2/ P2. When piece measures approx 6 cm / 2⅜" change to double pointed needles size 5 mm / US 8 and continue as follows: P 20-20-22-22-22-24, K4 and P 20-20-22-22-22-24.
When piece measures 7 cm / 2¾" continue as follows: P 16-16-18-18-18-20, M.4 (= 12 sts) and P 16-16-18-18-18-20. When piece measures 9-9-9-8-8-8 cm / 3½"-3½"-3½"-3⅛"-3⅛"-3⅛" inc 2 sts mid under sleeve (= 1 st each side of marker), and repeat on every 4-3.5-3.5-3-2.5-2 cm / 1½"-1¼"-1¼"-1⅛"-⅞"-¾" a total of 10-11-11-13-15-16 times = 64-66-70-74-78-84 sts. Continue until piece measures 49-49-49-47-46-44 cm / 19¼"-19¼"-19¼"-18½"-18"-17¼" (less for the larger sizes because of longer sleeve cap and wider shoulder). Now bind off 6 sts mid under sleeve (i.e. 3 sts each side of marker) and complete piece back and forth on needle. Bind off for sleeve cap each side at the beg of every row: 2 sts 3 times and 1 st 2-3-2-5-7-9 times, then 2 sts each side until piece measures 57-58-58-58-59-59 cm / 22½"-22¾"-22¾"-22¾"-23¼"-23¼". Now bind off 4 sts at beg of row from RS, AT THE SAME TIME dec 4 sts evenly on K sts in M.4, bind off 4 sts at beg of next row from WS and bind off remaining sts. Sleeve measures approx 58-59-59-59-60-60 cm / 22¾"-23¼"-23¼"-23¼"-23⅝"-23⅝".

ASSEMBLY:
Sew shoulder seams (make sure cables from front and back pieces meet on shoulder). Set in sleeves. Sew collar tog mid back and sew to neck on back piece. Sew on buttons.

Diagram

All measurements in charts are in cm.

symbols = K from RS, P from WS
symbols = P from RS, K from WS
symbols = slip 1 st on cable needle behind piece, K3, work 1 st from cable needle in Seed st.
symbols = slip 3 sts on cable needle in front of piece, work 1 st in Seed st, K3 from cable needle
symbols = slip 3 sts on cable needle in front of piece, P1, K3 from cable needle
symbols = slip 1 st on cable needle behind piece, K3, P1 from cable needle
symbols = slip 3 sts on cable needle behind piece, K3, K3 from cable needle
symbols = slip 3 sts on cable needle in front of piece, K3, K3 from cable needle
symbols = slip 1 st on cable needle behind piece, K2, work 1 st from cable needle in Seed st.
symbols = slip 2 sts on cable needle in front of piece, work 1 st in Seed st, K2 from cable needle
symbols = slip 2 sts on cable needle in front of piece, P1, K2 from cable needle
symbols = slip 1 st on cable needle behind piece, K2, P1 from cable needle
symbols = slip 2 sts on cable needle behind piece, K2, K2 from cable needle
symbols = slip 2 sts on cable needle in front of piece, K2, K2 from cable needle
diagram
diagram
Do you have a question? See a list of frequently asked questions (FAQ)

Knitting tension is what determines the final measurements of your work, and is usually measured per 10 x 10 cm. It is provided like so: number of stitches in width x number of rows in height - eg: 19 stitches x 26 rows = 10 x 10 cm.

The knitting tension is very individual; some people knit/crochet loosely while others work tightly. You adjust the knitting tension with the needle size, which is why the suggested needle size only serve as a guide! You need to adjust this (up or down) to ensure that YOUR knitting tension matches the knitting tension provided in the pattern. If you work with a different knitting tension than provided you will have a different yarn consumption, and your work will have different measurements than what the pattern suggests.

The knitting tension also determines which yarns can replace each other. As long as you achieve the same knitting tension you can replace one yarn with another.

See DROPS lesson: How to measure your tension/gauge

See DROPS video: How to make a gauge tension swatch

The required amount of yarn is provided in grams, eg: 450 g. To calculate how many balls you’ll need you first need to know how many grams are in 1 ball (25g, 50g or 100g). This information is available if you click on the individual yarn quality on our pages. Divide the amount required with the amount of each ball. For example, if each ball is 50g (the most common amount), the calculation will be as follows: 450 / 50 = 9 balls.

The important thing when changing from one yarn to another is that the knitting/crochet tension remains the same. This is so that the measurements of the finished piece will be the same as on the sketch provided. It is easier to achieve the same knitting tension using yarns from the same yarn group. It is also possible to work with multiple strands of a thinner yarn to achieve the knitting tension of a thicker one. Please try our yarn converter. We recommend you to always work a test swatch.

Please NOTE: when changing yarn the garment might have a different look and feel to the garment in the photo, due to individual properties and qualities of each yarn.

See DROPS lesson: Can I use a different yarn than the one mentioned in the pattern?

All our yarns are categorised into yarn groups (from A to F) according to thickness and knitting tension – group A contains the thinnest yarns and group F the thickest. This makes it easier for you to find alternative yarns to our patterns, should you wish to switch yarn. All yarns within the same group have a similar knitting tension and can easily replace each other. However, different yarn qualities have different structures and properties which will give the finished work a unique look and feel.

Click here for an overview of the yarns in each yarn group

At the top of all our patterns you’ll find a link to our yarn converter, which is a helpful tool should you wish to use a different yarn than suggested. By filling in the yarn quality you wish to replace, the amount (in your size) and number of strands, the converter will present good alternative yarns with the same knitting tension. Additionally it will tell you how much you’ll require in the new qualities and whether you’ll need to work with multiple strands. Most skeins are 50g (some are 25g or 100g).

If the pattern is worked with multiple colours, every colour will have to be converted separately. Similarly, if the pattern is worked with several strands of different yarns (for example 1 strand Alpaca and 1 strand Kid-Silk) you will have to find alternatives for each, individually.

Click here to see our yarn converter

Since different yarns have different qualities and textures we have chosen to keep the original yarn in our patterns. However, you can easily find options among our available qualities by using our yarn converter, or simply pick a yarn from the same yarn group.

It is possible that some retailers still have discontinued yarns in stock, or that someone has a few skeins at home that they would like to find patterns for.

The yarn converter will provide both alternative yarn as well as required amount in the new quality.

If you think it's hard to decide what size to make, it can be a good idea to measure a garment you own already and like the size of. Then you can pick the size by comparing those measures with the ones available in the pattern's size chart.

You'll find the size chart at the bottom of the pattern.

See DROPS lesson: How to read size chart

The needle size provided in the pattern serves only as a guide, the important thing is to follow the knitting tension. And since knitting tension is very individual, you will have to adjust the needle size to ensure that YOUR tension is the same as in the pattern – maybe you’ll have to adjust 1, or even 2 needle sizes, up or down to achieve the correct tension. For this, we recommend that you work test swatches.

Should you work with a different knitting tension than the one provided, the measurements of the finished garment might deviate from the measurement sketch.

See DROPS lesson: How to measure your tension/gauge

See DROPS video: How to make a gauge tension swatch

Working a garment top-down provides more flexibility and room for personal adjustment. For example it is easier to try the garment on while working, as well as making adjustments to length of yoke and shoulder caps.

The instructions are carefully explaining every step, in the correct order. Diagrams are adjusted to the knitting direction and are worked as usual.

The diagram depicts all rows/rounds, and every stitch seen from the right side. It is read from bottom to top, from right to left. 1 square = 1 stitch.

When working back and forth, every other row is worked from the right side and every other row is worked from the wrong side. When working from the wrong side, the diagram will have to be worked reversed: from left to right, knit stitches are purled, purl stitches are knit etc.

When working in the round every round is worked from the right side and the diagram are worked from right to left on all rounds.

See DROPS lesson: How to read knitting diagrams

The diagram depicts all rows/rounds, and every stitch seen from the right side. It is worked from bottom to top, from right to left.

When working back and forth every other row is worked from the right side: from right to left and every other row is worked from the wrong side: from left to right.

When working in the round, every row in the diagram are worked from the right side, from right to left.

When working a circular diagram you start in the middle and work your way outwards, counter clockwise, row by row.

The rows usually start with a given number of chain stitches (equivalent to the height of the following stitch), this will either be depicted in the diagram or explained in the pattern.

See DROPS lesson: How to read crochet diagrams

Instructions for working several diagrams after each other on the same row/round, will often be written like so: “work A.1, A.2, A.3 a total of 0-0-2-3-4 times". This means you work A.1 once, then A.2 is worked once, and A.3 is repeated (in width) the number of times provided for your size – in this case like so: S = 0 times, M = 0 times, L=2 times, XL= 3 times and XXL = 4 times.

The diagrams are worked as usual: begin with the first row in A.1, then work the first row in A.2 etc.

See DROPS lesson: How to read knitting diagrams

See DROPS lesson: How to read crochet diagrams

The total width of the garment (from wrist-to-wrist) will be larger in the larger sizes, despite the actual sleeves being shorter. The larger sizes have longer sleeve caps and wider shoulders, so there will be a good fit in all sizes.

The measurement sketch/schematic drawing provides information regarding the full length of the garment. If it’s a jumper or a jacket the length is measured from the highest point on the shoulder (usually closest to the neckline), and straight down to the bottom of the garment. It is NOT measured from the tip of shoulder. Similarly, the length of yoke is measured from the highest point on the shoulder and down to where yoke is split into body and sleeves.

See DROPS lesson: How to read a schematic drawing

Diagrams are often repeated on the round or in height. 1 repeat is the diagram the way it appears in the pattern. If it says to work 5 repeats of A.1 in the round, then you work A.1 a total of 5 times after/next to each other in the round. If it says to work 2 repeats of A.1 vertically/in height you work the entire diagram once, then begin again at the start and work the entire diagram one more time.

Chain stitches are slightly narrower than other stitches and to avoid working the cast-on edge too tight, we simply chain more stitches to begin with. The stitch count will be adjusted on the following row to fit the pattern and measurement sketch.

The rib edge is more elastic and will contract slightly compared to, for example, stocking stitch. By increasing before the rib edge, you avoid a visible difference in width between the rib edge and the rest of the body.

It’s very easy to cast off too tightly, and by making yarn overs while casting off (and simultaneously casting these off) you avoid a too tight cast off edge.

See DROPS video: How to bind off with yarn overs (yo)

To achieve an even increase (or decrease) you can increase on, for example: every 3rd and 4th row alternately, like so: work 2 rows and increase on the 3rd row, work 3 rows and increase on the 4th. Repeat this until the increase is complete.

See DROPS lesson: Increase or decrease 1 st on every 3rd and 4th row alternately

Should you prefer to work in the round instead of back and forth, you may of course adjust the pattern. You’ll need to add steeks mid-front (usually 5 stitches), and follow the instructions. When you would normally turn and work from the wrong side, simply work across the steek and continue in the round. At the end you’ll cut the piece open, pick up stitches to work bands, and cover the cut edges.

See DROPS video: How to knit steeks and cut open

Should you prefer to work back and forth instead of in the round, you may of course adjust the pattern so you work the pieces separately and then assemble them at the end. Divide the stitches for the body in 2, add 1 edge stitch in each side (for sewing) and work the front and back pieces separately.

See DROPS lesson: Can I adapt a pattern for circular needles into straight needles?

Pattern repeats can vary slightly in the different sizes, in order to get the correct proportions. If you’re not working the exact same size as the garment in the photo, yours might deviate slightly. This has been carefully developed and adjusted so that the complete impression of the garment is the same in all sizes.

Make sure to follow instructions and diagrams for your size!

If you have found a pattern you like which is available in women’s size it’s not very difficult to convert it to men’s size. The biggest difference will be the length of sleeves and body. Start working on the women size that you think would fit across the chest. The additional length will be worked right before you cast off for the armhole/sleeve cap. If the pattern is worked top-down you can add the length right after the armhole or before the first decrease on sleeve.

Regarding additional yarn amount, this will depend on how much length you add, but it is better with a skein too many than too few.

All yarns will have excess fibres (from production) that might come off as lint or shedding. Brushed yarns (ie hairier yarns) have more of these loose, excess fibres, causing more shedding.

Shedding also depends on what is worn under or over the garment, and whether this pulls at the yarn fibres. It’s therefore not possible to guarantee that there will be no shedding

Below are some tips on how to get the best result when working with hairier yarns:

1. When the garment is finished (before you wash it) shake it vigorously so the looser hairs come off. NOTE: do NOT use a lint roller, brush or any method that pulls at the yarn.

2. Place the garment in a plastic bag and put it in your freezer - the temperature will cause the fibres to become less attached to each other, and excess fibres will come off easier.

3. Leave in the freezer for a few hours before taking it out and shaking it again.

4. Wash the garment according to the instructions on the yarn label.

Pilling is a natural process that happens to even the most exclusive of fibers. It's a natural sign of wear and tear that is hard to avoid, and that is most visible in high friction areas of your garment like a sweater's arms and cuffs.

You can make your garment look as new by removing the pilling, using a fabric comb or a pill/lint remover.

Still can't find the answer you need? Then scroll down and leave your question so one of our experts can try to help you. This will be done normally within 5 to 10 working days.
In the meantime, you can read the questions and answers that others have left to this pattern or join the DROPS Workshop on Facebook to get help from fellow knitters/crocheters!

Post a comment to pattern DROPS 115-8

We would love to hear what you have to say about this pattern!

If you want to leave a question, please make sure you select the correct category in the form below, to speed up the answering process. Required fields are marked *.

Comments / Questions (35)

country flag Vittoria Enimmi wrote:

Ho capito ....ho letto meglio! Grazie, vittoria

26.01.2024 - 23:18

country flag Vittoria Enimmi wrote:

Buongiorno,sto avviando il lavoro di questo modello . Non ho capito se il bordo davanti è composto da 7 maglie per ciascun bordo o da 14 maglie ( per ciascun bordo). Nella prima pagina alla spiegazione " Bordo davanti" è scritto 7 ,nella spiegazione del corpo è scritto 14 . Vi ringrazio del chiarimento. Vittoria

26.01.2024 - 22:48

country flag Carol McMillan wrote:

Further to my previous question re shawl collor shapings K1, Collar Inc, remaining 6 seed sts, 7 rib sts , Collar Dec (p2tog ). so Increases are done 1 st in from start of row and decreases are done after the 14 front band sts??

10.11.2023 - 15:58

DROPS Design answered:

Dear Carol, yes, that's correct. K1, inc, 6 seed sts, 7 rib sts and p2tog. Happy knitting!

12.11.2023 - 23:41

country flag Carol McMillan wrote:

Dec for neck & inc for collar: place of inc & dec 7 seed sts, inc sts, 7 other sts then dec Inc's are done in the middle of the Front Band and the dec's are done in the purl sts between Front Band and M.1 ? Is this correct?

09.11.2023 - 22:04

DROPS Design answered:

Dear Mrs McMillan, the increases and the decreases for neckline are worked as follows: at the beg of the row work the 1st stitch and increase for collar, continue working front band sts as before then P2 tog on right front piece; starting when the front band sts + the sts increased for collar remain, P2 tog then work the front band sts as before. Happy knitting!

10.11.2023 - 09:52

country flag Carol McMillan wrote:

I need help with the Front Band Stitches Row 1: 7 Seed sts (P1, K1, P1, K1, P1, K1, P1) then K1, P1, K1, P1, K1, P1, K1. Why not say 14 Seed sts? Row 2: P1, K1, P1, K1, P1, K1, P1 then 7 Seed sts (K1, P1, K1, P1, K1, P1, K1). Why not say 14 Seed sts? Is this correct?

09.11.2023 - 21:58

DROPS Design answered:

Dear Mrs Mc Millan, seen from RS work the right front band stitches as follows: 7 sts in seed stitch, 7 sts rib (K1, P1) ending with K1. And the left front band stitches will be worked, seen from RS: 7 sts rib (K1, P1) ending with K1, 7 sts seed stitch. Happy knitting!

10.11.2023 - 09:32

country flag Marcia wrote:

Can I use Muskat for this pattern? Single thread?

28.06.2023 - 15:47

DROPS Design answered:

Dear Marcia, you can use Muskat but you should use also 1 strand Kid-Silk as this jacket is worked with 2 strands held together. Happy knitting!

28.06.2023 - 16:30

country flag Bibi wrote:

Bonjour, Je souhaite faire ce modèle avec une seule laine la Drops Alaska, laine qui se tricote en 5. Puis-je faire ceci ? Dans l'affirmative, combien dois-je acheter de pelotes de laine.

15.11.2020 - 16:17

DROPS Design answered:

Bonjour Bibi, DROPS Alaska peut se tricoter aussi avec 17 mailles pour 10 cm de large, mais rappelez-vous que vous n'aurez pas la même texture car ces laines ont une composition différente - retrouvez plus d'infos sur les alternatives ici - votre magasin saura vous aider si besoin, même par mail ou téléphone. Bon tricot!

16.11.2020 - 09:07

country flag Marianne Richin wrote:

Merci Drops design, j’adore ce modèle comme tous vos modèles d’ailleurs et j’ai hâte de l’avoir fini. C’est vrai que j’etais septique de reprendre la torsade au départ et de tricoter les mailles endroits en mailles envers. Je pensais que ça se verrait et que le rendu ne serait pas joli mais pas du tout. Ça ne se voit pas et le rendu est parfait. Merci encore. Marianne

30.01.2018 - 19:34

country flag Marianne Richin wrote:

Bonjour, je ne comprends pas comment reprendre la torsade M1 au début après les 42 premiers rands du motif?? Pourriez vous m’aider. Merci

29.01.2018 - 23:20

DROPS Design answered:

Bonjour Mme Richin, reprenez simplement au 1er rang de M.1 en commençant par 6 m env, les 2 torsades et 6 m env. Bon tricot!

30.01.2018 - 08:47

country flag Kimberley Adsitt wrote:

How many yards were in Alpaca Classic? I would like to make this sweater. Thank you for your help.

28.01.2016 - 00:12

DROPS Design answered:

Dear Mrs Adsitt, please click for more informations about Classic Alpaca and here to find an alternative same group and calculate new amount of yarn. Happy knitting!

28.01.2016 - 13:28