
Popular categories
Looking for a yarn?


Comments / Questions (153)
![]() Kata wrote:
Kata wrote:
Hei! Tee kokoa 1/3 (50/56). Mietin miten etukappaleen uusien silmukoiden luominen kainaloita/hihoja varten pitäisi toteuttaa? Silmukat osaan luoda reunoihin, mutta en ymmärrä ohjeesta montako silmukkaa milloinkin tulisi lisätä. Saisinko apua?
19.05.2025 - 20:52DROPS Design answered:
Hei, kumpaankin reunaan luodaan joka toinen kerros 4 silmukkaa 2 kertaa (eli kumpaankin reunaan luodaan 4 silmukkaa 2 kertaa), 8 silmukkaa kerran ja lopuksi 9 silmukkaa kerran. Kumpaankin reunaan luodaan siis yhteensä 25 silmukkaa.
20.05.2025 - 17:06
![]() Leila BALAFREJ wrote:
Leila BALAFREJ wrote:
Merci pour votre reponse. j ai 2 precisions a demander: comment former les boutonnieres de l entrejambe, a l endroit pour la jambe droite , a l envers pour la jambe gauche? en tricotant avec une aiguille circulaire , comment faire une fois les jambes reuniespour avoir les deux torsades au milieu du devant? Merci beaucoup
23.01.2025 - 17:38DROPS Design answered:
Bonjour Mme Balafrej, ouvrez les boutonnières comme indiqué en début de rang sur l'endroit pour la jambe droite et en début de rang sur l'envers pour la jambe gauche. Lorsque vous réunirez les 2 jambes, vous placerez les mailles des jambes l'une après l'autre sur l'aiguille mais commencerez sur le côté gauche de l'ouvrage = au milieu de l'une des jambes - cf DOS & DEVANT. Bon tricot!
24.01.2025 - 09:25
![]() Balafrej Leila wrote:
Balafrej Leila wrote:
Pourraije avoir une video du tricot de la combinaison bebe modele n° ME-008-by ? MERCI
23.01.2025 - 01:48DROPS Design answered:
Bonjour Mme Balafrej, nous n'avons pas de vidéos pour un modèle complet, ce serait beaucoup trop long et complexe; en revanche vous pouvez volontiers poser votre question ici , nous ferons notre possible pour vous aider. Bon tricot!
23.01.2025 - 10:22
![]() Balafrej Leila wrote:
Balafrej Leila wrote:
---boutonnieres entrejambes droite et gauche comment les realiser? merci modele ME -008-by-
22.01.2025 - 17:59DROPS Design answered:
Bonjour Mme Balafrej, ces boutonnières sont faites en tricotant les jambes - cf BOUTONNIÈRES au début des explications. Bon tricot!
23.01.2025 - 10:03
![]() Nancy wrote:
Nancy wrote:
Hello, I am trying to knit the size 12/18 months and I am stuck in this part: “ Change to needle size 4.5 mm [US 7] and continue in stockinette st with 4 garter sts each side. AT THE SAME TIME when piece measures 6 cm [2⅜\"] inc 1 st each side inside the 4 garter sts on every 3-3-4 (4-4) row a total of 9-10-11 (12-13) times = 54-60-66 (72-78) sts. “ So, D o I increase inside the garter button band or on the side of the leg parts? Thanks for your help,
08.12.2024 - 05:24
![]() CORBOZ wrote:
CORBOZ wrote:
Bonjour, Il faudrait préciser après la réunion ( pour la taille 1) des deux jambes que les tours débutent à la 24e maille et non pas au début de la jambe sinon la torsade ne se place pas au milieu du travail Merci
18.09.2024 - 13:11
![]() Aurélie wrote:
Aurélie wrote:
Bonsoir Au niveau de l'épaule /manche droite j'ai du mal à comprendre comment procéder à 64cm de hauteur. Il me reste 50 mailles donc je tricote en jersey 18 mailles puis 14m au point mousse puis à nouveau 18m en jersey? Où dois je ensuite positionner les boutonnières ? Au tout début de la ligne ? Et ensuite je reprend les 14m qui étaient en point mousse pour les continuer jusqu'à 66cm? Merci !
02.07.2024 - 00:16DROPS Design answered:
Bonjour Aurélie, pour le côté droit du devant, vous tricotez (vu sur l'endroit) les 14 premières mailles au point mousse (et les mailles restantes comme avant) pour former la bordure de boutonnage; après 4 rangs, ouvrez les boutonnières (en début de rang sur l'endroit) ainsi: 2 m ens à l'end, 1 jeté, tricoter 7 m end, 2 m ens à l'end, 1 jeté, tricoter les mailles restantes comme avant. Continuez ainsi avec ces 14 mailles côté encolure/épaule au point mousse et les mailles restantes comme avant et rabattez à 66 cm de hauteur totale. Bon tricot!
02.07.2024 - 10:24
![]() Aurélie wrote:
Aurélie wrote:
Bonjour Que veut dire tricoter ensemble les mailles des deux torsades ? Sur les 4 mailles on en tricote 2 ensemble deux fois et on recommence sur la torsade suivante ? Merci !
01.07.2024 - 11:00DROPS Design answered:
Bonjour Aurélie, tout à fait, ainsi vous conservez la bonne largeur (il faut plus de mailles pour une torsade, raison pour laquelle on doit diminuer avant de rabattre, on va ainsi éviter que le bord ne gondole). Bon tricot!
01.07.2024 - 13:39
![]() Aurélie wrote:
Aurélie wrote:
Merci beaucoup ! Pour tout, pour vos réponses claires, pour la rapidité de vos retours, pour le travail que vous faites et pour les si jolis modèles 😊 Bonne journée !
19.06.2024 - 08:55
![]() Aurélie wrote:
Aurélie wrote:
Bonjour Merci pour votre retour Mais en ce cas je ne comprend pas le diagramme qui dit que les cellules blanches c'est tricoter une maille envers sur l'envers... Du coup on faire une torsade tous les 6 tours mais on fait uniquement de la maille endroit ? Merci !
19.06.2024 - 07:36DROPS Design answered:
Bonjour Aurélie, tant que vous tricotez en rond, vous tricotez ces mailles à l'endroit car vous êtes sur l'endroit, mais lorsque vous allez diviser l'ouvrage pour les emmanchures et terminer le devant séparément, vous tricotez alternativement sur l'endroit et sur l'envers, les mailles de M.1 et de M.2 seront alors tricotées à l'envers sur l'envers (= jersey) - et vous devez avoir 5 tours entre chaque torsade. Bon tricot!
19.06.2024 - 08:21
|
||||||||||
Little Lamb#littlelambset |
||||||||||
|
|
||||||||||
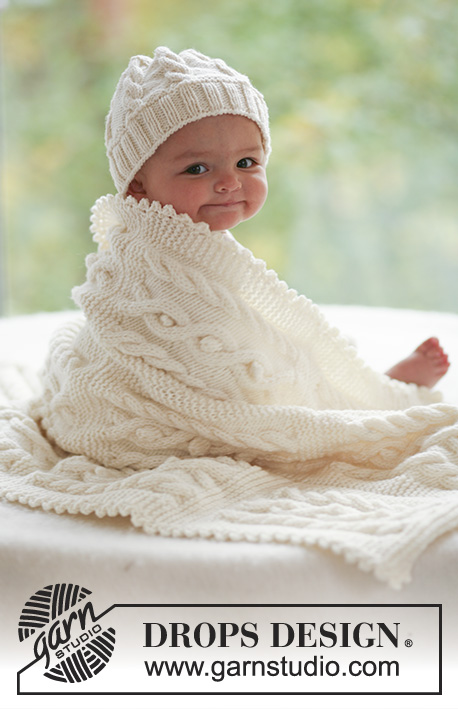
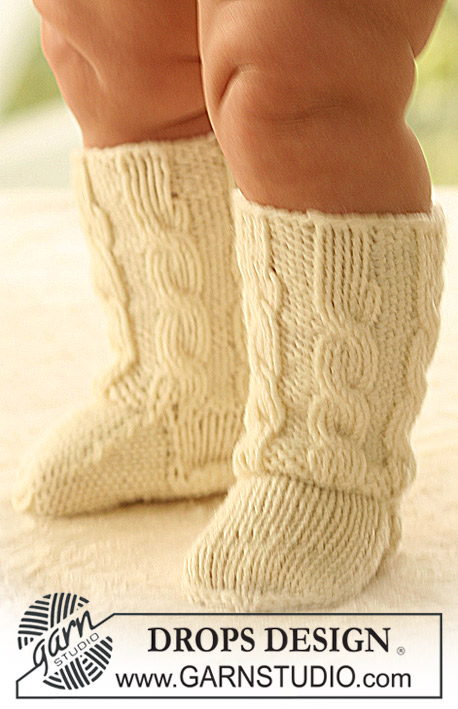
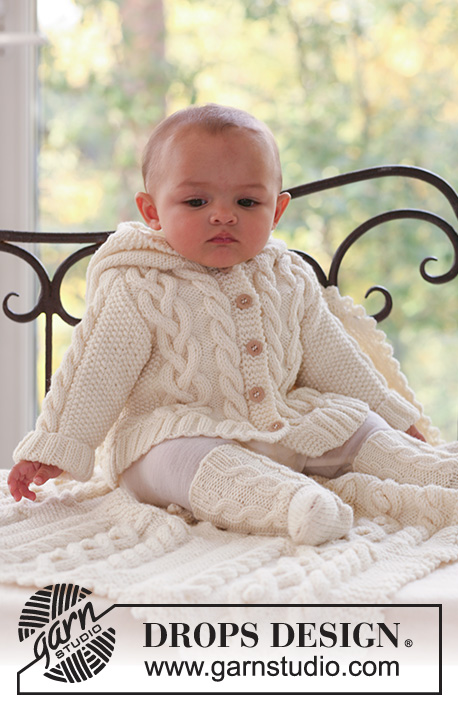
Set of beret hat and onesie with cables for baby in DROPS Merino Extra Fine
DROPS Baby 16-2 |
||||||||||
|
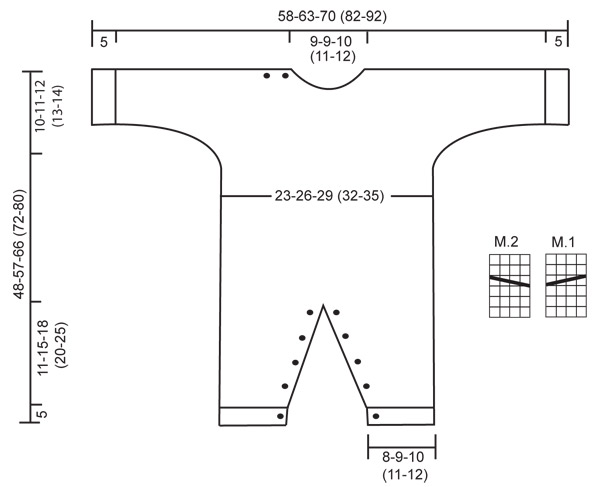
JUMPSUIT: GARTER ST (back and forth on needle): K all rows. PATTERN: See diagram M.1 and M.2. The diagrams show the pattern from the RS. BUTTONHOLES: Make buttonholes on buttonhole edge on front of leg. On right leg make buttonholes from RS and on left leg make buttonholes from WS. 1 buttonhole = K tog 2nd and 3rd st from edge and make 1 YO. Make buttonholes when leg measures: SIZE 1/3 months: 2, 5, 8, 11 and 14 cm [3/4", 2", 3⅛", 4⅜", 5½"]. SIZE 6/9 months: 2, 6, 10, 14 and 18 cm [3/4", 2⅜", 4", 5½", 7"]. SIZE 12/18 months: 2, 6, 11, 16 and 21 cm [3/4", 2⅜", 4⅜", 6¼", 8 ¼"]. SIZE 2 years: 2, 6, 10, 14, 18 and 23 cm [3/4", 2⅜", 4", 5½", 7", 9"]. SIZE 3/4 years: 2, 7, 12, 17, 22 and 28 cm [3/4", 2¾", 4¾", 6¾", 8¾", 11"]. ---------------------------------------------------------- RIGHT LEG: Worked back and forth on circular needle. Cast on 47-53-53 (59-65) sts on circular needle size 3.5 mm [US 4] with Merino Extra Fine. P 1 row from WS and continue as follows from RS: 4 garter sts (buttonhole edge) rib K3/P3, on the next 36-42-42 (48-54) sts and finish row with K3 and 4 garter sts (= buttonhole edge). Continue in rib with 4 garter sts each side, AT THE SAME TIME when piece measures 2 cm [3/4"] make buttonhole – SEE ABOVE. When piece measures 5 cm [2"] K 2 rows on all sts, AT THE SAME TIME dec 11-13-9 (11-13) sts evenly on first row = 36-40-44 (48-52) sts. Change to needle size 4.5 mm [US 7] and continue in stockinette st with 4 garter sts each side. AT THE SAME TIME when piece measures 6 cm [2⅜"] inc 1 st each side inside the 4 garter sts on every 3-3-4 (4-4) row a total of 9-10-11 (12-13) times = 54-60-66 (72-78) sts. REMEMBER THE KNITTING GAUGE! When piece measures 16-20-23 (25-30) cm [6¼"-8"-9" (9¾"-11¾")] bind off 4 sts each side = 46-52-58 (64-70) sts. Put piece aside and knit the other leg. LEFT LEG: Like right leg, but make buttonholes on the opposite side. BODY PIECE: Slip both legs on the same circular needle = 92-104-116 (128-140) sts. Insert 1 marker each side = 46-52-58 (64-70) sts between markers. Work next round as follows – beg on the left side of piece: 18-21-24 (27-30) stockinette sts, P2, K2 in each of the next 2 sts (= K4), P2, K2 in each of the next 2 sts (= K4), P2 and work remaining sts in stockinette st = 96-108-120 (132-144) sts. Work next round as follows: 18-21-24 (27-30) stockinette sts, P2, M.1, P2, M.2, P2 and work remaining sts in stockinette st. Continue like this until piece measures 38-46-54 (59-66) cm [15"-18"-21¼" (23¼"-26")]. Now divide the piece by markers at sides and complete front and back pieces separately – NOTE: Make sure to divide piece so that the cable row in M.1 and M.2 sits on the RS. FRONT PIECE: = 50-56-62 (68-74) sts. Continue in stockinette st with cables as before, AT THE SAME TIME cast on new sts each side for sleeves. Cast on at the end of every row at the sides: 4 sts 2-1-1 (1-1) times, 6 sts 0-1-1 (2-1) times, 8 sts 1-1-1 (1-2) times and 9-9-13 (16-21) sts 1 time = 100-110-124 (148-168) sts – work inc sts in stockinette st. When piece measures 44-53-61 (67-75) cm [17¼"-21"-24" (26⅜"-29½")] K2 tog on the 2 cables = 96-106-120 (144-164) sts. On next row slip the middle 10-10-12 (14-16) sts on a stitch holder for neck and complete each side separately. RIGHT SHOULDER/SLEEVE: Continue as before, AT THE SAME TIME bind off to shape the neckline at the beg of every row from mid front: 2 sts 1 time and 1 st 2 times = 39-44-50 (61-70) sts left on shoulder/sleeve. AT THE SAME TIME when piece measures 46-55-64 (70-78) cm [18"-21⅝"-25¼" (27½"-30¾")] work garter st on the first 12-13-14 (15-16) sts from mid front (work remaining sts as before). After 4 rows garter st make 2 buttonholes as follows from RS: K2 tog, 1 YO, work 5-6-7 (8-9) sts, K2 tog, 1 YO, work remaining sts on row. Continue in stockinette st with garter st on the first 12-13-14 (15-16) sts from mid front until piece measures 48-57-66 (72-80) cm [19"-22½"-26" (28⅜"-31½")], bind off. LEFT SHOULDER/SLEEVE: Like right shoulder/sleeve, but mirrored = 39-44-50 (61-70) sts on shoulder/sleeve. Continue in stockinette st until piece measures 48-57-66 (72-80) cm [19"-22½"-26" (28⅜"-31½")], bind off. BACK PIECE = 46-52-58 (64-70) sts. Cast on new sts each side for sleeves as described for front piece = 96-106-120 (144-164) sts. When piece measures 46-55-64 (70-78) cm [18"-21⅝"-25¼" (27½"-30¾")] bind off the middle 16-16-18 (20-22) sts for neck and complete each side separately. RIGHT SHOULDER/SLEEVE: = 40-45-51 (62-71) sts. Bind off 1 st on neckline on next row = 39-44-50 (61-70) sts. When piece measures 48-57-66 (72-80) cm [19"-22½"-26" (28⅜"-31½")] bind off the first 27-31-36 (46-54) sts from sleeve edge towards shoulder. Work another 1.5 cm [½"] stockinette st with 1 garter st each side on the remaining 12-13-14 (15-16) sts (= buttonhole edge). K 1 row from WS and bind off all sts from RS LEFT SHOULDER/SLEEVE: Continue and bind off as described for right shoulder/sleeve, but mirrored = 39-44-50 (61-70) sts left on shoulder/sleeve. Continue in stockinette st until piece measures 48-57-66 (72-80) cm [19"-22½"-26" (28⅜"-31½")], bind off. ASSEMBLY: Sew upper arm seams, edge to edge to avoid a chunky seam – on right shoulder only sew seam up to buttonhole edge. CUFF: Pick up 38-44-50 (50-56) sts on needle size 3.5 mm [US 4] along sleeve edge. K 2 rows and continue in rib, K3/P3, with 1 edge st each side. Bind off when rib measures 5 cm [2"]. Repeat along the other sleeve edge. Sew seams under arms inside 1 edge st. NECK: Pick up approx 48 to 64 sts round neckline (incl sts on stitch holders) on needle size 4.5 mm [US 7]. K 3 rows and bind off. Sew tog buttonhole edges at the top of the front of legs and sew tog the buttonhole edges at the top of the back of legs. Sew on buttons to fit buttonholes on legs and shoulder. ---------------------------------------------------------- BASQUE HAT: Head circumference: 40/42 - 44/46 - 46/48 (48/50 - 50/52) cm [16"-17½"-18½" (19"-20")] INCREASING TIP: Inc 1 st by making 1 YO. Work YO into back of loop on return row to avoid a hole. ---------------------------------------------------------- HAT: Worked back and forth on pointed needles. Cast on 90-92-94 (96-98) sts on needle size 4 mm [US 6] with Merino Extra Fine. Work 2 cm [3/4"] rib, K1/P1. Continue in garter st – SEE ABOVE – AT THE SAME TIME dec 5-7-4 (6-3) sts evenly on first row = 85-85-90 (90-95) sts. Insert 5 markers in piece as follows from RS: First marker after 1 st, and the remaining 4 markers with 17-17-18 (18-19) sts between each = 16-16-17 (17-18) sts left after the last marker. On next row from RS inc 1 st to the left of all markers – SEE INCREASING TIP – and repeat the inc on every other row a total of 6-7-8 (9-10) times = 115-120-130 (135-145) sts. REMEMBER THE KNITTING GAUGE! When piece measures 6.5-7-7.5 (8-8.5) cm [2½"-2¾"-2⅞" (3⅛"-3¼")] dec 1 st to the left of all markers by K2 tog, and repeat the dec on every other row a total of 18-19-20 (21-22) times = 25-25-30 (30-35) sts. Now K2 tog across the row. Cut the thread, pull through remaining sts and fasten. Sew hat tog mid back in outer loops of sts. Hat measures approx 15-16-17 (18-19) cm [6"-6¼"-6¾" (7"-7½")]. |
||||||||||
Diagram explanations |
||||||||||
|
||||||||||
 |
||||||||||
Have you finished this pattern?Tag your pictures with #dropspattern #littlelambset or submit them to the #dropsfan gallery. Do you need help with this pattern?You'll find 16 tutorial videos, a Comments/Questions area and more by visiting the pattern on garnstudio.com. © 1982-2026 DROPS Design A/S. We reserve all rights. This document, including all its sub-sections, has copyrights. Read more about what you can do with our patterns at the bottom of each pattern on our site. |
||||||||||


With over 40 years in knitting and crochet design, DROPS Design offers one of the most extensive collections of free patterns on the internet - translated to 17 languages. As of today we count 324 catalogs and 12290 patterns - 12280 of which are translated into English (US/in).
We work hard to bring you the best knitting and crochet have to offer, inspiration and advice as well as great quality yarns at incredible prices! Would you like to use our patterns for other than personal use? You can read what you are allowed to do in the Copyright text at the bottom of all our patterns. Happy crafting!
Post a comment to pattern DROPS Baby 16-2
We would love to hear what you have to say about this pattern!
If you want to leave a question, please make sure you select the correct category in the form below, to speed up the answering process. Required fields are marked *.