
Popular categories
Looking for a yarn?


Comments / Questions (153)
![]() Helena wrote:
Helena wrote:
Kaunis puku! Helppo vaihtaa vaippoja, kun on haarassa napit. Ihanan mallinen hattu.
19.10.2008 - 17:12
![]() Margita Roth wrote:
Margita Roth wrote:
Det sötaste jag sett på länge och dessutom så praktisk. Så kul det skall bli att sticka den til mitt barnbarn.
18.10.2008 - 00:39
![]() Annica Thomsson wrote:
Annica Thomsson wrote:
Kul med snygg & praktiskt på samma gång.
17.10.2008 - 21:59
![]() Gail Sterner wrote:
Gail Sterner wrote:
Sophisticated and softly darling. Would replace buttons with something baby proff.
17.10.2008 - 21:47
![]() Lisa wrote:
Lisa wrote:
This is a perfect new baby gift! When can I get the pattern....I have 3 grandchildren coming in the first 70 days of 2009! I need to get busy.
17.10.2008 - 20:10
![]() Marianne wrote:
Marianne wrote:
Så söt modell, den vill jag sticka, mössan är kanonbra
17.10.2008 - 18:12
![]() Grethe wrote:
Grethe wrote:
Flott. Passer gutt som jente. Selvfølgelig falt jeg for den fine bukseåpningen for å lette bleieskift.
17.10.2008 - 17:17
![]() AnnChristn wrote:
AnnChristn wrote:
En söt modell till en liten tuffing. Väntar på mönstret
17.10.2008 - 17:02
![]() Annika Karlsson wrote:
Annika Karlsson wrote:
Jag fastnade för byxorna som går att knäppa upp när det är dags för blöjbyte. Nätt och sött.
17.10.2008 - 16:43
![]() Mamie Coucou wrote:
Mamie Coucou wrote:
Du classique original ! superbe !
17.10.2008 - 16:35
|
||||||||||
Little Lamb#littlelambset |
||||||||||
|
|
||||||||||
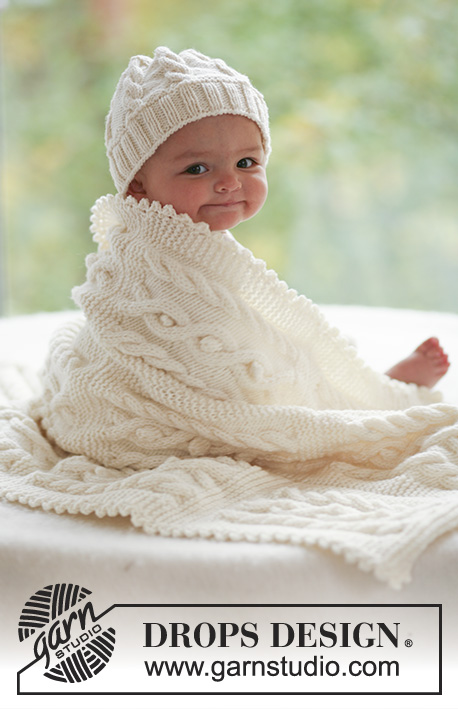
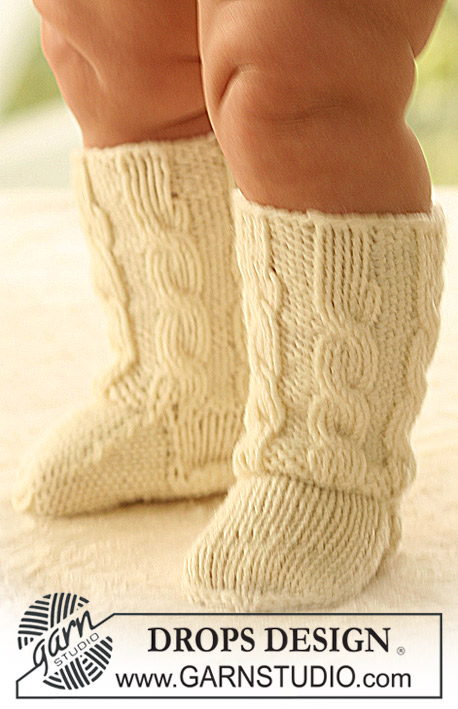
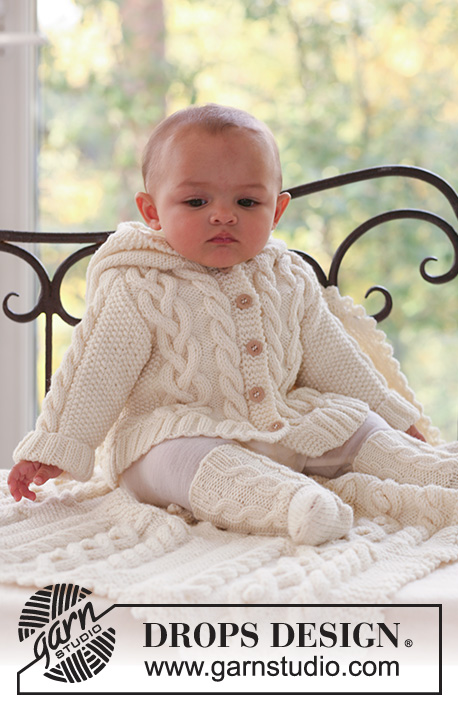
Set of beret hat and onesie with cables for baby in DROPS Merino Extra Fine
DROPS Baby 16-2 |
||||||||||
|
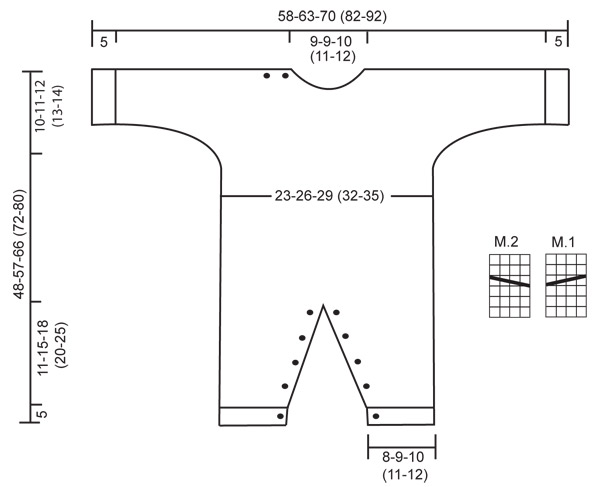
JUMPSUIT: GARTER ST (back and forth on needle): K all rows. PATTERN: See diagram M.1 and M.2. The diagrams show the pattern from the RS. BUTTONHOLES: Make buttonholes on buttonhole edge on front of leg. On right leg make buttonholes from RS and on left leg make buttonholes from WS. 1 buttonhole = K tog 2nd and 3rd st from edge and make 1 YO. Make buttonholes when leg measures: SIZE 1/3 months: 2, 5, 8, 11 and 14 cm [3/4", 2", 3⅛", 4⅜", 5½"]. SIZE 6/9 months: 2, 6, 10, 14 and 18 cm [3/4", 2⅜", 4", 5½", 7"]. SIZE 12/18 months: 2, 6, 11, 16 and 21 cm [3/4", 2⅜", 4⅜", 6¼", 8 ¼"]. SIZE 2 years: 2, 6, 10, 14, 18 and 23 cm [3/4", 2⅜", 4", 5½", 7", 9"]. SIZE 3/4 years: 2, 7, 12, 17, 22 and 28 cm [3/4", 2¾", 4¾", 6¾", 8¾", 11"]. ---------------------------------------------------------- RIGHT LEG: Worked back and forth on circular needle. Cast on 47-53-53 (59-65) sts on circular needle size 3.5 mm [US 4] with Merino Extra Fine. P 1 row from WS and continue as follows from RS: 4 garter sts (buttonhole edge) rib K3/P3, on the next 36-42-42 (48-54) sts and finish row with K3 and 4 garter sts (= buttonhole edge). Continue in rib with 4 garter sts each side, AT THE SAME TIME when piece measures 2 cm [3/4"] make buttonhole – SEE ABOVE. When piece measures 5 cm [2"] K 2 rows on all sts, AT THE SAME TIME dec 11-13-9 (11-13) sts evenly on first row = 36-40-44 (48-52) sts. Change to needle size 4.5 mm [US 7] and continue in stockinette st with 4 garter sts each side. AT THE SAME TIME when piece measures 6 cm [2⅜"] inc 1 st each side inside the 4 garter sts on every 3-3-4 (4-4) row a total of 9-10-11 (12-13) times = 54-60-66 (72-78) sts. REMEMBER THE KNITTING GAUGE! When piece measures 16-20-23 (25-30) cm [6¼"-8"-9" (9¾"-11¾")] bind off 4 sts each side = 46-52-58 (64-70) sts. Put piece aside and knit the other leg. LEFT LEG: Like right leg, but make buttonholes on the opposite side. BODY PIECE: Slip both legs on the same circular needle = 92-104-116 (128-140) sts. Insert 1 marker each side = 46-52-58 (64-70) sts between markers. Work next round as follows – beg on the left side of piece: 18-21-24 (27-30) stockinette sts, P2, K2 in each of the next 2 sts (= K4), P2, K2 in each of the next 2 sts (= K4), P2 and work remaining sts in stockinette st = 96-108-120 (132-144) sts. Work next round as follows: 18-21-24 (27-30) stockinette sts, P2, M.1, P2, M.2, P2 and work remaining sts in stockinette st. Continue like this until piece measures 38-46-54 (59-66) cm [15"-18"-21¼" (23¼"-26")]. Now divide the piece by markers at sides and complete front and back pieces separately – NOTE: Make sure to divide piece so that the cable row in M.1 and M.2 sits on the RS. FRONT PIECE: = 50-56-62 (68-74) sts. Continue in stockinette st with cables as before, AT THE SAME TIME cast on new sts each side for sleeves. Cast on at the end of every row at the sides: 4 sts 2-1-1 (1-1) times, 6 sts 0-1-1 (2-1) times, 8 sts 1-1-1 (1-2) times and 9-9-13 (16-21) sts 1 time = 100-110-124 (148-168) sts – work inc sts in stockinette st. When piece measures 44-53-61 (67-75) cm [17¼"-21"-24" (26⅜"-29½")] K2 tog on the 2 cables = 96-106-120 (144-164) sts. On next row slip the middle 10-10-12 (14-16) sts on a stitch holder for neck and complete each side separately. RIGHT SHOULDER/SLEEVE: Continue as before, AT THE SAME TIME bind off to shape the neckline at the beg of every row from mid front: 2 sts 1 time and 1 st 2 times = 39-44-50 (61-70) sts left on shoulder/sleeve. AT THE SAME TIME when piece measures 46-55-64 (70-78) cm [18"-21⅝"-25¼" (27½"-30¾")] work garter st on the first 12-13-14 (15-16) sts from mid front (work remaining sts as before). After 4 rows garter st make 2 buttonholes as follows from RS: K2 tog, 1 YO, work 5-6-7 (8-9) sts, K2 tog, 1 YO, work remaining sts on row. Continue in stockinette st with garter st on the first 12-13-14 (15-16) sts from mid front until piece measures 48-57-66 (72-80) cm [19"-22½"-26" (28⅜"-31½")], bind off. LEFT SHOULDER/SLEEVE: Like right shoulder/sleeve, but mirrored = 39-44-50 (61-70) sts on shoulder/sleeve. Continue in stockinette st until piece measures 48-57-66 (72-80) cm [19"-22½"-26" (28⅜"-31½")], bind off. BACK PIECE = 46-52-58 (64-70) sts. Cast on new sts each side for sleeves as described for front piece = 96-106-120 (144-164) sts. When piece measures 46-55-64 (70-78) cm [18"-21⅝"-25¼" (27½"-30¾")] bind off the middle 16-16-18 (20-22) sts for neck and complete each side separately. RIGHT SHOULDER/SLEEVE: = 40-45-51 (62-71) sts. Bind off 1 st on neckline on next row = 39-44-50 (61-70) sts. When piece measures 48-57-66 (72-80) cm [19"-22½"-26" (28⅜"-31½")] bind off the first 27-31-36 (46-54) sts from sleeve edge towards shoulder. Work another 1.5 cm [½"] stockinette st with 1 garter st each side on the remaining 12-13-14 (15-16) sts (= buttonhole edge). K 1 row from WS and bind off all sts from RS LEFT SHOULDER/SLEEVE: Continue and bind off as described for right shoulder/sleeve, but mirrored = 39-44-50 (61-70) sts left on shoulder/sleeve. Continue in stockinette st until piece measures 48-57-66 (72-80) cm [19"-22½"-26" (28⅜"-31½")], bind off. ASSEMBLY: Sew upper arm seams, edge to edge to avoid a chunky seam – on right shoulder only sew seam up to buttonhole edge. CUFF: Pick up 38-44-50 (50-56) sts on needle size 3.5 mm [US 4] along sleeve edge. K 2 rows and continue in rib, K3/P3, with 1 edge st each side. Bind off when rib measures 5 cm [2"]. Repeat along the other sleeve edge. Sew seams under arms inside 1 edge st. NECK: Pick up approx 48 to 64 sts round neckline (incl sts on stitch holders) on needle size 4.5 mm [US 7]. K 3 rows and bind off. Sew tog buttonhole edges at the top of the front of legs and sew tog the buttonhole edges at the top of the back of legs. Sew on buttons to fit buttonholes on legs and shoulder. ---------------------------------------------------------- BASQUE HAT: Head circumference: 40/42 - 44/46 - 46/48 (48/50 - 50/52) cm [16"-17½"-18½" (19"-20")] INCREASING TIP: Inc 1 st by making 1 YO. Work YO into back of loop on return row to avoid a hole. ---------------------------------------------------------- HAT: Worked back and forth on pointed needles. Cast on 90-92-94 (96-98) sts on needle size 4 mm [US 6] with Merino Extra Fine. Work 2 cm [3/4"] rib, K1/P1. Continue in garter st – SEE ABOVE – AT THE SAME TIME dec 5-7-4 (6-3) sts evenly on first row = 85-85-90 (90-95) sts. Insert 5 markers in piece as follows from RS: First marker after 1 st, and the remaining 4 markers with 17-17-18 (18-19) sts between each = 16-16-17 (17-18) sts left after the last marker. On next row from RS inc 1 st to the left of all markers – SEE INCREASING TIP – and repeat the inc on every other row a total of 6-7-8 (9-10) times = 115-120-130 (135-145) sts. REMEMBER THE KNITTING GAUGE! When piece measures 6.5-7-7.5 (8-8.5) cm [2½"-2¾"-2⅞" (3⅛"-3¼")] dec 1 st to the left of all markers by K2 tog, and repeat the dec on every other row a total of 18-19-20 (21-22) times = 25-25-30 (30-35) sts. Now K2 tog across the row. Cut the thread, pull through remaining sts and fasten. Sew hat tog mid back in outer loops of sts. Hat measures approx 15-16-17 (18-19) cm [6"-6¼"-6¾" (7"-7½")]. |
||||||||||
Diagram explanations |
||||||||||
|
||||||||||
 |
||||||||||
Have you finished this pattern?Tag your pictures with #dropspattern #littlelambset or submit them to the #dropsfan gallery. Do you need help with this pattern?You'll find 16 tutorial videos, a Comments/Questions area and more by visiting the pattern on garnstudio.com. © 1982-2026 DROPS Design A/S. We reserve all rights. This document, including all its sub-sections, has copyrights. Read more about what you can do with our patterns at the bottom of each pattern on our site. |
||||||||||


With over 40 years in knitting and crochet design, DROPS Design offers one of the most extensive collections of free patterns on the internet - translated to 17 languages. As of today we count 324 catalogs and 12290 patterns - 12280 of which are translated into English (US/in).
We work hard to bring you the best knitting and crochet have to offer, inspiration and advice as well as great quality yarns at incredible prices! Would you like to use our patterns for other than personal use? You can read what you are allowed to do in the Copyright text at the bottom of all our patterns. Happy crafting!
Post a comment to pattern DROPS Baby 16-2
We would love to hear what you have to say about this pattern!
If you want to leave a question, please make sure you select the correct category in the form below, to speed up the answering process. Required fields are marked *.