
Popular categories
Looking for a yarn?


Comments / Questions (195)
![]() Teresa Mas Pinto wrote:
Teresa Mas Pinto wrote:
Tengo otra duda: en la disminución para el raglán, cuando dice: 1 punto de arroz, quiere decir que en la vuelta por el revés debo tejer, en estos puntos de arroz, puntos derechos? Muchas gracias.
03.12.2020 - 21:50DROPS Design answered:
Hola Teresa, tienes que trabajar 1 pt en pt arroz de revés por el lado derecho y por el lado revés. Buen trabajo!
07.12.2020 - 08:52
![]() Teresa Mas Pinto wrote:
Teresa Mas Pinto wrote:
No sé si entiendo bien la disminución para el raglán. Cuando dice: 2 pjd, 1 pt en pt arroz, 1d, 1 pt en pt arroz, desl 1 pt del derecho, 1d, pasar pt desl por encima. Esta secuencia debo seguirla siempre, empezando 2 puntos antes cuando estoy en las mangas y 5 puntos antes cuando estoy en el frente y en la espalda? Muchas gracias por su ayuda.
03.12.2020 - 11:41DROPS Design answered:
Hola Teresa, tienes razon. Continua asi. Buen trabajo!
07.12.2020 - 09:00
![]() Donatella wrote:
Donatella wrote:
Buongiorno sarà sicuramente una domanda sciocca ma mi domando come riesco a seguire il diagramma M1 dopo gli aumenti a 12 cm del corpo. Se lo schema indica di lavorare 1 m. diritto e 1 m. rovescio aumentando una maglia a lato della maglia diritto poi mi si scombina lo schema fatto fin qui.
30.11.2020 - 11:55DROPS Design answered:
Buongiorno Donatella, deve aumentare 1 maglia per lato del segnapunti, quindi 2 maglie, e incorporarle nella lavorazione. Buon lavoro!
02.12.2020 - 08:46
![]() Teresa Mas wrote:
Teresa Mas wrote:
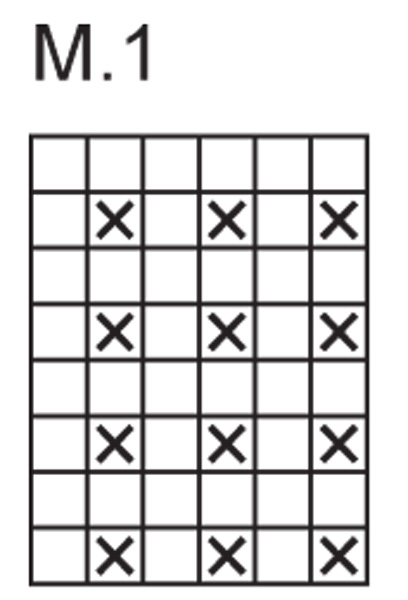
Sleeves knitted in the round. How I can knit pattern 1? Should I always knit like in the ribbing: *K 1, P 1*? If so, the wrong side of the sleeves will not look as the wrong side of the body. Thanks a lot.
18.11.2020 - 23:34DROPS Design answered:
Dear Mrs Mas, when you work in the round, work the sts as they should look like from RS, ie row 1 in M.1 will be worked: P1, K1, P1, K1, P1, K1 (= as all odd numbered row) and on row 2 you will knit all stitches (as all even numbered row). Repeat these 2 rows to get the same pattern in the round on the sleeves as for the body. Happy knitting!
19.11.2020 - 10:22
![]() Emmeline Richter wrote:
Emmeline Richter wrote:
Hej! Jeg er i tvivl om nederst på kroppen. Der står: "Strik Rib med 3 m retstrik og 1 r (set fra retsiden) i hver side mod midt foran.". Så der skal strikkes 3 m retstrik og 1 m glatstrik? Og skal dette kun gøres i hver ende, og resten er alm enkeltrib, eller skal det hele være 3 m retstrik og 1 m glatstrik? Håber det giver mening, på forhånd tak! Hilsen Emmeline Richter
18.11.2020 - 17:22DROPS Design answered:
Hei Emmeline. Det er kun i sidene det skal strikkes 3 m rettstrikk + 1 r. Mellom disse maskene strikkes det vrangbord (1 rett, 1 vrang). mvh DROPS design
24.11.2020 - 09:32
![]() Elena wrote:
Elena wrote:
Hola me gustaría que me ayuden con el cuello pues no sé desde dónde mido la prenda si desde el resorte y hasta dónde, los puntos cómo debo coger en los ganchos .Saludos
16.11.2020 - 01:09DROPS Design answered:
Hola Elena! Si es un jersey o una chaqueta, el largo se mide a partir del punto más alto en el hombro (usualmente lo más cerca al escote), y en línea recta hasta la parte de abajo de la prenda. NO se mide a partir de la punta del hombro. De manera similar, el largo del canesú se mide a partir del punto más alto en el hombro y en dirección hacia abajo hasta donde el canesú se divide para el cuerpo y las mangas. En una chaqueta, nunca se debe tomar las medidas a lo largo de los bordes delanteros, a menos que así se especifique. Siempre medir en el interior de los puntos de los bordes delanteros cuando se mide el largo de la prenda.
19.11.2020 - 09:58
![]() Eva -Mari wrote:
Eva -Mari wrote:
Går det att få köpa ett mönster jag har tyvärr ingen skrivare
30.10.2020 - 13:48
![]() Jacqueline FRANCOUAL-FOLTZER wrote:
Jacqueline FRANCOUAL-FOLTZER wrote:
Bonjour, la quantité de laine est très surévaluée. Pour une taille XL j'ai utilisé un peu plus de 300 g d'ALPACA (550 préconisés) et un peu plus de 500 g de KARISMA (850 préconisés). Sans compter les pelotes entamées pour les mises en attente, il me reste donc 4 pelotes intactes de chaque qualité. Y a t'il une possibilité de renvoi pour remboursement ?
04.06.2020 - 11:50DROPS Design answered:
Bonjour Mme Francoual-Foltzer, merci pour votre retour - aviez-vous la bonne tension à la fois en hauteur et en largeur? Pour le renvoi des pelotes non utilisées, merci de bien vouloir contacter directement le magasin DROPS où vous les avez achetées, eux seuls peuvent vous répondre. Bon tricot!
04.06.2020 - 13:08
![]() Lea wrote:
Lea wrote:
Je suis désolée mais j'ai rarement vu un patron aussi mal expliqué. Tricoter sur aiguilles circulaires mais en aller-retour ? Ce n'est précisé nulle part. Il n'est fait mention du zip à aucun moment dans le tricot du devant non plus. "côté milieu devant" ? Ok, donc "arbre, fourchette, pylône", kamoulox. Vous devriez faire tester vos patrons avant de les publier. Le nombre de commentaires dans toutes les langues confirme que je ne suis pas la seule à galérer.
20.04.2020 - 17:11DROPS Design answered:
Bonjour Lea, nous sommes désolés que vous ayez autant de souci avec ce modèle, il a été publié il y a quelques années et la façon d'écrire les explications a été modifiée depuis. Cette veste se tricote effectivement en allers et retours sur aiguille circulaire (plus d'infos ici) et le côté milieu devant correspond au milieu du devant de la veste = les bordures de chacun des devants. N'hésitez pas à poser votre question ici ou bien à contacter votre magasin pour toute assistance individuelle complémentaire. Bon tricot!
21.04.2020 - 10:00
![]() Elena wrote:
Elena wrote:
Hola podrían ayudarme a resolver mi problema para hacer coincidir los puntos según el diagrama del modelo drops /85/13 ,en el momento de hacer los aumentos a lado de cada mp y si los aumentos son uno a cada lado de los MP siendo así serían 4 p en la fila o es solo uno siendo así igual a 2 p por fila, donde dice: "cuando la pieza mida 12 cm..........." en las indicaciones del cuerpo. Gracias por su atencion y comprensión pare solfear mi problema🙅
16.03.2020 - 04:28DROPS Design answered:
Hola Elena. Los aumentos son 4 puntos por fila (1 a cada lado de ambos marcapuntos).
18.03.2020 - 18:55
|
|||||||
Richard |
|||||||
|
|
|||||||
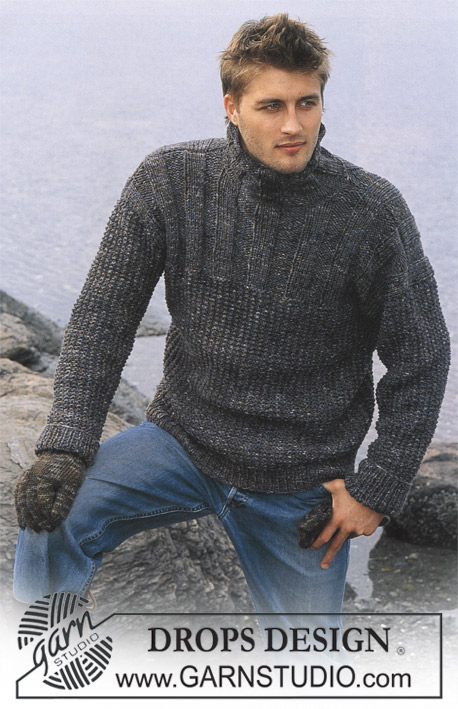
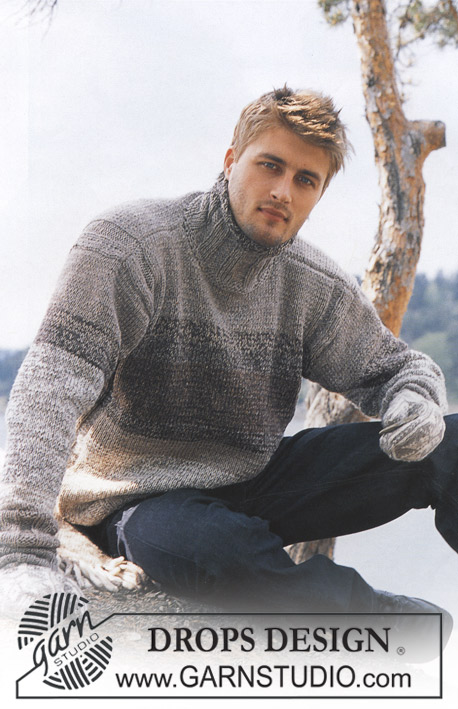
Knitted jacket for men, with raglan, high neck and zipper in DROPS Karisma and DROPS Alpaca
DROPS 85-13 |
|||||||
|
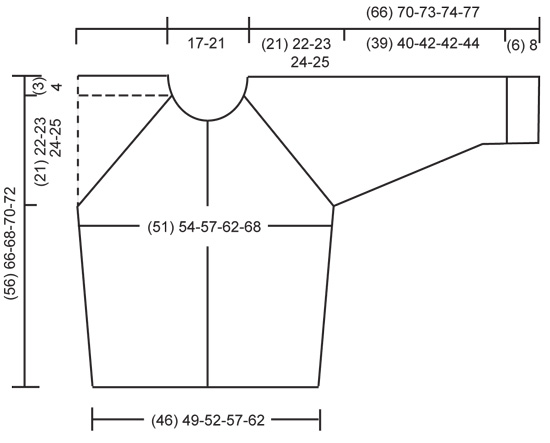
Gauge: 15 sts x 21 rows with 1 strand of each yarn on larger needles in stockinette st = 10 x 10 cm. Rib: *K 1, P 1*, repeat from *-*. Pattern: The diagrams are showing all rows seen from the right side. Decreasing tips (for raglan): All decs are made on the right side. On front- and back piece dec before the 3 sts before/after the marker, and on the sleeves dec right beside the marker. Start 2 sts before the marker on the sleeves and 5 sts before the marker on front and back, and work as follows: K 2 tog, 1 st in seed st, K 1, 1 st in seed st, slip 1 st as if to knit, K 1, psso. ___________________________________________________________________ BODY The cardigan are worked back and fort on circular needle. Cast on 137-147-155-171-187 sts on smaller circular needles with 1 strand Karisma + 1 strand Alpaca. Knit rib, keeping 3 sts in garter st at each side for front edges, and begin and end rib with K 1 (seen from the right side). When the piece measures 3-4-4-4-4 cm change to larger circular needles and Pattern 1, keeping 3 sts in garter st at each side for front edges. See that the K rib in the pattern is above the K rib in ribbing. Place a marker in the 36-38-40-44-48th st in from each side (it will be a K 1), there are 65-71-75-83-91 sts between markers on back. When the piece measures 10-12-12-12-12 cm inc 1 st at each side of both sts with markers. Inc every 5-6-6-6-6 cm a total of 4 times = 153-163-171-187-203 sts – knit the increased sts into the pattern as you go along. When the piece measures 32-40-41-42-43 cm bind off 7 sts at each side for armholes (= bind off the st with the marker + 3 sts each side of that st) = 67-73-77-85-93 sts on back and 36-38-40-44-48 sts on each front. Lay piece aside and knit the sleeves. SLEEVES Sleeves knitted in the round. Cast on 32-34-36-36-40 sts on smaller double-pointed needles with 1 strand Karisma + 1 strand Alpaca; join and place a marker at the join. Knit rib – start with K 1 at marker. When the piece measures 6-8-8-8-8 cm change to larger double-pointed needles and Pattern 1 – see that the K rib in the pattern is above the K rib in the ribbing. When the piece measures 10-14-10-14-10 cm inc 1 st each side of the K st at marker every 2.5-2-2.5-2-2.5 cm a total of 14-16-16-17-17 times = 60-66-68-70-74 sts – knit the increased sts in the pattern as you go along. When the piece measures 45-48-50-50-52 cm bind off 7 sts at marker (bind off the the K st at marker + 3 sts each side of it) = 53-59-61-63-67 sts. Lay piece aside and knit second sleeve. YOKE Put the sleeves in on the same circular needles as Body where you bound off for armholes = 245-267-279-299-323 sts Put a marker in each transition between Body and sleeves = 4 markers. Knit 3-1-1-1-0 rows before beginning shaping. Read entire section before knitting: Raglan shaping: Dec at each side of all markers (= 8 decs) – see Decreasing tips above – every other row 21-23-24-25-27 times. Neck: When the piece measures 49-57-59-60-62 cm put 3-4-5-6-6 sts at each center front edge on st holders for the neck. Then bind off at each neck edge every other row: 2 sts 2-0-0-2-4 times and 1 st 2-6-6-4-2 times. After all shaping is complete 59-63-65-71-75 sts remain. Neckband: Pick up and knit approx. 10-16 sts at each side of neck on fronts (including sts on st holders) with 1 strand of each yarn and put all sts on smaller circular needles. K 1 row from wrong side, then K 1 row from right side, adjusting (inc/dec) to 83-83-91-103-111 sts on 2nd row. Then knit rib, keeping 3 sts in garter st at each side and beginning rib with K 1 (as seen from the right side). When the collar measures 20-22-22-24-24 cm bind off all sts in rib. ASSEMBLY Sew opening under the sleeve. Sew in zipper – start at lower edge. Fold the collar in half to wrong side and stitch in place, covering end of zipper. |
|||||||
Diagram explanations |
|||||||
|
|||||||
 |
|||||||
 |
|||||||
Have you finished this pattern?Tag your pictures with #dropspattern or submit them to the #dropsfan gallery. Do you need help with this pattern?You'll find 22 tutorial videos, a Comments/Questions area and more by visiting the pattern on garnstudio.com. © 1982-2026 DROPS Design A/S. We reserve all rights. This document, including all its sub-sections, has copyrights. Read more about what you can do with our patterns at the bottom of each pattern on our site. |
|||||||


With over 40 years in knitting and crochet design, DROPS Design offers one of the most extensive collections of free patterns on the internet - translated to 17 languages. As of today we count 324 catalogs and 12290 patterns - 12280 of which are translated into English (US/in).
We work hard to bring you the best knitting and crochet have to offer, inspiration and advice as well as great quality yarns at incredible prices! Would you like to use our patterns for other than personal use? You can read what you are allowed to do in the Copyright text at the bottom of all our patterns. Happy crafting!
Post a comment to pattern DROPS 85-13
We would love to hear what you have to say about this pattern!
If you want to leave a question, please make sure you select the correct category in the form below, to speed up the answering process. Required fields are marked *.