
Popular categories
Looking for a yarn?


Comments / Questions (7)
![]() Glee Workman wrote:
Glee Workman wrote:
Don\'t see diagram on where to lay out blocks ???
01.12.2021 - 16:35DROPS Design answered:
Dear Mrs Workman, there is no diagram on how to put the squares together, just decide where you like the colours to be, you should have 4 squares in width and 6 in height. Happy crocheting!
02.12.2021 - 08:45
![]() Anette wrote:
Anette wrote:
Heisann, jeg prøver å hekle dette fine teppet, men uansett hva jeg gjør så blir det bølgete. Aner ikke hva jeg gjør feil da fastheten er normal ( for meg hvertfall 😅) kan noen hjelpe meg?
30.04.2020 - 21:45DROPS Design answered:
Hei Anett. Sjekk om din heklefasthet stemmer med den som er oppgitt i oppskriften, det er viktig. Når du er ferdig med en rute, prøv å blokke ruten (fukt ruten lett og spenn den fast i hvert hjørne, la den ligge til den tørker og se om den da ikke er flat). God Fornøyelse!
04.05.2020 - 10:00
![]() Rina Stein wrote:
Rina Stein wrote:
Hei! Tenkte å prøve denne. Skal det brukes dobbbelt garn (dvs to tråder)?
03.09.2012 - 17:06DROPS Design answered:
Nej ;o)
07.09.2012 - 09:09
![]() Hilde wrote:
Hilde wrote:
Hei, Stemmer det at jeg teller sekd farger på bildet? I oppskriften er det fem farger og det ser ut som at det mangler en slags gråfarge? Prøver å overføre fargekombinasjonen til et annet teppe så jeg har ikke prøvd å hekle enda...
19.07.2010 - 13:38Ilaria wrote:
Ciao Marina, le spiegazioni ci sono anche in inglese, non solo in francese.
09.01.2009 - 18:59Marina wrote:
Vorrei ricevere le spiegazioni di questo modello in italiano. Molte grazie! Il sito è molto bello
09.01.2009 - 18:14
![]() Marjun Dahl wrote:
Marjun Dahl wrote:
Tak for mange gode både hækleog strikke opskrifter og ikke at forglemme alle de lækre garnkvaliteter.
03.05.2008 - 16:36
|
|||||||
DROPS 87-20 |
|||||||
 |
 |
||||||
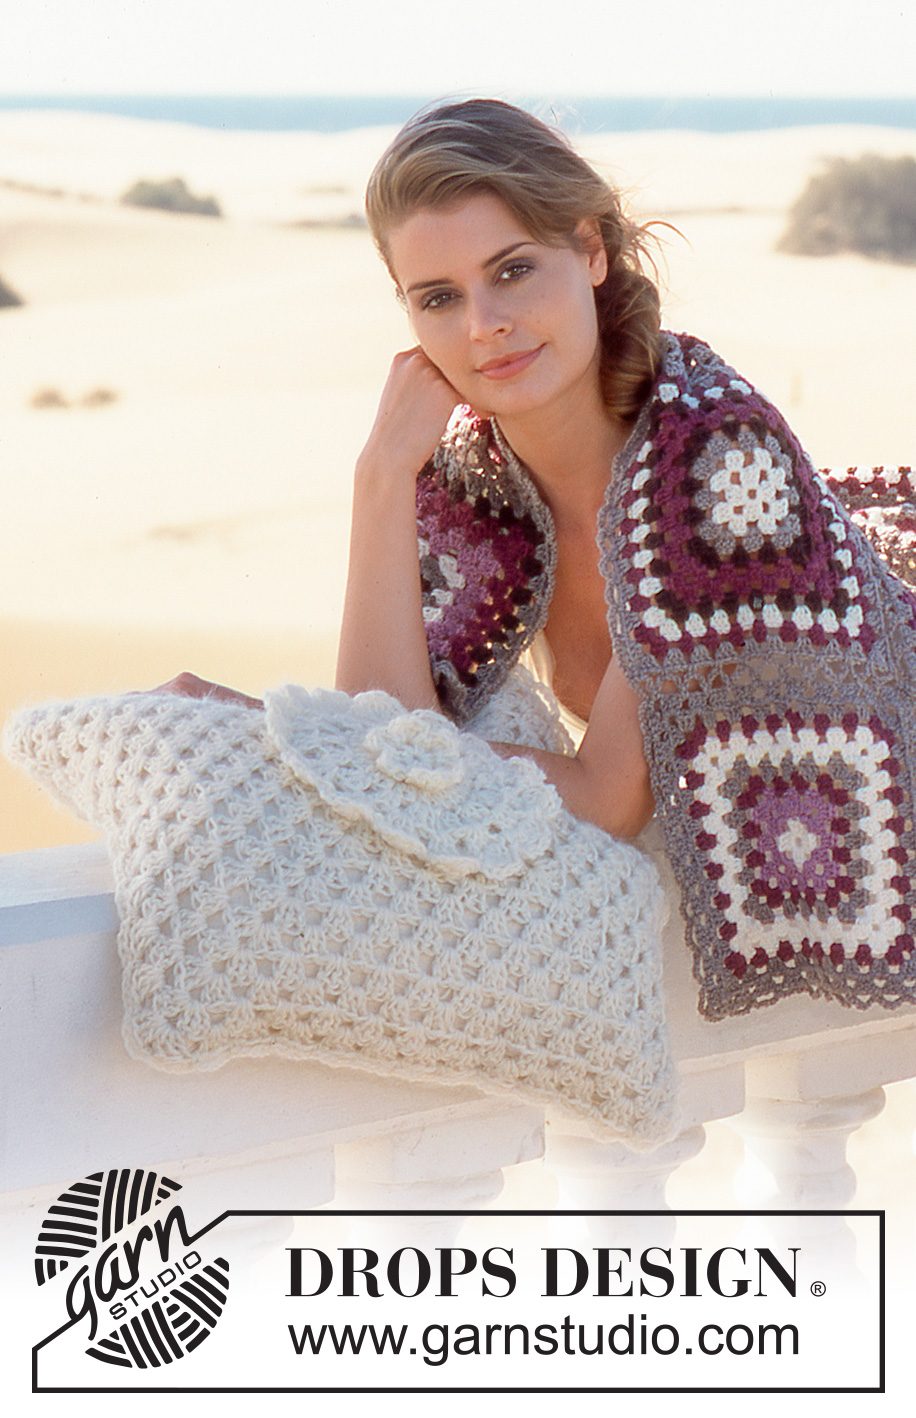
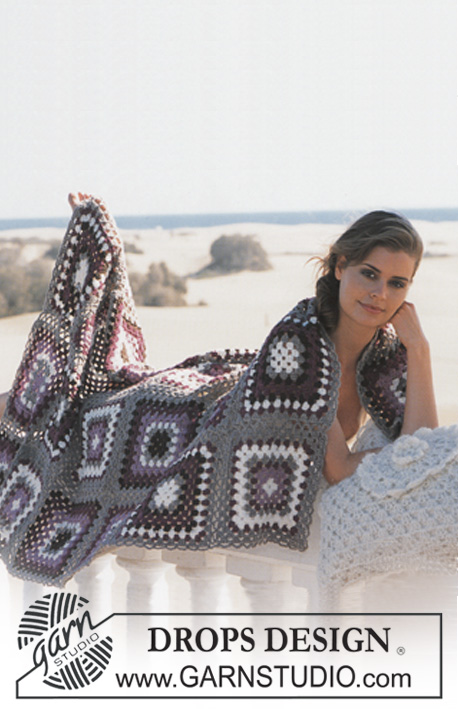
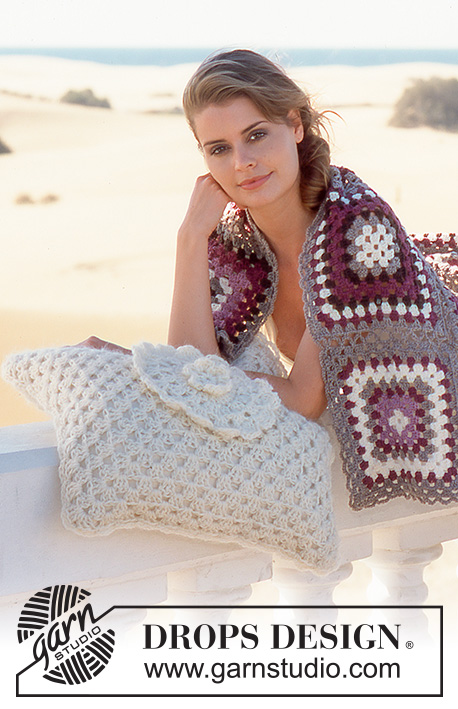
DROPS Crocheted Afghan in Karisma Superwash and crocheted Pillow in Karisma Superwash and Vivaldi
DROPS 87-20 |
|||||||
|
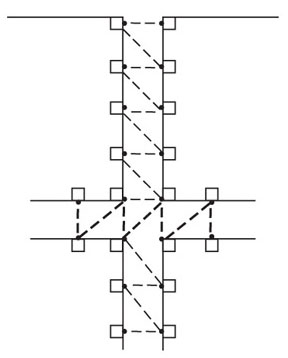
Gauge: 1 square measures approx. 26 x 26 cm. Crochet tips: To avoid having to tuck in the many ends you will have, crochet over the ends as you go along. Colors of Squares: Crochet squares in 4 different color combinations: Square A: 1st + 2nd rows: light plum 3rd + 4th rows: light brown 5th row: natural 6th + 7th rows: light plum 8th + 9th rows: dark plum 10th row: light brown. Square B: 1st + 2nd rows: dark brown 3rd row: light brown 4th row: natural 5th + 6th rows: light plum 7th + 8th rows: dark plum 9th row: dark brown 10th row: light brown. Square C: 1st + 2nd rows: natural 3rd row: light brown 4th row: dark brown 5th + 6th rows: dark plum 7th row: dark brown 8th row: natural 9th row: dark plum 10th row: light brown. Square D: 1st row: natural 2nd + 3rd rows: light plum 4th row: dark plum 5th row: light brown 6th + 7th rows: natural 8th row: dark plum 9th + 10th rows: light brown. Square: Make 6 squares in each color combination – see instructions above. Read crochet tips above before beginning: Ch 6 with color for first row and join into a ring with 1 sl st. 1st row: ch 3, 2 dc in ring, ch 3, * 3 dc, ch 3 *, repeat * - * a total of 3 times and finish with 1 sl st in ch 3 at start of row, turn the work. 2nd row: ch 3, 2 dc in first ch-loop, ch 3, 3 dc in same ch-loop, * ch 1, 3 dc in the next ch-loop, ch 3, 3 dc in the same ch-loop *, repeat * - * a total of 3 times and finish with ch 1 and 1 sl st in ch 3 at start of row, turn the work. 3rd row: ch 3, 2 dc in first ch-loop, ch 1, * 3 dc in the next ch-loop, ch 3, 3 dc in same ch-loop, ch 1, 3 dc in the next ch-loop, 1 ch *, repeat * - * a total of 3 times, 3 dc in the next ch-loop, ch 3, 3 dc in same ch-loop, 1 ch and finish with 1 sl st in ch 3 at start of row, turn the work. 4th row: ch 3, 2 dc in first ch-loop, ch 1, * 3 dc in the next ch-loop, ch 3, 3 dc in same ch-loop, ch 1, 3 dc in the next ch-loop, ch 1, 3 dc in the next ch-loop, 1 ch *, repeat * - * a total of 3 times, 3 dc in the next ch-loop, ch 3, 3 dc in same ch-loop, ch 1, 3 dc in the next ch-loop, 1 ch and finish with 1 sl st in ch 3 at start of row, turn the work. 5th-10th rows: Crochet in the same manner, adding 1 dc group more between each corner on each row. Assembly: Arrange square colors as you wish, 4 squares wide and 6 squares high. Crochet squares together as seen in diagram – first crochet squares together lengthwise, then in width. Crocheted edge: Crochet around entire edge with light brown as follows: 1 sc in corner ch-loop, ch 6, 1 sc in the next ch-loop *, repeat * - * and finish with ch 6 and 1 sl st in first sc at start of row. PILLOW: Measurements: 45 x 45 cm [17.75" x 17.75"] Materials: Garnstudio KARISMA SUPERWASH 250 gr nr 01, natural and use: Garnstudio VIVALDI 100 gr nr 06, natural DROPS 7 mm [US K] crochet hook, or size needed to obtain correct gauge. Gauge: 3 dc-group in width and 6 rows in height with 1 strand of each yarn (2 strands) = approx. 10 x 10 cm Back side: Ch 4 with 1 strand of each yarn (2 strands) and join into a ring with 1 sl st. 1st row: ch 3, 2 dc in ring, ch 2, * 3 dc in ring, ch 2 *, repeat * - * a total of 3 times and finish with 1 sl st in the ch 3 at start of row, turn the work. 2nd row: ch 3, 2 dc in first ch-loop, ch 2, 3 dc in same ch-loop (= corner), * 3 dc in the next ch-loop, ch 2, 3 dc in same ch-loop (= corner) *, repeat * - * a total of 3 times and finish with 1 sl st in the ch 3 at start of row, turn the work. 3rd row: ch 3, 2 dc between dc-groups, * 3 dc in the next ch-loop, ch 2, 3 dc in same ch-loop (= corner), 3 dc between the following 2 dc-groups *, repeat * - * a total of 3 times, 3 dc in the next ch-loop, ch 2, 3 dc in same ch-loop (= corner) and finish with 1 sl st in the ch 3 at start of row, turn the work. 4th row: ch 3, 2 st between dc-groups, * 3 dc in the next ch-loop, ch 2, 3 dc in same ch-loop (= corner), 3 dc between the following 2 dc-groups, 3 dc between the following 2 dc-groups, *, repeat * - * a total of 3 times, 3 dc in the next ch-loop, ch 2, 3 dc in same ch-loop (= corner), 3 dc between the following 2 dc-groups and finish with 1 sl st in the ch 3 at start of row, turn the work. 5th-13th rows (or to desired size): Crochet in the same manner (there will be 1 dc-group more between each corner every row). Front: Crochet the same as the back. Blossoms: Small blossom: Ch 4 with 1 strand each yarn (2 strands) and join into a ring with 1 sl st. 1st row: * 1 sc in ring, ch 3 *, repeat * - * a total of 6 times and finish with 1 sl st in first sc at start of row. 2nd row: Crochet as follows in each ch-loop: 1 sc, ch 1, 4 dc, ch 1 and 1 sc, finish with 1 sl st in first sc at start of row. Large blossom: Ch 4 with 1 strand each yarn (2 strands) and join into a ring with 1 sl st. At the start of every row ch 3 replaces 1 dc and every row ends with 1 sl st in the ch 3 at the start of row. 1st row: Crochet 15 dc in ring. 2nd row: Crochet 2 dc in each dc = 30 dc 3rd row: Crochet 3 dc between the 2 first dc on row, * ch 1, 3 dc between the next 2 dc *, repeat * - * to end of row (= 15 dc-groups). 4th row: * Crochet together 4 dc as follows: 2 dc between 1st and 2nd dc in dc-group and then 2 dc between 2nd and 3 dc in dc-group, but leave the last loop on the hook and pull yarn through all 4 dc at once, ch 2, 1 sc in ch-loop, ch 2 *, repeat * - * to end of row and finish with 1 sl st in the top of first dc-group on row. Assembly: Sew the small blossom on top of the large blossom, then sew the entire blossom assembly to the center of the front piece. Crochet front and back together with wrong sides facing and 1 strand of each yarn (2 strands) as follows (start at one corner): 1 sc in ch-loop in corner (crochet through both layers), * ch 4, 1 sc in the next ch-loop (crochet through both layers) *, repeat * - * around 3 sides, put in pillow form and continue along the last side in the same manner, finish with 1 sl st in first sc at start of row. |
|||||||
Diagram explanations |
|||||||
|
|||||||
 |
|||||||
Have you finished this pattern?Tag your pictures with #dropspattern or submit them to the #dropsfan gallery. Do you need help with this pattern?You'll find 8 tutorial videos, a Comments/Questions area and more by visiting the pattern on garnstudio.com. © 1982-2026 DROPS Design A/S. We reserve all rights. This document, including all its sub-sections, has copyrights. Read more about what you can do with our patterns at the bottom of each pattern on our site. |
|||||||


With over 40 years in knitting and crochet design, DROPS Design offers one of the most extensive collections of free patterns on the internet - translated to 17 languages. As of today we count 325 catalogs and 12298 patterns - 12288 of which are translated into English (US/in).
We work hard to bring you the best knitting and crochet have to offer, inspiration and advice as well as great quality yarns at incredible prices! Would you like to use our patterns for other than personal use? You can read what you are allowed to do in the Copyright text at the bottom of all our patterns. Happy crafting!
Post a comment to pattern DROPS 87-20
We would love to hear what you have to say about this pattern!
If you want to leave a question, please make sure you select the correct category in the form below, to speed up the answering process. Required fields are marked *.