
Popular categories
Looking for a yarn?


Comments / Questions (57)
![]() Ali Buisman wrote:
Ali Buisman wrote:
Hoe moet je bij het armsgat 2 steken minderen/afkanten naast die 2 eerste ribbelsteken?
08.04.2021 - 13:00
![]() Chantal Brees wrote:
Chantal Brees wrote:
In het telpatroon M1 ontbreekt volgens mij bovenaan een 15e rij die gelijk is aan rij 7.
11.03.2021 - 21:21
![]() Eva Linde wrote:
Eva Linde wrote:
Efter 14 varv vad gör jag då! På bilden är det mellanrum efter rapporterna men det framgår inte på mönstret!,
25.06.2020 - 11:30DROPS Design answered:
Hej Eva. Du upprepar M.1 (dvs de första 14 varven på diagrammet) tills arbetet mäter 19 cm och efter det börjar du sticka M.2 (dvs de varv 15 och uppåt). Det är markerat på höger sida av diagrammet vad som är M.1 och vad som är M.2. Mvh DROPS Design
26.06.2020 - 10:21
![]() Eva Linde wrote:
Eva Linde wrote:
Mycket märkligt mönster. Efter varje rapport ser det ut att vara ett par varv slätstickning men det framgår inte i mönstret! Och hur gör man med hålraden?
25.06.2020 - 10:06DROPS Design answered:
Hej Eva, följer du diagrammet M.1 fra nederste højre hjørne, strikker förste varv fra retsiden og næste fra vrangen, så får du et mønster som ser ud som på billedet. Strik gerne en lille prøve først hvis du er usikker :)
25.06.2020 - 10:55
![]() Lena Mörk wrote:
Lena Mörk wrote:
Den tomma rutan i diagrammet mönster 1 måste väl stickas avigt på varv 2,4 osv?
21.06.2020 - 20:31DROPS Design answered:
Hej Lena. Ja det stämmer, den tomma rutan stickas rät från rätsidan och avig från avigsidan. Mvh DROPS Design
22.06.2020 - 07:34
![]() Kirsten Van Es wrote:
Kirsten Van Es wrote:
Ik neem aan dat ik het vest in tricot steek moet breien? Dus op de teruggaande naald averecht? Het wordt nergens aangegeven. Zowel niet bovenin bij de stekenuitleg als bij het getekende breipatroon. Daar zijn de vakjes van de teruggande naalden wit, dus recht. Maar wanneer ik alles recht brei komt het patroon heel lelijk uit.
11.06.2020 - 19:58DROPS Design answered:
Dag Kirsten,
Klopt, het vest wordt inderdaad in tricotsteek gebreid, dus recht aan de goede kant en averecht aan de verkeerde kant.
18.06.2020 - 11:09
![]() AL wrote:
AL wrote:
Je ne comprends pas vos réponses en anglais à mes questions (qui ont été posées par quelqu'un je pense): 1 - (12 x 12) + 2 mailles lisières = 182 mailles au total et non 183 ? 2 - je ne comprends pas les symboles de la ligne 23 du diagramme M2. Merci car je suis bloquée svp ...
19.04.2020 - 20:30DROPS Design answered:
Bonjour Al, pour que le motif soit symétrique, on va terminer par la 1ère m de M1 en fin de rang, autrement dit tricotez les 183 m ainsi: 1 m lis, 15 fois les 12 m de M.1 au-dessus des 180 m suivantes, tricotez maintenant la 1ère m de M1 (= 1 m jersey) et terminez par 1 m lis. Au 23ème rang, tricotez la première m du 1er M.2 en largeur en jersey, puis, tricotez la dernière m de M.2 + la 1ère m du M.2 suivant ensemble à l'endroit (= dernière m de M.2), 1 jeté (= 1ère m du M.2 suivant). Bon tricot!
20.04.2020 - 10:47
![]() Karen wrote:
Karen wrote:
Thank you I understand row 23. I do not know the the symbol on row 25. The triangle is upside down
30.09.2019 - 15:06DROPS Design answered:
Dear Karen, I missed that one sorry, you should here K2 together (diagram will be edited), so that you will have same lace pattern as first one below. Thanks for your feedback. Happy knitting!
30.09.2019 - 17:00
![]() Karen wrote:
Karen wrote:
What does the upside down triangle symbol mean on M2 chart?
29.09.2019 - 21:34DROPS Design answered:
Dear Karen, see answer below. Happy knitting!
30.09.2019 - 11:41
![]() Karen wrote:
Karen wrote:
What is the upside triangle symbol mean on the M 2 chart?
29.09.2019 - 15:01DROPS Design answered:
Dear Karen, on row 23, K the edge stitch + first stitch first M.2 tog, YO, then work the last stitch in M.2 tog with first stitch next M.2 (= last st first M.2) and make a YO (= first st next M.2), repeat diagram like this, and at the end of the row, when 3 sts remain, Ktog the next 2 sts, YO, 1 edge stitch. Happy knitting!
30.09.2019 - 10:53
|
|||||||||||||
Cool Solace |
|||||||||||||
|
|
|||||||||||||
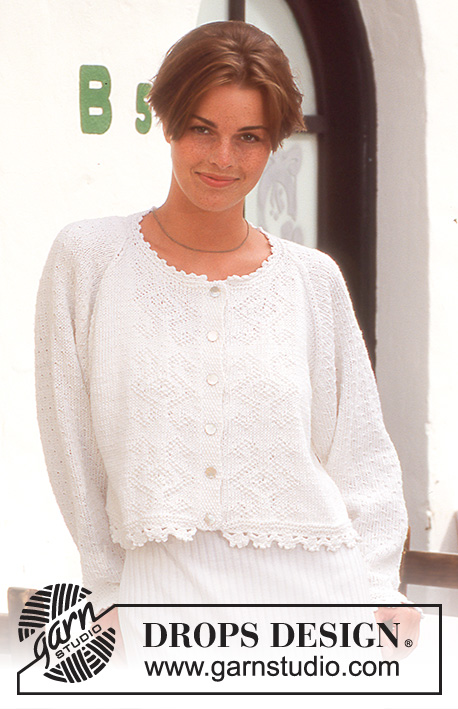
DROPS Top in Muskat with lace pattern
DROPS 46-8 |
|||||||||||||
|
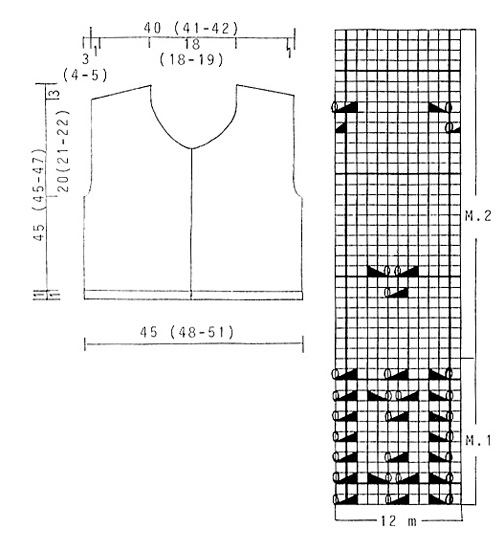
Pattern: See diagram (1 diagram = 1 pattern repeat). The diagrams are seen from the RS. Seed stitch: 1st row: K1, P1. 2nd row: K over P and P over K. Repeat 1st and 2nd row. Body: Work back and forth on circular needles. Cast on 183 (195-207) sts on circular needle sizes 4 mm/US 6 with gray and K2 rows. Then work chart M.1 with 1 edge st on each side mid front not included in pattern. Remember knitting gauge. When piece measures 19 (19-19) cm / 7½"-7½"-7½" – stop after a full repeat of M.1 – work M.2 with 1 edge st on each side mid front. At the same time when piece measures 22 (21-22) cm / 8¾"-8¼"-8¾" work next row as follows: 44 (47-50) sts front piece, bind off 4 sts for armhole, 87 (93-99) sts back piece, bind off 4 sts for armhole, 44 (47-50) sts front piece. Complete each piece separately. Front piece: = 44 (47-50) sts. Work 2 outermost sts towards armhole in garter st. Continuing bind off for armhole on every other row 2 sts 2 (2-3) times, 1 st 1 (3-3) time = 39 (40-41) sts. When piece measures 29 (29-31) cm bind off for neck on every other row: 4 (4-5) sts 1 times, 3 sts 2 times, 2 sts 1 times, 1 st 5 times and then on every 4th row: 1 st 2 times. At the same time when piece measures 42 (42-44) cm bind off for shoulders from armhole towards neckline on every other row: 5 (6-6) sts 1 time, 5 (5-5) sts 3 times. After bind off at neckline and shoulder is finished bind off remaining sts. Piece measures approx 45 (45-47) cm / 17¾"-17¾"-18½". Back piece: = 87 (93-99) sts. Continuing bind off for armhole like front piece = 77 (79-81) sts. When piece measures 42 (42-44) cm bind off for shoulder from armhole at neckline on every other row: 5 (6-6) sts 1 times, 5 (5-5) sts 3 times. At the same time when piece measures 43 (43-45) cm bind off middle 33 (33-35) sts for neck and work each side separately. Bind off 2 sts to shape the neckline on next row. After dec for neckline and shoulder bind off remaining sts. Piece measures approx 45 (45-47) cm / 17¾"-17¾"-18½". Assembly: Sew shoulder seam. Pick up approx 66-72 sts along left front piece on circular needle size 2.5 mm / US 1.5 with gray and work 2.5 cm/1" seed stitch back and forth on needle, bind off. Repeat along right front piece, but after 1 cm / ½" work 5 buttonholes evenly on row - 1 buttonhole = bind off 2 sts and cast on 2 new sts over bound off sts on next row. Pick up approx 126-130 sts round neckline on double pointed needles size 2.5 mm / US 1.5 with gray and K2 rows back and forth on needle, bind off. Now crochet an edge along bottom edge of body and around neckline with white and crochet hook size 3.5 mm/E/4as follows: 1 sc, * ch 3, 1 dc in first ch, skip 2 sts and crochet 1 sc in next st *, repeat from *-*. Continuing, crochet a row of sc (approx 95 sc) with gray and crochet hook size 3.5 mm/E/4 around armholes change to white and crochet an edge like bottom edge of body and neck. Sew in buttons. |
|||||||||||||
Diagram explanations |
|||||||||||||
|
|||||||||||||
 |
|||||||||||||
Have you finished this pattern?Tag your pictures with #dropspattern or submit them to the #dropsfan gallery. Do you need help with this pattern?You'll find 23 tutorial videos, a Comments/Questions area and more by visiting the pattern on garnstudio.com. © 1982-2026 DROPS Design A/S. We reserve all rights. This document, including all its sub-sections, has copyrights. Read more about what you can do with our patterns at the bottom of each pattern on our site. |
|||||||||||||


With over 40 years in knitting and crochet design, DROPS Design offers one of the most extensive collections of free patterns on the internet - translated to 17 languages. As of today we count 324 catalogs and 12290 patterns - 12280 of which are translated into English (US/in).
We work hard to bring you the best knitting and crochet have to offer, inspiration and advice as well as great quality yarns at incredible prices! Would you like to use our patterns for other than personal use? You can read what you are allowed to do in the Copyright text at the bottom of all our patterns. Happy crafting!
Post a comment to pattern DROPS 46-8
We would love to hear what you have to say about this pattern!
If you want to leave a question, please make sure you select the correct category in the form below, to speed up the answering process. Required fields are marked *.