
Popular categories
Looking for a yarn?


Comments / Questions (30)
![]() Juanita wrote:
Juanita wrote:
Hola, quiero dar gracias porque he tejido esta boina y me ha quedado estupendamente . El patrón es clarísimo y fácil de interpretar . La he tejido pra mi hija y ella esta contentísima, además es un modelo precioso. Un saludo desde Chile .
29.05.2023 - 05:00
![]() Bérengère M wrote:
Bérengère M wrote:
Bonjour, Ce modèle est très joli. Par contre, je rejoins les commentaires précédents où il est indiqué que les explications sont très légères ! Je vois qu'au premier il faut déjà faire des jetés, donc à la fin du rang, on a bien 14m ? Merci d'avance
10.12.2022 - 19:14DROPS Design answered:
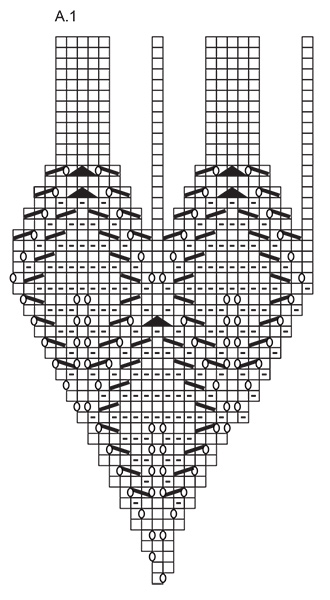
Bonjour Bérengère, tout à fait, on tricote 7 fois A.1 tout le tour, et au 1er tour, on répète (1 m end, 1 jeté) x 7 = on a 14 m à la fin du 1er tour. Vous trouverez quelques explications complémentaires sur les diagrammes ici, peut-être qu'elles vous aideront. Bon tricot!
12.12.2022 - 10:33
![]() Belinda wrote:
Belinda wrote:
Ik snap de start niet. Begin je gewoon met 7 steken op te zetten ? Moet je het telpatroon onderaan beginnen en dan 7 x na elkaar?
26.11.2022 - 11:30DROPS Design answered:
Dag Belinda,
Klopt, je begint met 7 steken en je breit vanuit het midden naar buiten toe. Je begint inderdaad onderaan het telpatroon en je leest het telpatroon van rechts naar links en inderdaad 7 herhalingen in de breedte van het patroon.
27.11.2022 - 14:03
![]() Dea wrote:
Dea wrote:
Buonasera, l'ho realizzato ed ho usato solo 100 gr di filato. Non credo di avere la mano larga, quindi fate ricontrollare se veramente è giusto il quantitativo.
29.09.2022 - 22:09DROPS Design answered:
Buonasera Dea, abbiamo inoltrato la sua segnalazione al settore design: se ci dovessero essere delle correzioni le troverà direttamente online. Buon lavoro!
01.10.2022 - 22:25
![]() Annette Petersen wrote:
Annette Petersen wrote:
Når man næsten er færdig med diagram er der lodrette stolper med blankt hvidt imellem. Hvordan skal det forstås og hvad skal man strikke her
17.09.2022 - 18:12DROPS Design answered:
Hei Annette. Fra 1. omgang til 27. omgang øker man masker hver gang man strikker diagram A.1. Når omgang 28 til 33 strikker er maskeantallet det sammen, men når man strikker fra omgang 34 begynner man å minke maske antallet og disse maskene blir borte (hvite felt i diagrammet / hcite felt mellom de loddrette stolpene). Så når du skal strikke f.eks 43. omgang, strikkes A.1 slik: 1 rett + 5 rett + 1 rett + 5 rett (og dette strikkes 7 ganger). mvh DROPS Design
19.09.2022 - 12:55
![]() Sara wrote:
Sara wrote:
Buongiorno, bellissimo modello! Come devo considerare e quindi come posso lavorare tutti gli spazi bianchi tra i quadrati delle ultime righe dello schema A.1? Ho guardato anche la vostra guida sul come leggere uno schema ma non ho trovato alcuna risposta. Grazie mille
18.08.2022 - 16:40DROPS Design answered:
Buonasera Sara, nelle ultime righe del diagramma A.1 rimangono solo le maglie indicate dai quadrati bianchi perchè le altre maglie sono state diminuite nelle righe precedenti. Buon lavoro!
18.08.2022 - 19:37
![]() Anne-Helene wrote:
Anne-Helene wrote:
Har strikket mye i mitt liv, men nå står jeg helt fast. Har lagt opp 7 masker, skal det da økes til 7 rapporter av hvor, mange masker (5+1)? Hvordan gjør man det? Føler at det mangler noe i begynnelsen av oppskriften. Mønsteret er greit nok, men hvordan man kommer fra 7 til 84 masker skjønner jeg ikke.
06.03.2022 - 19:01DROPS Design answered:
Hei Anne-Helene, Første omgang strikker du 1 rett, 1 kast i hver maske (7 rapporter av A.1). Andre omgang er rett, tredje omgang er 2 rett, 1 kast x 7, osv. Følger du A.1 oppover og strikker alle økningene får du 84 masker på slutten av A.1, enda flere på bredeste punktet. Håper dette hjelper og god fornøyelse!.
07.03.2022 - 07:01
![]() Sylvie wrote:
Sylvie wrote:
J'avais très envie de faire ce béret mais il n'y a pas assez d'explications pour que j'y arrive. Y a t'il un tuto vidéo de disponible ? Par avance merci
24.02.2022 - 08:03DROPS Design answered:
Bonjour Sylvie, je suis désolée, nous n'avons pas de vidéo spécifique à ce modèle, lisez-bien la légende des symboles et tricotez tous les tours en lisant le diagramme de droite à gauche - (voir aussi cette leçon sur les diagrammes. Consultez nos vidéos pour toute aide supplémentaire à propos des techniques utilisées et n'hésitez pas à poser votre question ici. Bon tricot!
24.02.2022 - 10:45
![]() Rita Børjesson wrote:
Rita Børjesson wrote:
Jeg har aldri før strikket en vanskeligere oppskrift. Forsøkt både ovenfra og nedenfra på mønsteret,men får det ikke til.
09.02.2022 - 21:37
![]() Melissa wrote:
Melissa wrote:
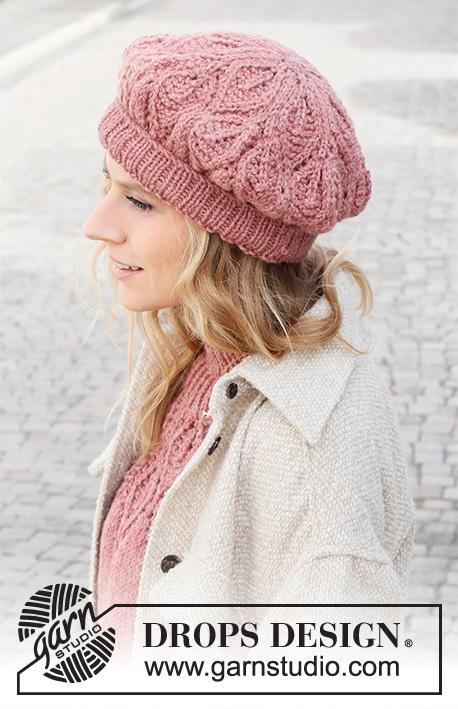
In the photo with the model, it appears the rib band of the hat is folded over. Is this the case? If so does the length of the band need to be doubled for this look? Thanks for your reply.
03.12.2021 - 09:39DROPS Design answered:
Dear Melissa, correct, the rib band is folded over and is hiding the last rounds stocking stitch in A.1 - so that ribbing edge should be 4 cm as written. Happy knitting!
03.12.2021 - 13:29
|
|||||||||||||||||||
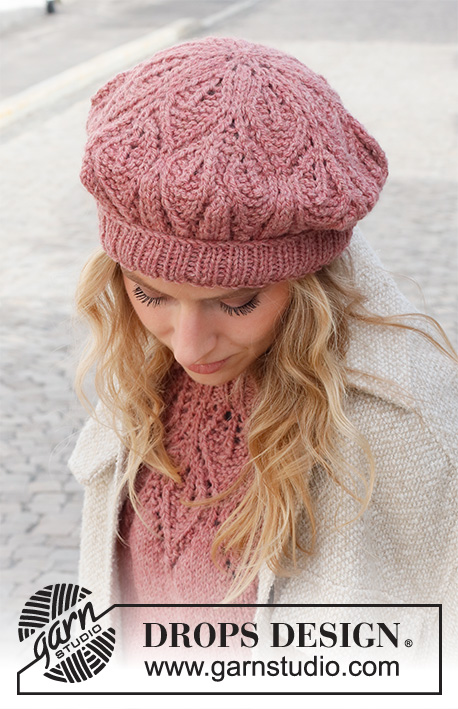
Posh Petals#poshpetalshat |
|||||||||||||||||||
 |
 |
||||||||||||||||||
Knitted beret in DROPS Nepal. The piece is worked with leaf pattern. Size: one-size.
DROPS 225-14 |
|||||||||||||||||||
|
------------------------------------------------------- EXPLANATIONS FOR THE PATTERN: ------------------------------------------------------- PATTERN: See diagram A.1. SHAPING: Make the beret wet and press out any excess moisture. Place the beret over a plate of approx. the same diameter as the hat. Place the plate on a glass so the beret is not touching the surface. Allow the beret to dry and carefully remove from the plate. Repeat after each wash. ------------------------------------------------------- START THE PIECE HERE: ------------------------------------------------------- BERET – SHORT OVERVIEW OF THE PIECE: The piece is worked in the round with double pointed needles/circular needle, top down. Stitches are increased and decreased as shown in the diagram. BERET: Cast on 7 stitches with double pointed needles size 5 MM = US 8 and DROPS Nepal. Work according to A.1 (= 7 repeats in width). REMEMBER THE KNITTING GAUGE! Change to circular needle size 5 MM = US 8 when you have enough stitches. When A.1 has been completed there are 84 stitches. Change to circular needle size 4 MM = US 6. Work rib (knit 1, purl 2) for 4 cm = 1½". Bind off with knit over knit and purl over purl. Close the hole at the top of the beret and fasten the strand well. Read SHAPING. |
|||||||||||||||||||
Diagram explanations |
|||||||||||||||||||
|
|||||||||||||||||||
 |
|||||||||||||||||||
Have you finished this pattern?Tag your pictures with #dropspattern #poshpetalshat or submit them to the #dropsfan gallery. Do you need help with this pattern?You'll find 17 tutorial videos, a Comments/Questions area and more by visiting the pattern on garnstudio.com. © 1982-2026 DROPS Design A/S. We reserve all rights. This document, including all its sub-sections, has copyrights. Read more about what you can do with our patterns at the bottom of each pattern on our site. |
|||||||||||||||||||


With over 40 years in knitting and crochet design, DROPS Design offers one of the most extensive collections of free patterns on the internet - translated to 17 languages. As of today we count 325 catalogs and 12291 patterns - 12281 of which are translated into English (US/in).
We work hard to bring you the best knitting and crochet have to offer, inspiration and advice as well as great quality yarns at incredible prices! Would you like to use our patterns for other than personal use? You can read what you are allowed to do in the Copyright text at the bottom of all our patterns. Happy crafting!
Post a comment to pattern DROPS 225-14
We would love to hear what you have to say about this pattern!
If you want to leave a question, please make sure you select the correct category in the form below, to speed up the answering process. Required fields are marked *.