DROPS Nepal
DROPS Nepal
65% Wool, 35% Alpaca
from 3.30 $ /50g
Get the yarn to make this pattern from 36.30$.

The yarn cost is calculated from the pattern’s smallest size and the yarn’s cheapest product type. Looking for an even better price? You might find it on the DROPS Deals!

DROPS SS24

Autumn Wreath

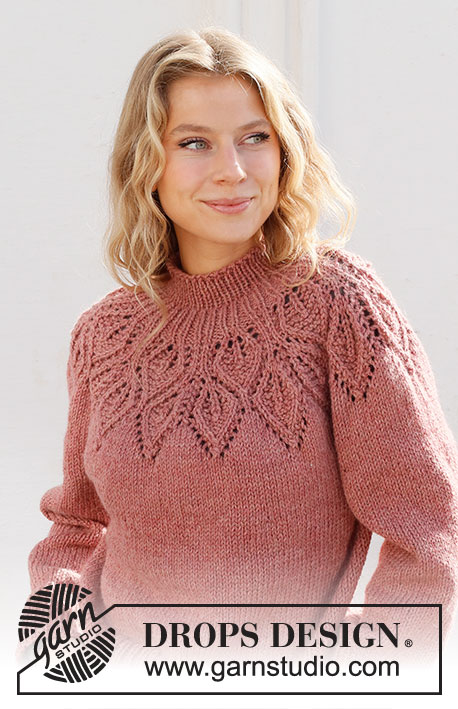
Knitted sweater in DROPS Nepal. The piece is worked top down, with round yoke and leaf pattern. Sizes S - XXXL.

DROPS 228-1
DROPS Design: Pattern no ne-348
Yarn group C or A + A
-------------------------------------------------------

SIZES:
S - M - L - XL - XXL – XXXL

Finished measurements:
Chest measurements: 86-94-102-112-134-138 cm = 33⅞"-37"-40"-44"-52¾"-54¼"
Full length: 56-58-60-62-64-66 cm = 22"-22¾"-23⅝"-24⅜"-25¼"-26"
All measurements in charts are in cm.

MATERIALS:
DROPS NEPAL from Garnstudio (belongs to yarn group C)
550-600-650-700-800-850 g color 8912, blush

NEEDLES:
DROPS CIRCULAR NEEDLE SIZE 5.5 MM = US 9: Length 40 cm = 16" and 60-60-60-80-80-80 cm = 24"-24"-24"-32"-32"-32".
DROPS CIRCULAR NEEDLE SIZE 4.5 MM = US 7: Length 40 cm = 16" and 80 cm = 32".
DROPS DOUBLE POINTED NEEDLES SIZE 5.5 MM = US 9.
DROPS DOUBLE POINTED NEEDLES SIZE 4.5 MM = US 7.
The technique MAGIC LOOP can be used – you then only need circular needle of 80 cm = 32" in each size.

KNITTING GAUGE:
16 stitches in width and 20 rows in height with stockinette stitch and pattern = 10 x 10 cm = 4" x 4".
NOTE: Needle size is only a guide. If you get too many stitches on 10 cm = 4", change to a larger needle size. If you get too few stitches on 10 cm = 4", change to a smaller needle size.

-------------------------------------------------------

Alternative Yarn – See how to change yarns here
Yarn Groups A to F – Use the same pattern and change the yarn here
Yarn usage using an alternative yarn – Use our yarn converter here

-------------------------------------------------------

DROPS Nepal
DROPS Nepal
65% Wool, 35% Alpaca
from 3.30 $ /50g
Get the yarn to make this pattern from 36.30$.

The yarn cost is calculated from the pattern’s smallest size and the yarn’s cheapest product type. Looking for an even better price? You might find it on the DROPS Deals!

Pattern instructions

NOTE: This pattern is written in American English. All measurements in charts are in cm. For conversion from inches to cm - click here. There are different terms for crocheting in American and British English. If this pattern includes crochet, click for "crochet terms" here. For this pattern in British English, please click here.
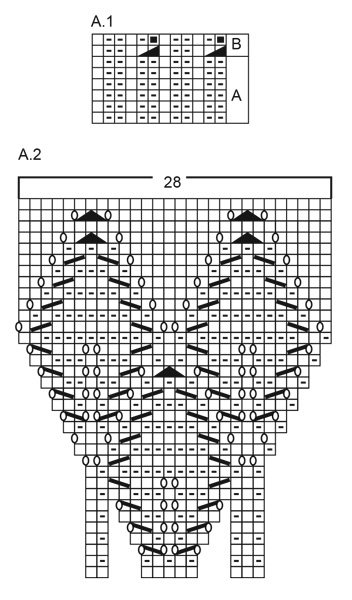
EXPLANATIONS FOR THE PATTERN:

-------------------------------------------------------

PATTERN:
See diagrams A.1 and A.2.

INCREASE TIP (evenly spaced):
To work out how to increase evenly, count the total number of stitches on the needle (e.g. 64 stitches) and divide by the number of increases to be made (e.g. 20) = 3.2.
In this example, increase by making 1 yarn over after approx. each 3rd stitch.


DECREASE TIP (for sleeves):
Decrease 1 stitch on either side of the marker thread as follows: Work until there are 3 stitches left before the marker thread, knit 2 together, knit 2 (marker thread sits between these 2 stitches), slip 1 stitch as if to knit, knit 1 and pass the slipped stitch over the knitted stitch (2 stitches decreased).

BINDING-OFF TIP:
To avoid the bind-off edge being tight you can bind off with a larger size needle. If the edge is still tight, make 1 yarn over after approx. each 6th stitch at the same time as binding off; the yarn overs are bind off as normal stitches.
-------------------------------------------------------

START THE PIECE HERE:

-------------------------------------------------------

SWEATER – SHORT OVERVIEW OF THE PIECE:
The neck and yoke are worked in the round with circular needle, from mid back and top down. The yoke is divided for body and sleeves and the body is continued in the round with circular needle. The sleeves are worked in the round with double pointed needles/short circular needle, top down.

NECK:
Cast on 64-68-72-76-80-84 stitches with short circular needle size 4.5 MM = US 7 and DROPS Nepal. Knit 1 round, then work rib (knit 1, purl 1) for 4 cm = 1½". Knit 1 round where you increase 20-28-24-32-28-36 stitches evenly spaced – read INCREASE TIP = 84-96-96-108-108-120 stitches. Insert 1 marker in the round; the yoke is measured from this marker.

YOKE:
Work A.1A over all stitches (= 7-8-8-9-9-10 repeats of 12 stitches) for 4 cm = 1½", then work A.1B (= 2 rounds). There are now 70-80-80-90-90-100 stitches. Change to circular needle size 5.5 MM = US 9.

Now work A.2 over A.1 (= 7-8-8-9-9-10 repeats of 10 stitches). REMEMBER THE KNITTING GAUGE!
When A.2 has been completed in height there are 196-224-224-252-252-280 stitches and the piece measures approx. 20 cm = 8" from the marker. Knit 1 round where you increase 18-11-27-27-47-42 stitches evenly spaced = 214-235-251-279-299-322 stitches.

Continue with stockinette stitch until the piece measures 22-22-23-25-27-29 cm = 8¾"-8¾"-9"-9¾"-10⅝"-11⅜".
Now divide for the body and sleeves on the next round as follows:
Work the first 30-33-35-39-43-48 stitches (= half back piece), place the next 46-50-54-60-62-64 stitches on a thread for the sleeve, cast on 8-8-10-10-12-12 stitches (= in side under sleeve), work the next 62-69-73-81-89-98 stitches (= front piece), place the next 46-50-54-60-62-64 stitches on a thread for the sleeve, cast on 8-8-10-10-12-12 stitches (= in side under sleeve), work the last 30-33-35-39-43-48 stitches (= half back piece). The body and sleeves are finished separately. THE PIECE IS NOW MEASURED FROM HERE.

BODY:
= 138-151-163-179-199-218 stitches. Continue with stockinette stitch in the round until the piece measures 20-22-23-23-23-23 cm = 8"-8¾"-9"-9"-9"-9". There is approx. 10 cm = 4" left to finished length; try the sweater on and work to desired length.
To avoid the following rib being tight, knit 1 round where you increase 24-26-29-31-35-37 stitches evenly spaced = 162-177-192-210-234-255 stitches.
Change to circular needle size 4.5 MM = US 7 and work rib (knit 1, purl 2) for 10 cm = 4". Bind off with knit over knit and purl over purl - read BINDING-OFF TIP. The sweater measures approx. 56-58-60-62-64-66 cm = 22"-22¾"-23⅝"-24⅜"-25¼"-26" from the shoulder down.

SLEEVES:
Place the 46-50-54-60-62-64 stitches from the thread on the one side of the piece on double pointed needles/short circular needle size 5.5 MM = US 9 and knit up 1 stitch in each of the 8-8-10-10-12-12 stitches cast on under the sleeve = 54-58-64-70-74-76 stitches. Insert a marker thread in the middle of the new stitches under the sleeve and start the round at the marker thread. Work stockinette stitch in the round for 4 cm = 1½" then decrease 1 stitch on each side of the marker thread – read DECREASE TIP. Decrease like this every 3½-3-2-1½-1½-1 cm = 1¼"-1⅛"-¾"-½"-½"-⅜" a total of 8-9-11-13-15-15 times = 38-40-42-44-44-46 stitches.
Continue with stockinette stitch until the sleeve measures 31-30-30-28-26-24 cm = 12¼"-11¾"-11¾"-11"-10¼"-9½". NOTE: Shorter measurements in larger sizes due to wider neck and longer yoke. Increase 4-5-6-7-7-8 stitches evenly spaced = 42-45-48-51-51-54 stitches.
Change to double pointed needles size 4.5 MM = US 7 and work rib (knit 1, purl 2) for 10 cm = 4".
Bind off with knit over knit and purl over purl - remember BINDING-OFF TIP. The sleeve measures approx. 41-40-40-38-36-34 cm = 16⅛"-15¾"-15¾"-15"-14¼"-13⅜" from the division.
Work the other sleeve in the same way.

This pattern has been corrected.

Updated online: 20.09.2021
New diagram A.2
Updated online: 08.10.2021
Correction diagram A.2

Diagram

All measurements in charts are in cm.

symbols = knit
symbols = purl
symbols = purl 2 together
symbols = between 2 stitches make 1 yarn over; on the next round purl/knit the yarn over (as shown in diagram) to leave a hole
symbols = knit 2 together
symbols = slip 1 stitch as if to knit, knit 1 and pass the slipped stitch over the knitted stitch
symbols = slip 1 stitch as if to knit, knit 2 together and pass the slipped stitch over the knitted together stitches
symbols = this square has no stitch as it was decreased earlier; go straight to next square
diagram
diagram

Each of our patterns has specific tutorial videos to help you.

Do you have a question? See a list of frequently asked questions (FAQ)

Knitting tension is what determines the final measurements of your work, and is usually measured per 10 x 10 cm. It is provided like so: number of stitches in width x number of rows in height - eg: 19 stitches x 26 rows = 10 x 10 cm.

The knitting tension is very individual; some people knit/crochet loosely while others work tightly. You adjust the knitting tension with the needle size, which is why the suggested needle size only serve as a guide! You need to adjust this (up or down) to ensure that YOUR knitting tension matches the knitting tension provided in the pattern. If you work with a different knitting tension than provided you will have a different yarn consumption, and your work will have different measurements than what the pattern suggests.

The knitting tension also determines which yarns can replace each other. As long as you achieve the same knitting tension you can replace one yarn with another.

See DROPS lesson: How to measure your tension/gauge

See DROPS video: How to make a gauge tension swatch

The required amount of yarn is provided in grams, eg: 450 g. To calculate how many balls you’ll need you first need to know how many grams are in 1 ball (25g, 50g or 100g). This information is available if you click on the individual yarn quality on our pages. Divide the amount required with the amount of each ball. For example, if each ball is 50g (the most common amount), the calculation will be as follows: 450 / 50 = 9 balls.

The important thing when changing from one yarn to another is that the knitting/crochet tension remains the same. This is so that the measurements of the finished piece will be the same as on the sketch provided. It is easier to achieve the same knitting tension using yarns from the same yarn group. It is also possible to work with multiple strands of a thinner yarn to achieve the knitting tension of a thicker one. Please try our yarn converter. We recommend you to always work a test swatch.

Please NOTE: when changing yarn the garment might have a different look and feel to the garment in the photo, due to individual properties and qualities of each yarn.

See DROPS lesson: Can I use a different yarn than the one mentioned in the pattern?

All our yarns are categorised into yarn groups (from A to F) according to thickness and knitting tension – group A contains the thinnest yarns and group F the thickest. This makes it easier for you to find alternative yarns to our patterns, should you wish to switch yarn. All yarns within the same group have a similar knitting tension and can easily replace each other. However, different yarn qualities have different structures and properties which will give the finished work a unique look and feel.

Click here for an overview of the yarns in each yarn group

At the top of all our patterns you’ll find a link to our yarn converter, which is a helpful tool should you wish to use a different yarn than suggested. By filling in the yarn quality you wish to replace, the amount (in your size) and number of strands, the converter will present good alternative yarns with the same knitting tension. Additionally it will tell you how much you’ll require in the new qualities and whether you’ll need to work with multiple strands. Most skeins are 50g (some are 25g or 100g).

If the pattern is worked with multiple colours, every colour will have to be converted separately. Similarly, if the pattern is worked with several strands of different yarns (for example 1 strand Alpaca and 1 strand Kid-Silk) you will have to find alternatives for each, individually.

Click here to see our yarn converter

Since different yarns have different qualities and textures we have chosen to keep the original yarn in our patterns. However, you can easily find options among our available qualities by using our yarn converter, or simply pick a yarn from the same yarn group.

It is possible that some retailers still have discontinued yarns in stock, or that someone has a few skeins at home that they would like to find patterns for.

The yarn converter will provide both alternative yarn as well as required amount in the new quality.

If you think it's hard to decide what size to make, it can be a good idea to measure a garment you own already and like the size of. Then you can pick the size by comparing those measures with the ones available in the pattern's size chart.

You'll find the size chart at the bottom of the pattern.

See DROPS lesson: How to read size chart

The needle size provided in the pattern serves only as a guide, the important thing is to follow the knitting tension. And since knitting tension is very individual, you will have to adjust the needle size to ensure that YOUR tension is the same as in the pattern – maybe you’ll have to adjust 1, or even 2 needle sizes, up or down to achieve the correct tension. For this, we recommend that you work test swatches.

Should you work with a different knitting tension than the one provided, the measurements of the finished garment might deviate from the measurement sketch.

See DROPS lesson: How to measure your tension/gauge

See DROPS video: How to make a gauge tension swatch

Working a garment top-down provides more flexibility and room for personal adjustment. For example it is easier to try the garment on while working, as well as making adjustments to length of yoke and shoulder caps.

The instructions are carefully explaining every step, in the correct order. Diagrams are adjusted to the knitting direction and are worked as usual.

The diagram depicts all rows/rounds, and every stitch seen from the right side. It is read from bottom to top, from right to left. 1 square = 1 stitch.

When working back and forth, every other row is worked from the right side and every other row is worked from the wrong side. When working from the wrong side, the diagram will have to be worked reversed: from left to right, knit stitches are purled, purl stitches are knit etc.

When working in the round every round is worked from the right side and the diagram are worked from right to left on all rounds.

See DROPS lesson: How to read knitting diagrams

The diagram depicts all rows/rounds, and every stitch seen from the right side. It is worked from bottom to top, from right to left.

When working back and forth every other row is worked from the right side: from right to left and every other row is worked from the wrong side: from left to right.

When working in the round, every row in the diagram are worked from the right side, from right to left.

When working a circular diagram you start in the middle and work your way outwards, counter clockwise, row by row.

The rows usually start with a given number of chain stitches (equivalent to the height of the following stitch), this will either be depicted in the diagram or explained in the pattern.

See DROPS lesson: How to read crochet diagrams

Instructions for working several diagrams after each other on the same row/round, will often be written like so: “work A.1, A.2, A.3 a total of 0-0-2-3-4 times". This means you work A.1 once, then A.2 is worked once, and A.3 is repeated (in width) the number of times provided for your size – in this case like so: S = 0 times, M = 0 times, L=2 times, XL= 3 times and XXL = 4 times.

The diagrams are worked as usual: begin with the first row in A.1, then work the first row in A.2 etc.

See DROPS lesson: How to read knitting diagrams

See DROPS lesson: How to read crochet diagrams

The total width of the garment (from wrist-to-wrist) will be larger in the larger sizes, despite the actual sleeves being shorter. The larger sizes have longer sleeve caps and wider shoulders, so there will be a good fit in all sizes.

The measurement sketch/schematic drawing provides information regarding the full length of the garment. If it’s a jumper or a jacket the length is measured from the highest point on the shoulder (usually closest to the neckline), and straight down to the bottom of the garment. It is NOT measured from the tip of shoulder. Similarly, the length of yoke is measured from the highest point on the shoulder and down to where yoke is split into body and sleeves.

See DROPS lesson: How to read a schematic drawing

Diagrams are often repeated on the round or in height. 1 repeat is the diagram the way it appears in the pattern. If it says to work 5 repeats of A.1 in the round, then you work A.1 a total of 5 times after/next to each other in the round. If it says to work 2 repeats of A.1 vertically/in height you work the entire diagram once, then begin again at the start and work the entire diagram one more time.

Chain stitches are slightly narrower than other stitches and to avoid working the cast-on edge too tight, we simply chain more stitches to begin with. The stitch count will be adjusted on the following row to fit the pattern and measurement sketch.

The rib edge is more elastic and will contract slightly compared to, for example, stocking stitch. By increasing before the rib edge, you avoid a visible difference in width between the rib edge and the rest of the body.

It’s very easy to cast off too tightly, and by making yarn overs while casting off (and simultaneously casting these off) you avoid a too tight cast off edge.

See DROPS video: How to bind off with yarn overs (yo)

To achieve an even increase (or decrease) you can increase on, for example: every 3rd and 4th row alternately, like so: work 2 rows and increase on the 3rd row, work 3 rows and increase on the 4th. Repeat this until the increase is complete.

See DROPS lesson: Increase or decrease 1 st on every 3rd and 4th row alternately

Should you prefer to work in the round instead of back and forth, you may of course adjust the pattern. You’ll need to add steeks mid-front (usually 5 stitches), and follow the instructions. When you would normally turn and work from the wrong side, simply work across the steek and continue in the round. At the end you’ll cut the piece open, pick up stitches to work bands, and cover the cut edges.

See DROPS video: How to knit steeks and cut open

Should you prefer to work back and forth instead of in the round, you may of course adjust the pattern so you work the pieces separately and then assemble them at the end. Divide the stitches for the body in 2, add 1 edge stitch in each side (for sewing) and work the front and back pieces separately.

See DROPS lesson: Can I adapt a pattern for circular needles into straight needles?

Pattern repeats can vary slightly in the different sizes, in order to get the correct proportions. If you’re not working the exact same size as the garment in the photo, yours might deviate slightly. This has been carefully developed and adjusted so that the complete impression of the garment is the same in all sizes.

Make sure to follow instructions and diagrams for your size!

If you have found a pattern you like which is available in women’s size it’s not very difficult to convert it to men’s size. The biggest difference will be the length of sleeves and body. Start working on the women size that you think would fit across the chest. The additional length will be worked right before you cast off for the armhole/sleeve cap. If the pattern is worked top-down you can add the length right after the armhole or before the first decrease on sleeve.

Regarding additional yarn amount, this will depend on how much length you add, but it is better with a skein too many than too few.

All yarns will have excess fibres (from production) that might come off as lint or shedding. Brushed yarns (ie hairier yarns) have more of these loose, excess fibres, causing more shedding.

Shedding also depends on what is worn under or over the garment, and whether this pulls at the yarn fibres. It’s therefore not possible to guarantee that there will be no shedding

Below are some tips on how to get the best result when working with hairier yarns:

1. When the garment is finished (before you wash it) shake it vigorously so the looser hairs come off. NOTE: do NOT use a lint roller, brush or any method that pulls at the yarn.

2. Place the garment in a plastic bag and put it in your freezer - the temperature will cause the fibres to become less attached to each other, and excess fibres will come off easier.

3. Leave in the freezer for a few hours before taking it out and shaking it again.

4. Wash the garment according to the instructions on the yarn label.

Pilling is a natural process that happens to even the most exclusive of fibers. It's a natural sign of wear and tear that is hard to avoid, and that is most visible in high friction areas of your garment like a sweater's arms and cuffs.

You can make your garment look as new by removing the pilling, using a fabric comb or a pill/lint remover.

Still can't find the answer you need? Then scroll down and leave your question so one of our experts can try to help you. This will be done normally within 5 to 10 working days.
In the meantime, you can read the questions and answers that others have left to this pattern or join the DROPS Workshop on Facebook to get help from fellow knitters/crocheters!

You might also like...

Autumn Wreath

Angelika, Poland

Autumn Wreath

Marcelina, Poland

Autumn Wreath

Agnieszka - Agnes_strikk, Norway

Autumn Wreath

Edyta, Poland

Autumn Wreath

Coby, Netherlands

Autumn Wreath

Claudia, Canada

Autumn Wreath

Jonnaja, Canada

Autumn Wreath

Annimoure, Sweden

Post a comment to pattern DROPS 228-1

We would love to hear what you have to say about this pattern!

If you want to leave a question, please make sure you select the correct category in the form below, to speed up the answering process. Required fields are marked *.

Comments / Questions (78)

country flag Brunhilde wrote:

I am battling with row 15 to 17 on pattern A2 - please could you email me the correct diagram, as mention red on the instructions

22.03.2024 - 19:00

DROPS Design answered:

Dear Brunhilde, the diagrams were corrected, the correct diagram is now on the page, below the instructions. Happy Knitting!

23.03.2024 - 22:58

country flag BIRGITTE wrote:

Hvorfor er nogle farver væsentligt tykkere end andre? Lige nu har jeg en koksgrå Nepal som sagtens kunne strikkes på pind 4 og så har jeg en lysegul Nepal som burde strikkes på pind 6. Hvorfor???

13.03.2024 - 16:41

DROPS Design answered:

Hej Birgitte, det skal de ikke være. Alle DROPS Nepal farver skal være nogenlunde lige tykke +/- 5% . Tag kontakt med din butik hvor du har købt garnet, hvis der er noget galt med garnet.

19.03.2024 - 11:30

country flag Sophia wrote:

Jeg er lidt ny inden for strik, så bær over med mig :) Når man skal lave strikkeprøve står der "glatstrik og mønsterstrik". Hvad er det for et mønster man skal følge? Et af diagrammerne? Kh Sophia

13.03.2024 - 08:56

DROPS Design answered:

Hei Sophia. Her er det diagram A.2 som er mønseret (mønsterstrikk) på denne genseren og i A.2 strikkes det både mønster og glattstrikk. mvh DROPS Design

18.03.2024 - 14:00

country flag Amel wrote:

Bonjour est ce que on peut tricoter les manches en aller retour ? Merci

23.12.2023 - 11:13

DROPS Design answered:

Bonjour Mme Amel, tout à fait, il vous suffit de monter les mailles sous les manches au lieu de les relever, montez 1 maille lisière en plus de chaque côté pour la couture (cf cette leçon), ou bien tricotez en rond, en magic loop pour ne pas avoir à utiliser les aiguilles doubles pointes (si c'est le souci). Bon tricot!

02.01.2024 - 07:52

country flag Ulla Skovby Hansen wrote:

Hejsa i første udtagning efter rib i halsen hvordan strikkes de ? Slå om pind og står ikke om de skal strikkes normalt eller drejet for ikke at få hul ? Plus a1a står der i opskrift "strik 4 cm " og forsæt med a1b men læste et svar til en anden at man strikker 6 omgange ? Mvh Ulla

14.11.2023 - 05:28

DROPS Design answered:

Hej Ulla, det er kun en omgang ret hvor du tager ud, og omslagene skal du strikke drejet på næste omgang. Allerede næste omgang begynder du at strikke ifølge diagrammet :)

16.11.2023 - 14:13

country flag Mary Ann Wujastyk wrote:

Would it be possible to add written pattern instructions along with the charts ? I find that in many of the Senior knitting groups I have been visiting many of the seasoned knitter's cannot read Charts due to aging vision problems but can follow and read written pattern instructions. This pattern and many more in your collection was one they mentioned but said they would be unable to do it due to aging vision problems. Thank you for taking the time to read this .

26.08.2023 - 10:18

DROPS Design answered:

Dear Mrs Wujastyk, we only have diagrams for this pattern sorry, maybe you can find anyway to enlarge diagrams to be able to read them better. Your DROPS store might even be able to help further. Thanks for your comprehension. Happy knitting!

28.08.2023 - 13:20

country flag Karin Schwab wrote:

Hallo,\r\nIch habe einen Brustumfang von 89cm -\r\nSoll ich nun Größe S stricken oder hat diese Anleitung eine Weitenzugabe? \r\nFür welche Größe sollte ich mich generell entscheiden wenn von den Maßen nichts passt - die größere oder die kleinere Größe?\r\nVielen Dank für ihre Antwort!

30.07.2023 - 13:15

DROPS Design answered:

Liebe Frau Schwab, am besten messen Sie einen ähnlichen Pullover, den Sie gerne tragen und vergleichen Sie die Maßnahmen, so finden Sie am besten die passende Größe - hier lesen Sie mehr. Viel Spaß beim stricken!

31.07.2023 - 12:00

country flag Amalia wrote:

Hi! I can't understand the diagram A 2 Because circular needles it's different than straight. Can I get the pattern in letters? Better than the drawing? I'm trying to understand the diagram but you put the 2 and 4 row like if was straight not circular... I never do different in that rows...I hope my English will be clear, 😔

28.07.2023 - 02:50

DROPS Design answered:

Dear Amalia, when working in the round you will read each row of the diagram from the right towards the left, each A.2 starts with 8 stitches (there are some "holes" because of the increases that cannot be drawn before since the stitches do not exist at the beg). So just repeat every row starting at the right corner on the bottom and read every row towards the left. Read more about diagrams here. Happy knitting!

28.07.2023 - 07:49

country flag Pauline wrote:

I love the look of this jumper but please would you explain the expression 'work A2 over A1'? Do you mean just proceed to work A2 which starts with a knit row? Regards Pauline

26.07.2023 - 23:02

DROPS Design answered:

Hi Pauline, insert a marker at the beginning of round. Work A.1 (repeat it in the same round as many times as stated in the pattern for your size). 6 rounds in height are done. Then you start from the marker and repeat A.1B as before (2 stitches are decreased in each repetition > each A.1 B has now 10 stitches). Now start the A.2 (actually A2 starts with a knit row) and beginning from the marker, repeat it the same number of times in the round as before. How to read the diagrammes you will find: HERE. Happy knitting!

27.07.2023 - 09:07

country flag Annette wrote:

Hej drops jeg skrev tidligere at jeg ikke kunde finde ud af hvor mange masker der er i mellem gentagelserne på mønsteret 128-1 str lx med 90 masker i en omgang ?Jeg havde ikke fået skrevet str på trøjen ,håber mit spørsmål er nemmer og forstå nu.hilsen Annette

20.06.2023 - 13:54

DROPS Design answered:

Hej Annette, Når du starter med A.1A, så strikker du 2vr, 1r, 2vr, 1r hele vejen rundt i 6 omgange. I A.1B strikker du hver anden 2vr sammen og da stemmer antal masker i hver rapport med de 10 masker som du har når du starter nederst i A.2. Sæt gerne 1 mærke imellem hver rapport, så du let kan se hvor rapporten starter og hvor mange masker du har i hver rapport :)

22.06.2023 - 14:24