
Popular categories
Looking for a yarn?


Comments / Questions (55)
![]() Manja wrote:
Manja wrote:
Die Jacke ist wunderschön. Ich warte gespannt auf die Anleitung!
16.01.2019 - 11:22
![]() Adelaide wrote:
Adelaide wrote:
Estou ansiosa para o poder fazer. Lindíssimo.
08.01.2019 - 01:53
![]() Iris wrote:
Iris wrote:
Love this design, and prefer this cardigan version.
21.12.2018 - 22:49
![]() Rita Reimann wrote:
Rita Reimann wrote:
Gefällt mir sehr gut. Ich werde das Modell nacharbeiten.
16.12.2018 - 15:26
![]() Odette M. Asseler-Griffioen wrote:
Odette M. Asseler-Griffioen wrote:
Such a lovely cardigan.
15.12.2018 - 07:18
|
||||||||||||||||||||||||||||||||||||||||||||||
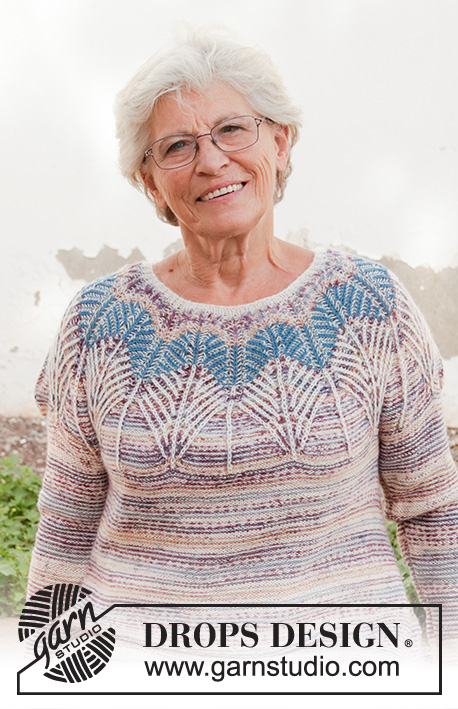
Egyptian Feathers Jacket#egyptianfeathersjacket |
||||||||||||||||||||||||||||||||||||||||||||||
|
|
||||||||||||||||||||||||||||||||||||||||||||||
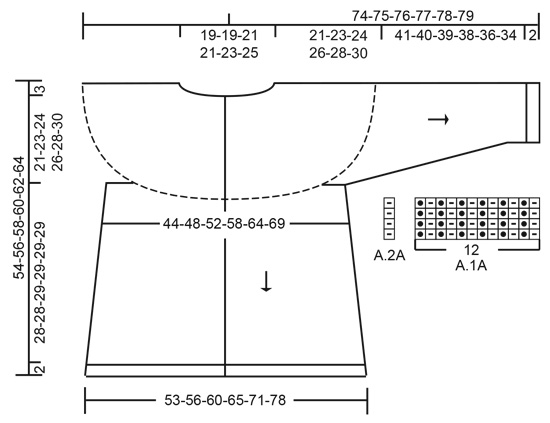
Knitted jacket with round yoke in DROPS Fabel. The piece is worked top down with 2-colored English rib and zigzag stripes. Sizes S - XXXL.
DROPS 201-29 |
||||||||||||||||||||||||||||||||||||||||||||||
|
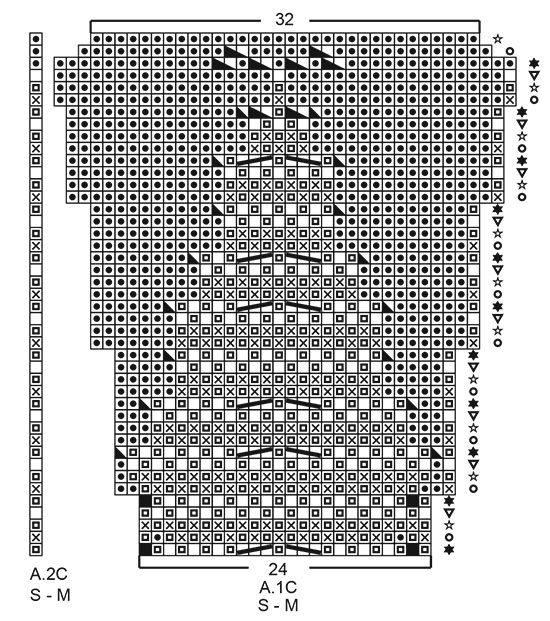
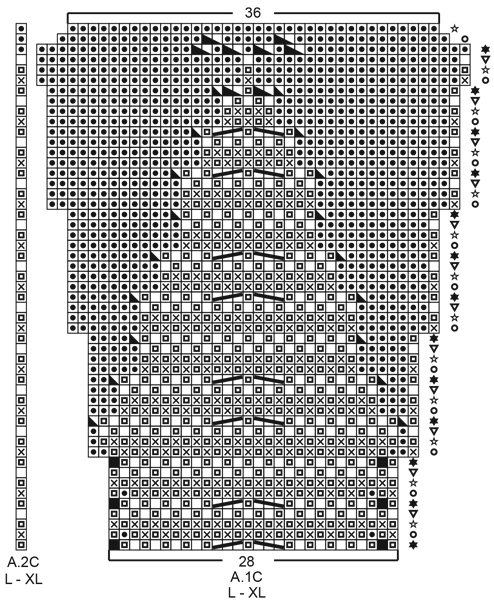
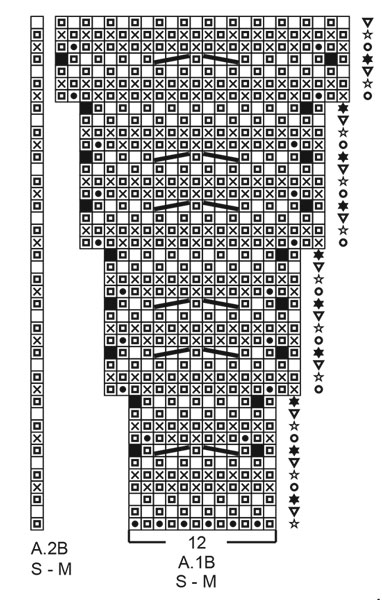
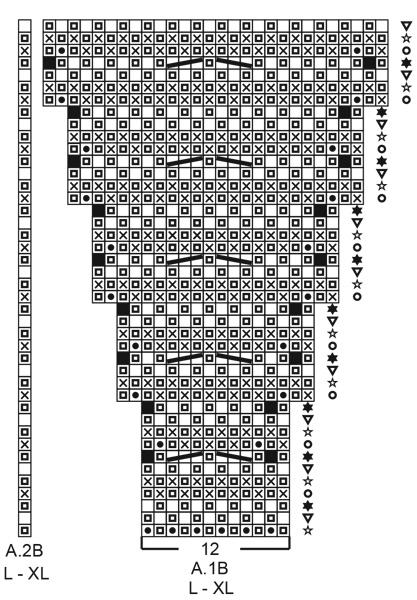
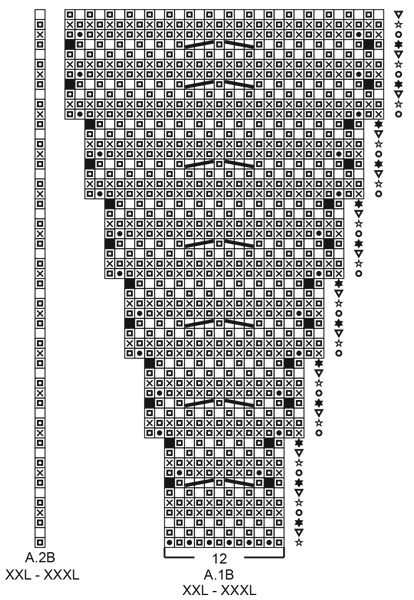
------------------------------------------------------- EXPLANATIONS FOR THE PATTERN: ------------------------------------------------------- RIDGE/GARTER STITCH (worked back and forth): Knit all rows. 1 ridge in height = Knit 2 rows. GARTER STITCH BAND (worked back and forth like this because of English rib pattern): ROW 1 (= from right side): Knit. ROW 2 (= from right side): Purl. ROW 3 (= from wrong side): Purl. ROW 4 (= from wrong side): Knit. PATTERN: See diagrams A.1 and A.2. Choose diagram for your size. First work A.1A/A.2A (= rib on neck). When A.A has been worked 1 time in height work A.1B/A.2B over A.A. When A.B has been worked 1 time in height work A.1C/A.2C over A.B. STRIPES: When working 2-colored English rib, work back and forth with circular needle as follows: Work row 1 from the right side with color-2, push all stitches back to the other end of the circular needle so the next row is also worked from the right side with color-1. Then turn the piece, work 1 row from the wrong side with color-2, push all stitches back to the other end of the circular needle so the next row is also worked from the wrong side with color-1. So you work 2 rows from the right side with different colors and 2 rows from the wrong side with different colors. Work stripes in English rib, i.e. color-1 = used for knitted stitch from right side and color-2 = used for purled stitch from right side. Adjust so that each stripe finishes after 2 rows from the wrong side. STRIPE 1: Color-1 = lavender, color-2 = off white. Work until the piece measures 5 cm = 2" at the shortest point. STRIPE 2: Color-1 = grey blue, color-2 = off white. Work until the piece measures a total of 9 cm = 3½" at the shortest point. STRIPE 3: Color-1 = off white, color-2 = lavender. Work until A.1c and A.2c have been worked 1 time in height. The last row in the diagram is worked with lavender from the right side. Then continue the stripes on yoke and body as follows (bands in garter stitch are worked as before): ROW 1: Purl with off white. ROW 2: Knit with lavender. Push all stitches to other end of circular needle so the next row is also from the wrong side. ROW 3 (= wrong side): Knit with off white. ROW 4 (= right side): Purl with lavender. Push all stitches to other end of circular needle so the next row is also from the right side. Repeat rows 1 to 4. KNITTING TIP-1: If you are in doubt about which color to use on next row, you can see the color used on the previous row by looking at the bands. KNITTING TIP-2: All stitch counts when working English rib are without yarn overs, because the yarn overs belong to the knitted stitches and are therefore counted as 1 stitch (unless otherwise stated). DECREASE TIP (for mid under sleeves): Decrease 1 stitch on each side of the marker thread as follows: Work until there are 3 stitches left before the marker thread, purl 2 together, purl 2 (marker thread sits between these 2 stitches), purl 2 stitches twisted together (2 stitches decreased). INCREASE TIP-1 (evenly spaced): To work out how to increase evenly, count the total number of stitches on the needle (e.g. 331 stitches) minus bands (e.g. 10 stitches) and divide the remaining stitches by the number of increases to be made (e.g. 4) = 80.25. In this example, increase by making 1 yarn over after approx. each 80th stitch. Do not increase on bands. On the next row (wrong side) work the yarn overs twisted to avoid holes. INCREASE TIP-2 (for sides of body): All increases are worked from the right side! Work until there are 2 stitches left before marker thread, 1 yarn over, purl 4 (marker thread sits in middle of these 4 stitches), 1 yarn over (= 2 stitches increased). On the next row (wrong side) knit the yarn overs twisted to avoid holes. Then purl the new stitches from the right side and knit from the wrong side. BUTTONHOLES: Work buttonholes on right band (when garment is worn). Work from the right side when there are 3 stitches left on row as follows: Make 1 yarn over, work 2 together and work the last stitch. On the next row (wrong side) work the yarn over normally to leave a hole. The first buttonhole is worked when the neck measures 1½-2 cm = ½"-¾". Then work the other 5-5-6-6-6-6 buttonholes with approx. 9-9-8-8-8½-9 cm = 3½"-3½"-3⅛"-3⅛"-3¼"-3½" between each one. ------------------------------------------------------- START THE PIECE HERE: ------------------------------------------------------- JACKET - SHORT OVERVIEW OF THE PIECE: Neck and yoke are worked back and forth with circular needle from mid front, top down. The yoke is worked in 2-colored English rib with zigzag, then continue with stockinette stitch with wrong side out and stripes with 1 row in each color. The yoke is divided for body and sleeves. The body is continued back and forth from mid front. The sleeves are worked in the round with short circular needle/double pointed needles, top down. NECK: Cast on 131-143-143-155-155-167 stitches (including 5 band stitches on each side towards mid front) with circular needle size 2.5 mm = US 1,5 and off-white. Work as follows from the wrong side: Knit 5 band stitches, purl until there are 5 stitches left and knit these 5 stitches. Then work pattern as follows: Work 5 band stitches in GARTER STITCH – read description above, work A.1A until there are 6 stitches left on row (= a total of 10-11-11-12-12-13 repeats of 12 stitches), A.2A (= 1 stitch) and finish with 5 band stitches in garter stitch– remember BUTTONHOLE – read description above. When A.1A and A.2A have been worked 1 time in height, work yoke as described below. YOKE: Change to circular needle size 3 mm = US 2,5 and work pattern as follows (first row from the right side with off-white): Work 5 stitches in GARTER STITCH BANDS – read description above, A.1B until there are 6 stitches left on row (= a total of 10-11-11-12-12-13 repeats of 12 stitches), A.2B (= 1 stitch) and finish with 5 stitches in garter stitch bands. Push all stitches back to the other end of the circular needle so the next row can be worked with color-1 from the right side. Read STRIPES, KNITTING TIP-1 and KNITTING TIP-2 and REMEMBER THE KNITTING GAUGE! When A.1B and A.2B have been worked 1 time in height there are 251-275-319-347-395-427 stitches on the needle. The piece measures approx. 9-9-9-9-11-11 cm = 3½"-3½"-3½"-3½"-4⅜"-4⅜" from the cast-on edge mid front. Now work A.1C over A.1B and A.2C over A.2B. When A.1C and A.2C have been worked 1 time in height there are 331-363-407-443-467-505 stitches on the needle. The piece measures approx. 17-17-19-19-21-21 cm = 6¾"-6¾"-7½"-7½"-8¼"-8¼" from the cast-on edge mid front. Continue with knit from wrong side and purl from right side, 5 stitches in garter stitch bands on each side and with stripes as before. When the piece measures 19-19-21-21-21-21 cm = 7½"-7½"-8¼"-8¼"-8¼"-8¼" from the cast-on edge increase stitches evenly spaced as follows: Increase 4-4-4-4-8-8 stitches every 2 cm = ¾" a total of 1-2-1-1-2-2 times = 335-371-411-447-483-521 stitches – read INCREASE TIP-1. When the piece measures 21-23-24-26-28-30 cm = 8¼"-9"-9½"-10¼"-11"-11¾" from the cast-on edge (measured along the band) divide the piece for body and sleeves as follows: Work 5 stitches in garter stitch bands and work the next 49-53-58-66-72-78 stitches as before (= front piece), place the next 64-74-84-88-92-98 stitches on 1 thread for sleeve, cast on 8 new stitches on the needle (= in side under sleeve), work the next 99-107-117-129-145-159 stitches as before (= back piece), place the next 64-74-84-88-92-98 stitches on 1 thread for sleeve, cast on 8 new stitches on the needle (= in side under sleeve) and work the next 49-53-58-66-72-78 stitches as before, finishing with 5 stitches in garter stitch bands. Body and sleeves are finished separately. THE PIECE IS NOW MEASURED FROM HERE! BODY: = 223-239-259-287-315-341 stitches. Insert 1 marker thread on each side of the body, in the middle of the 8 stitches cast on under each sleeve. Allow the marker threads to follow your work onwards; they are used when increasing in the sides. Continue back and forth with stripes as before with knit from the wrong side, purl from the right side and 5 stitches in garter stitch bands on each side towards mid front. When the piece measures 2 cm = ¾" from the division increase 1 stitch on each side of both marker threads – read INCREASE TIP-2 (= 4 stitches increased). Increase like this every 2½-2½-2½-3-3-2½ cm = 1"-1"-1"-1⅛"-1⅛"-1" a total of 10-10-10-9-9-11 times = 263-279-299-323-351-385 stitches. Continue working until the piece measures 28-28-29-29-29-29 cm = 11"-11"-11⅜"-11⅜"-11⅜"-11⅜" from the division (or to desired length; there is 2 cm = ¾" left to finished length). Purl 1 row from the wrong side (bands worked as before), where you increase 18-20-18-18-17-19 stitches evenly spaced (not on bands) = 281-299-317-341-368-404 stitches. Change to circular needle size 2.5 mm = US 1,5 and work rib as follows with off-white (first row from right side): 5 stitches in garter stitch *knit 1, purl 2*, work from *-* until there are 6 stitches left, knit 1 and finish with 5 band stitches in garter stitch. Work this rib for 2 cm = ¾". Loosely bind off with garter stitch over garter stitch, knit over knit and purl over purl. The jacket measures approx. 54-56-58-60-62-64 cm = 21¼"-22"-22¾"-23⅝"-24⅜"-25¼" from the shoulder down. SLEEVE: Place the 64-74-84-88-92-98 stitches from the thread on the 1 side of the piece on short circular needle/double pointed needles size 3 mm = US 2,5 and knit up 1 stitch in each of the 8 stitches cast on under the sleeve = 72-82-92-96-100-106 stitches. Insert 1 marker thread in the middle of the 8 stitches cast on under the sleeve. Allow the marker threads to follow your work onwards; they will be used when decreasing under the sleeve. Start the round by the marker thread and purl in the round with stripes with alternately 1 round off white and 1 round lavender. When the piece measures 2 cm = ¾" from the division decrease 2 stitches mid under sleeve – read DECREASE TIP. Decrease like this every 4-2½-2-1½-1½-1½ cm = 1½"-1"-¾"-½"-½"-½" a total of 9-13-17-18-19-21 times = 54-56-58-60-62-64 stitches. Continue working until the piece measures 41-40-39-38-36-34 cm = 16⅛"-15¾"-15¼"-15"-14¼"-13⅜" from the division (or to desired length; there is 2 cm = ¾" left to finished length. NOTE: Shorter measurements in larger sizes due to wider neck and longer yoke). Knit 1 round where you increase 0-1-2-0-1-2 stitches evenly spaced = 54-57-60-60-63-66 stitches. Change to double pointed needles size 2.5 mm = US 1,5 and work rib in the round with off-white (= knit 1/ purl 2) for 2 cm = ¾". Loosely bind off with knit over knit and purl over purl. The sleeve measures approx. 44-43-42-41-39-37 cm = 17¼"-17"-16½"-16⅛"-15¼"-14½" from the division. Work the other sleeve in the same way. ASSEMBLY: Sew buttons onto left band. |
||||||||||||||||||||||||||||||||||||||||||||||
Diagram explanations |
||||||||||||||||||||||||||||||||||||||||||||||
|
||||||||||||||||||||||||||||||||||||||||||||||
 |
||||||||||||||||||||||||||||||||||||||||||||||
 |
||||||||||||||||||||||||||||||||||||||||||||||
 |
||||||||||||||||||||||||||||||||||||||||||||||
 |
||||||||||||||||||||||||||||||||||||||||||||||
 |
||||||||||||||||||||||||||||||||||||||||||||||
 |
||||||||||||||||||||||||||||||||||||||||||||||
 |
||||||||||||||||||||||||||||||||||||||||||||||
Have you finished this pattern?Tag your pictures with #dropspattern #egyptianfeathersjacket or submit them to the #dropsfan gallery. Do you need help with this pattern?You'll find 24 tutorial videos, a Comments/Questions area and more by visiting the pattern on garnstudio.com. © 1982-2026 DROPS Design A/S. We reserve all rights. This document, including all its sub-sections, has copyrights. Read more about what you can do with our patterns at the bottom of each pattern on our site. |
||||||||||||||||||||||||||||||||||||||||||||||


With over 40 years in knitting and crochet design, DROPS Design offers one of the most extensive collections of free patterns on the internet - translated to 17 languages. As of today we count 324 catalogs and 12278 patterns - 12268 of which are translated into English (US/in).
We work hard to bring you the best knitting and crochet have to offer, inspiration and advice as well as great quality yarns at incredible prices! Would you like to use our patterns for other than personal use? You can read what you are allowed to do in the Copyright text at the bottom of all our patterns. Happy crafting!
Post a comment to pattern DROPS 201-29
We would love to hear what you have to say about this pattern!
If you want to leave a question, please make sure you select the correct category in the form below, to speed up the answering process. Required fields are marked *.