
Popular categories
Looking for a yarn?


Comments / Questions (192)
![]() Hanne wrote:
Hanne wrote:
Tak for svar. Kan se i har rettet de 38 til 28, jeg synes dog stadig det er forvirrende at i skriver man skal gentage rapporten 28 gange når det er med de udtagninger, som I tidligere har skrevet man skal lave og når det på ingen måde kommer til at passe med, hvordan I i diagrammet har tegnet rapporten op. Det ville give mere mening at beskrive omgangen som bestående af en stangmaske og en luftmaske og at man skal fordele det jævnt henover de 146 masker, så man ender på 168.
25.06.2024 - 16:18
![]() Karina wrote:
Karina wrote:
Hola, una duda, cuando se va a empezar a montar el diagrama A, cuando es para talla grande como se sigue en los 30, puntos retantes
25.06.2024 - 05:51DROPS Design answered:
Hola Karina, ¿qué talla estás trabajando y qué fila exactamente estás trabajando?
07.07.2024 - 23:29
![]() Hanne wrote:
Hanne wrote:
Jeg er ved at strikke denne i str. small. Jeg er kommet til,stykket, hvor man skal hækle diagram A4. Jeg har 146 masker på en runde og diagrammet går over 6 masker. I opskriften står der, jeg skal hækle rapporten 38 gange, det giver ingen mening da 38 gange 6 er 228. Jeg tænkte så at Imåske havde skrevet et forkert tal, men 146 divideret med 6 går ikke op 6 gange 24 giver 144, men hvad skal jeg så med de resterende 2 masker?
21.06.2024 - 11:36DROPS Design answered:
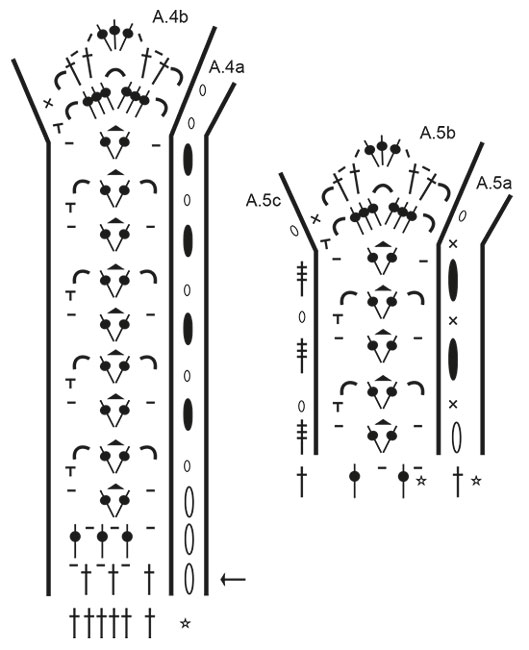
Hej Hanne, du har 146 masker, hækler A.4b 28 gange samtidig med at du tager 11 luftmaskebuer ud (1 st, 1 lm). 146 + 22 = 168m
25.06.2024 - 13:30
![]() Agnieszka wrote:
Agnieszka wrote:
Dzień dobry, moje pytanie dotyczy samego początku. W pierwszym rzędzie przerabiamy w rozmiarze S 49 słupków. W drugim rzędzie zaczynamy dodawanie oczek i jednocześnie przerabianie ściegu fantazyjnego. Zatem pierwszy rząd dodawania i wzoru wychodzi na lewej stronie, chyba, że mam uciąć nitkę i zacząć od prawej. Czy tak ma być ?
16.06.2024 - 12:35DROPS Design answered:
Witaj Agnieszko, pierwszy rząd dodawania oczek na bokach i ściegu fantazyjnego jest na prawej stronie robótki, włóż sobie marker po tej stronie, aby się nie pomylić później. Pozdrawiamy!
18.06.2024 - 09:15
![]() Jesica wrote:
Jesica wrote:
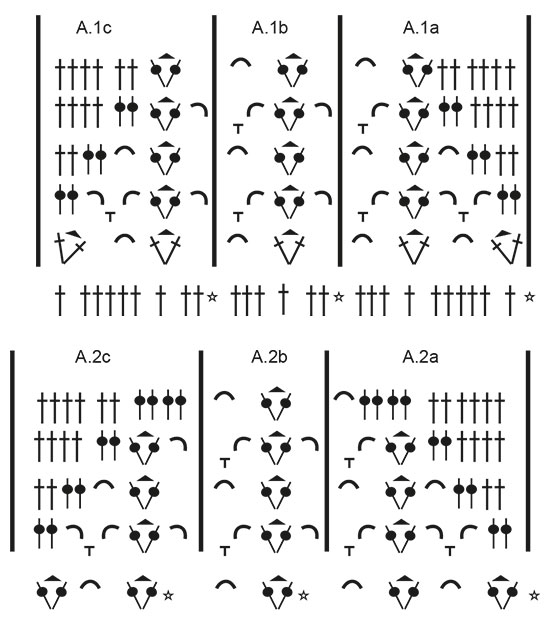
Hola buenas tardes lo que no entiendo es el diagrama que dice trabajar sobre los 10 primeros puntos de A1a y luego los 30 puntos siguientes de a1b etc.. pero los diagramas no se leen de derechas a izquierda y de abajo hacia arriba.. los 30 puntos de a1b no entiendo como se hace, si se repite o que.. podrías explicar .gracias
30.04.2024 - 20:51DROPS Design answered:
Hola Jesica, los diagramas se leen de abajo arriba y de derecha a izquierda en las filas por el lado derecho y de izquierda a derecha en las filas por el lado revés. Cuando hay que trabajar más puntos del diagrama que los que hay por fila se repite los símbolos de esa fila del diagrama tantas veces como sea necesario para alcanzar el número de puntos deseados. Si A.1b se trabaja sobre 6 puntos entonces tienes que repetir esa fila 1 del diagrama A.1b 5 veces en la fila. Puedes leer más información aquí: https://www.garnstudio.com/lesson.php?id=69&cid=23
05.05.2024 - 20:25
![]() Neusa wrote:
Neusa wrote:
Tem o vídeo ou gráfico, c receita não entendo! Obgda
19.04.2024 - 15:10DROPS Design answered:
Bom dia, Existe um gráfico ao fundo da página com a receita. Bons crochés!
23.04.2024 - 10:44
![]() Ineke De Gier wrote:
Ineke De Gier wrote:
Ik ben bezig met het voorpand. Er staat dat ik A1b over de volgende 30 stokjes moet haken en dan de laatste 9 stokjes A1c, maar na 5x patroon A1b gehaakt te hebben, ben ik nog maar op de helft van de toer. Doe ik iets niet goed?
05.04.2024 - 10:25DROPS Design answered:
Dag Ineke,
Dan gaat er inderdaad iets mis. De 30 stokjes waarover je A.1b haakt zitten precies in het midden van het werk.
07.04.2024 - 17:58
![]() Kristin wrote:
Kristin wrote:
Hej DROPS! Jag skulle behöva hjälp med detta mönster. Jag får 18 stolpar på 10 cm i både arbete och provlapp, men mitt fram/bakstycke mäter endast 40 cm i bredd (storlek M) där det står att det ska mäta 44 cm enligt skissen i slutet av beskrivningen. 71 maskor delat med 18 blir dessutom cirka 4, med andra ord 10 x 4 = 40. Hur gjorde ni för att få 44 cm i bredd? Mina mått gör ju nämligen att toppen bli alldeles för liten. Tacksam för hjälp!
25.08.2023 - 16:26DROPS Design answered:
Hei Kristin. Husk du også har 8 nye masker/staver- under hvert erme = 71 masker på forstykket, 71 masker på bakstykket og 8 masker under hvert erme = 71+71+8+8= 158 masker. Der det står 44 cm i målskissen hekler du altså over 158 masker. mvh DROPS Design
11.09.2023 - 10:48
![]() Isabel wrote:
Isabel wrote:
Hi! I’m confused when it comes to increasing at the same time as the pattern A1, when you increase is it just 2 DCs in the first and last stitch of the row? Or is the increase stitch specified in the pattern? Also does the chain 3 count as a DC?
15.08.2023 - 08:47DROPS Design answered:
Dear Isabel, increases are not included in the pattern, you have to work them extra; on very first row in the first size, crochet 1 extra dc in the first + in the last stitch, for example in A.1a you will then work 3 ch (=1st dc = increase) +1dc, 3 chains, 1 dc (A.1a) and end A.1c with 1 dc, 3 ch, 2 dc (1 for A1c + 1 increase). Happy crocheting!
15.08.2023 - 09:27
![]() Eneli wrote:
Eneli wrote:
Hi! I would like to know how should I read diagram A2 when I start with it as pattern says that diagram A2 will start from wrong side? Do I read diagrams first row from left to right then because I crochet from wrong side? (and I have read Drops tutorial about diagrams multiple times, I know that usually you will read diagram from right to left starting right side and when you crochet forth and back you crochet every other row reading diagram from left to right...) Thank you kindly for your hel
30.07.2023 - 13:10DROPS Design answered:
Hi Eneli, Yes, when working from the wrong side you read the diagrams from left to right. Happy crocheting!
31.07.2023 - 06:39
|
|||||||||||||||||||||||||||||||||||||||||||
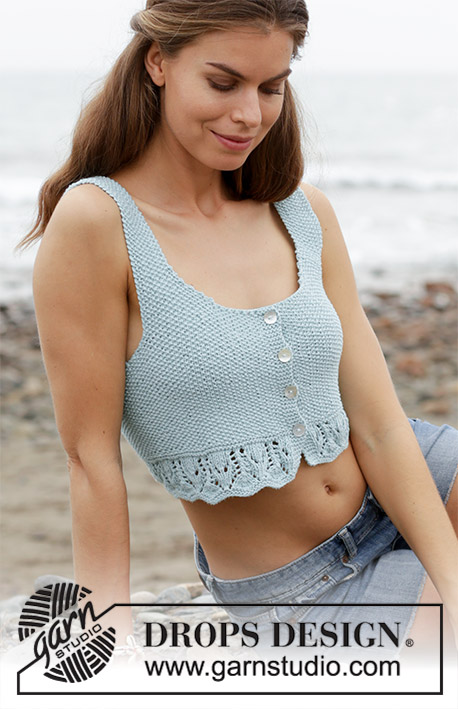
California Dream#californiadreamtop |
|||||||||||||||||||||||||||||||||||||||||||
 |
 |
||||||||||||||||||||||||||||||||||||||||||
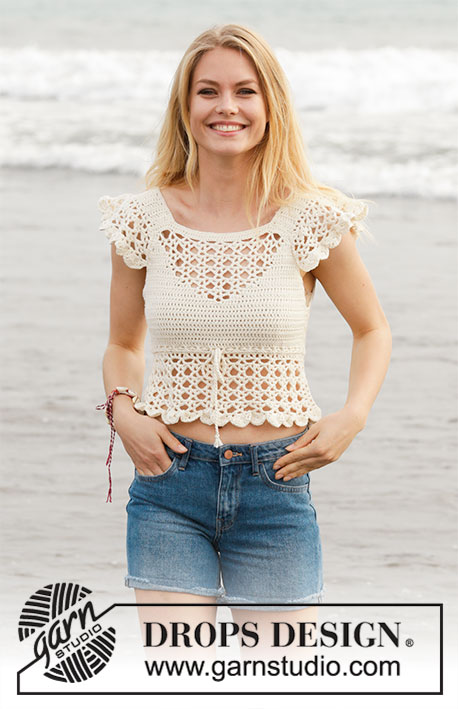
Crocheted top with lace pattern and flounce. Size: S - XXXL Piece is crocheted in DROPS Cotton Merino.
DROPS 190-21 |
|||||||||||||||||||||||||||||||||||||||||||
|
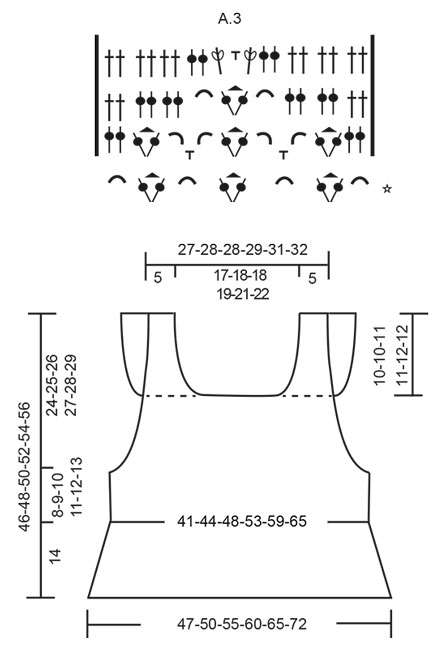
INFORMATION FOR PATTERN: PATTERN: See diagrams A.1 to A.5. INCREASE TIP-1: Increase 1 double crochet by working 2 double crochets in same stitch. CROCHET TIP-1 (applies to body but not diagram): Replace first double crochet at beginning of every row with 3 chain stitches. CROCHET TIP-2 (applies to body but not diagram): When working in the round, replace first treble with 3 chain stitches, finish round with 1 slip stitch in 3rd chain stitch at beginning of round. DECREASE TIP: Decrease by working 2 double crochets together. INCREASE TIP-2 (evenly): To calculate how to increase evenly, use the total number of double crochets on row (e.g. 146 double crochets) and divide double crochets by number of increases to be done (e.g. 22) = 6.6. In this example increase by working 2 double crochets in same double crochet alternately approx. every 6th and 7th double crochet. ---------------------------------------------------------- TOP: Piece is worked back and forth, top down, work front and back piece separately down to armhole, then work in the round over both parts. Then work straps from bottom up and then work flounces back and forth on straps, fasten flounce to front/back piece. FRONT PIECE: Work 51-53-53-55-57-59 chain stitches (including 3 chain stitches to turn with) on hook size 5 mm / H/8 with Cotton Merino. Switch to hook size 4 mm / G/6, turn and work 1 double crochet in 4th chain stitch from hook (= 2 double crochets), work 1 double crochet in each of the next 47-49-49-51-53-55 chain stitches = 49-51-51-53-55-57 double crochets. On next row begin increase in each side of piece AT THE SAME TIME work pattern as follows: Increase 1 double crochet in each side of piece (= 2 double crochets increased) - read INCREASE TIP-1. Increase like this every row 3-5-8-13-14-15 times in total, and then every other row 5-5-3-0-0-0 times in total = 65-71-73-79-83-87 double crochets on last row. Work next row as follows, begin from right side: Read CROCHET TIP-1 – work 1 double crochet in each of the first 0-1-1-2-3-4 double crochets, A.1a over the next 10 double crochets, repeat A.1b over the next 30 double crochets (= 5 times in total in width), A.1c over the next 9 double crochets and 1 double crochet in each of the last 0-1-1-2-3-4 double crochets. Continue until A.1 has been work 1 time vertically. REMEMBER THE CROCHET GAUGE! Then work as follows, begin from wrong side: Work 1 double crochet in every double crochet until 1 double crochet remains before first chain space, work A.2c, repeat A.2b 3 times in total in width, A.2a and 1 double crochet in every double crochet the entire row. Continue until A.2 has been worked vertically. Then work as follows, begin from wrong side: Work 1 double crochet in every double crochet until first chain space, work A.3 and 1 double crochet in every double crochet the rest of row. Continue until A.3 has been worked vertically. Now work 1 double crochet in every stitch until piece measures 14-15-15-16-16-17 cm / 5 ½"-5⅞"-5⅞"-6 ¼"-6 ¼"-6⅝". Fasten off, turn. Put piece aside. BACK PIECE: Work 51-53-53-55-57-59 chain stitches (including 3 chain stitches to turn with) on hook size 5 mm / H/8 with Cotton Merino. Switch to hook size 4 mm / G/6, turn and work 1 double crochet in 4th chain stitch from hook (= 2 double crochets), work 1 double crochet in each of the next 47-49-49-51-53-55 chain stitches = 49-51-51-53-55-57 double crochets. Then work 1 double crochet in every double crochet - AT THE SAME TIME increase 1 double crochet in each side of piece - remember INCREASE TIP-1. Increase like this every row 8-10-11-13-14-15 times in total = 65-71-73-79-83-87 double crochets on last row. When piece measures 14-15-15-16-16-17 cm / 5 ½"-5⅞"-5⅞"-6 ¼"-6 ¼"-6⅝" (adjust according to front piece), fasten off, turn. BODY: Now work the two parts together as follows: Work 4-4-7-8-12-15 chain stitches for armhole, 1 double crochet in each of the 65-71-73-79-83-87 double crochets from back piece, work 8-8-14-16-24-30 chain stitches for armhole, 1 double crochet in each of the 65-71-73-79-83-87 double crochets from front piece, work 4-4-7-8-12-15 chain stitches for armhole and finish with 1 slip stitch in first chain stitch at beginning of round. Then work piece in the round, continue with 1 double in every double/chain stitch = 146-158-174-190-214-234 double crochets. When working in the round, turn after every round to work alternately from right side and wrong side. This is so that the texture is the same on the entire top - read CROCHET TIP-2. Insert 1 marker thread in each side, in the middle of the 8-8-14-16-24-30 chain stitches. NOW MEASURE THE PIECE FROM HERE! Continue like this until piece measures 8-9-10-11-12-13 cm / 3⅛"-3½"-4"-4⅜"-4¾"-5⅛". Now work in the round according to diagram A.4 while at the same time increasing on first round (round marked with arrow in diagram) as follows: Work A.4b 28-30-33-36-39-43 times in total on round – A.4a shows how rounds begin and end and is worked in addition to A.4b – AT THE SAME TIME increase 11-11-12-13-10-12 chain spaces (= 1 double crochet + 1 chain stitch) evenly – read INCREASE TIP-2 = 84-90-99-108-117-129 chain spaces (= 1 double crochet + 1 chain stitch). Continue in the round, i.e. always work pattern from right side. When A.4 is done vertically, fasten off. STRAPS: Now work a strap back and forth in cast-on edge on front piece over the first 8-9-9-9-10-10 double crochets. Work 1 double crochet in every double crochet until strap measures 10-10-11-11-12-12 cm / 4"-4"-4⅜"-4⅜"-4¾"-4¾". Fasten off. Work 1 strap over the first 8-9-9-9-10-10 double crochets in the other side the same way. Work straps the same way on back piece. Sew tog straps on shoulder. FLOUNCE: Work back and forth over every row on strap (= 20-20-22-22-24-24 cm / 7⅞"-7⅞"-8⅝"-8⅝"-9⅜"-9⅜"). Begin from wrong side and work 1 double crochet in first row, * 1 chain stitch, 1 double crochet around row *, work from *-* along the entire strap – adjust so that there are 26-26-28-28-30-30 chain spaces (= 1 chain stitch + 1 double crochet) on this row, finish with 1 double crochet in last row = 1 double crochet in each side and 26-26-28-28-30-30 chain spaces (= 1 chain stitch + 1 double crochet). Turn and work as follows from right side: A.5a, A.5b 13-13-14-14-15-15 times in total in width, finish with A.5c. Continue this pattern until A.5 is done vertically, fasten off. Work flounce on the other strap the same way. NECK EDGE: Work 1 single crochet in every double crochet/2 single crochets along every double crochet row along the entire neck. SLEEVE EDGE: Work 1 single crochet in every double crochet/2 single crochets along every double crochet row along armhole – start right after flounce, work along armhole and to the flounce. Place flounce edge to edge to this sleeve edge (on both front and back piece) and fasten with small, neat stitches. Work the other sleeve edge the same way and fasten flounce. TIE: Cut 3 lengths of 3 metres each with Cotton Merino. Twine the strands tog until they resist, fold them double so that they twine again. Make a knot at each end. Baste the yarn up and down through first row with eyelet holes - start mid front. Tie a bow at the front. |
|||||||||||||||||||||||||||||||||||||||||||
Diagram explanations |
|||||||||||||||||||||||||||||||||||||||||||
|
|||||||||||||||||||||||||||||||||||||||||||
 |
|||||||||||||||||||||||||||||||||||||||||||
 |
|||||||||||||||||||||||||||||||||||||||||||
 |
|||||||||||||||||||||||||||||||||||||||||||
Have you finished this pattern?Tag your pictures with #dropspattern #californiadreamtop or submit them to the #dropsfan gallery. Do you need help with this pattern?You'll find 10 tutorial videos, a Comments/Questions area and more by visiting the pattern on garnstudio.com. © 1982-2026 DROPS Design A/S. We reserve all rights. This document, including all its sub-sections, has copyrights. Read more about what you can do with our patterns at the bottom of each pattern on our site. |
|||||||||||||||||||||||||||||||||||||||||||


With over 40 years in knitting and crochet design, DROPS Design offers one of the most extensive collections of free patterns on the internet - translated to 17 languages. As of today we count 324 catalogs and 12278 patterns - 12268 of which are translated into English (US/in).
We work hard to bring you the best knitting and crochet have to offer, inspiration and advice as well as great quality yarns at incredible prices! Would you like to use our patterns for other than personal use? You can read what you are allowed to do in the Copyright text at the bottom of all our patterns. Happy crafting!
Post a comment to pattern DROPS 190-21
We would love to hear what you have to say about this pattern!
If you want to leave a question, please make sure you select the correct category in the form below, to speed up the answering process. Required fields are marked *.