
Popular categories
Looking for a yarn?


Comments / Questions (32)
![]() Anette Markó wrote:
Anette Markó wrote:
Unfortunately, the Hungarian translation is incorrect. In some cases, the cast is inpropery described. ☹
05.04.2021 - 12:34DROPS Design answered:
Dear Anette, thank you for letting us know. One mistake was corrected on the left front, but of you know about more, can you be please more specidic? (You can also reply in Hungarian, or let us know in the Facebook group named Magyra DROPS csoport). Happy Knitting!
05.04.2021 - 19:53
![]() Inger Fjelstad Edvardsen wrote:
Inger Fjelstad Edvardsen wrote:
Hei. Hvor står det hva man legger opp til ryggen på denne oppskriften. ? Drops 168-8.
12.06.2020 - 14:43DROPS Design answered:
Hej inger, Genseren strikkes frem og tilbake i RILLER – først strikkes forstk, deretter strikkes det over skuldrene og nedover bakstk. God fornøjelse!
12.06.2020 - 15:36
![]() Danielle wrote:
Danielle wrote:
Je suis occupée à tricoter mon 7ème tellement c'est une vêtement chaud et léger à porter. J'adore ce modèle
22.02.2020 - 19:44
![]() Cécile wrote:
Cécile wrote:
Merci de votre réponse. Donc si je comprends bien... 1 rang = 1 aller-retour ?
25.09.2019 - 12:42DROPS Design answered:
Bonjour Cécile, 1 rang = 1 rang, en revanche, on augmente à la fin de chaque rang (= 11 x 2 m et 7 x 1 m) puis on augmente à la fin de tous les 2 rangs seulement (on monte les mailles en fin de rang, on tourne et on tricote le rang suivant en augmentant en fin de rang, on tourne et on tricote 2 rangs sur toutes les mailles sans augmenter, et on répète ces 4 rangs 6 fois au total. Bon tricot!
25.09.2019 - 14:07
![]() Cécile wrote:
Cécile wrote:
Bonjour, Vous dites au début, paragraphe 'devant', que l'ouvrage doit mesurer 18cm. Mais comment cela est-il possible, si l'echantillon fait 10cm avec 34 rangs, qu'il en fasse 18cm avec 31 rangs (version XL) ? Et mon ouvrgae ne fait qu'une dizaine de centimes au plus haut. Je ne comprends pas cette indication, car il faut monter à 36cm ensuite. Merci de votre aide.
24.09.2019 - 20:13DROPS Design answered:
Bonjour Cécile, on doit avoir tricoté 60 rangs dans toutes les tailles, soit en XL: 11 fois 2 m tous les rangs = 22 rangs + 7 x 1 m tous les rangs = 14 rangs + 6 x 1 m tous les 2 rangs en fin de rang soit tous les 4 rangs = 24 rangs = 22+14+24=60 rangs. Bon tricot!
25.09.2019 - 08:16
![]() Wieteke wrote:
Wieteke wrote:
Ik kom er niet uit... steken opzetten aan elke kant (de goede kant en de achterkant) aan einde van de naald, dat is toch iedere naald die je breit steken erbij? Maar dan kom ik niet aan het aantal steken en cms... Wat lees ik verkeerd? Alvast dank!
27.08.2019 - 11:35DROPS Design answered:
Dag Wieteke,
Ja, dat klopt; je zet aan het einde van iedere naald (dus zowel aan de goede als de verkeerde kant) nieuwe steken op. Je zet eerst elke naald aan het einde een aantal keren (afhankelijk van je maat) 2 steken op. Daarna elke naald een aantal keren 1 steek en tot slot om de naald een aantal keren 1 st. Nadat je alle steken op hebt gezet aan de zijkant, meet het werk ongeveer 18 cm in de hoogte.
31.08.2019 - 13:14
![]() Sandrine wrote:
Sandrine wrote:
Bonjour, pour une taille 38 habituellement, quelle taille choisir svp pour un rendu similaire à celui de la photo?
06.04.2019 - 12:39DROPS Design answered:
Bonjour Sandrine! Le modèle en photo mesure environ 1.70 m et porte une taille S ou M. Si vous faites un garment vous trouverez en bas de la page un schéma avec toutes les mesures (en cm) du vêtement terminé. Si vous suivez les explications et gardez la bonne tension/le bon échantillon, votre vêtement aura la même taille que les mesures du schéma. Si vous ne savez pas quelle taille choisir, la solution peut être de mesurer un pull que vous avez et dont vous aimez la taille. Vous pouvez ensuite regarder les mesures dans le schéma et y trouver la bonne taille. Bon tricot!
06.04.2019 - 17:54
![]() Marta wrote:
Marta wrote:
Intanto grazie per la risposta. Ne approfitto per chiarirmi bene le idee ed essere sicura di fare bene il progetto. Lo schema di "avviare alla fine del ferro",parla di aumenti solo più avanti , ma voi mi avete scritto "aumentare all'inizio e alla fine"..quindi devo aumentare o avviare nuove maglie a lato?? Scusatemi e grazie ancora tantissimo
27.03.2018 - 12:22DROPS Design answered:
Buongiorno Marta. Per le maniche, le maglie sono da avviare. Buon lavoro!
27.03.2018 - 14:17
![]() Marta wrote:
Marta wrote:
Ciao! Ho qualche difficoltà nel comprendere alcuni passaggi. Innanzitutto non mi è chiaro se la maglia legaccio è intesa come tutti i giri a dritto, o un giro a dritto e uno a rovescio. Poi, quando viene detto, ade esempio nella prima parte" avviare nuove m alla fine del f: 2 m dubogni f 7-8-9-11-12-14 volte ogni lato " o "1 maglia a f alterni 9-8-7-6-4-2 volte ogni lato "esattamente cosa significa?? Grazie mille
26.03.2018 - 14:31DROPS Design answered:
Buongiorno Marta, questo maglione è lavorato in piano, per cui la maglia legaccio si lavora sempre a diritto. Per gli aumenti, se ad esempio sta lavorando la taglia S, deve procedere come segue: deve aumentare 2 maglie su ogni ferro all'inizio e alla fine del ferro per 7 volte e poi 1 maglia all'inizio e alla fine del ferro ogni 2 ferri per 9 volte. Ci riscriva se ha ancora dei dubbi. Buon lavoro!
27.03.2018 - 10:55
![]() Bocquet wrote:
Bocquet wrote:
Modele réalise avec 3 pelotes, donc modele hyper léger, 75 g, et très agréable à porter sur un débardeur.
28.06.2017 - 16:13
|
|
Blue Mist#bluemistsweater |
|
|
|
|
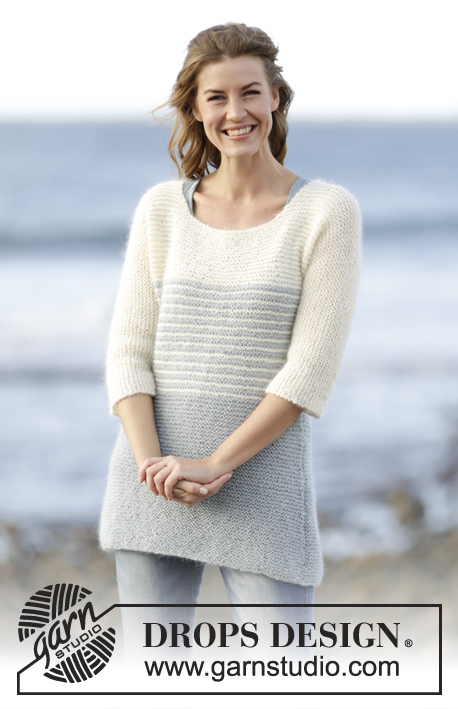
Knitted DROPS jumper in garter st with vents and ties at the front in ”Kid-Silk”. Size S-XXXL.
DROPS 168-8 |
|
|
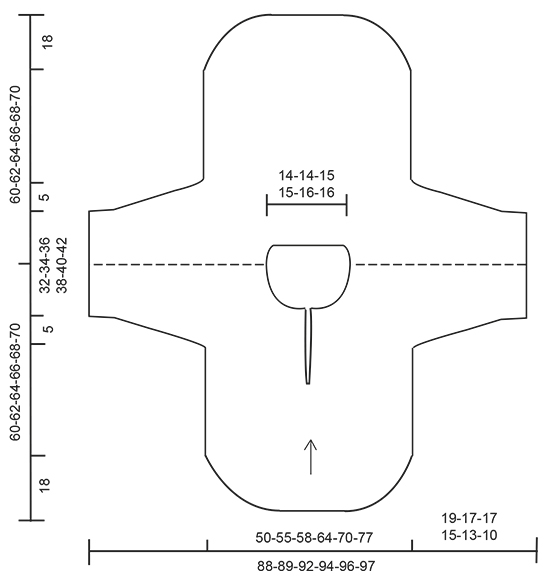
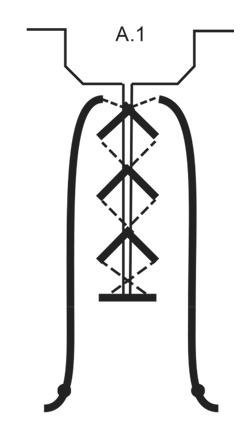
GARTER ST (back and forth): K all rows. 1 ridge = K2 rows. INCREASE TIP: Inc 1 st by making 1 YO, on next row K YO twisted to avoid holes. ---------------------------------------------------------- JUMPER: Worked back and forth on circular needle. The entire jumper is worked in GARTER ST - see explanation above. Work the front first, then work over the shoulders and work top down on back piece. FRONT PIECE: Cast on 31-35-37-41-45-49 sts on circular needle SIZE 5.5 mm/US 9 / US 9 with Kid-Silk. Work 1 ridge (1st row = RS), insert a marker here that shows RS on piece. Then cast on new sts on end of row as follows: Cast on 2 sts on every row 7-8-9-11-12-14 times in each side and 1 st on every row 5-6-7-7-10-12 times in each side, then cast on 1 st of every other row 9-8-7-6-4-2 times in each side = 87-95-101-111-121-133 sts. Piece measures 18 cm / 7". Insert a marker in each side (marks vent in the sides). REMEMBER THE KNITTING GAUGE Continue back and forth until piece measures 32-34-34-36-36-38 cm / 12½"-13½"-13½"-14¼"-14¼"-15". On next row from RS divide the piece to get a vent mid front as follows: Work the first 43-47-50-55-60-66 sts and slip them on a stitch holder for left front piece, bind off next st for vent, then work the remaining 43-47-50-55-60-66 sts (= right front piece). RIGHT FRONT PIECE: Continue back and forth over sts for right front piece until piece measures 39-40-41-42-43-44 cm / 15¼"-15¾"-16⅛"-16½"-17"-17¼". Now cast on new sts for sleeve at the end of every row from RS as follows: Cast on 2 sts 4-4-4-4-6-7 times, 3 sts 3-3-3-3-1-0 times and 14-11-11-7-6-2 sts 1 time = 74-75-78-79-81-82 sts. When piece measures 48-50-51-53-54-56 cm / 19"-19¾"-20"-21"-21¼"-22", bind off for neck on next row from RS as follows: bind off the first 6-6-6-6-7-7 sts, then bind off on every row from neck 2 sts 2 times in all sizes and 1 st 1-1-2-2-2-2 times = 63-64-66-67-68-69 sts. Continue back and forth until piece measures 60-62-64-66-68-70 cm / 23⅝"-24⅜"-25¼"-26"-26¾"-27½". Insert a marker here = shoulder. NOW MEASURE THE PIECE FROM HERE. Now continue back and forth on back piece until piece measures 3 cm / 1". On next row from RS inc 1 st inside 1 st in garter st towards the neck - READ INCREASE TIP = 64-65-67-68-69-70 sts. Work 1 row from WS. Slip sts on a stitch holder and work left front piece. LEFT FRONT PIECE: Slip the 43-47-50-55-60-66 sts from stitch holder back on circular needle. Beg from WS (= at vent) and continue back and forth in garter st. When piece measures 39-40-41-42-43-44 cm / 15¼"-15¾"-16⅛"-16½"-17"-17¼", cast on new sts for sleeve at the end of every row in the side as follows: Cast on 2 sts 4-4-4-4-6-7 times, 3 sts 3-3-3-3-1-0 times and 14-11-11-7-6-2 sts 1 time = 74-75-78-79-81-82 sts. When piece measures 48-50-51-53-54-56 cm / 19"-19¾"-20"-21"-21¼"-22", bind off for neck on next row from WS as follows: bind off the first 6-6-6-6-7-7 sts. Then bind off on every row from neck 2 sts 2 times in all sizes and 1 st 1-1-2-2-2-2 times = 63-64-66-67-68-69 sts. Continue back and forth until piece measures 60-62-64-66-68-70 cm / 23⅝"-24⅜"-25¼"-26"-26¾"-27½". Insert a marker here = shoulder. NOW MEASURE THE PIECE FROM HERE. BACK PIECE: Continue back and forth until piece measures 3 cm / 1". On next row from RS inc 1 st inside 1 st in garter st towards the neck = 64-65-67-68-69-70 sts. Work 1 row from WS. Now work over all sts, before casting on 21-21-23-23-25-25 sts for neck and then work the 64-65-67-68-69-70 sts from stitch holder on to needle = 149-151-157-159-163-165 sts. When piece measures 16-17-18-19-20-21 cm / 6¼"-6¾"-7"-7½"-8"-8¼", bind off sts for sleeves in each side at the beg on every row as follows: 14-11-11-7-6-2 sts 1 time, 3 sts 3-3-3-3-1-0 times, 2 sts 4-4-4-4-6-7 times = 87-95-101-111-121-133 sts. When piece measures 42-44-46-48-50-52 cm / 16½"-17¼"-18"-19"-19¾"-20½", insert a marker in each side (marks vent in each side). Then bind off sts on the start of row as follows: bind off 1 st on every other row 9-8-7-6-4-2 times in each side, then bind off 1 st on every row 5-6-7-7-10-12 times in each side and finally 2 sts on every row 7-8-9-11-12-14 times in each side = 31-35-37-41-45-49 sts remain. Work 1 ridge in garter st and loosely bind off. ASSEMBLY: Fold the garment double at the shoulder = where the marker is. Sew side and sleeve seams in one in outer loops of edge sts down to vent. Make sure that to avoid a tight seam. Cut and fasten the yarn. TIE: Cut 6 strands of 270 cm / 106" each, twine the strands tog until they resist, fold the string double so that it twines again. Tie a knot in each end at desired length and cut the ends (tie on picture is approx. 135 cm / 53"). Cross the tie through sts on WS over vent on jumper as shown in A.1. NOTE: Dotted line shows tie on WS of garment. |
|
 |
|
 |
|
Have you finished this pattern?Tag your pictures with #dropspattern #bluemistsweater or submit them to the #dropsfan gallery. Do you need help with this pattern?You'll find 13 tutorial videos, a Comments/Questions area and more by visiting the pattern on garnstudio.com. © 1982-2026 DROPS Design A/S. We reserve all rights. This document, including all its sub-sections, has copyrights. Read more about what you can do with our patterns at the bottom of each pattern on our site. |


With over 40 years in knitting and crochet design, DROPS Design offers one of the most extensive collections of free patterns on the internet - translated to 17 languages. As of today we count 324 catalogs and 12284 patterns - 12274 of which are translated into English (US/in).
We work hard to bring you the best knitting and crochet have to offer, inspiration and advice as well as great quality yarns at incredible prices! Would you like to use our patterns for other than personal use? You can read what you are allowed to do in the Copyright text at the bottom of all our patterns. Happy crafting!
Post a comment to pattern DROPS 168-8
We would love to hear what you have to say about this pattern!
If you want to leave a question, please make sure you select the correct category in the form below, to speed up the answering process. Required fields are marked *.