
Popular categories
Looking for a yarn?


Comments / Questions (10)
![]() Chachignon wrote:
Chachignon wrote:
Comment faire pour avoir le tuto de ce bonnet merci.
20.11.2025 - 09:39DROPS Design answered:
Bonjour Mme Chachignon, cliquez ici pour accéder aux explications, en français, de ce bonnet. Bon crochet!
20.11.2025 - 10:31
![]() Nicolas wrote:
Nicolas wrote:
Bonjour peut on realiser se bonnet aux aiguilles s'il vous plait. Merci
07.11.2025 - 15:31DROPS Design answered:
Bonjour Nicolas, probablement mais nous n'avons qu'une version crochet de ce bonnet. Découvrez tous les bonnets de Noël pour enfant, au tricot, ici. Bon tricot!
07.11.2025 - 17:12
![]() Robert wrote:
Robert wrote:
Comment réaliser ce modèle avec un tour de tête de 56
01.01.2025 - 22:06DROPS Design answered:
Bonjour Mme Robert, vous pouvez commencer de la même façon et ajouter des augmentations pour agrandir le bonnet, essayez si besoin pour ajuster au plus près de la bonne taille. Bon crochet!
02.01.2025 - 16:05Birthday Wishes App wrote:
Hey, I think your website might be having browser compatibility issues. When I look at your blog in Safari, it looks fine but when opening in Internet Explorer, it has some overlapping. I just wanted to give you a quick heads up! Other then that, wonderful blog!
22.11.2016 - 15:58DROPS Design answered:
Hi, Remember to always have your browser updated and it should then work! Happy crocheting!
23.11.2016 - 09:31Maria wrote:
At the end of the directions for the nose you say " fill the snout with some poly stuffing". Do you mean the nose? Otherwhise how to stuff with poly stuffing a flat piece? Thank you in advance and Merry Christmas!
24.12.2015 - 01:21DROPS Design answered:
Dear Maria, only the nose should be filled. Happy crocheting!
02.01.2016 - 13:27Maria wrote:
For the snout, after finishing the 1st ROW 2 and before repeating it for two more times, do I turn the piece or I continue in round? I tried to do it by turning the piece and the snout becomes very triangular.
24.12.2015 - 01:16DROPS Design answered:
Dear Maria, snout is worked back and forth, after you have worked row 2, turn and repeat row 2 a total of 3 more times, turning at the end of each row = the snout is 5 rows in total. Happy crocheting!
02.01.2016 - 13:26Maria wrote:
After round 11 you say to work around until the piece measures 18 cm. By that you mean to flatten the cap and count the diametre? Because I think it is too small like this... Thanks in advance
21.12.2015 - 15:58DROPS Design answered:
Dear Maria, you continue working until piece measures 18 cm from the beg (= 1st round). Happy crocheting!
22.12.2015 - 10:11
![]() FRANCOISE wrote:
FRANCOISE wrote:
Bonjour, quand vous dites après le tour 11 continuer pour que l'ouvrage mesure x cm c'est de diamètre ?? car sinon cela fait vraiment petit ?? D'avance merci Bonne journée Françoise
12.12.2015 - 06:54DROPS Design answered:
Bonjour Françoise, mesurez la hauteur depuis le 1er tour: mettez le bonnet à plat et mesurez à partir du haut du bonnet jusqu'au dernier rang. Bon crochet!
14.12.2015 - 09:32
![]() Cecile Tirmarche wrote:
Cecile Tirmarche wrote:
Un tout gran merci! Avec les petites video tout est bien clai!
05.10.2015 - 17:49
![]() Tinzi wrote:
Tinzi wrote:
So cute little reindeer, suloinen pikkuporo
01.12.2014 - 14:13
|
|
Little Rudolph#littlerudolphhat |
|
 |
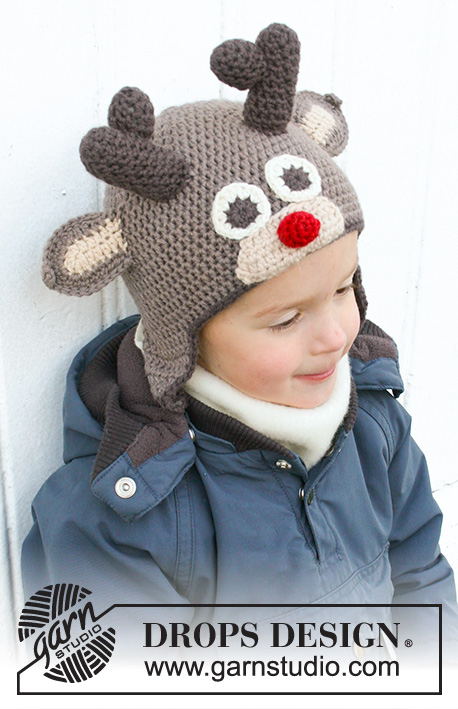 |
Crochet hat for baby and children in DROPS Lima. Piece is worked as a reindeer with antlers and ears. Size 6 months to 10 years. Theme: Christmas
DROPS Extra 0-1049 |
|
|
CROCHET INFO: Replace first hdc on round with 2 ch and finish every round with hdc with 1 sl st in second ch from beg of round. CROCHET 2 HDC TOG: * Make 1 YO, insert hook in next st, get yarn *, repeat from *-* one more time, make 1 YO and pull yarn through all sts on hook. ---------------------------------------------------------- HAT: The piece is worked top down. Work ear flaps back and forth until finished. Work 4 ch on hook size 4 mm / G/6 and light brown, form a ring with 1 sl st in first ch. ROUND 1: Work 8 hdc in ch-ring – READ CROCHET INFO! ROUND 2: Work 2 hdc in every hdc the entire round = 16 hdc. ROUND 3: Work * 1 hdc in first hdc, 2 hdc in next *, repeat from *-* the entire round = 24 hdc. ROUND 4: Work * 1 hdc in each of the next 2 hdc, 2 hdc in next hdc *, repeat from *-* the entire round = 32 hdc. ROUND 5: Work * 1 hdc in each of the next 3 hdc, 2 hdc in next hdc *, repeat from *-* the entire round = 40 hdc. ROUND 6: Work * 1 hdc in each of the next 4 hdc, 2 hdc in next hdc*, repeat from *-* the entire round = 48 hdc. ROUND 7: Work * 1 hdc in each of the next 5 hdc, 2 hdc in next hdc*, repeat from *-* the entire round = 56 hdc. ROUND 8: Work * 1 hdc in each of the next 6 hdc, 2 hdc in next hdc*, repeat from *-* the entire round = 64 hdc. Now work differently in the different sizes as follows: SIZE 6/9 MONTHS: ROUND 9: Work 1 hdc in every hdc BUT at the same time inc 6 hdc evenly on round = 70 hdc. SIZE 12/18 MONTHS - 2 YEARS: ROUND 9: Work * 1 hdc in each of the next 7 hdc, 2 hdc in next hdc*, repeat from *-* the entire round = 72 hdc. ROUND 10: Work 1 hdc in every hdc BUT at the same time inc 2-6 hdc evenly on round = 74-78 hdc. SIZE 3/4 - 5/6 - 7/8 YEARS: ROUND 9: Work * 1 hdc in each of the next 7 hdc, 2 hdc in next hdc*, repeat from *-* the entire round = 72 hdc. ROUND 10: Work * 1 hdc in each of the next 8 hdc, 2 hdc in next hdc*, repeat from *-* the entire round = 80 hdc. ROUND 11: Work 1 hdc in every hdc BUT at the same time inc 2-4-6 hdc evenly on round = 82-84-86 hdc. SIZE 9/10 YEARS: ROUND 9: Work * 1 hdc in each of the next 7 hdc, 2 hdc in next hdc *, repeat from *-* the entire round = 72 hdc. ROUND 10: Work * 1 hdc in each of the next 8 hdc, 2 hdc in next hdc *, repeat from *-* the entire round = 80 hdc. ROUND 11: Work * 1 hdc in each of the next 9 hdc, 2 hdc in next hdc *, repeat from *-* the entire round = 88 hdc. There are 70-74-78-82-84-86-88 hdc on round. Now work 1 hdc in every hdc every round in all sizes until piece measures 16-16-17-18-19-20-20 cm / 6¼"-6¼"-6¾"-7"-7½"-8"-8". Insert 2 markers in piece from RS. Insert first marker in 7th-7th-8th-8th-8th-8th-8th hdc from beg of round, second marker in 49th-51st-53rd-55th-57th-58th-59th hdc from beg of round. Fasten off. EAR FLAP: Beg by working from RS at the first marker. Use hook size 4 mm / G/6 and light brown. ROW 1: Work 13-14-15-15-15-17-17 hdc. Turn piece. ROW 2: Work ch 2, work 2 hdc tog, work until 2 hdc remain and work these tog. 11-12-13-13-13-15-15 hdc. Turn piece. Repeat 2nd row, there will be 2 hdc less on every row. Repeat until only 2 ch and 2 hdc remain. Then work the 2 hdc tog, fasten off. Work another ear flap the same way, beg from the other marker. EDGE: Work an edge around the hat with brown. Use hook size 4 mm / G/6 and beg mid back (beg of round on hat). Work 1 sc in every hdc until ear flap, work * 1 sc, 1 ch and skip approx. 1 cm / ½" *, repeat from *-* around the entire ear flap. Work 1 sc in every hdc until other ear flap and work the other ear flap as first. Finish by working 1 sc in every hdc on the edge at the back until beg of round and finish with 1 sl st in first sc from beg of round. Fasten off. DECORATION: EARS: Ears are worked in two parts that are worked tog. Use hook size 4 mm / G/6 and light beige, work 7 ch. ROW 1: Turn piece and work back in ch-row as follows: Start in the third ch from needle, 1 hdc in each of the next 4 ch. Work 6 hdc in the last ch on row, rotate piece and work 1 hdc in underside of each of the 5 ch from ch-row = 16 hdc. Turn piece and switch to light brown. ROW 2: Work 2 ch (replaces first hdc), 4 hdc, work 2 hdc in each of the next 6 hdc and 1 hdc in the last 5 hdc = 22 hdc. Fasten off. Work another ear the same way. Then work 2 more ears BUT entirely in light brown (= back of ears). Place one part with light beige on top of one part in light brown and work like this with light brown: 1 sc in every st until tip of ear, work 2 ch and 1 hdc in 2nd ch from hook, skip 1 sc and work 1 sc in every sc the rest of row. Let the yarn be approx.20 cm / 8" long, this is used for assembly. Repeat on the other ear. Fill the ears with some poly stuffing. ANTLER: Worked in 2 parts that are sewn tog into 1 antler. Beg as follows: Work 3 ch on hook size 4 mm / G/6 and brown, form a ring with 1 sl st in first ch. ROUND 1: Work 1 ch (replace first sc), 7 sc in ch-ring, finish with 1 sl st in first sc = 8 sc. ROUND 2: Work 1 ch (replace first sc) and 1 sc in first sc, then 2 sc in every sc the entire round and finish with 1 sl st in first ch = 16 sc. ROUND 3-5: Work 1 sc in every sc the entire round. Let the thread be approx 20 cm / 8" before cutting it, this is used for assembly. Fill the antler with some poly stuffing. Then make another antler the same way, but work 8 rounds in total with 1 sc in every sc. Leave the thread 20 cm / 8" long before cutting. Sew the small antler on the side of the large antler. Fill the large antler with some poly stuffing. Work another antler the same way. Work another antler the same way. EYES: Work 3 ch on hook size 4 mm / G/6 and brown, form a ring with 1 sl st in first ch. ROUND 1: Work 1 ch (replaces first sc) and 9 sc in ch-ring = 10 sc. Switch to off white and finish with a sl st in the first ch, cut the brown thread. ROUND 2: Work 1 ch (replaces first sc) and 1 sc in first sc, 2 sc in each of the next 2 sc, 2 hdc in next sc, 1 hdc and 1 dc in next sc, 2 dc in next sc, 1 dc and 1 hdc in next sc, 2 hdc in next sc and 2 sc in the last 2 sc and finish with 1 sl st in first ch. Let the yarn be approx. 20 cm / 8" long, this is used for assembly. Work another eye the same way. SNOUT: Work 16 ch on hook size 4 mm / G/6 with light beige. ROW 1: Work 2 ch and 1 hdc in third ch from hook, then work 1 hdc in every ch until 2 ch remain, work 2 hdc tog. - READ CROCHET 2 HDC TOG. Turn piece. ROW 2: Work ch 2, skip first hdc, 1 hdc in every hdc until 1 hdc remains and 2 ch from previous row, work 2 hdc tog with 2nd ch from previous row. Repeat 2nd row 3 times in total. Let the yarn be approx. 20 cm / 8" long, this is used for assembly. NOSE: Work 2 ch on hook size 4 mm / G/6 with red, form a ring with 1 sl st in first ch. ROUND 1: Work 1 ch (replaces first sc) and 5 sc in ch-ring = 6 sc. ROUND 2: Work 1 ch (replace first sc) and 1 sc in first sc, 2 sc in every sc the entire round and finish with 1 sl st in first ch = 12 sc. ROUND 3-4: Work 1 sc in every sc the entire round. Let the yarn be approx. 20 cm / 8" long, this is used for assembly. Fill the nose with some poly stuffing. ASSEMBLY: Fasten the snout mid front of hat, right over the dark brown edge. Sew the nose on the snout. Fasten eyes above the snout. Fasten antlers and ears at the top of the hat. |
|
Have you finished this pattern?Tag your pictures with #dropspattern #littlerudolphhat or submit them to the #dropsfan gallery. Do you need help with this pattern?You'll find 14 tutorial videos, a Comments/Questions area and more by visiting the pattern on garnstudio.com. © 1982-2026 DROPS Design A/S. We reserve all rights. This document, including all its sub-sections, has copyrights. Read more about what you can do with our patterns at the bottom of each pattern on our site. |
|


With over 40 years in knitting and crochet design, DROPS Design offers one of the most extensive collections of free patterns on the internet - translated to 17 languages. As of today we count 324 catalogs and 12290 patterns - 12280 of which are translated into English (US/in).
We work hard to bring you the best knitting and crochet have to offer, inspiration and advice as well as great quality yarns at incredible prices! Would you like to use our patterns for other than personal use? You can read what you are allowed to do in the Copyright text at the bottom of all our patterns. Happy crafting!
Post a comment to pattern DROPS Extra 0-1049
We would love to hear what you have to say about this pattern!
If you want to leave a question, please make sure you select the correct category in the form below, to speed up the answering process. Required fields are marked *.