
Popular categories
Looking for a yarn?


Comments / Questions (14)
![]() Beatha wrote:
Beatha wrote:
Już wiem. Długość mitenek też mierzona jest po skosie, więc jest ok. Mój błąd
23.05.2022 - 19:16DROPS Design answered:
I to też :) Pozdrawiamy!
23.05.2022 - 19:33
![]() Beatha wrote:
Beatha wrote:
Zamierzam zrobić mitenki. W opisie mam nabrać 62 o. Z rozliczenia próbki wynika, że będą miały wtedy długość 24 cm! A mają mieć 17cm. Chyba jest błąd w liczbie oczek wg obliczeń z próbki, moim zdaniem powinno być 42o. a nie 62o. Pozdrawiam
23.05.2022 - 13:29DROPS Design answered:
Witaj Beatho, próbka jest na dżersej, a mitenki są wykonane ściegiem fantazyjnym (odmiana ściegu francuskiego). Pozdrawiamy!
23.05.2022 - 19:32
![]() Anna H wrote:
Anna H wrote:
Jag menar om "minskningar" ska göras i vändningarna dvs mitt i arbetet. Mvh Anna H
25.11.2018 - 12:09
![]() Anna H wrote:
Anna H wrote:
Hej! Jag vill sticka den fina mössan. Undrar om ökningarna endast görs på de varv som når ut till kantmaskan eller om de även ska göras vid vändningen mitt i arbetet? Mvh Anna H
25.11.2018 - 12:07DROPS Design answered:
Hei Anna. Du skal felle masker på starten av hver pinne fra retten, uavhengig av om du er midt i arbeidet eller ikke. Husk å lese FELLETIPS 2. God fornøyelse
26.11.2018 - 10:48
![]() Dorthe Hansen wrote:
Dorthe Hansen wrote:
Hvor på hue skal der måles ?? Sød og sjov model .👍 Hilsen Dorthe
16.11.2017 - 14:11DROPS Design answered:
Hej Dorthe, huen måler 26-27 i højden og 49-53 cm rundt. God fornøjelse!
22.11.2017 - 14:38
![]() Birgit Villain wrote:
Birgit Villain wrote:
Bei der Mütze verstehe ich nicht wo ich zunehmen muss bei den verkürzten Reihen. Mitten in der Reihe? Vielen Dank für Ihre Hilfe.
27.12.2016 - 22:33DROPS Design answered:
Liebe Frau Villain, die Zunahmen bei der Mütze sind am Ende jeder Hin-R gestrickt (= immer neben der Randm zunehmen, dh die Zunahmen werden am Ende jeder Hin-R über alle Maschen gestrickt. Viel Spaß beim stricken!
29.12.2016 - 14:55
![]() MAIZIE MORRIS wrote:
MAIZIE MORRIS wrote:
I have questions about this pattern i,m doing the hat so i am doing short rows so it tells me to dec.at the beg.of every row from RS.& TO INC.AT THE END OF ROW FROM RS.SO IF THATS THE RIGHT WAY I,M DOING IT THERE SHOULD BE THE SAME AMOUNT OF STS.ON EVERY ROW . I JUST FINISHED R.4 WERE I HAD TO P 40 ST & TURN. WHEN I DO ROW 5 WHICH IS A RS ROW DO I DEC AT THE BEG.OF ROW & INC.AT THE END EVEN THOUGH IT WAS A TURNING ROW .I,M A LITTLE CONFUSED ,HELP .
08.04.2016 - 18:57DROPS Design answered:
Dear Mrs Morris, dec at beg of every row from RS (see increase tip 2 how/where to dec) and inc at the end of every row from RS (with a YO inside 1 edge st). Happy knitting!
11.04.2016 - 10:46
![]() Therese Dahl Kristensen wrote:
Therese Dahl Kristensen wrote:
I oppskriften står det at man skal felle av på allle pinner på "retten". Under "mønster" er kun pinne 1 angitt som retten. Pinne to "vrangen" et grei. Men pinne 3 og 4 er jo også rett, men de skal ikke kalles "retten"?
08.02.2016 - 23:44DROPS Design answered:
Hej. Den ena sidan av det du stickar är retten och den andra är vrangen oavsett om du stickar rett eller vrangt. Pinne 1, 3, 5 osv är alltså från retten och du feller på alla de. Lycka till!
10.02.2016 - 12:28
![]() Stefanie wrote:
Stefanie wrote:
Hallo, jetzt habe ich den Hinweis gelesen...nur in der Hinreihe wird zu- und abgenommen...:) Schönes Wochenende!
07.02.2015 - 13:15
![]() Stefanie wrote:
Stefanie wrote:
Hallo! Ich stricke die Pulswärmer und frage mich, ob ich in jeder Reihe ab- und zunehmen muss, oder aber nur in der Hinreihe? Das ist für mich aus der Anleitung nicht ganz ersichtlich. Danke schon im Voraus! Viele Grüße, Stefanie
07.02.2015 - 13:10
|
|
Erin#erinset |
|
 |
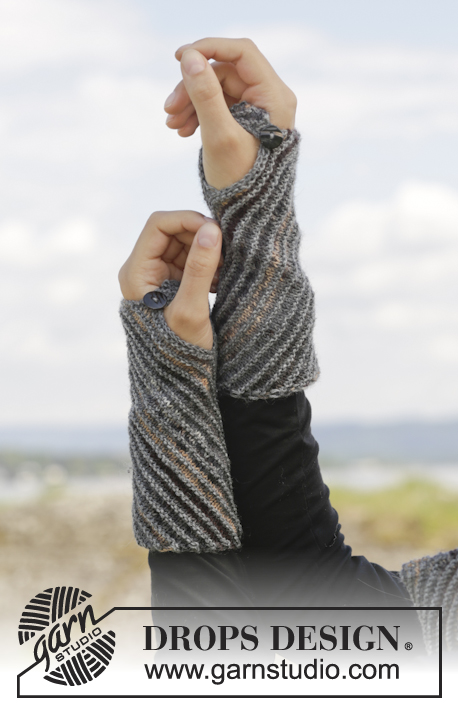 |
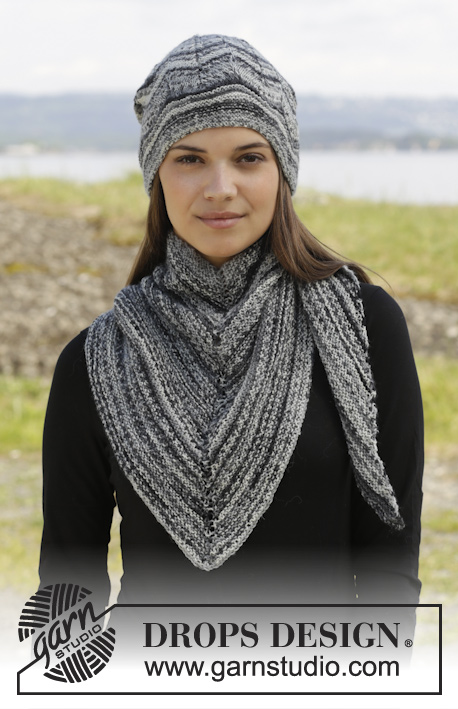
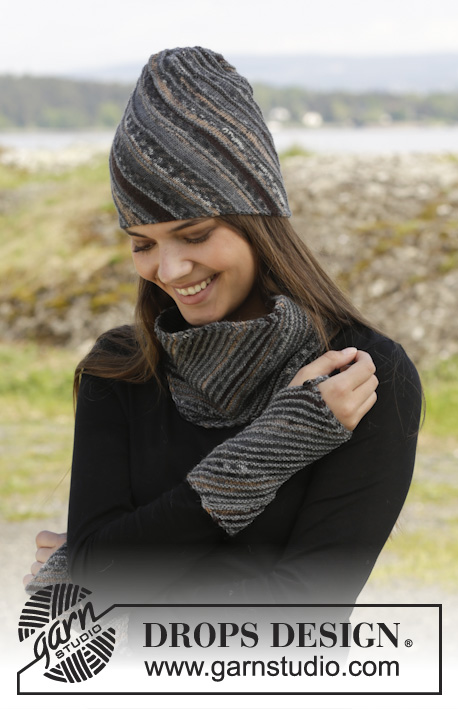
Knitted DROPS hat, neck warmer and wrist warmers in stockinette st with diagonal ridges in ”Fabel”.
DROPS 157-44 |
|
|
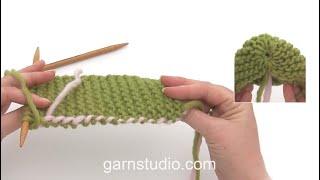
GARTER ST (back and forth on needle): K all rows. 1 ridge = K2 rows. PATTERN: NOTE: Yarn change should always be in same side of piece. Row 1 (= RS): K with gray/brown Row 2 (= WS): P with gray/brown. Row 3: K with gray. Row 4: K with gray. Repeat rows 1 to 4. DECREASE TIP 1: Dec inside 1 edge st through entire piece. Dec after 1 edge st as follows: K 2 tog. Dec before 1 edge st as follows: K 2 tog. DECREASE TIP 2: Dec inside 1 st at beg of every row from RS by K 2 tog. On 1st and 3rd row in short rows dec inside 1 edge st in GARTER ST - see explanation above. On 5th, 7th and 9th row dec inside 1 K. INCREASE TIP: Inc inside 1 edge st through entire piece. Inc 1 st by making a YO. On next row work YO twisted (i.e. work in the back loop of st instead of front) to avoid holes. SHORT ROWS: Work short rows AT THE SAME TIME dec at beg of every row from RS - READ DECREASE TIP 2 and inc at the end of every row from RS - READ INCREASE TIP! Row 1 (= RS): 1 edge st in garter st, K until 1 st remains, 1 edge st in garter st, turn (gray). Row 2: 1 edge st in garter st, K until 1 st remains, 1 edge st in garter st, turn (gray). Row 3: 1 edge st in garter st, K until 1 st remains, 1 edge st in garter st, turn (gray/brown). Row 4: 1 edge st in garter st, P over the next first 40 sts, turn (gray/brown). Row 5: K until 1 st remains, 1 edge st in garter st, turn (gray/brown). Row 6: 1 edge st in garter st, P over the next 68-70 sts, turn (gray/brown). Row 7: K until 1 st remains, 1 edge st in garter st, turn (gray/brown). Row 8: 1 edge st in garter st, P over the next 82-86 sts, turn (gray/brown). Row 9: K until 1 st remains, 1 edge st in garter st, turn (gray/brown). Row 10: 1 edge st in garter st, P until 1 st remains, 1 edge st in garter st (gray/brown). ---------------------------------------------------------- HAT: Worked back and forth on needle. Cast on 89-93 sts on needle size 3 mm / US 2.5 with gray. Work SHORT ROWS - see explanation above. REMEMBER THE GAUGE! Continue like this back and forth until piece measures 49-53 cm / 19 1/4"-21" - adjust after a whole repetition with short rows. The hat measures approx. 26-27 cm / 10 1/4"-10½" vertically. Switch to gray, work 1 ridge and loosely bind off. ASSEMBLY: Fold cast-on edge and bind-off edge towards each other and sew neatly tog st by st. Baste a strand st by st at beg of every row from RS (i.e. at the top of hat), and tighten tog. Cut the yarn and fasten. ---------------------------------------------------------- NECK WARMER: Worked back and forth on needle. Inc in one side and dec in the other side on every row from RS, to get diagonal ridges. Cast on 67 sts on needle size 3 mm / US 2.5 with gray. Work 1 ridge in GARTER ST - see explanation above. Then switch to gray/brown and work PATTERN – see explanation above – over all sts on needle, AT THE SAME TIME dec 1 st inside 1 edge st at beg of row from RS – READ DECREASE TIP 1, and inc 1 st inside 1 edge st at the end of row from RS – READ INCREASE TIP! REMEMBER THE GAUGE! Continue like this until piece measures 58 cm / 22 3/4'' along dec side - adjust so that last row is 4th row in pattern. Loosely bind off with gray. ASSEMBLY: Fold cast-on edge and bind-off edge towards each other and sew neatly tog st by st. Cut and fasten the yarn. ---------------------------------------------------------- WRIST WARMERS: Worked back and forth on needle. RIGHT WRIST WARMER: Inc in one side and dec in the other side on every row from RS, to get diagonal ridges. Cast on 62 sts on needle size 3 mm / US 2.5 with gray. Work 1 ridge in GARTER ST - see explanation above. Then switch to gray/brown and work PATTERN – see explanation above – over all sts on needle, AT THE SAME TIME dec 1 st inside an edge st at beg of every row from RS – READ DECREASE TIP 1, and inc 1 st inside 1 edge st at the end of every row from RS – READ INCREASE TIP! REMEMBER THE GAUGE! Continue like this until piece measures 18 cm / 7'' along dec side - adjust so that last row is 4th row in pattern. Loosely bind off with gray. LEFT WRIST WARMER: Cast on 62 sts on needle size 3 mm / US 2.5 with gray. Work 1 ridge. Now switch to gray/brown and continue as on right wrist warmer but inc at beg of every row from RS and dec at the end of every row from RS. Continue like this until piece measures 18 cm / 7'' along dec side - adjust so that last row is 4th row in pattern. Loosely bind off with gray. ASSEMBLY: Sew cast-on edge and bind-off edge neatly tog st by st, but leave approx. 7 cm / 2¾'' that are not sewn. Sew a button through bind-off and cast-on edge to make a hole for thumb. Fasten off. |
|
Have you finished this pattern?Tag your pictures with #dropspattern #erinset or submit them to the #dropsfan gallery. Do you need help with this pattern?You'll find 18 tutorial videos, a Comments/Questions area and more by visiting the pattern on garnstudio.com. © 1982-2026 DROPS Design A/S. We reserve all rights. This document, including all its sub-sections, has copyrights. Read more about what you can do with our patterns at the bottom of each pattern on our site. |
|


With over 40 years in knitting and crochet design, DROPS Design offers one of the most extensive collections of free patterns on the internet - translated to 17 languages. As of today we count 324 catalogs and 12278 patterns - 12268 of which are translated into English (US/in).
We work hard to bring you the best knitting and crochet have to offer, inspiration and advice as well as great quality yarns at incredible prices! Would you like to use our patterns for other than personal use? You can read what you are allowed to do in the Copyright text at the bottom of all our patterns. Happy crafting!
Post a comment to pattern DROPS 157-44
We would love to hear what you have to say about this pattern!
If you want to leave a question, please make sure you select the correct category in the form below, to speed up the answering process. Required fields are marked *.