
Popular categories
Looking for a yarn?


Comments / Questions (298)
![]() Sue Wardle wrote:
Sue Wardle wrote:
Apologies re previous post - spreadsheet was incorrect! but I am still left with 5 stitches too few at 236 instead of 241.
14.11.2014 - 13:59DROPS Design answered:
Dear Mrs Wardle, can this come from "dec 1" as you said before ? ie you have to dec the 5 sections P16 into P1, ie you will dec a total of 15 sts in each of these sections, ie you dec a total of 7 times P2 tog twice in each of these sections (4 dec), then P2 tog the last 2 sts = P1 left. Happy knitting!
14.11.2014 - 15:06
![]() Sue Wardle wrote:
Sue Wardle wrote:
For size Med, I have calculated my decreases required comes to 100 stitches less in total ie Dec 1 = 70 stitches less in total Dec 2 = 14 stitches less in total Dec 3 = 16 stitches less in total This would leave me with 218 stitches instead of the 241 stitches in the pattern. Where am I going wrong in my calculations? Many thanks.
14.11.2014 - 12:51DROPS Design answered:
Dear Mrs Wardle, in size M you start pattern with 362 sts then dec 1 = 75 sts (you dec in the P16 into P1: 15 sts dec x 5 sections P16 into P1), then dec 2 (14 sts) and dec 3 (32 sts: 16 sts a total of 2 times) = 362 - 75 - 14 - 32 = 241 sts. Happy knitting!
14.11.2014 - 14:54
![]() Monika Breininger wrote:
Monika Breininger wrote:
Liebes Drops Team, vielen Dank für die super Anleitung. Habe eine Frage. Beim Rundstricken der Ärmel habe ich leider am Übergang von einer Nadel zur nächsten breit gezogene Maschen, die sich dann auf der gesamten Ärmellänge hinziehen. Ich versuche, den Faden an den Nadelübergängen fest anzuziehen, aber leider ohne Erfolg. Das passiert mir übrigens auch bei Strümpfen. Habt Ihr vielleicht einen Trick, wie man den Übergang schön glatt bekommt? Vielen Dank! Monika
14.11.2014 - 08:03DROPS Design answered:
Ein Trick besteht darin, den Übergang nicht immer an dieselbe Stelle zu legen. Sie können also z.B. die 1. M von der nächsten Nadel auf die Nadel davor heben und somit als letzte M der letzten Nadel stricken. Wenn Sie das immer mal wieder machen (es können auch mal 2 M sein, und auch in "umgekehrter" Richtung), ergeben sich keine "breiteren Maschen". Sie müssen natürlich darauf achten, dass Sie den Rundenbeginn nicht aus den Augen verlieren.
15.11.2014 - 17:50
![]() Marit Simensen wrote:
Marit Simensen wrote:
Hei. Vi trenger til str L. I denne jakken Mvh Marit simensen
09.11.2014 - 07:51DROPS Design answered:
Large: 378 m M.2= (8+3+8)19 A.2=10 A.1=10 A.4=6 A.5=6 Hvis du skriver rækkefølgen op og med antal masker under, så vil du få det til at stemme: 8, A2, M2, A4, 16v, A5, M2, A4, 9v, A5, M2, A4, 16v, A5, M2, A1, 16v, A2, M2, A4, 16v, A5, M2, A4, 9v, A5, M2, A4, 16v, A5, M2, A1, 8 Og omregnet i antal masker: 8 10 19 6 16 6 19 6 9 6 19 6 16 6 19 10 16 10 19 6 16 6 19 6 9 6 19 6 16 6 19 10 8 = 378
25.11.2014 - 10:11
![]() Toril Røsseng wrote:
Toril Røsseng wrote:
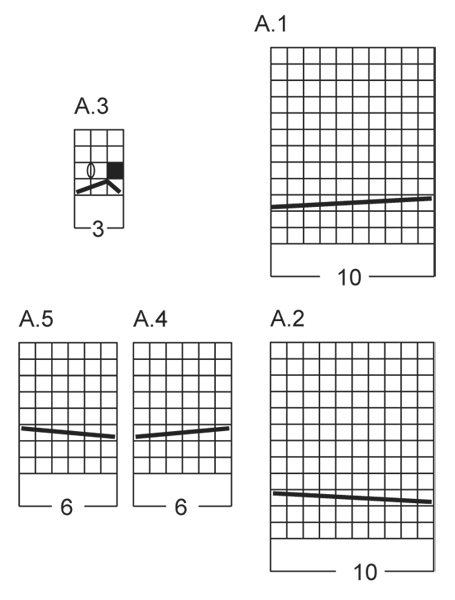
Kan du forklare hvordan diagramm A3 strikkes.hvor gjør jeg kastet, på vrangsida, eller ny omg.
03.11.2014 - 19:21DROPS Design answered:
Hej Torill. Du strikker förste raekke (retten) som fölger: ta 1 m løst av p som den skulle strikkes rett, 2 m rett, ta den løse m over de 2 m rett (dvs, 3 masker bliver 2 masker). Paa vrangen laeser du fra venstre mod höyre, saa du strikker: 1 vrang, 1 kast, 1 vrang (dvs, 2 masker bliver 3 masker igen).
05.11.2014 - 17:04
![]() Marit Simensen wrote:
Marit Simensen wrote:
Hei. Min mor og jeg forsøker å strikke denne jakken, men får ikke mønsteret til å stemme. Kan du være så snill å sette opp, helt konkret den første rillen? Hele pinnen altså? Mvh marit
26.10.2014 - 11:53DROPS Design answered:
Hei Marit. Hvilken str strikker I, saa kan jeg lave et eksempel til jer.
27.10.2014 - 17:49
![]() Gitte K wrote:
Gitte K wrote:
Hej Hvad betyder det, når der i forklaringen til diagrammet står ved den sorte firkant "denne m er felt" ?
22.10.2014 - 16:08DROPS Design answered:
Hej Gitte, Det betyder "denne maske er lukket af/taget ind". Jeg skal få det rettet så det står på dansk. Tak for information!
23.10.2014 - 09:55
![]() Sabine Enderle wrote:
Sabine Enderle wrote:
Liebes Drops Team, bin jetzt beim Schalkragen angekommen. Ist dieser über alle 21 M (Größe L) Kraus rechts zu Stricken oder ist das "neue Muster" aufgrund der geringeren Maschen beizubehalten ? Freue mich auf Ihre Antwort ! LG Sabine
20.10.2014 - 10:12DROPS Design answered:
Liebe Frau Enderle, Sie behalten das Muster bei den verkürzten Schalkragen-R bei, das durch die Abnahmen der M in den einzelnen Mustern entstanden ist. Weiterhin gutes Gelingen!
20.10.2014 - 13:17
![]() Ingrid Vogel wrote:
Ingrid Vogel wrote:
Liebes Drops Team, diese schöne Jacke würde ich gerne nacharbeiten in XXXL. Scheitere aber schon am Anfang mit der Aufteilung der Maschen. Die genannten 462 M bekomme ich nicht aufgeteilt ich habe noch jede Menge übrig. Wo liegt mein Fehler an welcher Stelle der angegebenen Muster könnte es liegen, das ich es nicht verstanden habe?
19.10.2014 - 11:49DROPS Design answered:
Liebe Frau Vogel, versuchen Sie, sich die Musterabfolge mit den entsprechenden Maschenzahlen untereinander auf einen Zettel zu schreiben, um eine bessere Übersicht zu bekommen. Beachten Sie, das MUSTER-2 in Ihrer Größe 23 M hat. Die Musterabfolge geht auf jeden Fall in den 462 M auf.
19.10.2014 - 21:45
![]() Sibylle wrote:
Sibylle wrote:
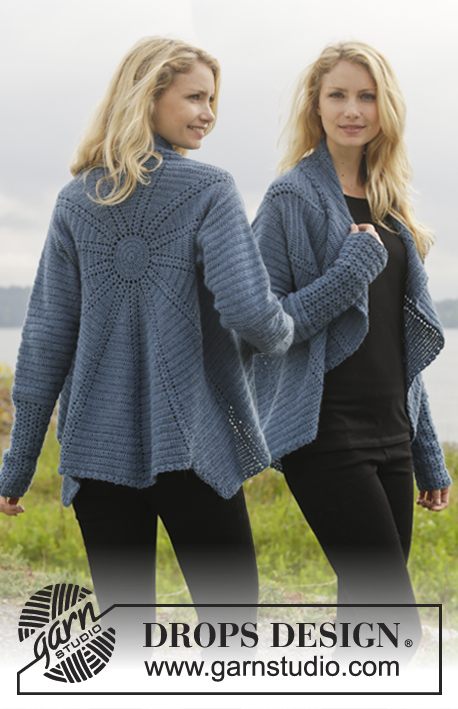
Hallo, können Sie mir sagen, welche Größe das Model auf der Abbildung trägt? Vielen Dank!
18.10.2014 - 16:32DROPS Design answered:
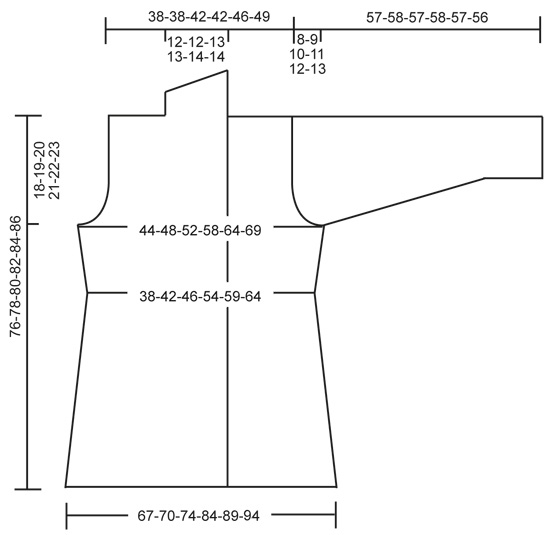
Die Jacke müsste Größe S sein, höchstens M. Beachten Sie die Maße in der Maßskizze, um die für Sie passende Größe herauszufinden. Viel Spaß beim Stricken!
23.10.2014 - 11:57
|
|||||||||||||||||||||||||
Morning Glory#morningglorycardigan |
|||||||||||||||||||||||||
 |
 |
||||||||||||||||||||||||
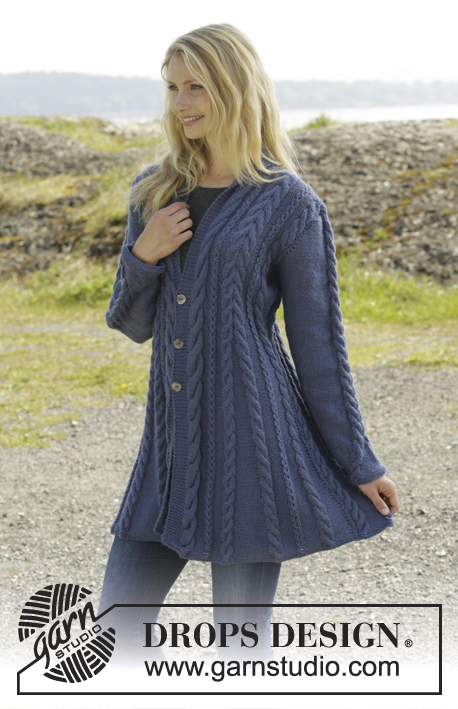
Knitted DROPS jacket with cables and shawl collar in ”Karisma”. Size: S - XXXL.
DROPS 158-1 |
|||||||||||||||||||||||||
|
GARTER ST (back and forth on needle): K all rows. 1 ridge = K2 rows. GARTER ST (in the round on double pointed needles): * K 1 round and P 1 round *, repeat from *-*. 1 ridge = 2 rounds. DECREASE TIP: Dec 1 st before marker/A.3 as follows: Work until 2 sts remain before marker, P 2 tog. Dec 1 st after marker/A.3 as follows: P 2 tog. PATTERN 1: See diagrams A.1-A.5. The diagrams show all rows in pattern seen from RS. PATTERN 2: P 7-7-8-8-9-10, A.3, P 7-7-8-8-9-10. PATTERN 3: P 4-5-6-6-7-8, A.3, P 4-5-6-6-7-8. BUTTONHOLES: Dec for buttonholes on right band. 1 buttonhole = K tog second and third st from edge and make 1 YO. Dec for buttonholes when piece measures: SIZE S: 31, 39 and 47 cm / 12¼",15¼",18½" SIZE M: 31, 39 and 47 cm / 12¼",15¼",18½" SIZE L: 31, 39 and 47 cm / 12¼",15¼",18½" SIZE XL: 32, 40 and 48 cm / 12½",15¾",19" SIZE XXL: 32, 40 and 48 cm / 12½",15¾",19" SIZE XXL: 32, 40 and 48 cm / 12½",15¾",19" ---------------------------------------------------------- BODY: Worked back and forth on circular needle. Cast on 306-318-334-378-398-418 sts (includes 8 band sts in each side of piece) on circular needle size 3.5 mm / US 4 with Karisma. Work 2 ridges in GARTER ST - see explanation above AT THE SAME TIME on last row inc 44 sts evenly = 350-362-378-422-442-462 sts. Switch to circular needle size 4 mm / US 6. Then work from RS AT THE SAME TIME insert 2 markers and 0-0-0-4-4-4 strands in the piece as follows: Work 8 band sts in garter st, A.2, PATTERN 2 – see explanation above, A.4, P 14-16-16-16-16-16, A.5, pattern 2, A.4, P 0-0-0-8-9-10, insert 1 strand in size XL-XXL-XXXL, A.3 0-0-0-1-1-1 time, insert 1st marker, P 8-9-9-9-9-9, A.3 0-0-0-1-1-1 time, insert 1 strand in size XL-XXL-XXXL, P 0-0-0-8-9-10, A.5, pattern 2, A.4, P 14-16-16-16-16-16, A.5, pattern 2, A.1, P 14-16-16-16-16-16, A.2, pattern 2, A.4, P 14-16-16-16-16-16, A.5, pattern 2, A.4, P 0-0-0-8-9-10, insert 1 strand in size XL-XXL-XXXL, A.3 0-0-0-1-1-1 time, P 8-9-9-9-9-9, insert 2nd marker, A.3 0-0-0-1-1-1 time, insert 1 strand in size XL-XXL-XXXL, P 0-0-0-8-9-10, A.5, pattern 2, A.4, P 14-16-16-16-16-16, A.5, pattern 2, A.1, 8 band sts in garter st. Move the markers and strands upwards when working. Work band sts in garter st until finished measurements. Work K over K sts between cables from WS, i.e. P sts seen from RS. Continue pattern like this. Remember BUTTONHOLES - see explanation above. REMEMBER THE GAUGE! When piece measures 8-10-10-10-10-10 cm / 4", dec as follows: Dec in every section with 14-16-16-16-16-16 P sts by working as follows: P 2 tog, P 10-12-12-12-12-12, P 2 tog (= 10 sts dec in total). Repeat this dec every 5-4-4-4-4-4 cm / 2"-1½"-1½"-1½"-1½"-1½" 6-7-7-7-7-7 more times. NOTE: On last dec work the remaining 2 P tog. AT THE SAME TIME when piece measures 8-10-10-10-10-10 cm / 3"-4"-4"-4"-4"-4", dec as follows: Dec 1 st after 1st marker and 1 st before 2nd marker - see DECREASE TIP. Repeat this dec every 6-4½-4½-4½-4½-4½ cm / 2⅜"-1¾"-1¾"-1¾"-1¾"-1¾" 5-6-6-6-6-6 more times. AT THE SAME TIME when piece measures 16 cm / 6¼", dec as follows in pattern 2: Dec 1 st before A.3 and 1 st after A.3 (= 16 sts dec). Repeat this dec every 10-20-20-20-20-20 cm / 4"-8"-8"-8"-8" 2-1-1-1-1-1 more times. AT THE SAME TIME in size XL-XXL-XXXL dec as follows at every strand: Dec 1 st by working the 2 P sts closes to A.3 P tog (= 4 sts dec). Repeat this dec every 20 cm / 8" 1 more time. When all dec are done, there are 225-241-257-293-313-333 sts on needle. There are now 2 P st at markers in the sides and 1 P st between A.4 and A.5 and between A.1 and A.2 and 4-5-6-6-7-8 P sts on each side of A.3. When piece measures 44 cm / 17¼", adjust so that next row is from RS, inc as follows: 8 band sts in garter st, A.2, PATTERN 3 – see explanation above, A.4, P 1, A.5, pattern 3, A.4, P 0-0-0-6-7-8, A.3 0-0-0-1-1-1 time, 1 YO, P 2, 1 YO, A.3 0-0-0-1-1-1 time, P 0-0-0-6-7-8, A.5, pattern 3, A.4, P 1, A.5, pattern 3, A.1, P 1, A.2, pattern 3, A.4, P 1, A.5, pattern 3, A.4, P 0-0-0-6-7-8, A.3 0-0-0-1-1-1 time, 1 YO, P 2, 1 YO, A.3 0-0-0-1-1-1 time, P 0-0-0-6-7-8, A.5, pattern 3, A.4, P 1, A.5, pattern 3, A.1, 8 band sts in garter st (= 4 sts inc). K YOs twisted on next row to avoid holes. Repeat inc every 6th-6th-6th-12th-10th-12th row 5-5-5-3-4-4 more times = 249-265-281-309-333-353 sts. Work inc sts P from RS and K from WS. When piece measures 58-59-60-61-62-63 cm / 22¾"-23¼"-23⅝"-24"-24⅜"-24¾", divide the piece, finish front and back pieces separately as follows: Slip the first and last 66-70-74-81-87-92 sts on a stitch holder for front pieces, cut the yarn, then work only over the middle 117-125-133-147-159-169 sts (= back piece). BACK PIECE: Now bind off for armholes at beg of every row in each side as follows: bind off 3 sts 1 time, then 2 sts 1-1-1-3-4-4 times and 1 st 1-1-1-4-4-5 times = 105-113-121-121-129-137 sts. Then dec on next row from RS as follows: Dec 1 st before A.3 and 1 st after A.3 0-1-1-1-1-1 time = 105-105-113-113-121-129 sts. When piece measures 73-75-77-79-81-83 cm / 28¾"-29½"-30⅜"-31"-32"-32¾", dec 5 sts over A.1 and 5 sts over A.2 by working 2 and 2 sts K tog = 95-95-103-103-111-119 sts on needle. Then bind off the middle 25-25-27-27-29-31 sts for neck and finish each shoulder separately = 35-35-38-38-41-44 sts remain on each shoulder. When piece measures 75-77-79-81-83-85 cm / 29½"-30⅜"-31"-32"-32¾"-33½", dec 3 sts over every A.4 and A.5 (= 9 sts dec) = 26-26-29-29-32-35 sts remain on needle. Bind off. RIGHT FRONT PIECE: = 66-70-74-81-87-92 sts. Now bind off for armhole at beg of every row from the side as follows: bind off 3 sts 1 time, then 2 sts 1-1-1-3-4-4 times and 1 st 1-1-1-4-4-5 times = 60-64-68-68-72-76 sts. Then dec on next row from RS as follows: Dec 1 st before A.3 and 1 st after A.3 0-1-1-1-1-1 time = 60-60-64-64-68-72 sts on needle. When piece measures 75-77-79-81-83-85 cm / 29½"-30⅜"-31"-32"-32¾"-33½", dec 5 sts over A.2 by working 2 and 2 sts K tog and 3 sts over every A.4 and A.5 = 46-46-50-50-54-58 sts. Then bind off the first 26-26-29-29-32-35 sts for shoulder, work the rest of row = 20-20-21-21-22-23 sts. Then work shawl collar in garter st over the remaining sts, beg mid front (1st row = RS) as follows: * Work 2 rows back and forth over the first 12-12-13-13-14-15 sts, work 2 rows back and forth over all sts *, repeat from *-* until shawl collar measures 8-8-9-9-10-10 cm / 3⅛"-3⅛"-3½"-3½"-4"-4" at the shortest. Bind off. LEFT FRONT PIECE: Work as right front piece but reversed. Dec 5 sts over A.1 instead of A.2. Shawl collar beg from WS. SLEEVE: Worked in the round on double pointed needles. Cast on 48-50-52-54-54-56 sts on double pointed needles size 3.5 mm / US 4 with Karisma. Work 2 ridges in GARTER ST - see explanation above AT THE SAME TIME on last round inc 5 sts = 53-55-57-59-59-61 sts. Switch to double pointed needles size 4 mm / US 6. READ ALL OF THE FOLLOWING SECTION BEFORE CONTINUING! Work as follows: P 4-5-6-7-7-8, A.4, P 33, A.5, finish with P 4-5-6-7-7-8. Insert 1 marker at the beg of the round. On next round move A.4 and A.5 1 st towards the middle as follows: P 4-5-6-7-7-8, 1 YO, A.4, P 2 tog, P 29, P 2 tog, A.5, 1 YO, finish with P 4-5-6-7-7-8. P YO twisted on next round. Move A.4 and A.5 towards the middle 1 st every other round until 1 st remains between A.4 and A.5. Piece measures approx. 12 cm / 4¾". Continue to work P and A.4/A.5 with 1 P st between until finished measurements. AT THE SAME TIME when piece measures 10 cm / 4", inc 1 st on each side of marker. Repeat inc every 4-3½-2½-2½-2-1½ cm / 1½"-1¼"-⅞"-7/"-¾"-½" 9-10-12-13-16-17 more times = 73-77-83-87-93-97 sts. When piece measures 49-49-47-47-46-43 cm / 19¼"-19¼"-18½"-18½"-18"-17" (shorter measurements in the larger sizes because of longer sleeve cap and wider shoulders) bind off for sleeve cap at beg of every row in each side: bind off 4 sts 1 time, 2 sts 3 times and 1 st 6 times, then bind off 2 sts in each side until piece measures 56-57-56-57-56-55 cm/22"-22½"-22"-22½"-22"-21½", then bind off 3 sts 1 time in each side AT THE SAME TIME dec 2 sts over every cable. Bind off the remaining sts, piece measures approx. 57-58-57-58-57-56 cm / 22½"-22¾"-22½"-22¾"-22½"-22". Make another sleeve. ASSEMBLY: Sew the shoulder seams. Sew in sleeves. Sew the collar tog mid back and sew it to the neckline. Sew the buttons on to left band. SHAPING: Moisten piece and place it on a carpet or mattress - carefully stretch it out to measurements. Leave to dry. |
|||||||||||||||||||||||||
Diagram explanations |
|||||||||||||||||||||||||
|
|||||||||||||||||||||||||
 |
|||||||||||||||||||||||||
 |
|||||||||||||||||||||||||
Have you finished this pattern?Tag your pictures with #dropspattern #morningglorycardigan or submit them to the #dropsfan gallery. Do you need help with this pattern?You'll find 30 tutorial videos, a Comments/Questions area and more by visiting the pattern on garnstudio.com. © 1982-2026 DROPS Design A/S. We reserve all rights. This document, including all its sub-sections, has copyrights. Read more about what you can do with our patterns at the bottom of each pattern on our site. |
|||||||||||||||||||||||||


With over 40 years in knitting and crochet design, DROPS Design offers one of the most extensive collections of free patterns on the internet - translated to 17 languages. As of today we count 324 catalogs and 12245 patterns - 12235 of which are translated into English (US/in).
We work hard to bring you the best knitting and crochet have to offer, inspiration and advice as well as great quality yarns at incredible prices! Would you like to use our patterns for other than personal use? You can read what you are allowed to do in the Copyright text at the bottom of all our patterns. Happy crafting!
Post a comment to pattern DROPS 158-1
We would love to hear what you have to say about this pattern!
If you want to leave a question, please make sure you select the correct category in the form below, to speed up the answering process. Required fields are marked *.