
Popular categories
Looking for a yarn?


Comments / Questions (298)
![]() Barbara McLennan wrote:
Barbara McLennan wrote:
I am about to knit the collar, I notice that first you reduce all the cables to half the stitches, so what stitch is the collar knitted in?
16.01.2015 - 02:15DROPS Design answered:
Dear Mrs McLennan, you first cast off sts for shoulder (where you reduced the cables to half the sts), the remaining sts are for collar, work row to the end, then starting from mid front (outwards edge), work short rows about the sts for collar. Happy knitting!
16.01.2015 - 10:06
![]() Adrie wrote:
Adrie wrote:
Ben bezig met de 5e naald van di patroon in maat L, 334 steken opgezet, daarna 44 st gemeerderd, dan 5e naald hou ik 78 st over. U liet weten dat we dan patroon 2 en 3 niet goed breien. Maar hoe kan ik zien dat het niet A3 die achter patroon 2 staat, maar de A3 die achter patroon 3 staat. Heb het al verschillende malen uitgehaald, het schiet niet op. Vandaar dat ik u maar mail. Alvast bedankt voor de uitleg.
14.01.2015 - 19:46DROPS Design answered:
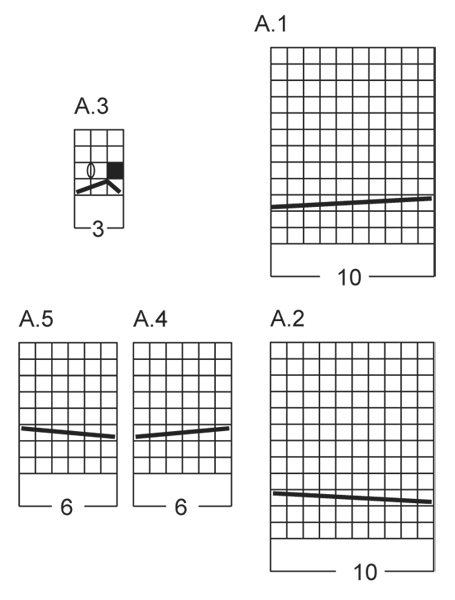
Hoi Adrie. Bij maat L breit u: 8 voorbies st in ribbelst, A.2 (10 st), PATROON 2 (19 st), A.4 (6 st), 16 av, A.5 (6 st), patroon 2, A.4, plaats 1e markeerder, 9 av, A.5, patroon 2, A.4, 16 av, A.5, patroon 2, A.1, 16 av, A.2, patroon 2, A.4, 16 av, A.5, patroon 2, A.4, 9 av, plaats 2e markeerder, A.5, patroon 2, A.4, 16 av, A.5, patroon 2, A.1, 8 voorbies st in ribbelst = 378 st. Vergeet niet om bij A.3 de omslag in de tweede nld te maken zodat het aantal st gelijk blijven. Plaats eventueel eerst markeerders tussen elk patroon, dan is het makkelijk te onderscheiden.
23.01.2015 - 16:31
![]() Elisabeth Sørensen wrote:
Elisabeth Sørensen wrote:
Jeg er færdig med at strikke jakken og mangler nu ærmerne, hvilket jeg har problemer med. jeg vil gerne have en uddybende beskrivelse af flytning af A4 og A5 mod midten. Er det kun den ene snoning der bliver flyttet?
12.01.2015 - 09:28DROPS Design answered:
Hej Elisabeth. Nej, det er begge snoninger: På næste omg forflyttes A.4 og A.5 1 m mod midten således:... Dvs, naar du laver slaa om/strikker sammen paa hver side af beggen kablerne flytter du faktisk langsomt kablerne ind mod hinanden indtil der kun er 1 vr mellem dem.
12.01.2015 - 16:14
![]() Beanie wrote:
Beanie wrote:
Are the charts read from left to right or right to left?
11.01.2015 - 04:21DROPS Design answered:
Dear Beanie, please click here to read more about diagrams - when diagram is worked in the round, read all rows in diagram from the left to the right, when diagram is worked back and forth, read from the right towards the left from RS and from the left towards the right from WS. Happy knitting!
12.01.2015 - 10:02
![]() Gisela wrote:
Gisela wrote:
Liebes Drops Team, kann es sein, dass die zwei 6M-Zöpfe im Vorderteil, die dann auf der Schulter zusammen laufen, in der Strickanleitung genau umgekehrt beschrieben sind als der Zopfverlauf bei der Jacke auf dem Foto gestrickt wurde? Die Zöpfe im Vorderteil laufen momentan laut Strickanleitung wie die im Rücken zusammen, was dann aber ein ganz anderes Muster ergibt als das auf dem Foto. Ist dies korrekt? Vielen Dank schon mal für Ihre Hilfe!!
11.01.2015 - 00:05DROPS Design answered:
Ja, ich glaube auch, dass die besagten 6-M-Zöpfe vertauscht werden müssten, da sie momentan genau gegenläufig sind wie auf dem Foto. Sie müssten an den Vorderteilen also A.4 und A.5 vertauschen. Ich leite die Frage auf jeden Fall an die Designerinnen weiter, allerdings ist gerade die neue Kollektion noch vorrangig. Sie können mit den vertauschten Zopfmustern stricken und Ihr Ergebnis noch einmal mit dem Foto abgleichen. Die Vorderteile müssen ja zudem gegengleich sein.
18.01.2015 - 19:21
![]() YOLANDE wrote:
YOLANDE wrote:
Bonjour Je suis arrivée aux diminutions pour le col du dos et je ne comprends pas les explications Il y a écrit "diminuer 5m au-dessus de A.1 et 5m au-dessus de A.2" J'ai beau le relire, je ne comprends pas. J'ai téléphoné là où j'ai acheté la laine, la vendeuse ne comprend pas non plus Merci de m'aider
07.01.2015 - 09:38DROPS Design answered:
Bonjour Yolande, pour éviter que les 10 m de la torsade ne soient trop large quand on les rabat, on diminue 5 m au-dessus de la torsade (A.1 et A.2) en tricotant les 10 mailles ens 2 par 2= on diminue 5 m, il reste 5 m au-dessus de A.1 et A.2 - au rang suivant, on rabat les mailles indiquées, la bordure d'encolure sera droite et ne "gondolera" pas. Bon tricot!
07.01.2015 - 10:48
![]() Bernadette wrote:
Bernadette wrote:
Bonjour, je ne comprends pas les explications pour le col chale, pouvez-vous me simplifier, s'il vous plait, merci
06.01.2015 - 10:39DROPS Design answered:
Bonjour Bernadette, pour que le col soit plus large côté extérieur que côté couture (le long de l'encolure dos), on tricote plus de rangs sur les mailles de l'extérieur, commencez par l'extérieur et tricotez 2 rangs sur les 12-13-14-15 premières m, 2 rangs sur toutes les mailles jusqu'à ce que le col mesure 8-9-10 cm côté couture le long du dos (le côté le plus court). Bon tricot!
06.01.2015 - 16:57
![]() Karen wrote:
Karen wrote:
I have pulled this out 2x, working with the XL size, and I have too many stitches when I get to the end of the 1st row. Not sure what I'm doing wrong. Can you please explain what it means to "insert 1 strand"? Is it considered a stitch marker also?
31.12.2014 - 19:25DROPS Design answered:
Dear Karen, in size XL, work as follows: 8sts in garter st, A.2 (=10 sts), PATTERN2 (= P 8, A.3, P 8 = 19sts), A.4 (=6 sts), P16, A.5 (6 sts), pattern2, A.4, P8, insert 1 strand, A.3 (=3sts), insert 1st marker, P9, A.3, insert 1 strand, P8, A.5, pattern 2, A.4, P16, A.5, pattern2, A.1, P16, A.2, pattern 2, A.4, P16, A.5, pattern2, A.4, P8, insert 1 strand, A.3, P 9, insert 2nd marker, A.3, insert 1 strand, P8, A.5 (=6 sts), pattern2, A.4, P16, A.5, pattern 2, A.1 (=10sts), 8 sts in garter st= 422 sts. Threads are like markers you will also dec at every strand. Happy knitting!
02.01.2015 - 16:22
![]() Wendy Stahnke wrote:
Wendy Stahnke wrote:
I have started making this pattern with the body section. I have restarted 3 times. I always end up with not Enough stitches left for the garter stitch band Is therea mistake in the pattern? I am very frustrated
30.12.2014 - 04:26DROPS Design answered:
Dear Mrs Stahnke, number of sts should match- take care some sections haave to be worked only in the 3 largest sizes and not in the first 3 sizes. Happy knitting!
30.12.2014 - 14:28
![]() Chrissy wrote:
Chrissy wrote:
Hi Do you know what size the medium is for this pattern. Thanks
29.12.2014 - 20:59DROPS Design answered:
Dear Chrissy, you will find at the bottom of the pattern a measurement chart with measures for each sizes taken flat from side to side, in cm - measure a similar garment and compare to the measurements in chart to find out the matching size. Happy knitting!
30.12.2014 - 14:18
|
|||||||||||||||||||||||||
Morning Glory#morningglorycardigan |
|||||||||||||||||||||||||
 |
 |
||||||||||||||||||||||||
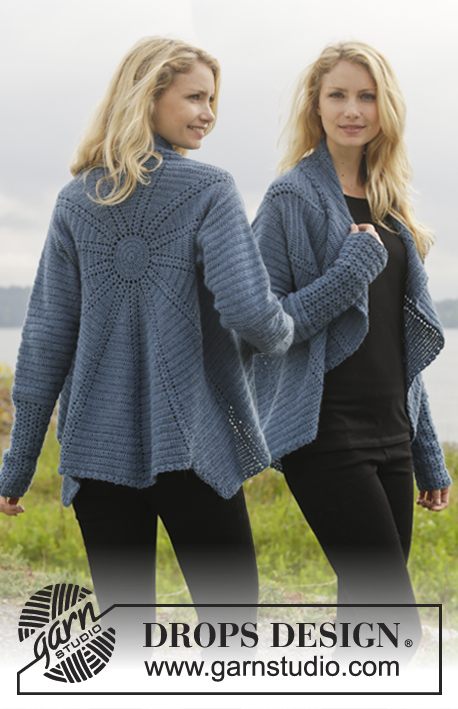
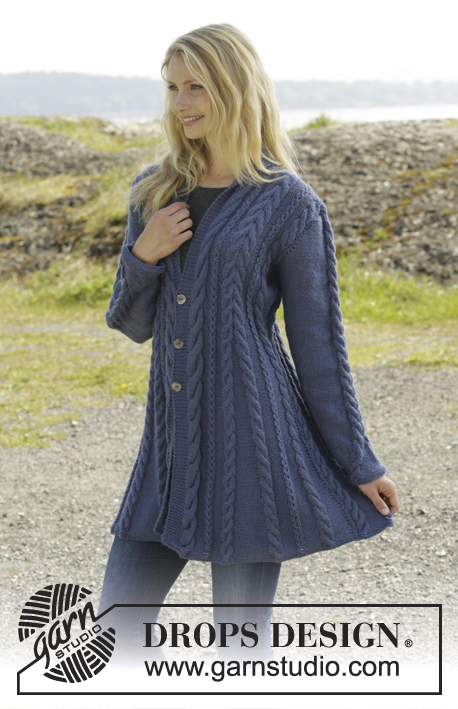
Knitted DROPS jacket with cables and shawl collar in ”Karisma”. Size: S - XXXL.
DROPS 158-1 |
|||||||||||||||||||||||||
|
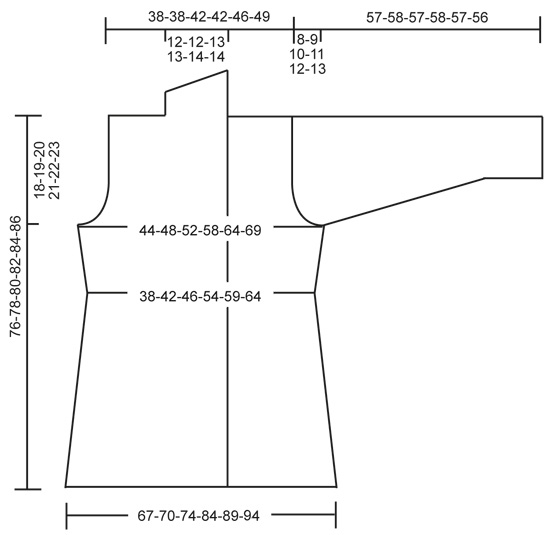
GARTER ST (back and forth on needle): K all rows. 1 ridge = K2 rows. GARTER ST (in the round on double pointed needles): * K 1 round and P 1 round *, repeat from *-*. 1 ridge = 2 rounds. DECREASE TIP: Dec 1 st before marker/A.3 as follows: Work until 2 sts remain before marker, P 2 tog. Dec 1 st after marker/A.3 as follows: P 2 tog. PATTERN 1: See diagrams A.1-A.5. The diagrams show all rows in pattern seen from RS. PATTERN 2: P 7-7-8-8-9-10, A.3, P 7-7-8-8-9-10. PATTERN 3: P 4-5-6-6-7-8, A.3, P 4-5-6-6-7-8. BUTTONHOLES: Dec for buttonholes on right band. 1 buttonhole = K tog second and third st from edge and make 1 YO. Dec for buttonholes when piece measures: SIZE S: 31, 39 and 47 cm / 12¼",15¼",18½" SIZE M: 31, 39 and 47 cm / 12¼",15¼",18½" SIZE L: 31, 39 and 47 cm / 12¼",15¼",18½" SIZE XL: 32, 40 and 48 cm / 12½",15¾",19" SIZE XXL: 32, 40 and 48 cm / 12½",15¾",19" SIZE XXL: 32, 40 and 48 cm / 12½",15¾",19" ---------------------------------------------------------- BODY: Worked back and forth on circular needle. Cast on 306-318-334-378-398-418 sts (includes 8 band sts in each side of piece) on circular needle size 3.5 mm / US 4 with Karisma. Work 2 ridges in GARTER ST - see explanation above AT THE SAME TIME on last row inc 44 sts evenly = 350-362-378-422-442-462 sts. Switch to circular needle size 4 mm / US 6. Then work from RS AT THE SAME TIME insert 2 markers and 0-0-0-4-4-4 strands in the piece as follows: Work 8 band sts in garter st, A.2, PATTERN 2 – see explanation above, A.4, P 14-16-16-16-16-16, A.5, pattern 2, A.4, P 0-0-0-8-9-10, insert 1 strand in size XL-XXL-XXXL, A.3 0-0-0-1-1-1 time, insert 1st marker, P 8-9-9-9-9-9, A.3 0-0-0-1-1-1 time, insert 1 strand in size XL-XXL-XXXL, P 0-0-0-8-9-10, A.5, pattern 2, A.4, P 14-16-16-16-16-16, A.5, pattern 2, A.1, P 14-16-16-16-16-16, A.2, pattern 2, A.4, P 14-16-16-16-16-16, A.5, pattern 2, A.4, P 0-0-0-8-9-10, insert 1 strand in size XL-XXL-XXXL, A.3 0-0-0-1-1-1 time, P 8-9-9-9-9-9, insert 2nd marker, A.3 0-0-0-1-1-1 time, insert 1 strand in size XL-XXL-XXXL, P 0-0-0-8-9-10, A.5, pattern 2, A.4, P 14-16-16-16-16-16, A.5, pattern 2, A.1, 8 band sts in garter st. Move the markers and strands upwards when working. Work band sts in garter st until finished measurements. Work K over K sts between cables from WS, i.e. P sts seen from RS. Continue pattern like this. Remember BUTTONHOLES - see explanation above. REMEMBER THE GAUGE! When piece measures 8-10-10-10-10-10 cm / 4", dec as follows: Dec in every section with 14-16-16-16-16-16 P sts by working as follows: P 2 tog, P 10-12-12-12-12-12, P 2 tog (= 10 sts dec in total). Repeat this dec every 5-4-4-4-4-4 cm / 2"-1½"-1½"-1½"-1½"-1½" 6-7-7-7-7-7 more times. NOTE: On last dec work the remaining 2 P tog. AT THE SAME TIME when piece measures 8-10-10-10-10-10 cm / 3"-4"-4"-4"-4"-4", dec as follows: Dec 1 st after 1st marker and 1 st before 2nd marker - see DECREASE TIP. Repeat this dec every 6-4½-4½-4½-4½-4½ cm / 2⅜"-1¾"-1¾"-1¾"-1¾"-1¾" 5-6-6-6-6-6 more times. AT THE SAME TIME when piece measures 16 cm / 6¼", dec as follows in pattern 2: Dec 1 st before A.3 and 1 st after A.3 (= 16 sts dec). Repeat this dec every 10-20-20-20-20-20 cm / 4"-8"-8"-8"-8" 2-1-1-1-1-1 more times. AT THE SAME TIME in size XL-XXL-XXXL dec as follows at every strand: Dec 1 st by working the 2 P sts closes to A.3 P tog (= 4 sts dec). Repeat this dec every 20 cm / 8" 1 more time. When all dec are done, there are 225-241-257-293-313-333 sts on needle. There are now 2 P st at markers in the sides and 1 P st between A.4 and A.5 and between A.1 and A.2 and 4-5-6-6-7-8 P sts on each side of A.3. When piece measures 44 cm / 17¼", adjust so that next row is from RS, inc as follows: 8 band sts in garter st, A.2, PATTERN 3 – see explanation above, A.4, P 1, A.5, pattern 3, A.4, P 0-0-0-6-7-8, A.3 0-0-0-1-1-1 time, 1 YO, P 2, 1 YO, A.3 0-0-0-1-1-1 time, P 0-0-0-6-7-8, A.5, pattern 3, A.4, P 1, A.5, pattern 3, A.1, P 1, A.2, pattern 3, A.4, P 1, A.5, pattern 3, A.4, P 0-0-0-6-7-8, A.3 0-0-0-1-1-1 time, 1 YO, P 2, 1 YO, A.3 0-0-0-1-1-1 time, P 0-0-0-6-7-8, A.5, pattern 3, A.4, P 1, A.5, pattern 3, A.1, 8 band sts in garter st (= 4 sts inc). K YOs twisted on next row to avoid holes. Repeat inc every 6th-6th-6th-12th-10th-12th row 5-5-5-3-4-4 more times = 249-265-281-309-333-353 sts. Work inc sts P from RS and K from WS. When piece measures 58-59-60-61-62-63 cm / 22¾"-23¼"-23⅝"-24"-24⅜"-24¾", divide the piece, finish front and back pieces separately as follows: Slip the first and last 66-70-74-81-87-92 sts on a stitch holder for front pieces, cut the yarn, then work only over the middle 117-125-133-147-159-169 sts (= back piece). BACK PIECE: Now bind off for armholes at beg of every row in each side as follows: bind off 3 sts 1 time, then 2 sts 1-1-1-3-4-4 times and 1 st 1-1-1-4-4-5 times = 105-113-121-121-129-137 sts. Then dec on next row from RS as follows: Dec 1 st before A.3 and 1 st after A.3 0-1-1-1-1-1 time = 105-105-113-113-121-129 sts. When piece measures 73-75-77-79-81-83 cm / 28¾"-29½"-30⅜"-31"-32"-32¾", dec 5 sts over A.1 and 5 sts over A.2 by working 2 and 2 sts K tog = 95-95-103-103-111-119 sts on needle. Then bind off the middle 25-25-27-27-29-31 sts for neck and finish each shoulder separately = 35-35-38-38-41-44 sts remain on each shoulder. When piece measures 75-77-79-81-83-85 cm / 29½"-30⅜"-31"-32"-32¾"-33½", dec 3 sts over every A.4 and A.5 (= 9 sts dec) = 26-26-29-29-32-35 sts remain on needle. Bind off. RIGHT FRONT PIECE: = 66-70-74-81-87-92 sts. Now bind off for armhole at beg of every row from the side as follows: bind off 3 sts 1 time, then 2 sts 1-1-1-3-4-4 times and 1 st 1-1-1-4-4-5 times = 60-64-68-68-72-76 sts. Then dec on next row from RS as follows: Dec 1 st before A.3 and 1 st after A.3 0-1-1-1-1-1 time = 60-60-64-64-68-72 sts on needle. When piece measures 75-77-79-81-83-85 cm / 29½"-30⅜"-31"-32"-32¾"-33½", dec 5 sts over A.2 by working 2 and 2 sts K tog and 3 sts over every A.4 and A.5 = 46-46-50-50-54-58 sts. Then bind off the first 26-26-29-29-32-35 sts for shoulder, work the rest of row = 20-20-21-21-22-23 sts. Then work shawl collar in garter st over the remaining sts, beg mid front (1st row = RS) as follows: * Work 2 rows back and forth over the first 12-12-13-13-14-15 sts, work 2 rows back and forth over all sts *, repeat from *-* until shawl collar measures 8-8-9-9-10-10 cm / 3⅛"-3⅛"-3½"-3½"-4"-4" at the shortest. Bind off. LEFT FRONT PIECE: Work as right front piece but reversed. Dec 5 sts over A.1 instead of A.2. Shawl collar beg from WS. SLEEVE: Worked in the round on double pointed needles. Cast on 48-50-52-54-54-56 sts on double pointed needles size 3.5 mm / US 4 with Karisma. Work 2 ridges in GARTER ST - see explanation above AT THE SAME TIME on last round inc 5 sts = 53-55-57-59-59-61 sts. Switch to double pointed needles size 4 mm / US 6. READ ALL OF THE FOLLOWING SECTION BEFORE CONTINUING! Work as follows: P 4-5-6-7-7-8, A.4, P 33, A.5, finish with P 4-5-6-7-7-8. Insert 1 marker at the beg of the round. On next round move A.4 and A.5 1 st towards the middle as follows: P 4-5-6-7-7-8, 1 YO, A.4, P 2 tog, P 29, P 2 tog, A.5, 1 YO, finish with P 4-5-6-7-7-8. P YO twisted on next round. Move A.4 and A.5 towards the middle 1 st every other round until 1 st remains between A.4 and A.5. Piece measures approx. 12 cm / 4¾". Continue to work P and A.4/A.5 with 1 P st between until finished measurements. AT THE SAME TIME when piece measures 10 cm / 4", inc 1 st on each side of marker. Repeat inc every 4-3½-2½-2½-2-1½ cm / 1½"-1¼"-⅞"-7/"-¾"-½" 9-10-12-13-16-17 more times = 73-77-83-87-93-97 sts. When piece measures 49-49-47-47-46-43 cm / 19¼"-19¼"-18½"-18½"-18"-17" (shorter measurements in the larger sizes because of longer sleeve cap and wider shoulders) bind off for sleeve cap at beg of every row in each side: bind off 4 sts 1 time, 2 sts 3 times and 1 st 6 times, then bind off 2 sts in each side until piece measures 56-57-56-57-56-55 cm/22"-22½"-22"-22½"-22"-21½", then bind off 3 sts 1 time in each side AT THE SAME TIME dec 2 sts over every cable. Bind off the remaining sts, piece measures approx. 57-58-57-58-57-56 cm / 22½"-22¾"-22½"-22¾"-22½"-22". Make another sleeve. ASSEMBLY: Sew the shoulder seams. Sew in sleeves. Sew the collar tog mid back and sew it to the neckline. Sew the buttons on to left band. SHAPING: Moisten piece and place it on a carpet or mattress - carefully stretch it out to measurements. Leave to dry. |
|||||||||||||||||||||||||
Diagram explanations |
|||||||||||||||||||||||||
|
|||||||||||||||||||||||||
 |
|||||||||||||||||||||||||
 |
|||||||||||||||||||||||||
Have you finished this pattern?Tag your pictures with #dropspattern #morningglorycardigan or submit them to the #dropsfan gallery. Do you need help with this pattern?You'll find 30 tutorial videos, a Comments/Questions area and more by visiting the pattern on garnstudio.com. © 1982-2026 DROPS Design A/S. We reserve all rights. This document, including all its sub-sections, has copyrights. Read more about what you can do with our patterns at the bottom of each pattern on our site. |
|||||||||||||||||||||||||


With over 40 years in knitting and crochet design, DROPS Design offers one of the most extensive collections of free patterns on the internet - translated to 17 languages. As of today we count 324 catalogs and 12245 patterns - 12235 of which are translated into English (US/in).
We work hard to bring you the best knitting and crochet have to offer, inspiration and advice as well as great quality yarns at incredible prices! Would you like to use our patterns for other than personal use? You can read what you are allowed to do in the Copyright text at the bottom of all our patterns. Happy crafting!
Post a comment to pattern DROPS 158-1
We would love to hear what you have to say about this pattern!
If you want to leave a question, please make sure you select the correct category in the form below, to speed up the answering process. Required fields are marked *.