
Popular categories
Looking for a yarn?


Comments / Questions (46)
![]() Alida Drijkoningen wrote:
Alida Drijkoningen wrote:
+ nog een fout in de beschrijving van de afwerking van de mouw: Vouw de mouw dubbel en haak samen midden onder als volgt= ! haak aan de linker kant (niet aan de goede) door beide lagen. Zie ook * Afwerking: Haak de mouw samen met het armsgat als volgt: haak aan de linkerkant (niet aan de goede kant) door beide lagen. Eenvoudiger is het eerst de kop van de mouw in het armsgat te haken en dan de naad van de mouw :)
13.07.2014 - 10:36
![]() Alida Drijkoningen wrote:
Alida Drijkoningen wrote:
Het tekort aan garen heb ik opgelost ...door de afwerkingsrand rondom het werk minder dik te zetten. Dwz. Haak een rand rondom de hele cirkel als volgt: haak in elke lus 2 dstk en 2 l en 2 dstk. Als ik het jasje gehaakt zoals de beschrijving had ik nog extra 50 g nodig gehad voor de de maat L
13.07.2014 - 10:25
![]() Alida Drijkoningen wrote:
Alida Drijkoningen wrote:
Heb op een creatieve manier zelf de oplossing gevonden :)De aanhouder wint Fouten in beschrijving mouw : Toer 12: haak als 7 de toer(niet als 2 de )en verder nog....bij Herhaal toer 8 tot en met 12 : * Ga verder en haak als toer 6 (ipv toer 1tot het werk 56 cm meet voor alle maten.
13.07.2014 - 10:20
![]() Alida Drijkoningen wrote:
Alida Drijkoningen wrote:
Tot op welke hoogte moet je de mouwnaad haken? Indien je de mouw zoals de beschrijving aan de goede kant door beide lagen aan mekaar haakt krijg je een zichtbare naad ? Kan dit een foute vertaling zijn ? Kan u aub ook de hoeveelheid wol voor de maat L controleren. Ik heb 13 x 50 g aangekocht en dit is niet voldoende ???
10.07.2014 - 15:16DROPS Design answered:
Beste, de naad is inderdaad zichtbaar. De hoeveelheid garen is door ons berekend, maar ik geef uw bevinding door aan Oslo. Als er meer mensen met deze bevinding komen, zal onze designafdeling het eventueel aanpassen.
01.09.2014 - 16:34
![]() Alida Drijkoningen wrote:
Alida Drijkoningen wrote:
Ik haak dus de maat L. ;)
05.07.2014 - 15:38
![]() Alida Drijkoningen wrote:
Alida Drijkoningen wrote:
Graag nog info over de afwerking van de mouw. Haak aan de goede kant door beide lagen ? Is het mogelijk dat dit aan de linkerkant van het haakwerk moet gebeuren ? Anders krijg je een zichtbare naad???
05.07.2014 - 15:28DROPS Design answered:
De naad is inderdaad zichtbaar, maar als u dat mooier vindt, kunt u dat anders doen.
01.09.2014 - 16:53
![]() Alida Drijkoningen wrote:
Alida Drijkoningen wrote:
L/XL Fout in beschrijving mouw:toer 12 : haak als 1 ste toer zou zoals 7 de moeten zijn ? En verder ...bij herhaal toer 8 tot en met 12 *Ga verder en haak als toer 6 ipv toer 1 ?
05.07.2014 - 15:24DROPS Design answered:
We hebben het aangepast, bedankt voor het doorgeven.
04.09.2014 - 16:47
![]() Alida Drijkoningen wrote:
Alida Drijkoningen wrote:
Beste, Graag reactie op mijn opmerkingen.
05.07.2014 - 14:28
![]() Alida Drijkoningen wrote:
Alida Drijkoningen wrote:
Hoeveelheid wol is onvoldoende voor de maten L/XL?? 13 x 50 gr is dus onvoldoende voor maat L
29.06.2014 - 18:44
![]() Alida Drijkoningen wrote:
Alida Drijkoningen wrote:
Fout in beschrijving mouw . Graag advies via mail
29.06.2014 - 18:42DROPS Design answered:
Hoi Alida. Graag hoor ik welke maat je maakt en wat je denkt fout te zijn? Ik zal het dan nakijken en reageren hier op de blog.
01.07.2014 - 14:24
|
|
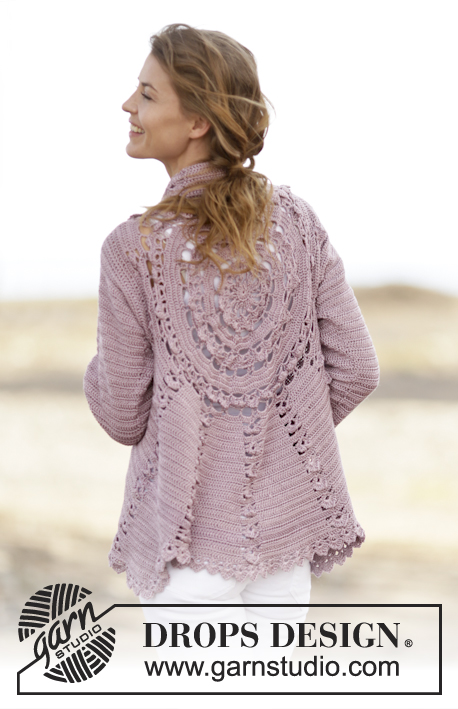
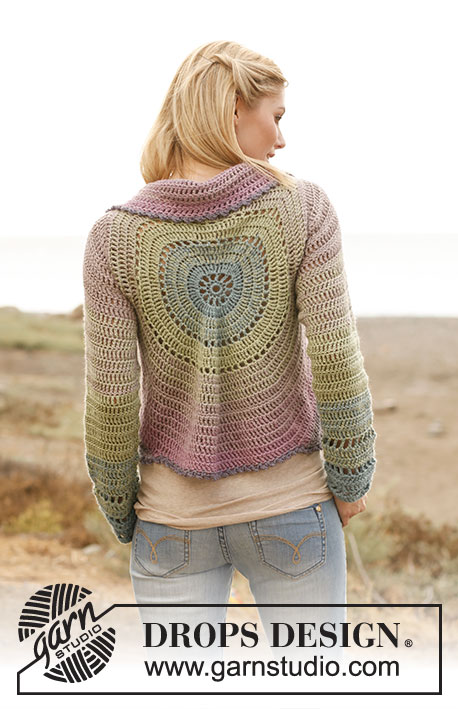
Lila Sun#lilasuncardigan |
|
 |
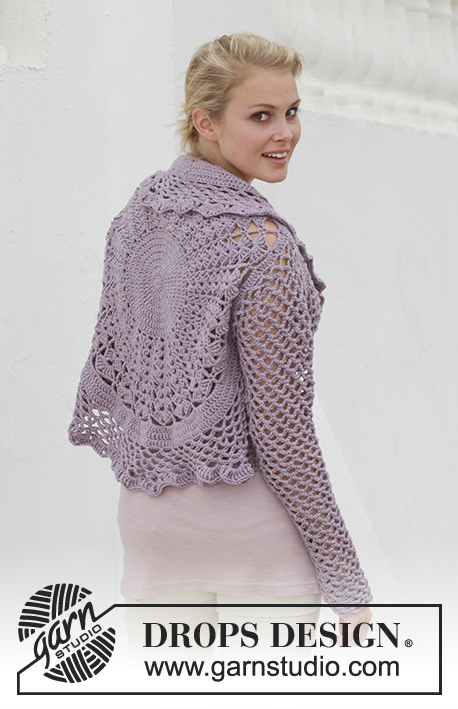 |
Crochet DROPS jacket worked in a circle in "Big Merino". Size: S - XXXL.
DROPS 155-10 |
|
|
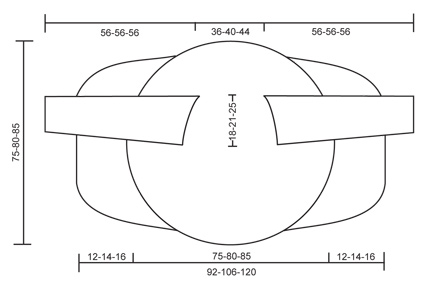
CROCHET INFO: Replace first dc on every round/row with 3 ch. Finish every round with 1 sl st in 3rd ch from beg of round. ---------------------------------------------------------- CIRCLE: Work 4 ch on hook size 5 mm / H/8 with Big Merino and form a ring with 1 sl st in first ch. Continue to work in the ring. ROUND 1: Read CROCHET INFO! Work 3 ch + 11 dc in ch-ring = 12 dc. ROUND 2: Work 2 dc in every dc = 24 dc. ROUND 3: * 2 dc in first dc, 1 dc in next dc *, repeat from *-* the entire round = 36 dc. ROUND 4: * 2 dc in first dc, 1 dc in each of the next 2 dc *, repeat from *-* the entire round = 48 dc. ROUND 5: * 2 dc in first dc, 1 dc in each of the next 3 dc *, repeat from *-* the entire round = 60 dc. ROUND 6: * 2 dc in first dc, 1 dc in each of the next 4 dc *, repeat from *-* the entire round = 72 dc. ROUND 7: * 2 dc in first dc, 1 dc in each of the next 5 dc *, repeat from *-* the entire round = 84 dc. Stop here in size S/M. ROUND 8: Work 1 dc in every dc. ROUND 9: * 2 dc in first dc, 1 dc in each of the next 6 dc *, repeat from *-* the entire round = 96 dc. Stop here in size L/XL. ROUND 10: Work 1 dc in every dc. ROUND 11: * 2 dc in first dc, 1 dc in each of the next 7 dc *, repeat from *-* the entire round = 108 dc. The circle now measures approx. 18-23-28 cm / 7"-9"-11" in diameter. ALL SIZES (= 84-96-108 dc): ROUND 12: * ch 3, skip 1 dc, 1 sc in next dc *, repeat from *-* the entire round and finish with 3 ch and 1 sl st in 1st ch from beg of round = 42-48-54 ch-spaces. ROUND 13: Work sl sts until mid of first ch-space, 3 ch (= 1 dc), * 2 dc + 2 ch + 2 dc in next ch-space, 1 dc in next ch-space *, repeat from *-* until 1 ch-space remains, work 2 dc + 2 ch + 2 dc in last ch-space and finish with 1 sl st in 3rd ch from beg of round = 21-24-27 dc-groups with 1 dc between each. ROUND 14: Work 1 dc in every dc and 1 dc-group as on previous row in ch-space in every dc-group. ROUND 15: 3 ch (= 1 dc), * 3 dc + 2 ch + 3 dc in ch-space in mid of dc-group, 1 dc in next dc *, repeat from *-* the entire round, finish with 3 dc + 2 ch + 3 dc in ch-space in mid of last dc-group and 1 sl st in 3rd ch from beg of round. ROUND 16: Work 1 dc in every dc and 1 dc-group as on previous row in ch-space in every dc-group. ROUND 17: 3 ch (= 1 dc), * 4 dc + 2 ch + 4 dc in ch-space in mid of dc-group, 1 dc in next dc *, repeat from *-* the entire round, finish with 4 dc + 2 ch + 4 dc in ch-space in mid of last dc-group and 1 sl st in 3rd ch from beg of round. ROUND 18: Work 1 dc in every dc and 1 dc-group as on previous row in ch-space in every dc-group. ROUND 19: 4 ch (= 1 tr), * 4 tr + 2 ch + 4 tr in ch-space in mid of dc-group, 1 tr in next dc *, repeat from *-* the entire round, finish with 4 tr + 2 ch + 4 tr in ch-space in mid of last dc-group and 1 sl st in 4th ch from beg of round. ROUND 20: Work 1 tr in every tr and 1 dc-group as on previous row in ch-space in every dc-group. ROUND 21: 8 ch, * work 1 sc in 2 ch in the middle of next fan, ch 5, 1 dc in next tr, 5 ch *, repeat from *-* finish with 1 sc in 2 ch in the middle of next fan, 5 ch and 1 sl st in 3rd ch from beg of round = 42-48-54 ch-spaces. ROUND 22: Work 6 dc in every ch-space = 252-288-324 dc. ROUND 23: Work 1 dc in each of the first 30-36-42 dc, work 30-36-42 ch, skip the next 30-36-42 dc, work 1 dc in each of the next 132-144-156 dc, work 30-36-42 ch, skip the next 30-36-42 dc, work 1 dc in each of the last 30-36-42 dc. (Round beg = mid back of neck.) ROUND 24: Work 1 dc in every dc and 30-36-42 dc in every ch-space, AT THE SAME TIME inc 28-20-12 dc evenly on round = 280-308-336 dc. Piece measures approx. 56-61-66 cm / 22"-24"-26" in diameter. ROUND 25: Work 1 sc in first dc, * ch 5, skip 3 dc, 1 sc in next dc *, repeat from *-* and finish with 1 sl st in first sc = 70-77-84 ch-spaces. ROUND 26: Work sl sts until middle of first ch-space, 1 sc, * work ch 5, 1 sc in next ch-space *, repeat from *-* and finish with 1 sl st in first sc. ROUND 27: Work sl sts until middle of first ch-space, 1 sc, ** work ch 5, 1 sc in next ch-space, ch 5, 1 sc in same ch-space, * work ch 5, 1 sc in next ch-space *, repeat from *-* 6 times **, repeat from **-** and finish with 1 sl st in first sc = 80-88-96 spaces. ROUND 28: Work as 26th round. ROUND 29: Work sl sts until middle of first ch-space, 1 sc, ** work ch 5, 1 sc in next ch-space, ch 5, 1 sc in same ch-space, * work ch 5, 1 sc in next ch-space *, repeat from *-* 7 times **, repeat from **-** and finish with 1 sl st in first sc = 90-99-108 spaces. ROUND 30: Work as 26th round. Piece now measures approx. 75-80-85 cm / 29½"-31½"-33½" in diameter, cut the yarn. Continue working only over 26-28-30 ch-spaces in each side – i.e. do not work over 19-21-24 ch-spaces at top by neck and 19-22-24 ch-spaces at bottom of back. Continue with explanation below left front piece. LEFT FRONT PIECE: = 26-28-30 ch-spaces. Continue as follows: ROW 1: Work sl sts until middle of first ch-space, 1 sc, * work ch 5, 1 sc in next ch-space *, repeat from *-* and finish with 1 sc in last ch-space = 25-27-29 ch-spaces. Repeat 1st row 12-14-16 times in total (= approx. 12-14-16 cm / 4 3/4"-5½"-6 1/4"). 14 ch-spaces remain at the edge of front piece. Cut the yarn. RIGHT FRONT PIECE: Work same way as on left front piece over 26-28-30 ch-spaces in the right side. Cut the yarn. FINISHING EDGE: Work an edge around the entire circle as follows: In every space work 4 tr + 2 ch + 4 tr. Fasten off. SLEEVE: Worked top down. Work 45-53-65 ch with Big Merino on hook size 5 mm / H/8. Turn and work 1 sc in 9th ch from hook, * ch 5, skip ch 3, 1 sc in next ch *, repeat from *-* = 10-12-15 ch-spaces. ROW 1: Work ch 5, 1 sc in first ch-space, ch 5, 1 sc in same ch-space, * ch 5, 1 sc in next ch-space *, repeat from *-* until 1 ch-space remains, work ch 5, 1 sc in last ch-space = 11-13-16 ch-spaces. Repeat 1st row 4 more times = 15-17-20 ch-spaces. Continue to work as follows: ROW 6: Work ch 5, 1 sc in first ch-space, * ch 5, 1 sc in next ch-space *, repeat from *-* until 1 ch-space remains, work ch 5, 1 sc in last ch-space = 15-17-20 ch-spaces. ROW 7: Work sl sts until middle of first ch-space, * ch 5, 1 sc in next ch-space *, repeat from *-* until 1 ch-space remains, work ch 5, 1 sc in last ch-space = 14-16-19 ch-spaces. ROW 8-11: Work as 6th row. ROW 12: Work as 7th row = 13-15-18 ch-spaces. Repeat rows 8 to 12 - i.e. dec 1 ch-space in the side every 5th row - dec alternately in right and left side of sleeve. Repeat these 5 rows 4-5-7 more times (= 6-7-9 dec in total) = 9-10-11 ch-spaces on row. Continue to work as row 1 until piece measures 56 cm / 22'' in all sizes. Place sleeve double and work tog mid under as follows - work from RS through both layers: Work * 1 sc, ch 3, skip approx. 1 cm / ½'' *, repeat from *-*, finish with 1 sc. Fasten off. ASSEMBLY: Work sleeve tog with armhole as follows: Work from RS through both layers: Work * 1 sc, ch 3, skip approx. 1 cm / ½'' *, repeat from *-* around the entire armhole. |
|
 |
|
Have you finished this pattern?Tag your pictures with #dropspattern #lilasuncardigan or submit them to the #dropsfan gallery. Do you need help with this pattern?You'll find 7 tutorial videos, a Comments/Questions area and more by visiting the pattern on garnstudio.com. © 1982-2026 DROPS Design A/S. We reserve all rights. This document, including all its sub-sections, has copyrights. Read more about what you can do with our patterns at the bottom of each pattern on our site. |
|


With over 40 years in knitting and crochet design, DROPS Design offers one of the most extensive collections of free patterns on the internet - translated to 17 languages. As of today we count 325 catalogs and 12298 patterns - 12288 of which are translated into English (US/in).
We work hard to bring you the best knitting and crochet have to offer, inspiration and advice as well as great quality yarns at incredible prices! Would you like to use our patterns for other than personal use? You can read what you are allowed to do in the Copyright text at the bottom of all our patterns. Happy crafting!
Post a comment to pattern DROPS 155-10
We would love to hear what you have to say about this pattern!
If you want to leave a question, please make sure you select the correct category in the form below, to speed up the answering process. Required fields are marked *.