
Popular categories
Looking for a yarn?


Comments / Questions (46)
![]() Alison wrote:
Alison wrote:
I don't understand the instructions to join the sleeve seams
28.04.2017 - 09:18DROPS Design answered:
Dear Alison, this video shows how to crochet 2 pieces tog, work the same way, crocheting alternately 1 dc in sleeve and 1 dc in edge around armhole. Happy crocheting!
28.04.2017 - 13:42
![]() Petra Eng-Schweikert wrote:
Petra Eng-Schweikert wrote:
Meiner Ansicht nach stimmen Bild / Skizze nicht mit der Anleitung überein. Ich bin bei Runde 20 und sehe auf dem Bild, dass die Armlöcher schon fertig sein sollten, laut Anleitung kommen sie aber erst in Runde 23. Laut der Skizze sollten die Armlöcher bei ca 40 cm Durchmesser beginnen, laut Anleitung aber erst bei 61 cm. Was ist richtig? Bitte um schnelle Antwort, da ich Ferien habe und unbedingt weiterhäkeln möchte! Herzliche Grüße Petra
02.08.2015 - 21:13DROPS Design answered:
Halten Sie sich auf jeden Fall an die Anleitung. Sie können die Jacke auch zwischendurch anprobieren und schauen, ob sie gut sitzt, beachten Sie, dass sie sich durch das Muster auch noch leicht dehnt.
07.08.2015 - 09:38Joanne McDonald wrote:
Hello. I'm stuck on row 21. I understand what I do in the fan sections but I am confused by what goes in-between?? Can anyone help me please?
02.08.2015 - 18:42DROPS Design answered:
Dear Mrs McDonald, start round 21 with 8 ch, then work * work 1 dc (UK-English) / sc (US-English) in 2 ch in the middle of next fan, 5 ch, 1 tr (UK-English)/dc (US-English) in next dtr (UK-English)/tr (US-English), 5 ch *, repeat from *-* finish with 1 dc (UK-English) / 1 sc (US-English) in 2 ch in the middle of next fan, 5 ch and 1 sl st in 3rd ch from beg of round, you have a total of 42-48-54 ch-spaces at the end of round 21. Happy crocheting!
03.08.2015 - 09:54
![]() Schwarz Renáta wrote:
Schwarz Renáta wrote:
A minta leírása, fordítása hiányos, az ujjai leírása egyáltalán nincsen meg, de összehasonlítva az angol mintaleírással a bal illetve jobb eleje sincsen leírva.
18.12.2014 - 21:07
![]() Anja Den Hartogh wrote:
Anja Den Hartogh wrote:
Ik ben dit patroon aan het haken met Drops Paris garen. Nu ben ik bij toer 14, en vanaf toer12 begint het erg te bobbelen net of er teveel stokjes in de toer zitten terwijl in het patroon staat dat op elk stokje een stokje moet en in de losse lus een stokjes groep. Hoe kan ik de stokjes minderen zonder dat het werk weer te open word? vriendelijke groet, Anja den Hartogh
01.11.2014 - 12:29DROPS Design answered:
Hoi Anja. Het werk zal zich recht trekken als je verder gaat. Het kan meer hobbelig lijken met Paris ipv Big Merino (katoen ipv wol), maar ik verwacht dat het goed komt. Vertrouw je het niet, dan kan je proberen te minderen en aan te passen.
06.11.2014 - 14:06
![]() Agnes Szabo wrote:
Agnes Szabo wrote:
Hi, in the Hungarian translation second half of the pattern is simply missing.
15.08.2014 - 17:20
![]() Alida Drijkoningen wrote:
Alida Drijkoningen wrote:
Tip voor Ina : Neem de volgende rijen waar je vermeerderd hebt mee voor de kop van de mouw of mouwinzet ;)
27.07.2014 - 10:11
![]() Ina Blom wrote:
Ina Blom wrote:
Het aantal lossen bij de mouw 45 is veel te klein voor t armsgat. Ik begrijp niet hoe dit kan
22.07.2014 - 22:24
![]() Alida Drijkoningen wrote:
Alida Drijkoningen wrote:
Het resultaat is wel prachtig. Hopelijk hebben jullie wat aan mijn tips.....groetjes van een volhoudende creatieveling
13.07.2014 - 10:37
![]() Alida Drijkoningen wrote:
Alida Drijkoningen wrote:
Indien de beschrijving niet zoveel fouten omvatte, was dit jasje al op 1 week klaar geweest.
13.07.2014 - 10:37
|
|
Lila Sun#lilasuncardigan |
|
 |
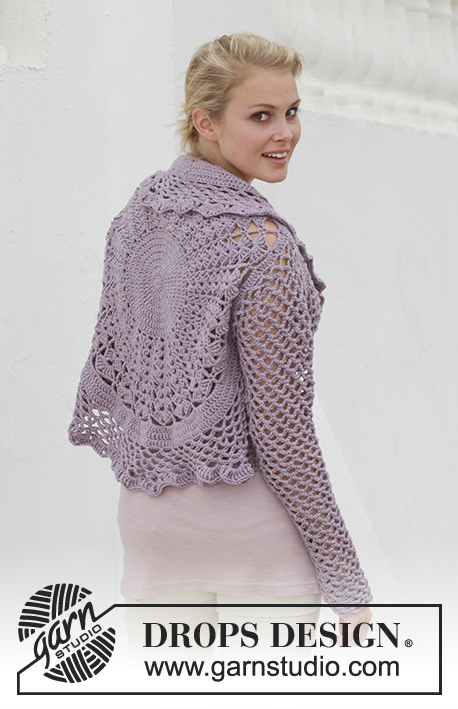 |
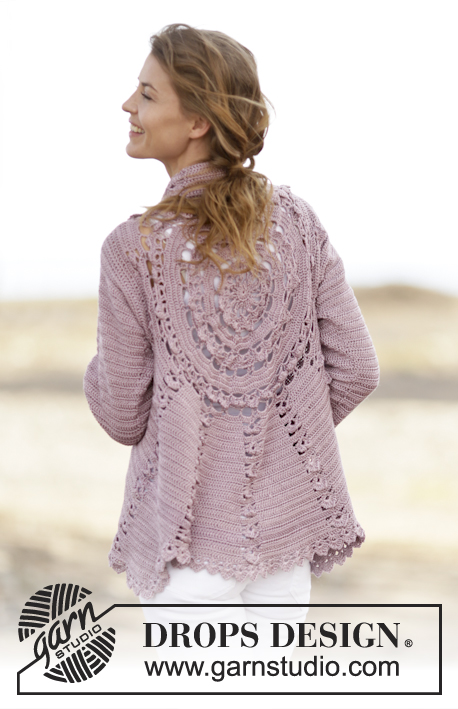
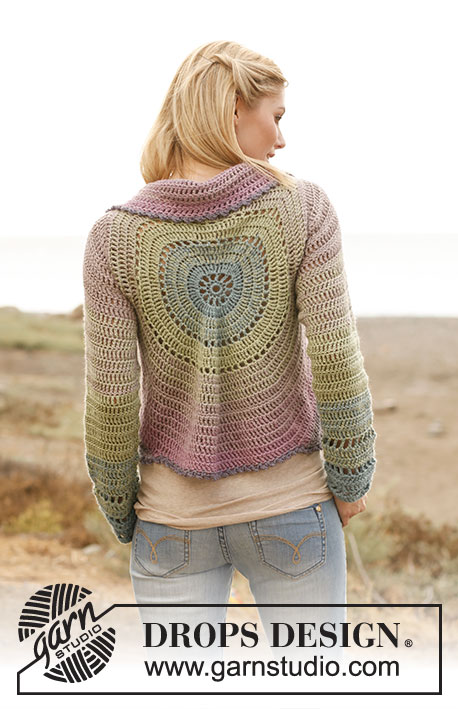
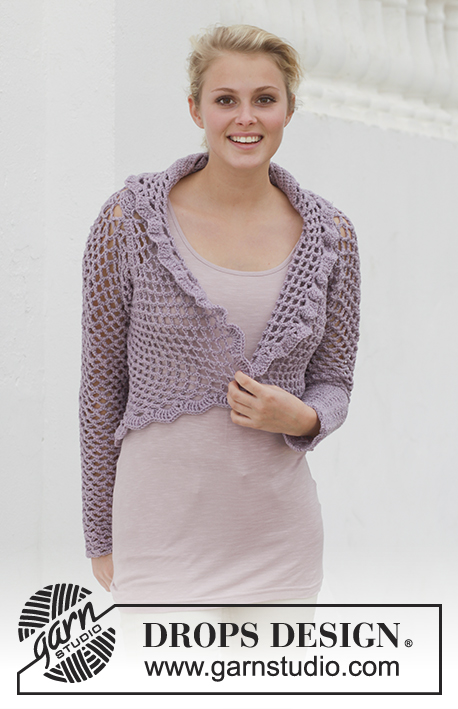
Crochet DROPS jacket worked in a circle in "Big Merino". Size: S - XXXL.
DROPS 155-10 |
|
|
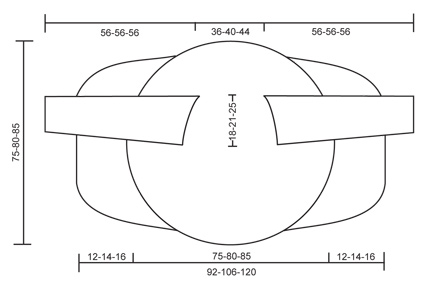
CROCHET INFO: Replace first dc on every round/row with 3 ch. Finish every round with 1 sl st in 3rd ch from beg of round. ---------------------------------------------------------- CIRCLE: Work 4 ch on hook size 5 mm / H/8 with Big Merino and form a ring with 1 sl st in first ch. Continue to work in the ring. ROUND 1: Read CROCHET INFO! Work 3 ch + 11 dc in ch-ring = 12 dc. ROUND 2: Work 2 dc in every dc = 24 dc. ROUND 3: * 2 dc in first dc, 1 dc in next dc *, repeat from *-* the entire round = 36 dc. ROUND 4: * 2 dc in first dc, 1 dc in each of the next 2 dc *, repeat from *-* the entire round = 48 dc. ROUND 5: * 2 dc in first dc, 1 dc in each of the next 3 dc *, repeat from *-* the entire round = 60 dc. ROUND 6: * 2 dc in first dc, 1 dc in each of the next 4 dc *, repeat from *-* the entire round = 72 dc. ROUND 7: * 2 dc in first dc, 1 dc in each of the next 5 dc *, repeat from *-* the entire round = 84 dc. Stop here in size S/M. ROUND 8: Work 1 dc in every dc. ROUND 9: * 2 dc in first dc, 1 dc in each of the next 6 dc *, repeat from *-* the entire round = 96 dc. Stop here in size L/XL. ROUND 10: Work 1 dc in every dc. ROUND 11: * 2 dc in first dc, 1 dc in each of the next 7 dc *, repeat from *-* the entire round = 108 dc. The circle now measures approx. 18-23-28 cm / 7"-9"-11" in diameter. ALL SIZES (= 84-96-108 dc): ROUND 12: * ch 3, skip 1 dc, 1 sc in next dc *, repeat from *-* the entire round and finish with 3 ch and 1 sl st in 1st ch from beg of round = 42-48-54 ch-spaces. ROUND 13: Work sl sts until mid of first ch-space, 3 ch (= 1 dc), * 2 dc + 2 ch + 2 dc in next ch-space, 1 dc in next ch-space *, repeat from *-* until 1 ch-space remains, work 2 dc + 2 ch + 2 dc in last ch-space and finish with 1 sl st in 3rd ch from beg of round = 21-24-27 dc-groups with 1 dc between each. ROUND 14: Work 1 dc in every dc and 1 dc-group as on previous row in ch-space in every dc-group. ROUND 15: 3 ch (= 1 dc), * 3 dc + 2 ch + 3 dc in ch-space in mid of dc-group, 1 dc in next dc *, repeat from *-* the entire round, finish with 3 dc + 2 ch + 3 dc in ch-space in mid of last dc-group and 1 sl st in 3rd ch from beg of round. ROUND 16: Work 1 dc in every dc and 1 dc-group as on previous row in ch-space in every dc-group. ROUND 17: 3 ch (= 1 dc), * 4 dc + 2 ch + 4 dc in ch-space in mid of dc-group, 1 dc in next dc *, repeat from *-* the entire round, finish with 4 dc + 2 ch + 4 dc in ch-space in mid of last dc-group and 1 sl st in 3rd ch from beg of round. ROUND 18: Work 1 dc in every dc and 1 dc-group as on previous row in ch-space in every dc-group. ROUND 19: 4 ch (= 1 tr), * 4 tr + 2 ch + 4 tr in ch-space in mid of dc-group, 1 tr in next dc *, repeat from *-* the entire round, finish with 4 tr + 2 ch + 4 tr in ch-space in mid of last dc-group and 1 sl st in 4th ch from beg of round. ROUND 20: Work 1 tr in every tr and 1 dc-group as on previous row in ch-space in every dc-group. ROUND 21: 8 ch, * work 1 sc in 2 ch in the middle of next fan, ch 5, 1 dc in next tr, 5 ch *, repeat from *-* finish with 1 sc in 2 ch in the middle of next fan, 5 ch and 1 sl st in 3rd ch from beg of round = 42-48-54 ch-spaces. ROUND 22: Work 6 dc in every ch-space = 252-288-324 dc. ROUND 23: Work 1 dc in each of the first 30-36-42 dc, work 30-36-42 ch, skip the next 30-36-42 dc, work 1 dc in each of the next 132-144-156 dc, work 30-36-42 ch, skip the next 30-36-42 dc, work 1 dc in each of the last 30-36-42 dc. (Round beg = mid back of neck.) ROUND 24: Work 1 dc in every dc and 30-36-42 dc in every ch-space, AT THE SAME TIME inc 28-20-12 dc evenly on round = 280-308-336 dc. Piece measures approx. 56-61-66 cm / 22"-24"-26" in diameter. ROUND 25: Work 1 sc in first dc, * ch 5, skip 3 dc, 1 sc in next dc *, repeat from *-* and finish with 1 sl st in first sc = 70-77-84 ch-spaces. ROUND 26: Work sl sts until middle of first ch-space, 1 sc, * work ch 5, 1 sc in next ch-space *, repeat from *-* and finish with 1 sl st in first sc. ROUND 27: Work sl sts until middle of first ch-space, 1 sc, ** work ch 5, 1 sc in next ch-space, ch 5, 1 sc in same ch-space, * work ch 5, 1 sc in next ch-space *, repeat from *-* 6 times **, repeat from **-** and finish with 1 sl st in first sc = 80-88-96 spaces. ROUND 28: Work as 26th round. ROUND 29: Work sl sts until middle of first ch-space, 1 sc, ** work ch 5, 1 sc in next ch-space, ch 5, 1 sc in same ch-space, * work ch 5, 1 sc in next ch-space *, repeat from *-* 7 times **, repeat from **-** and finish with 1 sl st in first sc = 90-99-108 spaces. ROUND 30: Work as 26th round. Piece now measures approx. 75-80-85 cm / 29½"-31½"-33½" in diameter, cut the yarn. Continue working only over 26-28-30 ch-spaces in each side – i.e. do not work over 19-21-24 ch-spaces at top by neck and 19-22-24 ch-spaces at bottom of back. Continue with explanation below left front piece. LEFT FRONT PIECE: = 26-28-30 ch-spaces. Continue as follows: ROW 1: Work sl sts until middle of first ch-space, 1 sc, * work ch 5, 1 sc in next ch-space *, repeat from *-* and finish with 1 sc in last ch-space = 25-27-29 ch-spaces. Repeat 1st row 12-14-16 times in total (= approx. 12-14-16 cm / 4 3/4"-5½"-6 1/4"). 14 ch-spaces remain at the edge of front piece. Cut the yarn. RIGHT FRONT PIECE: Work same way as on left front piece over 26-28-30 ch-spaces in the right side. Cut the yarn. FINISHING EDGE: Work an edge around the entire circle as follows: In every space work 4 tr + 2 ch + 4 tr. Fasten off. SLEEVE: Worked top down. Work 45-53-65 ch with Big Merino on hook size 5 mm / H/8. Turn and work 1 sc in 9th ch from hook, * ch 5, skip ch 3, 1 sc in next ch *, repeat from *-* = 10-12-15 ch-spaces. ROW 1: Work ch 5, 1 sc in first ch-space, ch 5, 1 sc in same ch-space, * ch 5, 1 sc in next ch-space *, repeat from *-* until 1 ch-space remains, work ch 5, 1 sc in last ch-space = 11-13-16 ch-spaces. Repeat 1st row 4 more times = 15-17-20 ch-spaces. Continue to work as follows: ROW 6: Work ch 5, 1 sc in first ch-space, * ch 5, 1 sc in next ch-space *, repeat from *-* until 1 ch-space remains, work ch 5, 1 sc in last ch-space = 15-17-20 ch-spaces. ROW 7: Work sl sts until middle of first ch-space, * ch 5, 1 sc in next ch-space *, repeat from *-* until 1 ch-space remains, work ch 5, 1 sc in last ch-space = 14-16-19 ch-spaces. ROW 8-11: Work as 6th row. ROW 12: Work as 7th row = 13-15-18 ch-spaces. Repeat rows 8 to 12 - i.e. dec 1 ch-space in the side every 5th row - dec alternately in right and left side of sleeve. Repeat these 5 rows 4-5-7 more times (= 6-7-9 dec in total) = 9-10-11 ch-spaces on row. Continue to work as row 1 until piece measures 56 cm / 22'' in all sizes. Place sleeve double and work tog mid under as follows - work from RS through both layers: Work * 1 sc, ch 3, skip approx. 1 cm / ½'' *, repeat from *-*, finish with 1 sc. Fasten off. ASSEMBLY: Work sleeve tog with armhole as follows: Work from RS through both layers: Work * 1 sc, ch 3, skip approx. 1 cm / ½'' *, repeat from *-* around the entire armhole. |
|
 |
|
Have you finished this pattern?Tag your pictures with #dropspattern #lilasuncardigan or submit them to the #dropsfan gallery. Do you need help with this pattern?You'll find 7 tutorial videos, a Comments/Questions area and more by visiting the pattern on garnstudio.com. © 1982-2026 DROPS Design A/S. We reserve all rights. This document, including all its sub-sections, has copyrights. Read more about what you can do with our patterns at the bottom of each pattern on our site. |
|


With over 40 years in knitting and crochet design, DROPS Design offers one of the most extensive collections of free patterns on the internet - translated to 17 languages. As of today we count 325 catalogs and 12298 patterns - 12288 of which are translated into English (US/in).
We work hard to bring you the best knitting and crochet have to offer, inspiration and advice as well as great quality yarns at incredible prices! Would you like to use our patterns for other than personal use? You can read what you are allowed to do in the Copyright text at the bottom of all our patterns. Happy crafting!
Post a comment to pattern DROPS 155-10
We would love to hear what you have to say about this pattern!
If you want to leave a question, please make sure you select the correct category in the form below, to speed up the answering process. Required fields are marked *.