
Popular categories
Looking for a yarn?


Comments / Questions (41)
![]() Alison Smith wrote:
Alison Smith wrote:
I am a little confused by your symbols. You have 2 explanations for your symbol but the symbols on the pattern are exactly the same. One says 1yo, slip 1st on cable needle etc. and the other without the yo. Which one am I supposed use in the main pattern?
26.03.2025 - 13:45DROPS Design answered:
Dear Mrs Smith, the 5th symbols = with yarn overs before and after the double decrease is worked in M.2; the 6th symbol = double decrease without yarn over is worked on next to last row in M.1. Happy knitting!
27.03.2025 - 09:03
![]() Kim Angus wrote:
Kim Angus wrote:
HI There, the M1 and M2 charts dont having any symbols to say what they are in the charts. Im assuming a circle is a purl a blank square in a knit and the slant across a square in M1. It still doesnt make sense on how you M1. Do you have a video on how you M1 Thanks ....Kim
13.11.2023 - 01:03DROPS Design answered:
Hi Kim, The explanations for the symbols are above the size chart. Happy knitting!
13.11.2023 - 06:48
![]() Jessica wrote:
Jessica wrote:
Bonjour, je suis aux augmentations du dos, qu’il faut tricoter au point mousse. En taille S on se retrouve donc avec 13 m au point mousse de chaque côté, mais ensuite après la séparation il faut continuer en point fantaisie avec 3 m point mousse de chaque côté. Est-ce qu’on devrait avoir 13m point mousse à l’extérieur et 3m point mousse côté encolure, ou est-ce qu’on tricote les augmentations au point fantaisie? Merci d’avance et merci pour tous vos patrons gratuits!
17.01.2022 - 22:37DROPS Design answered:
Bonjour Jessica, désolée pour la réponse tardive, la correction a été faite, on tricote effectivement les 13 m au point mousse côté emmanchure et 3 m point mousse côté encolure. Bon tricot!
10.03.2022 - 11:55
![]() Andrea L Fogg wrote:
Andrea L Fogg wrote:
It\'s been a while since I\'ve read charts, but in the M1 chart why are there no boxes in some parts (is it just to show the pattern more?) are those \"spaces\" with no box just knit stitches?
20.05.2021 - 21:56DROPS Design answered:
Dear Mrs Fogg, in M.1 you will decrease stitches, for ex. on 7th row in M.1 you decrease 2 sts, on next row, there are only K5 left (repeat: P3, K5), on next row decrease 2 sts = K3 left (repeat: P3, K3), ... Happy knitting!
21.05.2021 - 07:57
![]() Roberta wrote:
Roberta wrote:
Grazie mille!!
22.04.2015 - 20:33
![]() Roberta wrote:
Roberta wrote:
Quindi quello che voi chiamate sopra è il sotto.. allora si arriva fino agli scalfi e si lasciano le maglie in attesa o del davanti o del dietro e poi si lavorano uno per volta.. giusto? speriamo bene grazie mille!! lavorare con 450 maglie sul filo da 60 cm è un incubo, per fortuna che sono solo 8 giri!!
20.04.2015 - 16:32DROPS Design answered:
Buongiorno Roberta. Abbiamo modificato il titolo del paragrafo. E’ come dice lei: si inizia dalla parte inferiore della canotta per arrivare agli scalfi. Ci riscriva se incontra altre difficoltà. Buon lavoro!
20.04.2015 - 16:43
![]() Roberta wrote:
Roberta wrote:
Non riesco a capire come si lavora parlate prima del sopra poi del dietro e del davanti si devono attaccare poi i pezzi? lasciare le maglie in attesa e riprenderle poi sul davanti e sul dietro? aiuto grazie!!
19.04.2015 - 14:50DROPS Design answered:
Buongiorno Roberta, questo top è lavorato in tondo a partire dal bordo inferiore fino agli scalfi, poi il davanti e il dietro vengono lavorati avanti e indietro sui f fino alla scollatura e in ultimo vengono lavorate le spalle. Le uniche parti da cucire sono le spalle. Ci riscriva se qualcosa non le è chiaro. Buon lavoro!
19.04.2015 - 17:22
![]() Claudia Romero wrote:
Claudia Romero wrote:
Vorrei sapere a che taglie italiane corrispondono quelle dei Vostri modelli. È la prima volta che li uso. Io ho una taglia italiana che corrisponde a una 48. Grazie.
14.03.2015 - 18:04DROPS Design answered:
Buongiorno Claudia. Le taglie DROPS vestono comodo. La S corrisponde alla 42, la XL alla 48. Le consigliamo di misurare un suo capo analogo e di scegliere la taglia da seguire confrontando le misure con quelle riportate nel grafico in basso, alla fine delle spiegazioni del modello. Si ricordi anche di verificare la correttezza del campione misurandolo dopo averlo lavato e fatto asciugare. Buon lavoro!
15.03.2015 - 16:36
![]() Tamara wrote:
Tamara wrote:
In Größe XXL habe ich 400 gr gebraucht!
02.09.2014 - 12:18
![]() Deb Polner wrote:
Deb Polner wrote:
Reading over the pattern leaves me to believe the "join" runs down the middle of the back. Is it noticeable and if so can the markers be placed so the seam runs up the side instead where it is less noticeable and not affect the pattern design?
14.07.2014 - 15:57DROPS Design answered:
Dear Mrs Polner, the both markers placed in M.2 are marking the sides, beg of round is in the mid of K2 each side, after half part of M.2 in the round + after last st in the round. Happy knitting!
15.07.2014 - 08:41
|
|||||||||||||||||||
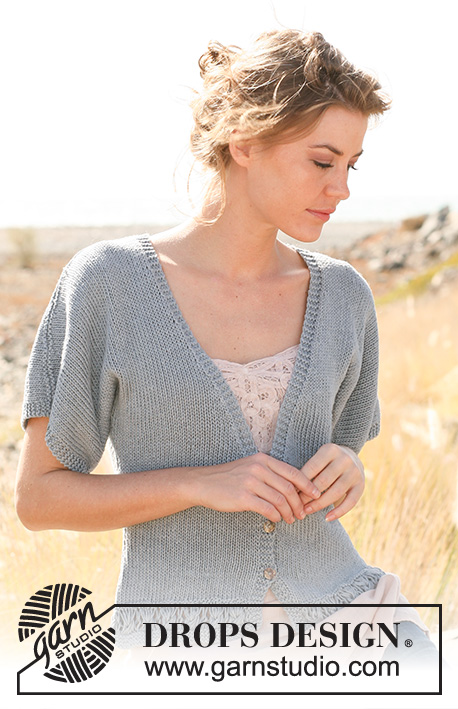
Vivienne#viviennetop |
|||||||||||||||||||
 |
 |
||||||||||||||||||
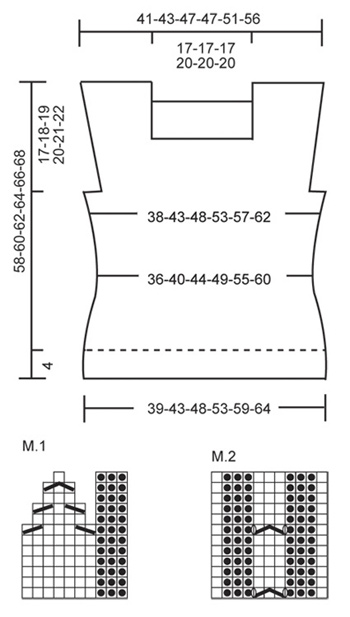
Knitted DROPS top with bell pattern and wing sleeves in "Safran". Size S-XXXL.
DROPS 129-36 |
|||||||||||||||||||
|
GARTER ST (in the round): * K 1 round and P 1 round *, repeat from *-*. GARTER ST (back and forth on needle): K all rows. PATTERN: See diagram M.1 and M.2. The diagram shows the pattern from RS. DECREASE TIP: Dec as follows AFTER marker: Slip 1 st as if to K, K 1, psso. Dec as follows BEFORE marker: K 2 tog. INCREASE TIP 1: Inc by working 2 sts in 1 st. INCREASE TIP 2: Inc 1 st by making 1 YO inside the outermost 3 sts in garter st. On next row K the YO twisted (i.e. knit into back loop of st instead of front loop). Work the inc sts in garter st. NOTE! Avoid inc for wing sleeve on 1st and 7th row in the pattern diagram for sizes XL, XXL and XXXL (because of YO in pattern on 1st and 7th row for these sizes). -------------------------------------------------------- TOP: Worked in the round on circular needle. Cast on 450-500-550-610-680-740 sts on circular needle size 3.5 mm / US 4 with Safran. Work diagram M.1 over all sts - see explanation above! When M.1 has been worked 1 time vertically, 180-200-220-244-272-296 sts remain on needle. Work in stockinette st over all sts. REMEMBER THE GAUGE! When piece measures 13 cm / 5⅛", insert 4 markers in the piece as follows (for waist): Work 27-31-36-41-47-52 sts, insert marker 1, work 36-38-38-40-42-44 sts, insert marker 2, work 54-62-72-82-94-104 sts, insert marker 3, work 36-38-38-40-42-44 sts, insert marker 4, work the remaining 27-31-36-41-47-52 sts. Now dec 2 sts on front piece and 2 sts on back piece as follows: Dec AFTER marker 1 and 3 and BEFORE marker 2 and 4 - SEE DECREASE TIP! Repeat these dec on every 6th-6th-6th-6th-5th-5th round a total of 4-4-4-4-5-5 times = 164-184-204-228-252-276 sts. When piece measures 24 cm / 9½", inc 2 sts on front piece and 2 sts on back piece as follows: Inc AFTER marker 1 and 3 and BEFORE marker 2 and 4 - READ INCREASE TIP 1! Repeat inc on every 6th-6th-6th-8th-8th-8th round a total of 3-3-3-3-2-2 times = 176-196-216-240-260-284 sts. When piece measures 32-33-34-35-36-37 cm / 12½"-13½"-13⅜"-13¾"-14¼"-14½", K 1 round while AT THE SAME TIME inc 0-2-4-2-4-2 sts evenly = 176-198-220-242-264-286 sts. Continue to work M.2 over all sts (= 16-18-20-22-24-26 repetitions). Insert 2 markers in the piece, after 8-9-10-11-12-13 repetitions of M.2 and after last st on round (= between 2 K sts in each side). Continue with M.2 vertically. When piece measures 40-41-42-43-44-45 cm / 15¾"-16⅛"-16½"-17"-17¼"-17¾", work 4 rounds in GARTER ST - see explanation above - over 20-20-20-30-30-30 sts in each side (= 10-10-10-15-15-15 sts on each side of marker in each side) while AT THE SAME TIME on 1st round dec 2-2-2-4-4-4 sts evenly over these sts in each side (= 18-18-18-26-26-26 sts in garter st), work the remaining sts in pattern as before. When 4 rounds in garter st have been worked vertically over the 18-18-18-26-26-26 sts in each side, bind off the middle 12-12-12-20-20-20 sts each side for armholes and finish each piece separately. BACK PIECE: = 74-85-96-97-108-119 sts. Worked back and forth on needle from this point. Continue to work pattern and 3 sts in GARTER ST each side - see explanation above. When piece measures 2 cm / ¾" from where armholes were bind off, inc 1 st for wing sleeve in each side - READ INCREASE TIP 2! Repeat inc in each side on every 4th-6th-8th-8th-12th-12th row a total of 10-7-6-6-5-5 times = 94-99-108-109-118-129 sts. AT THE SAME TIME when piece measures 53-55-57-59-61-63 cm / 21"-21⅝"-22½"-23¼"-24"-24¾", work 4 rows in garter st over the middle 52-53-52-63-64-63 sts while AT THE SAME TIME dec 8-8-8-12-12-12 sts evenly over these sts in garter st on 1st row (= 44-45-44-51-52-51 sts in garter st), work the remaining sts in pattern as before. When 4 rows in garter st have been worked vertically over the 44-45-44-51-52-51 sts in garter st, bind off the middle 38-39-38-45-46-45 sts for neck and finish each piece separately = 24-26-31-26-30-36 sts remain on shoulder. Continue with pattern 13-10-9-9-8-8 stitches in garter stitch towards armhole and 3 sts in garter st towards neck. Bind off when piece measures 58-60-62-64-66-68 cm / 22¾"-23⅝"-24⅜"-25¼"-26"-26¾". FRONT PIECE: = 74-85-96-97-108-119 sts. Work and inc for wing sleeve in each side as on back piece. AT THE SAME TIME when piece measures 42-44-46-48-50-52 cm / 16½"-17¼"-18"-19"-19¾"-20½", work 4 rows in garter st over the middle 52-53-52-63-64-63 sts while AT THE SAME TIME dec 8-8-8-12-12-12 sts evenly over these sts in garter st on 1st row (= 44-45-44-51-52-51 sts in garter st), work the remaining sts in pattern as before. When 4 rows in garter st have been worked vertically over the 44-45-44-51-52-51 sts in garter st, bind off the middle 38-39-38-45-46-45 sts for neck and finish each piece separately = 24-26-31-26-30-36 sts remain on shoulder. Continue with pattern, 3-10-9-9-8-8 stitches in garter stitch towards armhole and 3 sts in garter st towards neck. Bind off when piece measures 58-60-62-64-66-68 cm / 22¾"-23⅝"-24⅜"-25¼"-26"-26¾". ASSEMBLY: Sew the shoulder seams. |
|||||||||||||||||||
Diagram explanations |
|||||||||||||||||||
|
|||||||||||||||||||
 |
|||||||||||||||||||
Have you finished this pattern?Tag your pictures with #dropspattern #viviennetop or submit them to the #dropsfan gallery. Do you need help with this pattern?You'll find 14 tutorial videos, a Comments/Questions area and more by visiting the pattern on garnstudio.com. © 1982-2026 DROPS Design A/S. We reserve all rights. This document, including all its sub-sections, has copyrights. Read more about what you can do with our patterns at the bottom of each pattern on our site. |
|||||||||||||||||||


With over 40 years in knitting and crochet design, DROPS Design offers one of the most extensive collections of free patterns on the internet - translated to 17 languages. As of today we count 324 catalogs and 12278 patterns - 12268 of which are translated into English (US/in).
We work hard to bring you the best knitting and crochet have to offer, inspiration and advice as well as great quality yarns at incredible prices! Would you like to use our patterns for other than personal use? You can read what you are allowed to do in the Copyright text at the bottom of all our patterns. Happy crafting!
Post a comment to pattern DROPS 129-36
We would love to hear what you have to say about this pattern!
If you want to leave a question, please make sure you select the correct category in the form below, to speed up the answering process. Required fields are marked *.