
Popular categories
Looking for a yarn?


Comments / Questions (46)
![]() Ingrid Søndergård wrote:
Ingrid Søndergård wrote:
Når jeg skal måle på mit strikketøj, er det da et liggende mål? Jeg oplever at denne model er meget elastisk og jeg er i tvivl.
16.07.2016 - 08:59DROPS Design answered:
Hej Ingrid. Jeg ville maale denne liggende, men traekke let i arbejdet naar du maaler.
19.07.2016 - 13:52
![]() Liv wrote:
Liv wrote:
Am Anfang der Beschreibung steht "Mit 2 Fäden (...) Maschen anschlagen." Heisst das, dass man die ganze Arbeit mit doppeltem Faden strickt? Oder ab wann nimmt man nur noch einen Faden? Und was macht man dann mit dem zweiten? Vielen Dank und herzliche Grüsse.
19.05.2016 - 09:06DROPS Design answered:
Liebe Liv, ja die ganze Arbeit wird mit doppeltem Faden gestrickt (siehe Titel).
20.05.2016 - 08:25
![]() Benedetta wrote:
Benedetta wrote:
Grazie, come sempre le vs risposte sono celeri e facili da interpretare.
19.10.2015 - 10:02
![]() Benedetta wrote:
Benedetta wrote:
Buonasera,vorrei un chiarimento per la Tg S -davanti."Quando il lavoro misura 9 cm aumentare 1 m verso il centro davanti.ripetere gli aumenti ogni 3 ferri".cioe' devo fare l'aumento e poi ?.grazie per la Vs cortesia
18.10.2015 - 21:47DROPS Design answered:
Buongiorno Benedetta. Deve fare un aumento, poi lavora due ferri senza aumentare, al terzo ferro aumenta, sempre verso il centro davanti per formare la punta. Poi altri due ferri senza aumenti, e al terzo aumenta, e così via. Buon lavoro!
19.10.2015 - 08:39
![]() Marie Chevalier wrote:
Marie Chevalier wrote:
Bonjour 'adore ce modèle"!...mais je suis bloquée...j'ai terminé le dos. Redue au devant, je ne comprend pas : "continuer pendant 1 cm et placer un marqueur"...ceci pour le milieu épaule????.... et la suite?...."a 9 cm de ce marqueur, augmenter 1 m côté milieu devant"... je ne vois vraiment pas ce que vous voulez dire?.... svp expliquez moi plus clairement...merci beaucoup...Marie
13.10.2015 - 17:47DROPS Design answered:
Bonjour Marie, le marqueur placé 1 cm après le marqueur sur le devant correspond à l'épaule (là où l'ouvrage sera ensuite plié). Augmentez ensuite à 9 cm du marqueur 1 m côté milieu devant = côté bordure devant (voir "Augmentations" au début des explications). Bon tricot!
14.10.2015 - 08:45
![]() Chantal B wrote:
Chantal B wrote:
Ok. Merci pour votre réponse rapide. Amitiés. Chantal
30.04.2014 - 19:51
![]() Chantal wrote:
Chantal wrote:
Pour la réalisation du devant, vous mentionnez : "répéter ces augmentations 26 fois tous les 3 rangs" Comment faut-il compter les rangs ? 1ère dim sur le rang 1 et ensuite 3 rangs plus bas, soit le rang 4, et dans ce cas, les dim se font 1 fois en début de rang et 1 fois en fin de rang, 3 rangs plus bas ? Est-ce bien cela ? Merci de votre réponse. Chantal
30.04.2014 - 10:27DROPS Design answered:
Bonjour Chantal, les augmentations se font tous les 3 rangs, c'est-à-dire, *1 rang avec augm, 2 rangs sans augm*, répétez de *-* mais notez que ces augmentations pourront ainsi se faire aussi bien sur l'endroit que sur l'envers, mais elles doivent toutes être faites sur le même côté (côté milieu devant = bordure devant). Bon tricot!
30.04.2014 - 13:10
![]() Elisabeth Hosnowsky wrote:
Elisabeth Hosnowsky wrote:
Ein richtig schönes stück. Habe es aber aus Baumwolle gestrickt. einfach total schön! Danke!!!
07.01.2014 - 22:31
![]() Jodi Sanders wrote:
Jodi Sanders wrote:
I am about 3/4 of the way thru this pattern. It's probably a bit too advanced for me because there are some confusing directions. Even my local yarn shop knitting guru is having trouble understanding the intent. I did email Garn Studio with the questions. It really is a beautiful sweater so I hope I can figure it out :)
30.07.2013 - 19:43
![]() Marie Cadieux wrote:
Marie Cadieux wrote:
Merci beaucoup beaucoup!!!!!!!
17.04.2012 - 06:48
|
|
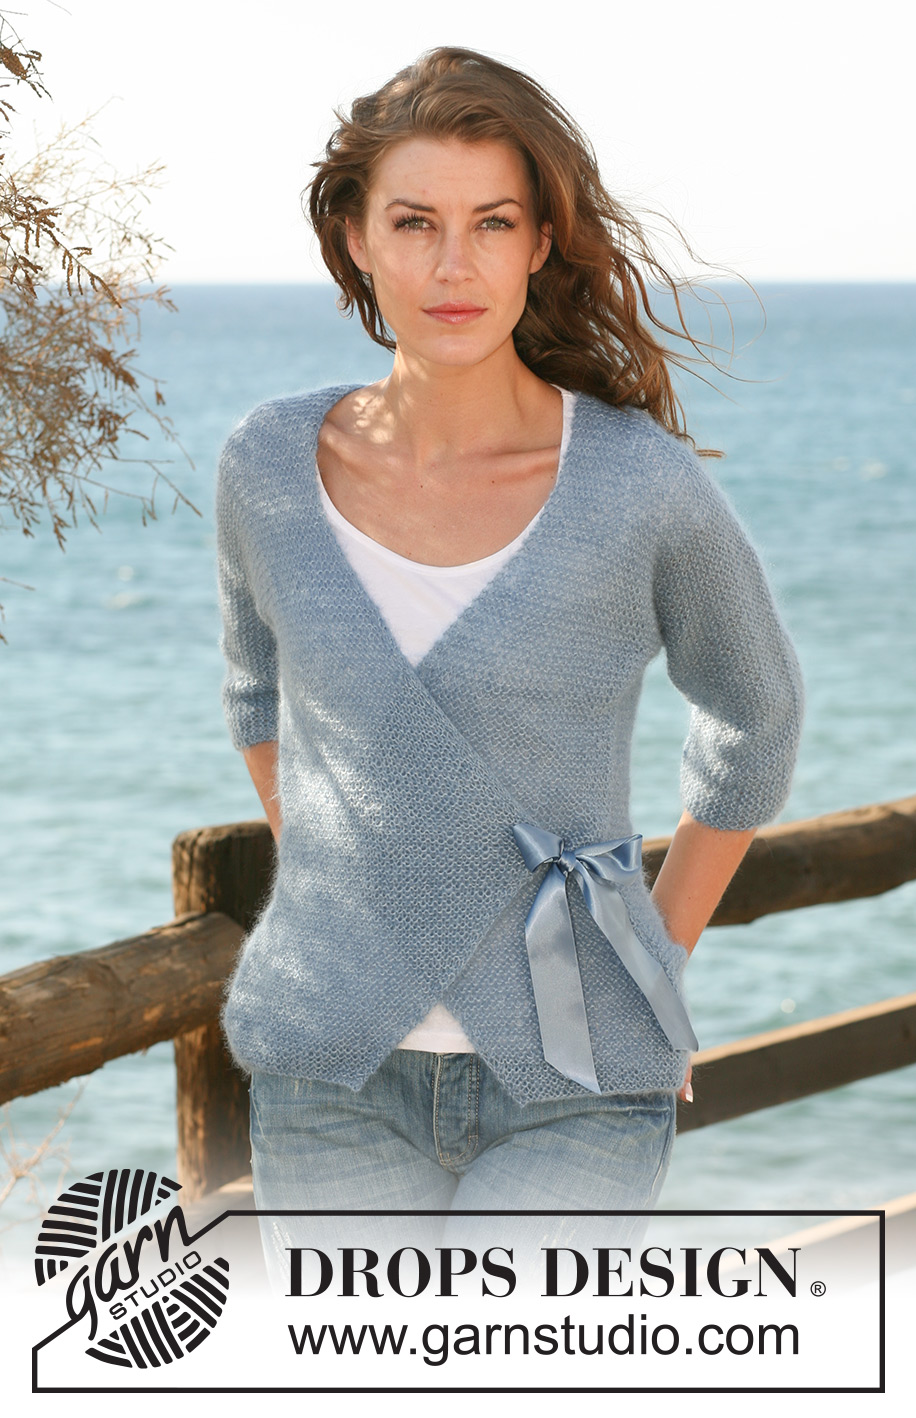
Mother Sea#motherseacardigan |
|
 |
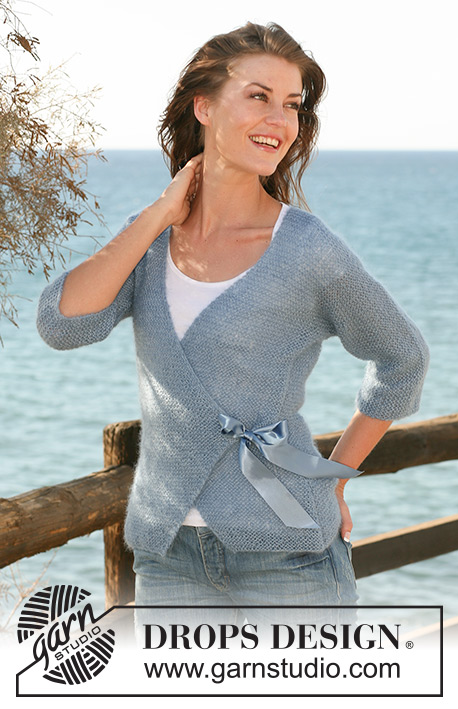 |
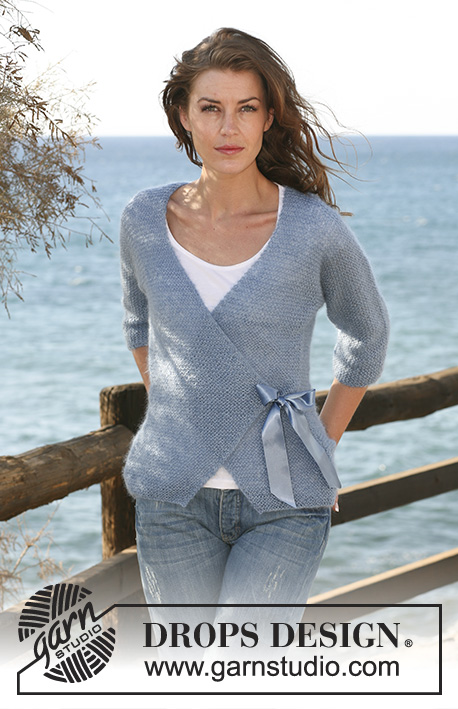
Knitted DROPS wrap-round jacket with ¾ sleeves in garter st in 2 threads ”Kid-Silk”. Size S-XXXL.
DROPS 119-5 |
|
|
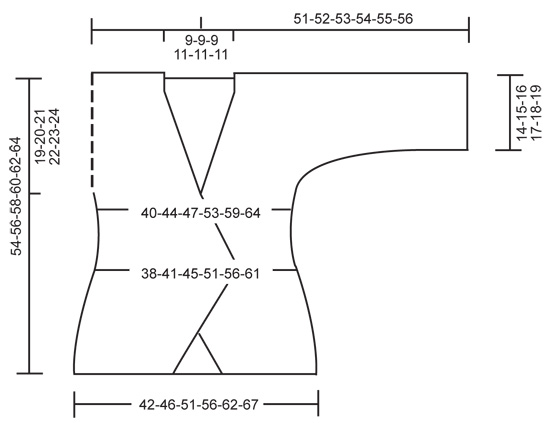
GARTER ST (back and forth on needle): K all rows. DECREASING TIP: Dec inside 1 edge st by K2 tog. INCREASING TIP: Inc by K2 in st inside edge st. -------------------------------------------------------- -------------------------------------------------------- Worked in one piece. Beg at the bottom of back piece, continue over shoulders and work front pieces separately from shoulder down. BACK PIECE: Worked back and forth on circular needle. Cast on 74-80-88-98-108-116 sts (includes 1 edge st each side) on circular needle size 4.5 mm / US 7 with 2 threads Kid-Silk. Work GARTER ST - see above! REMEMBER THE GAUGE! When piece measures 6-6-7-7-7-7 cm / 2⅜"-2⅜"-2¾"-2¾"-2¾"-2¾" dec 1 st each side – See DECREASING TIP! Repeat the dec on every 3-3-2-2-2-2 cm / 1⅛"-1⅛"-¾"-¾"-¾"-¾" a total of 4-4-5-5-5-5 times = 66-72-78-88-98-106 sts. When piece measures 21 cm / 8¼" inc 1 st each side – See INCREASING TIP! Repeat the inc when piece measures 30-31-32-33-34-35 cm / 11¾"-12¼"-12½"-13"-13⅜"-13¾" = 70-76-82-92-102-110 sts. When piece measures 35-36-37-38-39-40 cm / 13¾"-14¼"-14½"-15"-15¼"-15¾" cast on new sts for sleeve at the end of row each side as follows: 1 st 1-2-2-2-3-4 times, 2 sts 2-2-2-2-1-1 times, 4 sts 2-1-1-1-1-0 times, 6 sts 1 time, 8 sts 1 time and 25-26-25-22-19-19 sts 1 time = a total of 174-176-180-184-186-188 sts on needle. Continue until piece measures 53-55-57-59-61-63 cm / 21"-21⅝"-22½"-23¼"-24"-24¾". Now bind off the middle 16-16-16-18-18-18 sts for neck = 79-80-82-83-84-85 sts left on each shoulder/sleeve. Slip sts from one shoulder/sleeve on a stitch holder. FRONT PIECE 1: = 79-80-82-83-84-85 sts. Continue for 1 cm / ⅜", insert a marker in piece = mid shoulder (measure piece form here). READ ALL OF THE FOLLOWING SECTION BEFORE CONTINUING! When piece measures 9-11-8-10-9-8 cm / 3½"-4⅜"-3⅛"-4"-3½"-3⅛" inc 1 st towards mid front - SEE INCREASING TIP. Size S-L: Repeat the inc on every 3rd row a total of 26-26-31 times. Size XL-XXXL: Repeat the inc on every other and 3rd row alternately a total of 37-41-44 times (piece measures approx 32-34-36-38-40-42 cm / 12½"-13⅜"-14¼"-15"-15¾"-16½" after the last inc), AT THE SAME TIME when piece measures 14-15-16-17-18-19 cm / 5½"-6"-6¼"-6¾"-7"-7½" bind off sleeve sts – bind off loosely at the beg of every row from sleeve edge: 25-26-25-22-19-19 sts 1 time, 8 sts 1 time, 6 sts 1 time, 4 sts 2-1-1-1-1-0 times, 2 sts 2-2-2-2-1-1 times and 1 st 1-2-2-2-3-4 times. AT THE SAME TIME when piece measures 24-25-26-27-28-29 cm / 9½"-9¾"-10¼"-10⅝"-11"-11⅜" dec 1 st at the side as on back piece. NOW READ ALL OF THE FOLLOWING SECTION BEFORE CONTINUING: Repeat the dec at the side when piece measures 33-35-37-39-41-43 cm / 13"-13¾"-14½"-15¼"-16⅛"-17". AT THE SAME TIME when piece measures 33-35-37-39-41-43 cm / 13"-13¾"-14½"-15¼"-16⅛"-17" dec 1 st towards mid front – See DECREASING TIP! Repeat the dec towards mid front until finished measurements as follows: Size S-L: on every other and 3rd row alternately. Size XL-XXL: on every other row. Size XXXL: on every and every other row alternately. AT THE SAME TIME when piece measures 39-41-43-45-47-49 cm / 15¼"-16⅛"-17"-17¾"-18½"-19¼" inc 1 st at the side. Repeat the inc on every 3-3-2-2-2-2 cm / 1⅛"-1⅛"-¾"-¾"-¾"-¾" a total of 4-4-5-5-5-5 times. Bind off LOOSELY when piece measures 54-56-58-60-62-64 cm / 21¼"-22"-22¾"-23⅝"-24⅜"-25¼". FRONT PIECE 2: Slip sts from stitch holder back on needle and work like the other front piece, but mirrored. ASSEMBLY: Fold jacket double by shoulders. Sew the right side and sleeve seam inside 1 edge st. Sew 50 cm / 20" silk ribbon to the inside of the widest part of right front piece and sew 50 cm / 20" silk ribbon at the same height on the inside of the side seam of left front piece. Sew the left side and sleeve seam inside 1 edge st. Sew the button on the inside of right side seam in the same height as ribbons (use st at the point of left front pieces as buttonhole). |
|
 |
|
Have you finished this pattern?Tag your pictures with #dropspattern #motherseacardigan or submit them to the #dropsfan gallery. Do you need help with this pattern?You'll find 11 tutorial videos, a Comments/Questions area and more by visiting the pattern on garnstudio.com. © 1982-2026 DROPS Design A/S. We reserve all rights. This document, including all its sub-sections, has copyrights. Read more about what you can do with our patterns at the bottom of each pattern on our site. |
|


With over 40 years in knitting and crochet design, DROPS Design offers one of the most extensive collections of free patterns on the internet - translated to 17 languages. As of today we count 325 catalogs and 12298 patterns - 12288 of which are translated into English (US/in).
We work hard to bring you the best knitting and crochet have to offer, inspiration and advice as well as great quality yarns at incredible prices! Would you like to use our patterns for other than personal use? You can read what you are allowed to do in the Copyright text at the bottom of all our patterns. Happy crafting!
Post a comment to pattern DROPS 119-5
We would love to hear what you have to say about this pattern!
If you want to leave a question, please make sure you select the correct category in the form below, to speed up the answering process. Required fields are marked *.