
Popular categories
Looking for a yarn?


Comments / Questions (42)
![]() Jannie Hansen wrote:
Jannie Hansen wrote:
Det er umuligt at hækle efter jeres diagrammer. Kan i da ikke skrive det række for række som andre gør 😥😯 øv
05.09.2018 - 19:07
![]() Francine wrote:
Francine wrote:
I tried to contact Nordic Mart where I purchased your Eskimo Yarn. There is no way to contact them for help!
04.09.2018 - 13:25DROPS Design answered:
Dear Francine, maybe you can just let us know the exact part you don't understand or try to contact them on Facebook.
05.09.2018 - 12:29
![]() Tammy wrote:
Tammy wrote:
I wish I could follow your patterns. I haven’t found one pattern I can understand enough to even attempt one of your beautiful projects. Just wish you’d put full written instructions. Too hard to follow your half diagram and half written instructions.
29.08.2018 - 08:46
![]() Francine wrote:
Francine wrote:
I don't understand some of your instructions. I had to rip out the first row as your diagram should show more than one pattern so that you can see if you have to skip a stitch or start the new pattern immediately after the shell pattern. Then I am not sure if I am crocheting between the stitches or in them on the second row. It would be nice if you made a complete diagram of a few rows to get started or give a better explanation. I am trying to get this done for my son's wedding
29.08.2018 - 06:14DROPS Design answered:
Dear Francine, I'm sorry, I'm not sure to understand your question, could you please reword it and let us know theh part you don't understand. Thank you!
04.09.2018 - 13:15
![]() Christine Isnard wrote:
Christine Isnard wrote:
Bonjour, je ne comprends pas en quoi consiste le point structuré. Faut il faire des mailles serrées pour les augmentations? comme indiqué mais dans ce cas cela reste trop bas par rapport à la hauteur des coquilles...J'ai déjà lu toutes vos réponses en anglais et en français mais le mieux serait que vous nous mettiez une vidéo montrant M1 et M2. Vos vidéos sont très bien faites . Merci d'avance d'en faire une. Sinon je vais devoir renoncer et me rabattre sur un autre modèle...;
03.01.2017 - 13:10DROPS Design answered:
Bonjour Mme Isnard, dans les mailles entre M.2 on crochète comme les mailles de M2 soit en ms ou en DB comme dans M.2. Les augmentations se font sur les rangs en ms, cf "AUGMENTATIONS" au début des explications. Bon crochet!
03.01.2017 - 14:46
![]() DEVOTI wrote:
DEVOTI wrote:
Bonjour, je ne comprends pas ce point structuré, il me semble bien faire les coquille mais cela ne donne pas comme la photo, pas de relief???Merci
25.10.2016 - 18:44DROPS Design answered:
Bonjour Mme Devoti, pour bien donner du relief, pensez à crocheter les ms du rang après les bride à picots entre les mailles en veillant bien à ce que les picots soient sur le devant de l'ouvrage. Bon crochet!
26.10.2016 - 08:52
![]() Ilona Lehmann wrote:
Ilona Lehmann wrote:
Die Anleitung passt nicht zu dem Bild. M.E. Zeigt das Foto, dass überwiegend Stäbchen, nein Doppelstäbchen gehäkelt werden. Das Gehäkelte ist nur "blumig", auch fehlen die vereinzelten Fächer laut Foto. Was stimmt hier nicht? Ich bin enttäuscht, hatte einen hübschen Poncho erwartet. Eine Antwort wäre toll, danke.
26.11.2015 - 19:22DROPS Design answered:
Es fehlt nicht, das Bild stimmt mit der Anleitung überein. Es ist richtig, dass Sie zwischen den Fächern Doppelstäbchen häkeln. Die Fächer, die Sie sehen, sind Muster M.1 und M.2. Sie nehmen zwischen den Fächern wie beschrieben nach und nach M zu, diese häkeln Sie als Doppel-Stb, wenn Sie beim Fächermuster Doppel-Stb häkeln, und als feste M, wenn beim Fächermuster feste M gehäkelt werden. Sie häkeln das Cape ja von oben nach unten, daher werden es erst nach und nach mehr Doppel-Stb zwischen den einzelnen Fächermustersätzen.
30.11.2015 - 13:21Dona wrote:
How many shells are on each row?
09.09.2014 - 12:58DROPS Design answered:
Dear Dona, you are working M.1 over 35-40 sts ie you repeat 7 times M.1 in first size and 8 times M.1 in 2nd size. Happy crocheting!
09.09.2014 - 17:23
![]() Nora wrote:
Nora wrote:
What is an example of a stitch that is not included in M2? Thank you!
20.02.2014 - 22:55DROPS Design answered:
Dear Nora, when you work M.2 you inc between each repetition of the diagram, these inc are the sts that are not included in M.2. Happy crocheting!
21.02.2014 - 08:39
![]() Nora wrote:
Nora wrote:
I am having difficulty understanding the instructions for "textured pattern". I don't understand what it means by "worked on all stitches not included in M.2".
20.02.2014 - 05:51DROPS Design answered:
Dear Nora, all sts not included in M.2 will be crocheted either with sc when sc are crocheted in M.2 and with tr when shells are worked in M.2. Happy crocheting!
20.02.2014 - 08:41
|
||||||||||||||||
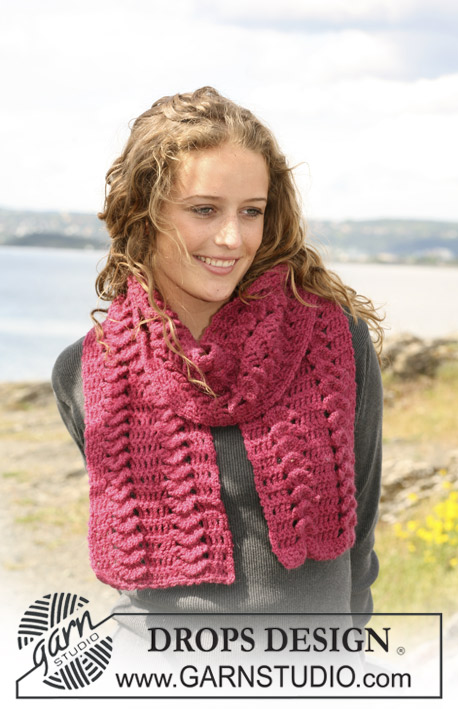
Shells on the Shore |
||||||||||||||||
|
|
||||||||||||||||
Crochet DROPS cape with shell pattern in ”Snow”. Size S - XL.
DROPS 110-9 |
||||||||||||||||
|
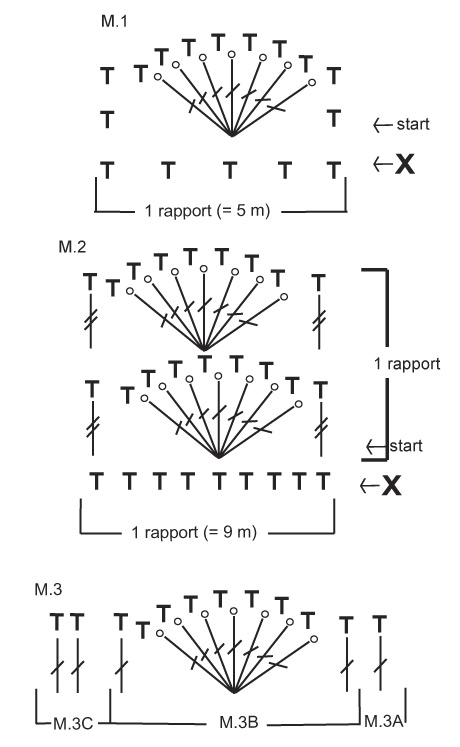
Crochet tip-1: Replace first sc on row with 1 ch. Replace first dc on row with 3 ch. Replace first tr on row with 4 ch. Crochet tip-2: When working sc over tr, crochet in tr, but when working sc over shell with picots crochet between sts. Make sure the picot sits at the front of piece. Increasing tip: Inc 2 sts between each shell by working 2 sc in the first tr/sc and the last tr/sc in each repeat of M.2. Note! No inc towards mid front (i.e. do not inc at the beg of the first repeat of M.2 and at the end of the last repeat of M.2 on row). Shell pattern: See diagram M.1 to M.3. Textured pattern: Worked on all sts not included in M.2. The textured pattern follows the pattern in M.2, i.e. when working sc in M.2 work sc in textured pattern and when working shells in M.2 work tr in textured pattern. CAPE Worked from top down, back and forth on needle towards mid front. Crochet 47-53 ch (includes 1 ch to turn with) on crochet hook size 8 mm [L/11] with Snow. Work 1 sc in 2nd ch from hook and 1 sc in 3rd ch from hook, * skip 1 ch, 1 sc in each of the next 4 ch *, repeat from *-* until 4-5 ch remain, skip 1 ch and work 1 sc in each of the last 3-4 ch = 37-42 sc on row. Continue as follows from RS: See Crochet tip-1 and Textured pattern! 1 st in the first st, M.1 on the next 35-40 sts (7-8 repeats), 1 st in the last st on row. See Crochet tip-2! After 1 vertical repeat of M.1 (= 65-74 sts) continue in M.2. At the same time inc 2 sts between each of the 7-8 repeats on row of M.2, inc on dc-rows – see Increasing tip – a total of 5 times = 125-144 sts on row. Incorporate the inc sts in Textured pattern as you go along, i.e. no of sts between each repeat of M.2 increases. When all inc are complete continue as follows: 1 st in first st on row, * M.2 on the next 9 sts, 1 st in each of the next 10 sts *, repeat from *-* until 10 sts remain on row, M.2 on the next 9 sts and 1 st in the last st on row. After 9-10 vertical repeats of M.2 continue as follows: M.3A on the first st, * M.3B on the next 9 sts, M.3C on the next 10 sts *, repeat from *-* until 10 sts remain, M.3B on the next 9 sts and M.3A on the last st on row. See Crochet tip-2! After 1 vertical repeat of M.3 (2 rows) cut the thread. Front bands and neckline: Beg at the bottom of left front piece (1st row = WS). Crochet approx 100 to 120 sc with crochet hook size 8 mm [L/11] and Snow up along left front piece, round neck and down along right front piece (make sure border isn’t too tight). Turn piece. Work 1 dc in each sc, at the same time make 2 buttonholes on right front piece, one approx 8 cm [3"] from neckline and one approx 1 cm [½"] from neckline by replacing 1 dc with 1 ch. On next row work 1 sc in each dc and in each ch for buttonhole. Sew on buttons. |
||||||||||||||||
Diagram explanations |
||||||||||||||||
|
||||||||||||||||
 |
||||||||||||||||
Have you finished this pattern?Tag your pictures with #dropspattern or submit them to the #dropsfan gallery. Do you need help with this pattern?You'll find 6 tutorial videos, a Comments/Questions area and more by visiting the pattern on garnstudio.com. © 1982-2026 DROPS Design A/S. We reserve all rights. This document, including all its sub-sections, has copyrights. Read more about what you can do with our patterns at the bottom of each pattern on our site. |
||||||||||||||||


With over 40 years in knitting and crochet design, DROPS Design offers one of the most extensive collections of free patterns on the internet - translated to 17 languages. As of today we count 325 catalogs and 12298 patterns - 12288 of which are translated into English (US/in).
We work hard to bring you the best knitting and crochet have to offer, inspiration and advice as well as great quality yarns at incredible prices! Would you like to use our patterns for other than personal use? You can read what you are allowed to do in the Copyright text at the bottom of all our patterns. Happy crafting!
Post a comment to pattern DROPS 110-9
We would love to hear what you have to say about this pattern!
If you want to leave a question, please make sure you select the correct category in the form below, to speed up the answering process. Required fields are marked *.