
Popular categories
Looking for a yarn?


Comments / Questions (50)
![]() Agneta Sjöberg wrote:
Agneta Sjöberg wrote:
Förstår inte hur jag gör på varv 8 på M7. Visar ingenstans hur jag maskar av med trekanten. Hur gör jag?
26.10.2016 - 23:38DROPS Design answered:
Hej Agneta. Det er sidste symbol i forklaringen: 2 rm tills
27.10.2016 - 09:57
![]() Ilona wrote:
Ilona wrote:
Hallo, leider verstehe ich nicht wie die Aermel gestrickt werden. Es steht da man soll 80 Machen anschlagen und eine Reihe links stricken. Weiter steht dann man soll das Muster M1B stricken = 72 Maschen... Meine Frage ist wo sind die 8 Maschen geblieben? Danach gehts mit Muster M2B weiter und dier sind es dann nur noch 56 Maschen. Vielen Dank im voraus fuer die Hilfe!
31.08.2016 - 20:01DROPS Design answered:
Liebe Ilona, M.1B is über 20 M gestrickt, aber nach M.1B gestrickt ist, bleiben nur 18 M übrig, dh wenn Sie 4 x M.1B stricken, stricken Sie über 80 Maschen aber es sind jetzt 72 M übrig ( 2 Abnahmen x 4 M.1B = 8 M abegnommen). Das gleiche betrifft M.2B, dh Sie werden auch im Diagram abnehmen.
01.09.2016 - 10:18
![]() Ellis M. wrote:
Ellis M. wrote:
Hallo, Waarom worden er 2 verschillende tekens gebruikt voor 1 en hetzelfde ding? Bij de tekenverklaring staat een schuin streepje over 2 steken én ong. hetzelfde maar dan is de obderste helft zwart ingevuld. Beide verklaringen: 2 r samenbreien. Moet dit niet op 2 verschillende manieren gedaan worden? Vr.gr. ellis
09.05.2016 - 17:06DROPS Design answered:
Hoi Ellis. Dit is correct. Beide zijn 2 st r samenbreien, maar de ene teken hoort bij het kantpatroon (samen met een omslag) en de andere hoort bij het minderen bij de pas.
10.05.2016 - 11:08
![]() Natalia Bigorra wrote:
Natalia Bigorra wrote:
Hola! No entiendo bien como tejer el grafico M2 ya que cuando lo he terminado de tejer se me han aumentado muchos puntos Podriais indicarme porfavor como se hace? Gracias
13.11.2015 - 09:14DROPS Design answered:
Hola Natalia, si te fijas en el diagrama para cada aumento hay una disminución. Recomendamos marcar con MP (maracapuntos) cada repetición del patrón de 18 pts para controlar que el nº de pts no varía.
15.11.2015 - 10:32
![]() Mieke Brandt Hessels wrote:
Mieke Brandt Hessels wrote:
Ik had het vest eerst op nld. Nr 3 gebreid, maar toen was het vest veel te klein, ik heb hem weer uitgehaald en met nld nr 3,5 gebreid, toen was het wel goed. Groetjes, Mieke.
06.09.2015 - 16:29
![]() Christa wrote:
Christa wrote:
Rückenteil: Nach M1, M2, M3, M4, M5 soll die Arbeit 12 cm messen. Wie soll das funktionieren, wenn schon die Maschenprobe (M3) 10cm misst?
03.01.2015 - 08:01
![]() Christa wrote:
Christa wrote:
Rückenteil: Nach M1, M2, M3, M4, M5 soll die Arbeit 12 cm messen. Wie soll das funktionieren, wenn schon die Maschenprobe (M3) 10cm misst?
03.01.2015 - 08:01
![]() Sandrine wrote:
Sandrine wrote:
Quant M7 est fini les diminutions pour obtenir 60 m elles se font au dernier rang de M7 ou à 59 cm de hauteur ?
23.10.2014 - 09:26DROPS Design answered:
Bonjour Sandrine, après M7, on continue en jersey jusqu'à la hauteur d'épaules (59 cm dans la 3ème taille), au dernier rang quand l'ouvrage mesure ou juste avant qu'il ne mesure 59 cm, répartissez des diminutions pour ajuster à 60 m et tricotez ensuite le col en relevant les mailles de chaque côté de l'encolure comme indiqué. Bon tricot!
23.10.2014 - 10:38
![]() Sandrine wrote:
Sandrine wrote:
Merci beaucoup c'est tout simple
20.10.2014 - 11:28
![]() Sandrine wrote:
Sandrine wrote:
Je suis d’accord mais il faut quand même tricoter jusqu'au mailles rabattues pour rajouter les mailles de la manche ?
20.10.2014 - 10:52DROPS Design answered:
Bonjour Sandrine, vous pouvez simplement glisser les mailles des manches sur l'aiguille circulaire, sans les tricoter, puis commencer sur l'endroit (à partir du devant droit) comme indiqué, sur ce 1er rang sur l'endroit, vous tricoterez alors les mailles des manches au-dessus des emmanchures. Bon tricot!
20.10.2014 - 10:54
|
|||||||||||||||||||
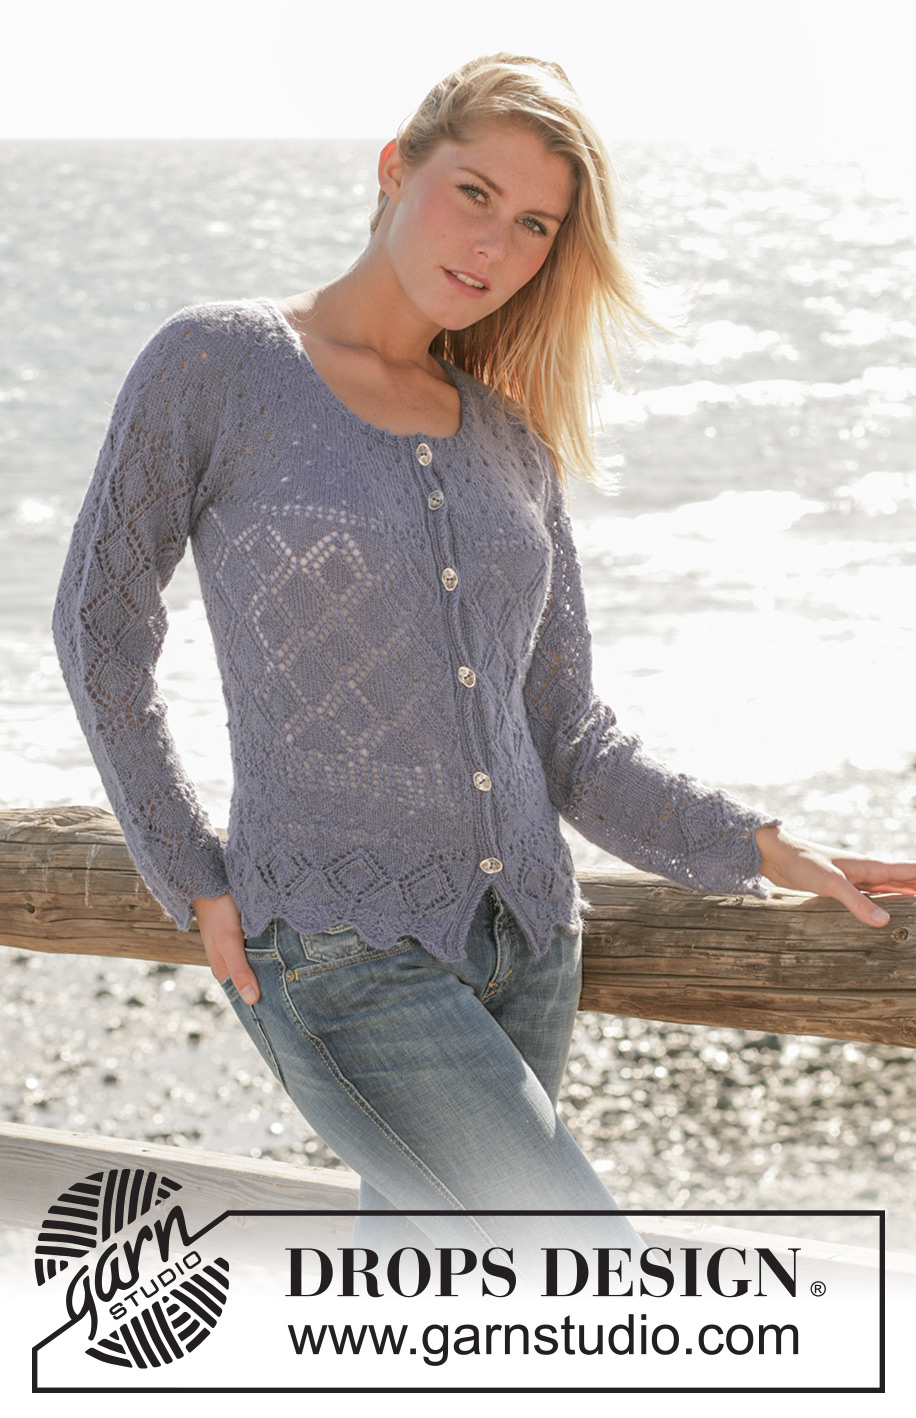
Emma's Diamonds#emmasdiamondscardigan |
|||||||||||||||||||
|
|
|||||||||||||||||||
DROPS cardigan knitted with different lace patterns in “Alpaca”.
DROPS 101-12 |
|||||||||||||||||||
|
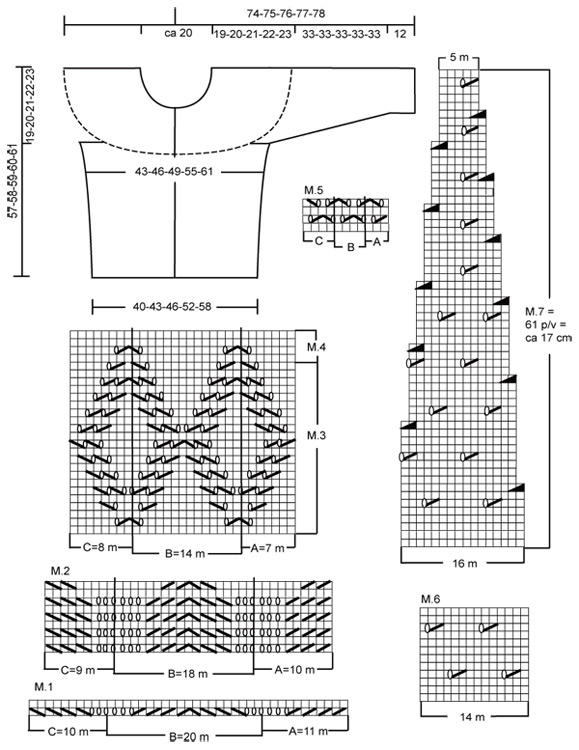
Knitting gauge: 23 sts x 36 rows on needles size 3 mm / US 2or3 in pattern sts = 10 x 10 cm / 4" x 4" . Pattern: See diagrams M.1 to M.7. The diagrams are seen from the RS. Garter sts back and forth: Knit on all rows Front band: Knit 7 front band sts each side mid front as follows (seen from the RS): 1 garter st, K1, P2, K1, P2. Continue with K over K and P over P until finished. Note! For best results knit the front band a bit tight. Button holes: Bind off for button holes at the right front band: 1 button hole = P the 3rd and 4 st from edge tog. and make a yo. Bind off for button holes when the piece measures: Size S: 9, 17, 25, 33, 41 and 47 cm Size M: 10, 18, 26, 34, 42 and 48 cm Size L: 11, 19, 27, 35, 43 and 49 cm Size XL: 12, 20, 28, 36, 44 and 50 cm Size XXL: 13, 21, 29, 37, 45 and 51 cm ___________________________________________________________________ Back and front piece: Knit the cardigan back and forth on circular needle from the mid front. Cast on loosely 275-295-315-355-395 sts (includes 7 front band sts each side mid front) on circular needles size 3 mm / US 2or3. Purl 1 row from the WS. Continue as follows: 7 front band sts – see explanation above M.1A (= 11 sts), M.1B over the next 240-260-280-320-360 sts, M.1C (=10sts), 7 front band sts – see explanation above. After M.1 is completed there are 249-267-285-321-357 sts left. Continue as follows: 7 front band sts, M.2A (=10 sts), M.2B over the next 216-234-252-288-324 sts, M.2C (=9 sts), 7 front band sts. Remember button holes on the right front band – see explanation above. After M.2 is completed there are 197-211-225-253-281 sts left. Continue with M.3 and M.4 as follows: Purl 1 row from the WS according to diagram and then from the RS as follows: Front band as before A (=7 sts), B over the next 168-182-196-224-252 sts, C (= 8 sts) and front band as before. On the last row of M.4 inc. 2 sts for size M, evenly distributed = 197-213-225-253-281 sts. Continue to knit M.5 as follows: Purl 1 row from the WS according to diagram and then continue from the RS as follows: Front band as before M.5A (=3 sts), M.5B until 11 sts remaining, M.5C (= 4 sts) and front band as before. After M.5 is completed the piece measures approx. 12 cm / 4¾". Knit M.6 1 vertical repeat – at the same time on the 1st row inc. evenly distributed number of sts to = 203-217-231-259-287 sts. After M.6 is completed knit M.5 for 3 vertical repeats – at the same time on the 1st row adjust the number of sts to 205-217-233-261-289 sts. Continue to knit M.3 one more time – at the same time on the 1st row inc. evenly distributed number of sts to = 211-225-239-267-295 sts. Knit M.3 for 3 vertical repeats and then finish with M.4 – on the last row of M.4 bind off for armholes as follows: Knit 51-55-58-65-72 sts (=front piece), bind off 10 sts for the arm hole, knit 89-95-103-117-131 sts (=back piece), bind off 10 sts for the armhole, knit 51-55-58-65-72 sts (=front piece). The piece measures approx. 38 cm. Put work aside and knit the sleeves Sleeve: Knit sleeves round on double pointed needles. Cast on loosely 80-80-80-100-100 sts on double pointed needles size 3 mm / US 2or3 with Alpaca and purl 1 row. Continue to knit M.1B = 72-72-72-90-90 sts. Continue with M.2B, after M.2B is completed there are 56-56-56-70-70 sts left. Continue with M.3B and M.4B – at the same time on the last row inc. 2 sts for size XL and XXL evenly distributed = 72-72 sts. Continue with M.5B. After M.5 is completed the piece measures approx. 12 cm / 4¾". Please read all of the following section before knitting it! Knit M.6 for 2 vertical repeats, then M.5 and then M.3 for four vertical repeats, finish with M.4. At the same time when the piece measures 12-12-12-14-14 cm inc. 2 sts mid underneath the sleeve on every 3-2.5-2-3-2.5 cm a total of 11-13-16-10-12 times = 78-82-88-92-96 sts – knit new sts in stockinette sts. On the last row of M.4 bind off 10 sts mid underneath the sleeve = 68-72-78-82-86 sts. The sleeve measures approx. 45 cm. Put work aside and knit another sleeve. Yoke: Put the sleeve onto the same circular needle as the back and front piece – where bind off for armholes = 327-349-375-411-447 sts. Cut the thread and begin to knit from the mid right front side. K the 1st row from the RS (front band as before) at the same time adjust the number of sts to 321-337-369-401-445 sts (do not dec. in the front bands). Continue to knit M.5 as follows: Purl 1 row from the WS according to diagram and continue from the RS as follows: Front band as before, M.5A (= 3 sts), M.5B until 11 sts left, M.5C (=4 sts) and front band as before. After M.5 is completed knit and dec. according M.7 (knit front band as before) – at the same time on the 1st row adjust the number of sts to 318-334-366-398-446 sts. Neck shaping: When the back and front piece measures approx. 48-49-50-51-52 cm put 14 sts at the mid front each side on a thread or a stitch holder for shaping of the neck. Continue to bind off 1 st each side towards the neck on every other row until finish – make sure the pattern will not be displaced and knit sts not divisible into M.7 in stockinette sts. When M.7 is completed approx. 60 – 90 sts are left. Knit in stockinette sts until the piece measure 57-58-59-60-61 cm to the shoulder – at the same time on the last row dec. number of sts evenly distributed to 54-67-60-63-66 sts. Neck edge: Pick up approx. 30-42 sts each side of the neck (incl. the sts from the thread or the stitch holder) = approx. 114 to 150 sts (number should be divisible with 3). Knit 5 rows of Rib = K1, P2 with the front band as before. Bind off loosely with K over K and P over P. Assembly: Sew the opening underneath the sleeves. Sew on the buttons. To make sure the cardigan sits nicely - steam it well. |
|||||||||||||||||||
Diagram explanations |
|||||||||||||||||||
|
|||||||||||||||||||
 |
|||||||||||||||||||
Have you finished this pattern?Tag your pictures with #dropspattern #emmasdiamondscardigan or submit them to the #dropsfan gallery. Do you need help with this pattern?You'll find 23 tutorial videos, a Comments/Questions area and more by visiting the pattern on garnstudio.com. © 1982-2026 DROPS Design A/S. We reserve all rights. This document, including all its sub-sections, has copyrights. Read more about what you can do with our patterns at the bottom of each pattern on our site. |
|||||||||||||||||||


With over 40 years in knitting and crochet design, DROPS Design offers one of the most extensive collections of free patterns on the internet - translated to 17 languages. As of today we count 324 catalogs and 12290 patterns - 12280 of which are translated into English (US/in).
We work hard to bring you the best knitting and crochet have to offer, inspiration and advice as well as great quality yarns at incredible prices! Would you like to use our patterns for other than personal use? You can read what you are allowed to do in the Copyright text at the bottom of all our patterns. Happy crafting!
Post a comment to pattern DROPS 101-12
We would love to hear what you have to say about this pattern!
If you want to leave a question, please make sure you select the correct category in the form below, to speed up the answering process. Required fields are marked *.