
Popular categories
Looking for a yarn?


Comments / Questions (35)
![]() DROPS Design wrote:
DROPS Design wrote:
Nei, bare over de 3 rader med fm til knappestolpen som du hekler i slutten av bakstk.
19.01.2012 - 09:27
![]() Katrine wrote:
Katrine wrote:
Jeg har heklet meg så langt at jeg skal begynne på halsen, men skjønner ikke helt oppskriften. det står hekle 56 - 64 fm rundt halsen (også over knappestolpen). men jeg skal vel ikke hekle hals på skulderen?
18.01.2012 - 21:10Drops Design wrote:
Anha, no there is no such addition, but shouldn't be to complicated just working the hem a bit longer than what pattern tells.
29.11.2011 - 03:52Anha wrote:
Is there an addition to this pattern to lengthening the hem? To about maybe from the knee to mid-calf?
27.11.2011 - 07:19
![]() DROPS Design wrote:
DROPS Design wrote:
Hi Andrea, it's very important for the sleeve to fit that you have the exact gauge both in width but also in height. Look at the gauge info in pattern and also measure chart. Remember to use original yarn for correct measures.
29.11.2010 - 19:14Andrea Kasper wrote:
HELP!!!! I cannot get the sleeves to fit in correctly, they seem to be too large for the arm hole. Any advice? thanks Andrea
29.11.2010 - 11:27
![]() Jeannett wrote:
Jeannett wrote:
Jeg vil hækle kjolen i str. L. Jeg har slået 124 lm op og i næste række hækler jeg 2 lm, 2fm, 1lf, 2 fm osv. Når jeg slutter har jeg 3 lf tilbage. Problemet er, at jeg kommer frem til 80 fm og ikke 84 masker. Er der nogen der ved, hvad jeg gør forkert?
08.06.2010 - 20:34
![]() DROPS Design wrote:
DROPS Design wrote:
Elizabeth, the lacy border at the bottom of the dress is made afterwards, see further down in pattern text. Bind off/Dec is explained in a tip above. NB is latin Nota Bene and means take notice/Note.
22.04.2009 - 18:28
![]() Elizabeth wrote:
Elizabeth wrote:
I'm having trouble following this pattern. I got started on the first row, but the second doesn't make the open pattern like the picture shows in the bottom of the dress. Is the pattern wrong or am I making a mistake? Also, what is "bind off"? Surely it doesn't mean keep cutting the yarn? And what's NB?
21.04.2009 - 21:58
![]() Drops Design wrote:
Drops Design wrote:
Kan du ta meg arbeidet til butikken. Hivs de syns oppsk. er feil må de gjenere kontakte oss. P.S. den franske komentaren var ang. en oversettelesfeil.
24.11.2008 - 08:33
|
|
DROPS 91-27 |
|
|
|
|
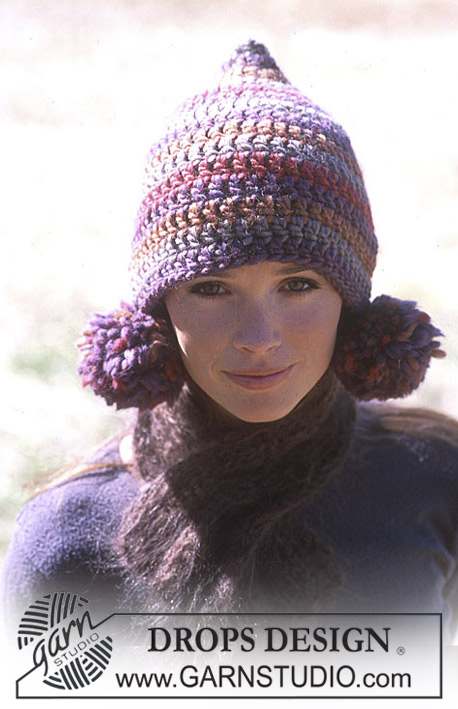
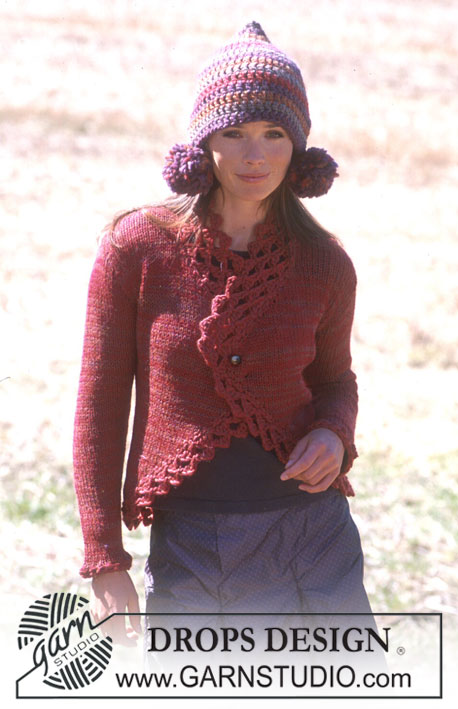
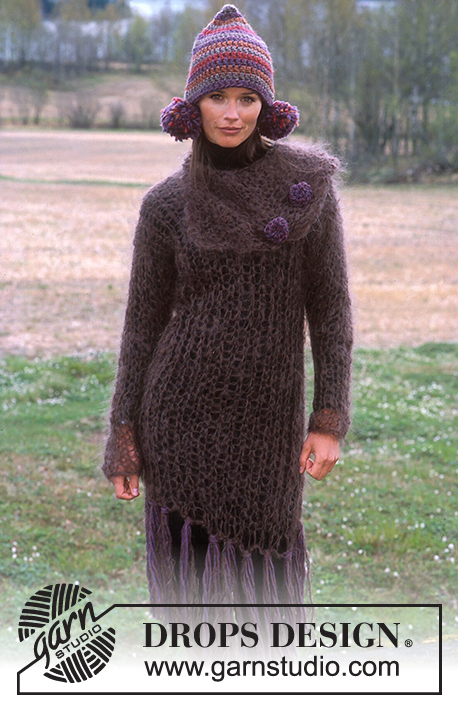
DROPS Crocheted Dress in Karisma Superwash
DROPS 91-27 |
|
|
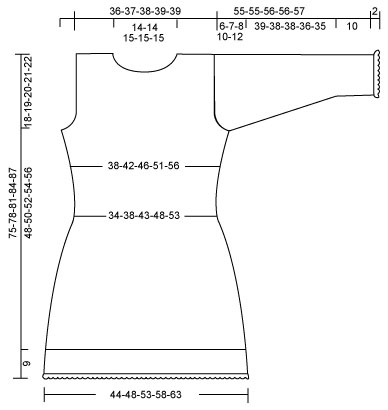
Crochet gauge: 16 sc/tr in width and approx. 5 structure pattern rows in height (that is, 1 row sc + 1 row tr x 5) = 10 x 10 cm. Note: Because of different crochet techniques used by the individual, the gauge may vary, so you might have to drop/go up a hook size to obtain the correct gauge. Crochet tips: Replace the first sc in every sc row with ch 1 and the first tr in every tr row with ch 4. Every sc row ends with 1 sc in the ch 4 at the start of previous row and every tr row with 1 tr in 1st ch at start of previous row. Structure pattern: * 1 row tr, 1 row sc*, repeat from * - * to finished measurements Crochet in each sc/tr from previous row and not in between. Decreasing tips: Dec as follows at the start of row: replace 1 sc/tr with 1 sl st. Dec as follows at end of row: turn piece before last sc/tr and crochet back. Increasing tips: Inc 1 sc/tr at each side by crocheting 1 extra sc/tr in the next to last sc/tr at each side. FRONT Loosely ch 105-114-124-136-148. Crochet the first row as follows: 1 sc in 2nd ch from hook, 1 sc in the next ch, * skip over 1 ch, 1 sc in each of the 2 following ch *, repeat * - * across row. Sizes L + XL + XXL will end row with 1 sc in each of the last 3 ch (instead of the last 2 ch) = 71-77-84-92-100 sc, turn the work. Now crochet Structure pattern – see instructions above. When the piece measures 5 cm dec 1 sc/tr at each side every approx. 3-3-3.5-3.5-4 cm a total of 8 times – see decreasing tips above = 55-61-68-76-84 sc/tr. When the piece measures 30-32-34-36-38 cm inc 1 sc/tr at each side every approx. 6-6-5-5-5 cm a total of 3 times – see increasing tips above = 61-67-74-82-90 sc/tr. When the piece measures 48-50-52-54-56 cm dec for armhole at each side– see decreasing tips above: 3 sc/tr 0-0-1-1-2 times, 2 sc/tr 1-1-1-2-2 times and 1 sc/tr 0-2-2-3-4 times = 57-59-60-62-62 sc/tr. When the piece measures 59-62-65-67-70 cm put a marker in the center sc/tr (in Sizes L + XL + XXL put the marker between the 2 center sc/tr). Now dec for the neck as follows: crochet from shoulder and toward the neck until 8-8-9-9-9 sc/tr remain before the marker, turn the work. Continue to dec at neck edge every row: 2 sc/tr 1 time and 1 sc/tr 1 time = 17-18-18-19-19 sc/tr remains on shoulder. When the piece measures 66-69-72-75-78 cm cut yarn and fasten. Repeat on the other side of the neck. BACK Crochet the same as the front. Bind off for armhole as on front and continue until the piece measures 64-67-70-73-76 cm. Now crochet only over the outermost 17-18-18-19-19 sc/tr at right side. When the piece measures 66-69-72-75-78 cm cut yarn and fasten. Repeat on left side, but when the piece measures 66-69-72-75-78 cm crochet 3 rows of sc (with 1 sc in each sc from previous row) for buttonband, then cut yarn and fasten. Do not crochet over the center 23-23-24-24-24 sc/tr = neck. SLEEVE Ch 51-52-55-58-61 loosely. First row crochet as follows: 1 sc in 2nd ch from hook, 1 sc in the next ch, * skip over 1 ch, 1 sc in each of the next 2 ch *, repeat * - * across row – Sizes M + L + XL + XXL will end row with 1 sc in each of the last 3 ch (instead of the last 2 ch) = 35-36-38-40-42 sc, turn the work. Now crochet structure pattern as on Body. When the piece measures 10 cm inc 1 sc/tr at each side every approx. 5-4.5-4-3.5-3 cm a total of 8-9-10-10-11 times = 51-54-58-60-64 sc/tr – see increasing tips above. When the piece measures 49-48-48-46-45 cm dec for sleeve cap at each side every row – see decreasing tips: 4 sc/tr 1 time and 3 sc/tr 1 time, then bind off 2 sc/tr at each side until piece measures 55-55-56-56-57 cm, cut yarn and fasten. ASSEMBLY Sew right shoulder edge to edge. Neckband: Crochet approx. 56-64 sc around the neck (including over button edge). Then crochet structure pattern back and forth. When neckband measures approx. 8-8-8-9-9 cm cut yarn and fasten. Buttonhole: Crochet 1 row sc along left shoulder on front and continue up along neckband. Turn piece and crochet sc back, and make 5 buttonholes evenly spaced – there should be 2 buttonholes on neckband (the top one approx. 1.5 - 2 cm from top edge), the remaining ones evenly distributed. 1 buttonhole = sc up to where the buttonhole should be, ch 4, 1 sc in the same sc. Sew in sleeves. If you have trouble making a nice seam, you can crochet 1 sc alternately in armhole and sleeve cap with ch 1 between them. On left shoulder, lay buttonband on back under the one on front and sew or crochet through both layers. Sew sleeve and side seams edge to edge. Sew buttons on left shoulder on back. LACY LOWER EDGE ON DRESS Start at the side and crochet from lower edge down. Row 1: 1 sc in first st, ch 6 (= 1 tr + ch 2), * skip over 2 sc, 1 tr in the next sc, ch 2 *, repeat from * - * and finish with 1 sl st in ch 4 at the start of row. Row 2: ch 7 (= 1 tr + ch 3), * 1 tr in the next tr, ch 3 *, repeat * - * and finish with 1 sl st in ch 4 at the start of row. Rows 3 and 4: Same as Row 2. Row 5 (= ruffle): ch 5 (= 1 tr + ch 1), 1 tr in first ch-loop, ch 1, 1 tr in same ch-loop, ch 1, 1 tr in same ch-loop, ** ch 2, in the next ch-loop crochet: * 1 tr, ch 1 *, repeat from * - * a total of 5 times, ch 2, in the next ch-loop crochet: * 1 tr, ch 1 *, repeat from * - * a total of 4 times **, repeat from ** - ** around row and finish with ch 2 and 1 sl st in ch 4 at the start of row. CROCHET RUFFLE AT LOWER EDGE OF SLEEVES 1 sc in first st, ch 5 (1 tr + ch 1), then crochet alternately 1 tr and 2 tr in each st with ch 1 between each tr around row, finish with 1 sl st in ch 4 at the start of row. |
|
 |
|
Have you finished this pattern?Tag your pictures with #dropspattern or submit them to the #dropsfan gallery. Do you need help with this pattern?You'll find 7 tutorial videos, a Comments/Questions area and more by visiting the pattern on garnstudio.com. © 1982-2026 DROPS Design A/S. We reserve all rights. This document, including all its sub-sections, has copyrights. Read more about what you can do with our patterns at the bottom of each pattern on our site. |


With over 40 years in knitting and crochet design, DROPS Design offers one of the most extensive collections of free patterns on the internet - translated to 17 languages. As of today we count 325 catalogs and 12298 patterns - 12288 of which are translated into English (US/in).
We work hard to bring you the best knitting and crochet have to offer, inspiration and advice as well as great quality yarns at incredible prices! Would you like to use our patterns for other than personal use? You can read what you are allowed to do in the Copyright text at the bottom of all our patterns. Happy crafting!
Post a comment to pattern DROPS 91-27
We would love to hear what you have to say about this pattern!
If you want to leave a question, please make sure you select the correct category in the form below, to speed up the answering process. Required fields are marked *.