
Popular categories
Looking for a yarn?


Comments / Questions (12)
![]() Ulrika wrote:
Ulrika wrote:
Hej! Hur många centimeter i diameter är det efter varv 12? Jag förstod inte riktigt hur jag skulle beräkna virkfastheten (eftersom det är en cirkel) och tänkte gå efter centimeter istället.
27.05.2024 - 17:04DROPS Design answered:
Hej Ulrika, efter 12 varv skal du have omkredsen på hatten, her stopper økningerne, du kan altid prøve hatten undervejs :)
28.05.2024 - 11:05
![]() Janelle wrote:
Janelle wrote:
What does it mean when it says to crochet around a stitch? I don't know where I'm supposed to insert my hook to make the stitch.
01.07.2022 - 23:05DROPS Design answered:
Dear Janelle, you work in the front post of the stitch, you can check out how to do this in the following video: https://www.garnstudio.com/video.php?id=205&lang=en. Happy crocheting!
02.07.2022 - 16:05
![]() Laís wrote:
Laís wrote:
Olá, fiquei em dúvida sobre a parte em que diz que, para os dois tamanhos, após as 12 carreiras, fazer ponto baixo ao redor do ponto e não como normalmente é feito (sob as duas alçasdo ponto anterior) ... Não entendi com muita clareza como fazer isso, me ajuda?
24.04.2022 - 02:53DROPS Design answered:
Bom dia, No fim da receita, existem vários vídeos de apoio para as técnicas usadas neste modelo. Poderá ver como fazer no vídeo abaixo: https://www.garnstudio.com/video.php?id=690&lang=pt Bom croché!
25.04.2022 - 10:20
![]() Christiane G wrote:
Christiane G wrote:
Bonjour, je voudrais faire ce chapeau en coton mais le convertisseur ne me propose aucune alternative. Avez-vous un conseil?
25.03.2022 - 07:57DROPS Design answered:
Bonjour Christiane, vous pouvez utiliser notre convertisseur, il vous proposera tous les fils du groupe B (le même que Puna), y compris les cotons: Muskat, Cotton Light, Cotton Merino, ou Belle. Bon crochet!
25.03.2022 - 08:08
![]() Lisen wrote:
Lisen wrote:
Takk til DROPS for fantastiske oppskrifter og kundestøtte! Denne hatten ser flott ut! Oppskriften er beregnet for to tråder garn. Gir det er spesielt uttrykk som går tapt hvis an velger én tråd av tykkere garn - for samme masketetthet?
19.02.2022 - 11:06DROPS Design answered:
Hei Lisen. Så lenge du overholde heklefastheten som er oppgitt til denne oppskriften kan du fint bruke 1 tråd. Denne luen er heklet med DROPS Puna farge nr 03 som er en brun natural mix farge, bruker du en helt ensfarget farge kan du miste litt av den lille fargemeleringen som du ser på bildet. God Fornøyelse!
21.02.2022 - 11:27
![]() Mill Britt Løkke wrote:
Mill Britt Løkke wrote:
Jeg kan skrive begge språk ,men jeg forstår ikke norske oppskrifter. Hvordan oversetter jeg? Baskerlue ALASKA og STORMFULLE HØYDER ?
30.01.2022 - 22:50DROPS Design answered:
Hei Mill Britt, Du finner forskjellige språk for alle oppskrifter under fotografiene . God fornøyelse!
31.01.2022 - 07:28
![]() Barbara wrote:
Barbara wrote:
Where can i find a barber and some water, I dont remeber when i saw water last time. Pls help me.
19.10.2021 - 09:59
![]() Fanny wrote:
Fanny wrote:
Bonjour J'ai commencé ce magnifique chapeau mais je ne comprends pas ce qu'il faut faire avec la phrase suivante :"Crocheter 1 tour sur l'endroit ainsi: 1 maille serrée autour de chaque maille – ne pas piquer sous les 2 boucles mais bien autour de chacune des mailles. " je ne comprends pas où il faut piquer. Avez vous un tuto que je puisse visualiser ce qu'il faut faire? Merci!
15.10.2021 - 23:04DROPS Design answered:
Bonjour Fanny, vous crochetez ces mailles serrées comme des brides en relief, autrement dit, insérez le crochet avant la première maille et ressortez-le après cette maille et terminez votre maille serrée - cf aussi la vidéo de la bride en relief. Bon crochet!
18.10.2021 - 08:30
![]() Ale wrote:
Ale wrote:
Che significa: lavorare al rovescio? Si deve invertire il giro?
20.09.2021 - 15:44DROPS Design answered:
Buongiorno Ale, in questo modello si lavora un giro sul diritto del lavoro e un giro sul rovescio. Buon lavoro!
21.09.2021 - 10:49
![]() Winter Sun Or Perfect Brim wrote:
Winter Sun Or Perfect Brim wrote:
Perfect to knit as winter and summer hat, perfect brim
07.08.2021 - 10:01
|
|
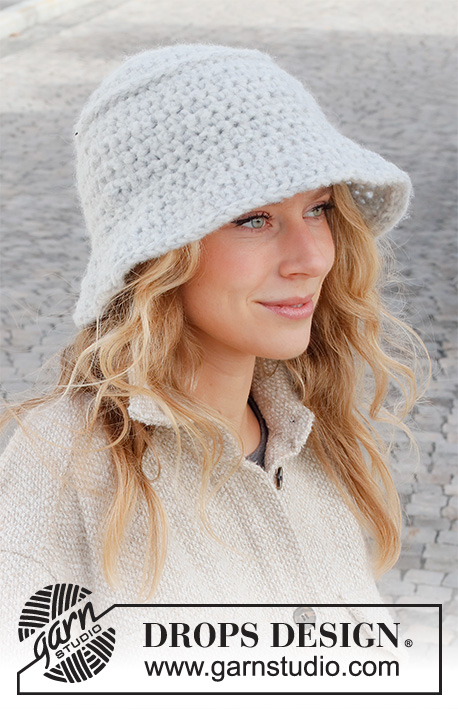
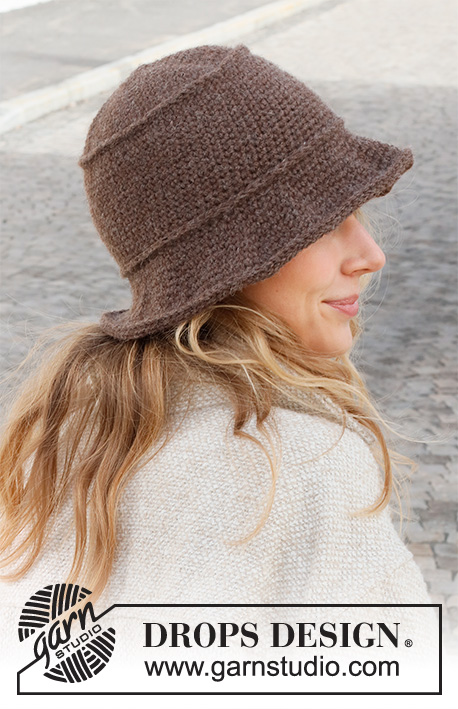
Wuthering Heights#wutheringheightshat |
|
 |
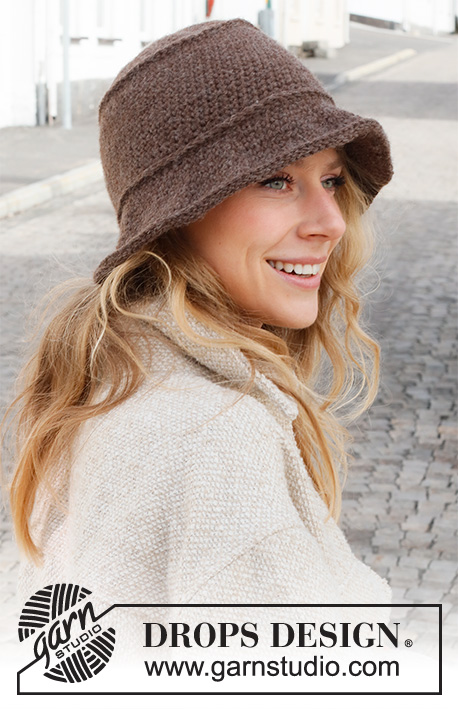 |
Crocheted hat in 2 strands DROPS Puna. The piece is worked top down.
DROPS 225-38 |
|
|
------------------------------------------------------- EXPLANATIONS FOR THE PATTERN: ------------------------------------------------------- CROCHET INFORMATION: At the beginning of each round of single crochets work 1 chain stitch; this chain stitch does not replace the first single crochet. The round finishes with 1 slip stitch in the first chain stitch on the round. CROCHET TIP: Round 1 is worked from the right side. Finish the round with 1 slip stitch in the first single crochet. Turn and work the next round from the wrong side. Finish the round with 1 slip stitch in the first single crochet. Turn and work the next round from the right side. Continue back and forth like this – alternate rounds from the right and wrong side. INCREASE TIP: To work out how to increase evenly, count the total number of stitches on the round (e.g. 72 stitches) and divide by the number of increases to be worked (e.g. 2) = 36. In this example, increase by working 2 stitches in every 36th stitch. ------------------------------------------------------- START THE PIECE HERE: ------------------------------------------------------- HAT – SHORT OVERVIEW OF THE PIECE: The piece is worked top down in the round, at the same time as you turn after each round – read CROCHET TIP. HAT: Work 4 chain stitches with hook size 5 MM = US 8 and 2 strands DROPS Puna. Form them into a ring with 1 slip stitch in the first chain stitch worked. ROUND 1: Work 1 chain stitch – read CROCHET INFORMATION, then 6 single crochets around the chain-stitch ring. ROUND 2: Work 2 single crochets in each single crochet = 12 stitches. ROUND 3: Work * 2 single crochets in the first single crochet, 1 single crochet in the next single crochet *, work from *-* to end of round = 18 stitches. ROUND 4: Work * 2 single crochets in the first single crochet, 1 single crochet in each of the next 2 single crochets *, work from *-* to end of round = 24 stitches. REMEMBER THE CROCHET GAUGE! Continue like this, increasing 6 stitches and with 1 more stitch between increases on each round. After 12 rounds there are 72 stitches. In size M/L work 1 round where you increase 2 stitches evenly spaced – read INCREASE TIP = 74 stitches. BOTH SIZES: Work 1 round from the right side as follows: 1 single crochet around each stitch – not in the loops but around the stitch. Finish the round with 1 slip stitch in the first single crochet. Continue working single crochets in the round below the last round (still working alternately from the right and wrong side). When the piece measures 18-19 cm = 7"-7½" from the top (approx. 11-11 cm = 4⅜"-4⅜" from the round where you worked around the stitches) work the brim; adjust so you are working the next round from the wrong side. BRIM: Work 1 round with 1 single crochet in each stitch. Then work 1 round from the right side as follows: 1 single crochet around each stitch – not in the loops but around the stitch. Finish the round with 1 slip stitch in the first single crochet. Insert 5 markers without working the stitches as follows (insert from the right side): Skip 2 stitches, insert marker after these 2 stitches, skip 15-15 stitches, insert a marker here, skip 14-15 stitches, insert a marker here, skip 15-15 stitches, insert a marker here, skip 14-15 stitches, insert a marker here, there are 12-12 stitches left on the round. Continue by working single crochets in the round before the previous round (still working alternately from the right and wrong side), AT THE SAME TIME increase 1 stitch at each marker as follows: ROUND 1: Increase 1 stitch by working 2 stitches in the stitch after each marker (seen from the right side) – read CROCHET TIP = 77-79 stitches. Move the markers two stitches to the left (seen from the right side). ROUND 2: Increase 1 stitch by working 2 stitches in the stitch before each marker (seen from the wrong side) = 82-84 stitches. Move the markers two stitches to the left (seen from the right side). ROUND 3: Increase 1 stitch by working 2 stitches in the stitch after each marker (seen from the right side) = 87-89 stitches. Move the markers two stitches to the left (seen from the right side). Continue like this, moving the markers two stitches to the left (seen from the right side) on each round and increasing 1 stitch at each marker a total of 9 times = 117-119 stitches. Now work a finishing edge as follows from the right side: 1 single crochet around each stitch – not in the loops but around the stitch. Finish the round with 1 slip stitch in the first single crochet. Cut and fasten the strand. The hat measures approx. 25-26 cm = 9¾"-10¼" from the top down. |
|
Have you finished this pattern?Tag your pictures with #dropspattern #wutheringheightshat or submit them to the #dropsfan gallery. Do you need help with this pattern?You'll find 9 tutorial videos, a Comments/Questions area and more by visiting the pattern on garnstudio.com. © 1982-2026 DROPS Design A/S. We reserve all rights. This document, including all its sub-sections, has copyrights. Read more about what you can do with our patterns at the bottom of each pattern on our site. |
|


With over 40 years in knitting and crochet design, DROPS Design offers one of the most extensive collections of free patterns on the internet - translated to 17 languages. As of today we count 324 catalogs and 12290 patterns - 12280 of which are translated into English (US/in).
We work hard to bring you the best knitting and crochet have to offer, inspiration and advice as well as great quality yarns at incredible prices! Would you like to use our patterns for other than personal use? You can read what you are allowed to do in the Copyright text at the bottom of all our patterns. Happy crafting!
Post a comment to pattern DROPS 225-38
We would love to hear what you have to say about this pattern!
If you want to leave a question, please make sure you select the correct category in the form below, to speed up the answering process. Required fields are marked *.