
Popular categories
Looking for a yarn?


Comments / Questions (107)
![]() Brigitte Zweil wrote:
Brigitte Zweil wrote:
Wie genau kann ich eine Anleitung auf dem Handy abspeichern? Diamond Sky pullunder
01.07.2023 - 11:21DROPS Design answered:
Siehe unten :)
03.07.2023 - 09:58
![]() Brigitte Zweil wrote:
Brigitte Zweil wrote:
Wie genau kann ich eine Anleitung auf dem Handy abspeichern?
01.07.2023 - 11:20DROPS Design answered:
Liebe Frau Zweil, unsere Anleitungen können nur gedruckt werden, aber wenn Sie einen virtuellen Drucker benutzen, dann können Sie die Anleitung als .PDF speichern (schauen Sie mal je nach Ihrem Handy, wie es bei Ihnen geht). Viel Spaß beim stricken!
03.07.2023 - 09:58
![]() Abonyi Krisztina wrote:
Abonyi Krisztina wrote:
Az A4-es minta mikor lép be?Nem derült ki a mintaleírásból!
03.05.2023 - 16:16
![]() Stine wrote:
Stine wrote:
Jeg er kommet til punket “videre lukkes der af i hver side ...” Jeg strikker en S og har virkelig svært ved at forstå hvordan jeg skal tage ind. Der står at jeg skal tage ind i begge sider men kun i starten af pinden og noget med hver anden/fjerde pind. Kan du forklare hvordan jeg skal tage ind i starten af hver anden pind i begge sider?
18.04.2023 - 15:47DROPS Design answered:
Hei Stine. Jo, når arbeidet måler 24 cm skal du på neste pinne fra retten starte med å felle av 6 masker (= 1.ermhull), strikk pinnen ut som før, snu arbeidet og nå feller du 6 nye masker fra vrangen (= 2. ermhull). Strikk pinnen ut, du har nå felt 6 masker i hver side og du har nå strikket 2 pinner, snu. Gjenta dette 1 gang til, men da feller du bare 2 masker i hver side. Strikk deretter 2 pinner uten å felle. Så feller du 1 maske i hver side (= 2 pinner) og så strikker du 2 pinner uten å felle. Så feller du 1 maske i hver side (= 2 pinner), men nå feller du bare på hver 4. pinne og dette gjør du 4 ganger = 68 masker. mvh DROPS Design
24.04.2023 - 10:10
![]() Stine wrote:
Stine wrote:
Hej, hvordan skal "... strik A.2 over hver rapport A.1 (der tages 1 maske ind i hver rapport A.2 = 9-10-11-12-13-14 masker taget ind)" forståes? Og hvad er en rapport?
23.02.2023 - 14:58DROPS Design answered:
Hej Stine, rapporten i A.1 består af de 11 masker du ser i diagrammet, denne rapport skal gentages. Sæt gerne et mærke imellem hver rapport så du er sikker på at du starter forfra ifølge diagrammet :)
28.02.2023 - 15:37
![]() Tina wrote:
Tina wrote:
Hei! Jeg er nå ved forstykket hvor det skal felles av 3m 1 gang osv fra halsen. Det jeg lurer på er hvordan det er ment at jeg skal felle av? Er det tre masker sammen rett/vrang eller er dette felle av ved å "strikke 1, strikk 1 til, dra den første over den andre"? For hvis det er det å dra en maske over en annen så lurer jeg på om det er meningen at jeg skal klippe tråden for hver rad, siden på den siste masken skal jo tråden ofte klippes?
22.02.2023 - 22:45DROPS Design answered:
Hei Tina. Det felles av masker på hver pinne FRA halsen slik (ikke på hver pinne). Du feller av 3 masker, som vanlig avfelling (strikke 1, strikk 1 til, dra den første over den andre), strikk pinnen ut, snu og strikk tilbake mot halsen, snu og fell 2 masker som vanlig avfelling, strikk pinnen ut, snu, osv. På den ene skulderen felles det fra retten og på den andre skulderen fra vrangen. mvh DROPS Design
28.02.2023 - 20:02
![]() Jenny Cyr wrote:
Jenny Cyr wrote:
Je voudrais voir une explication pour ceci: Quand l'ouvrage mesure 24 cm, rabattre 6 mailles pour les emmanchures au début des 2 rangs suivants. Rabattre ensuite de chaque côté (rabattre en début de rang), ainsi: Rabattre 1 fois 2 mailles tous les 2 rangs, puis 1 fois 1 maille tous les 2 rangs et enfin 4 fois 1 maille tous les 4 rangs = 68 mailles De 80 m. Pour passer à 68 c’est 12 mailles ??
19.02.2023 - 01:30DROPS Design answered:
Bonjour Mme Cyr, en taille S on doit avoir 94 mailles, pas 80 mailles, et on va rabattre de chaque côté: 1 x 6 m + 2 x 1 m + 1 mx 1 m + 4 x 1 m soit 13 m de chaque côté, 26 m au total, il restera ainsi 94-26=68 mailles. Bon tricot!
20.02.2023 - 09:54
![]() Stine wrote:
Stine wrote:
Hej! Hvordan ved man hvilken størrelse man skal strikke? Synes ikke jeg kan se nogle mål.
16.02.2023 - 17:56DROPS Design answered:
Hej Stine, du finder måleskitsen nederst i opskriften, lige under diagrammerne :)
23.02.2023 - 14:54
![]() Any wrote:
Any wrote:
Je ne saisi pas l'explication du col à partir de : "Augmenter maintenant 1 maille envers dans environ une section en mailles envers sur deux. Tricoter ensuite les mailles endroit à l'endroit et les mailles envers à l'envers jusqu'à ce que col mesure 14 cm." Merci pour votre retour
09.02.2023 - 22:20DROPS Design answered:
Bonjour Amy, vous tricotez en côtes 1 m end/1 m env et allez augmentez ainsi: *1 m end, 1 m env, 1 m end, 1 m env, augmenter 1 m env*, répétez de *-* ; au tour suivant, vous tricoterez les côtes ainsi: *1 m end, 1 m env, 1 m end, 2 m env*. Bon tricot!
10.02.2023 - 09:28
![]() Lisa wrote:
Lisa wrote:
Gibt es diese Strickmuster auch für einen Raglanpullover mit langen Ärmeln?
04.02.2023 - 15:39DROPS Design answered:
Liebe Lisa, für dieses Modell haben wir nur diese Version ohne Ärmel - aber sicher könnnen Sie sich von einem ähnlichen Pullover mit langen Ärmeln inspirieren. Viel Spaß beim stricken!
06.02.2023 - 15:20
|
|||||||||||||||||||||||||
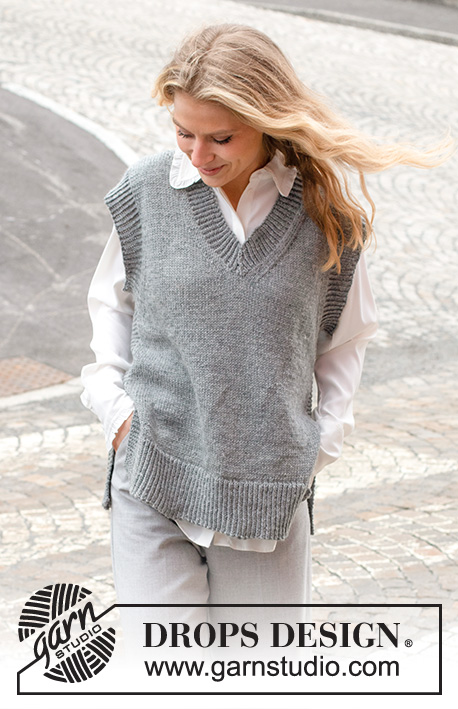
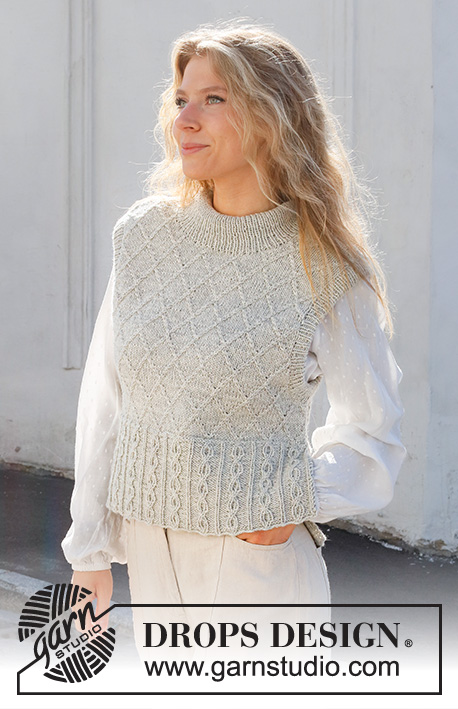
Diamond Sky#diamondskyslipover |
|||||||||||||||||||||||||
 |
 |
||||||||||||||||||||||||
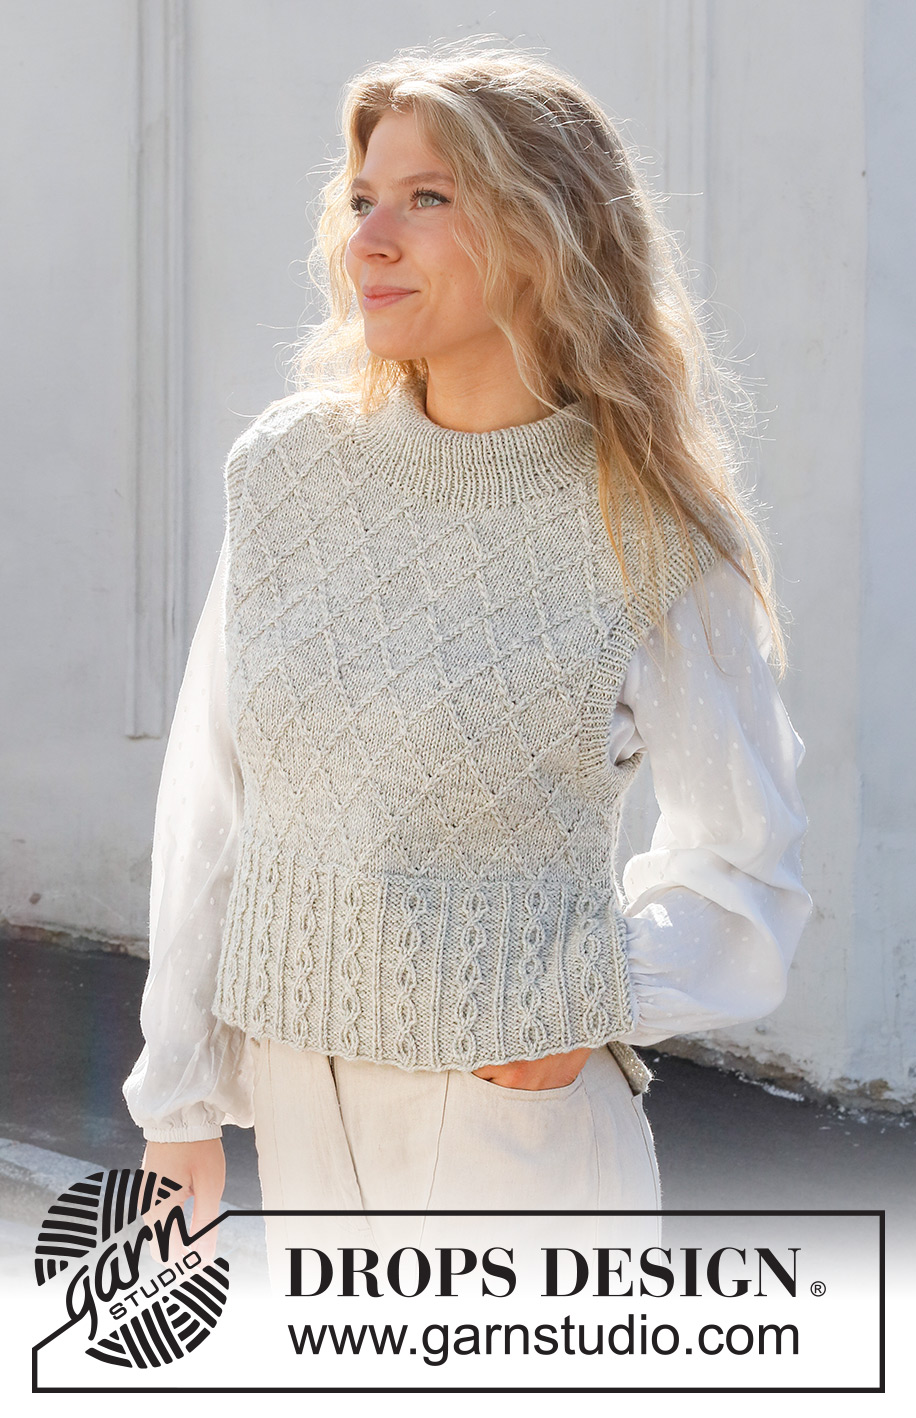
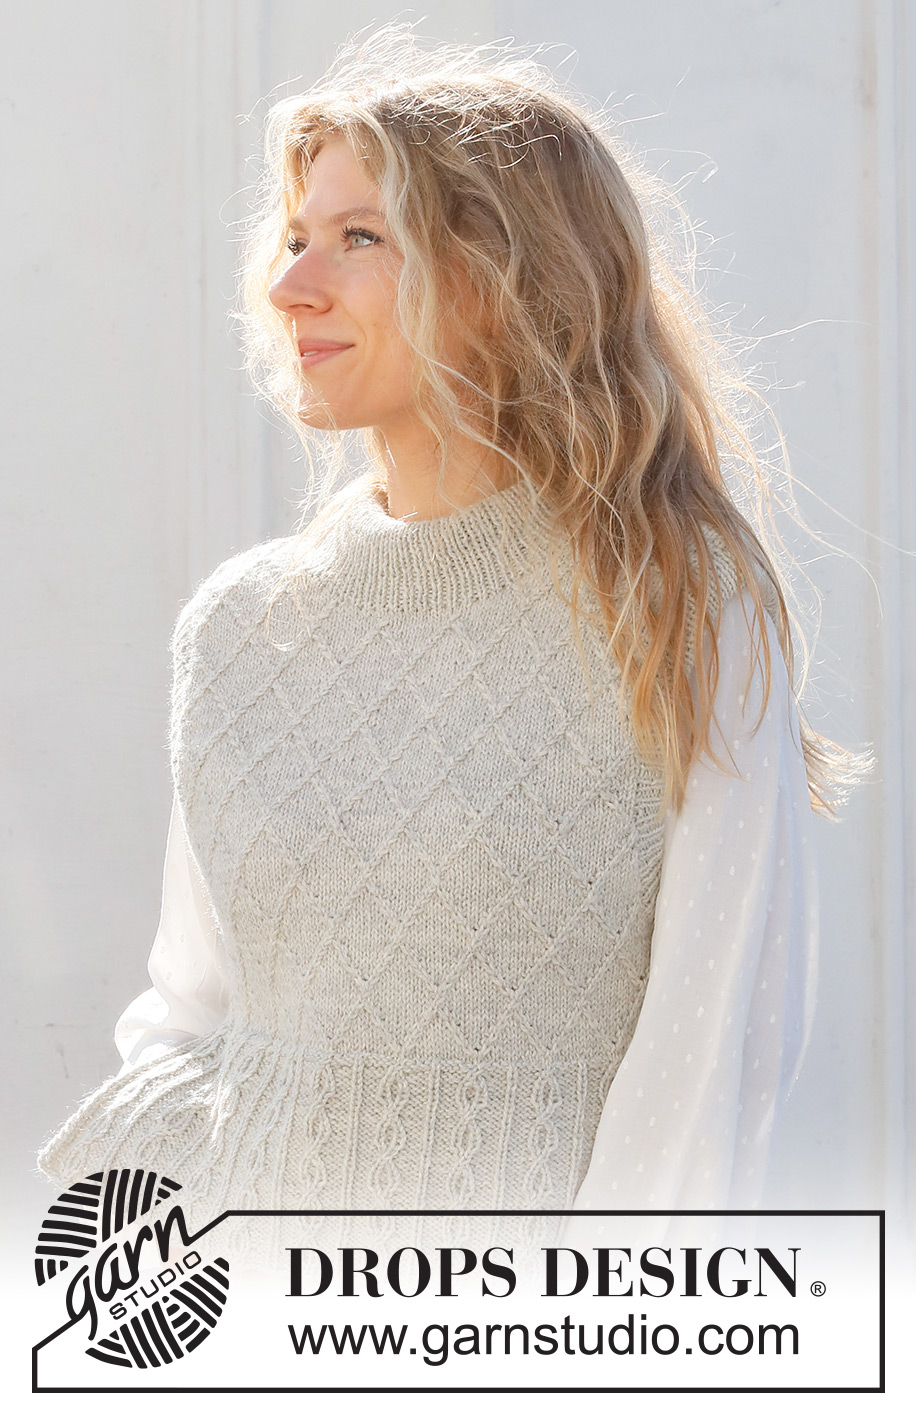
Knitted vest in DROPS Lima or DROPS Merino Extra Fine. Piece is knitted with cables, textured pattern, double neck edge and sleeve edges. Size: S - XXXL
DROPS 228-8 |
|||||||||||||||||||||||||
|
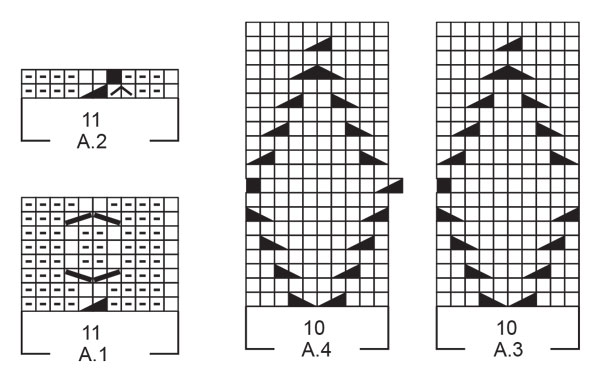
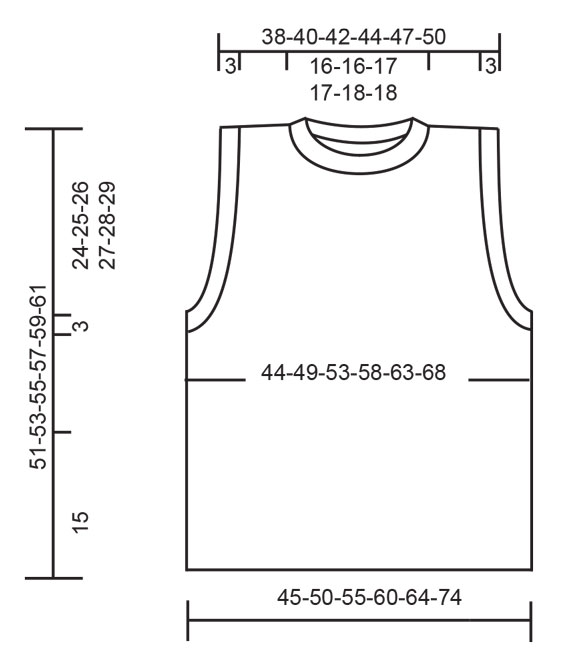
---------------------------------------------------------- EXPLANATION FOR THE PATTERN: ---------------------------------------------------------- GARTER STITCH (back and forth): Knit all rows. 1 ridge vertically = knit 2 rows. PATTERN: See diagrams A.1 to A.4. Diagrams show all rows in pattern seen from the right side. BIND-OFF TIP: To avoid a tight bind-off edge when binding off, you may use a larger needle. If this still is too tight make 1 yarn over after approx. every 4th stitch while binding off (bind off yarn overs as stitches). ---------------------------------------------------------- START THE PIECE HERE: ---------------------------------------------------------- VEST – SHORT SUMMARY OF PIECE: Work front and back piece back and forth in 2 parts. Then assemble the piece at the shoulder seems and sew the side seams. Finish with a double neck edge and sleeve edges in the round on a circular needle. BACK PIECE: Cast on 104-115-126-137-148-159 stitches (including 2 edge stitches in each side) on circular needle size 4 MM = US 6 with DROPS Lima or DROPS Merino Extra Fine. Purl 1 row from wrong side. Then work pattern as follows: 2 edge stitches in GARTER STITCH – read explanation above, A.1 over the next 99-110-121-132-143-154 stitches (= 9-10-11-12-13-14 repetitions of 11 stitches), work first stitch in A.1, 2 edge stitches in garter stitch. Continue back and forth until A.1 has been worked 5 times vertically. REMEMBER THE KNITTING GAUGE. Work next row as follows: Knit 2 together (= 1 stitch decreased), work A.2 over every repetition of A.1 (1 stitch is decreased in each repetition A.2 = 9-10-11-12-13-14 stitches decreased), knit the next 3 together (= 2 stitches decreased), cast on 1 stitch at the end of row (= edge stitch). Turn and work 1 edge stitch in garter stitch, purl 1, work A.2 until 1 stitch remains, purl 1, cast on 1 stitch at the end of row (= 1 edge stitch in garter stitch) = 94-104-114-124-134-144 stitches on needle and piece measures approx. 15 cm = 6". Now work pattern as follows: 1 edge stitch in garter stitch, 1 stitch in stockinette stitch, A.3 over the next 10 stitches, A.4 over the next 80-90-100-110-120-130 stitches (= 8-9-10-11-12-13 repetitions of 10 stitches), work 1 stitch in stockinette stitch, and finish with 1 edge stitch in garter stitch. Continue back and forth like this. On 9th row in A.4 knit 1 when last repetition is finished. When piece measures 24-25-26-27-28-29 cm = 9½"-9¾"-10¼"-10⅝"-11"-11⅜", bind off 6-6-9-9-12-12 stitches for armholes at the beginning of the next 2 rows. Then bind off stitches in each side (bind off stitches at the beginning of the row) as follows: Bind off 2 stitches on every other row 1-2-2-2-2-2 times, then bind off 1 stitch on every other row 1-1-1-3-3-5 times and finally 1 stitch every 4th row 4-5-5-6-5-5 times = 68-72-76-80-86-92 stitches. Continue to work until piece measures 49-51-53-55-57-59 cm = 19¼"-20"-21"-21⅝"-22½"-23¼". Now bind off the middle 32-32-34-34-36-36 stitches for neck and finish each shoulder separately. Then bind off 1 stitch on next row from the neck = 17-19-20-22-24-27 stitches remain on each shoulder. Now finish each shoulder separately. Continue to work until piece measures 51-53-55-57-59-61 cm = 20"-21"-21⅝"-22½"-23¼"-24". Bind off knitting from right side. Work the other shoulder the same way. FRONT PIECE: Cast on and work as on back piece until piece measures 43-45-46-48-49-51 cm = 17"-17¾"-18"-19"-19¼"-20". Now slip the middle 16-16-18-18-20-20 stitches on a stitch holder and finish each shoulder separately. Then bind off stitches on every row from neck as follows: Bind off 3 stitches 1 time, 2 stitches 2 times and 1 stitch 2 times = 17-19-20-22-24-27 stitches remain for shoulder. Bind off when piece measures 51-53-55-57-59-61 cm = 20"-21"-21⅝"-22½"-23¼"-24". Work the other shoulder the same way. ASSEMBLY: Sew the shoulder seams. Sew side seam from armholes and down to where 1 edge stitch was cast on in each side (= approx. 15 cm = 6" vent). DOUBLE SLEEVE EDGES: Begin mid under sleeve in side seam and pick up approx. 136 to 162 stitch around armhole with circular needle size 3 MM = US 2.5 and DROPS Lima or DROPS Merino Extra Fine. Number of stitches must be divisible by 2. Work rib in the round (= knit 1/purl 1) for 6 cm = 2⅜". Bind off – read BIND-OFF TIP. Fold the rib around sleeves on inside of garment. Fasten rib to get a double sleeve edge. To avoid a tight sleeve edge that sticks out it is important to keep the seam elastic. DOUBLE NECK EDGE: Pick up from right side approx. 100 to 116 stitches (including stitch on stitch holder) inside 1 edge stitch around the neck on circular needle size 3 MM = US 2.5 with DROPS Lima or DROPS Merino Extra Fine. Number of stitches must be divisible by 2. Work rib in the round (= knit 1/purl 1) for 10 cm = 4". Now increase 1 purl stitch in approx. every other section with purl stitches. Then work knit over knit and purl over purl until neck edge measures 14 cm = 5½". Bind off stitches with knit over knit and purl over purl - make sure to avoid a tight neck edge - remember BIND-OFF TIP. Fold rib at the top of neck down on inside of garment. Fasten rib to get a double neck edge. To avoid a tight neck edge that sticks out it is important to keep the seam elastic. |
|||||||||||||||||||||||||
Diagram explanations |
|||||||||||||||||||||||||
|
|||||||||||||||||||||||||
 |
|||||||||||||||||||||||||
 |
|||||||||||||||||||||||||
Have you finished this pattern?Tag your pictures with #dropspattern #diamondskyslipover or submit them to the #dropsfan gallery. Do you need help with this pattern?You'll find 31 tutorial videos, a Comments/Questions area and more by visiting the pattern on garnstudio.com. © 1982-2026 DROPS Design A/S. We reserve all rights. This document, including all its sub-sections, has copyrights. Read more about what you can do with our patterns at the bottom of each pattern on our site. |
|||||||||||||||||||||||||


With over 40 years in knitting and crochet design, DROPS Design offers one of the most extensive collections of free patterns on the internet - translated to 17 languages. As of today we count 325 catalogs and 12298 patterns - 12288 of which are translated into English (US/in).
We work hard to bring you the best knitting and crochet have to offer, inspiration and advice as well as great quality yarns at incredible prices! Would you like to use our patterns for other than personal use? You can read what you are allowed to do in the Copyright text at the bottom of all our patterns. Happy crafting!
Post a comment to pattern DROPS 228-8
We would love to hear what you have to say about this pattern!
If you want to leave a question, please make sure you select the correct category in the form below, to speed up the answering process. Required fields are marked *.