
Looking for a yarn?


Comments / Questions (57)
![]() Ing-Marie wrote:
Ing-Marie wrote:
När maskorna skall minskas på mössan tycker jag det är lite oklart. Skall minskningsvarven vara med 1cm mellanrum och görs de alltid på varvet när man bara stickar räta maskor ( slätstickning) ?? Mönstret hade dessutom varit lättare att förstå om man skrivit : Varv 1: 1 rät maska, 3 aviga maskor Varv 2 : Räta maskor, upprepa varv 1 och 2 !
08.05.2022 - 23:53DROPS Design answered:
Hei Ing-Marie Når du strikker fellingene med ca 1 cm mellomrom strikkes det fra retten, om strikkefastheten overholdes. Design avd. har valgt å skrive oppskriften slik de mener det er enklest å forstå etter all tilbakemeldiger de får. mvh DROPS Design
09.05.2022 - 13:36
![]() Lilli Tønnesen wrote:
Lilli Tønnesen wrote:
Jeg vil gerne vide hvornår I har mulighed for at svare på mine spørgsmål. Det sidste skrev jeg den 7.3.22?
21.03.2022 - 19:36DROPS Design answered:
Hej Lilli, 2.pind strikker du således fra vrangen, 1 retstrik, 1ret, (1 omslag,1vr,1r,1vr) 1ret midt, (1vr, 1r,1vr,1oms), 1ret, 1retstrik = 13 masker. 3.pind strikkes således: 1 retstrik, 1ret, (1oms, 4ret, 1oms), 1ret midt, (1oms, 4ret,1oms) 1ret, 1retstrik = 17 masker - God fornøjelse!
22.03.2022 - 13:05
![]() Lilli Tønnesen wrote:
Lilli Tønnesen wrote:
Det er hagesmækken jeg strikker Og har brug for en nøjagtig beskrivelse af 2. Pind og 3. Pind
07.03.2022 - 08:53
![]() Lilli Tønnesen wrote:
Lilli Tønnesen wrote:
Jeg kan ikke få pind 2. Til at passe Jeg starter med 1 retstrik( kantm) 1 ret, omslag, så kommer omslaget fra side pind ( drejet v) så 1 ret, nu kommer omslaget fra sidste pind ( drejet v) så er jeg ved midtertanken og har ikke kunnet lave 1 v ,1 r. Kan I prøve at skrive 2. Pind og 3. Pind, så kan det være jeg kan find eud af det. Jeg synes jeg mangler masker for at kunne lave 2. Pind
28.02.2022 - 13:33DROPS Design answered:
Hei Lilli. Vi skal hjelpe deg så godt du kan, men fint om du kan opplyse hva du strikker (hue eller hagesmæk) og hvilken str. strikker du? mvh DROPS Design
07.03.2022 - 08:33
![]() Ira wrote:
Ira wrote:
Die Anleitung zum Lätzchen ist für mich leider absolut unverständlich. Ich hab sie mehrfach gelesen und die Diagramme dazu angesehen, ohne irgendwie den Durchblick zu erlangen... Wie mache ich aus den 7 Maschen plötzlich 11 Maschen? Wo beginnt das Diagramm (wo ist oben bzw. unten?)? Gibt es vielleicht eine detaillierte Anleitung? Danke für eure Hilfe!
22.02.2022 - 10:45DROPS Design answered:
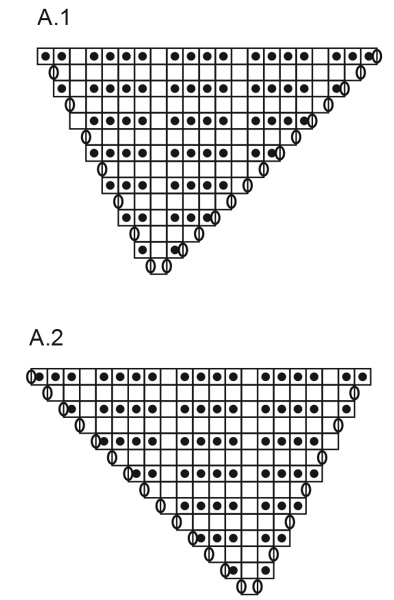
Liebe Ira, so stricken Sie die 7 Maschen: 1 Randmasche kraus rechts, 1 M. re, dann A.1 (= 1. Reihe = 1 Umschlag, 1 M re, 1 Umschlag), 1 M re (Mittelmasche), A.2 (= 1. Reihe = 1 Umschlag, 1 M re, 1 Umschlag), 1 M re, 1 Randmasche = 1+1+3+1+3+1+1=11 M. In A.1 und A.2 werden Sie beidseitig innerhalb 2 Maschen in jeder Reihe (Hin + Rückreihen) zunehmen und 1 Masche beidseiting von der Mittelmasche in jeder Hin-Reihe zunehmen. Kann das Ihnen helfen?
22.02.2022 - 13:19
![]() France wrote:
France wrote:
Bonjour, pour le bonnet, est ce que les diminutions sont font une après l’autre ou il a 1 ou 2 com entre chaque? Merci à l’avance
13.02.2022 - 23:23DROPS Design answered:
Bonjour, il y a 1 cm en hauteur entre chaque de 4 diminutions mentionnees dans le modele. Bon tricot!
14.02.2022 - 08:06
![]() þóra Lilja wrote:
þóra Lilja wrote:
Samkvæmt munstri á að slá upp á prjóninn í byrjun og enda hverrar umferðar er þetta rétt ? Munstrið er mjög einkennilega sett upp.
12.01.2022 - 06:15DROPS Design answered:
Þú byrjar með 7 lykkjur. Prjónar 1. lykkju slétt (= 1 lykkja garðaprjón). Síðan prjónar þú 1 lykkju slétt. Prjónar A.1 (= 1 uppsláttur, 1 lykkja slétt, 1 uppsláttur). Nú eru 3 lykkjur og 2 uppslættir á prjóninum. Prjónar miðjulykkjuna slétt (setur prjónamerki í þessa lykkju og lætur það fylgja með upp úr). Prjónar A.2 (= 1 uppsláttur, 1 lykkja slétt, 1 uppsláttur), 1 lykkja slétt og 1 lykkja garðaprjón (slétt frá réttu) = 11 lykkjur. Nú er mynstur A.1 og A.2 hvoru megin við miðjulykkju. Það eru auknar út 4 lykkjur í hverri umferð frá réttu og 2 lykkjur í hverri umferð frá röngu. Gangi þér vel!
14.01.2022 - 10:18
![]() Antonella wrote:
Antonella wrote:
Scusa mi trovo in difficoltà col il bavaglino. Dopo la prima riga ho 11 maglie, ma poi col secondo giro mi trovo già in difficoltà. Devo sempre fare 2 maglie prima del diagramma? Per il secondo ferro devo iniziare facendo diagramma A1 o A2? E devo leggerlo da sx o da destra? Mi puoi aiutare con il secondo ferro? Grazie
11.01.2022 - 18:37DROPS Design answered:
Buonasera Antonella, si, ci sono 2 maglie prima del diagramma: i diagrammi si leggono dal basso verso l'alto e da destra verso sinistra per i ferri di andata e da sinistra verso destra per i ferri di ritorno. Per il secondo ferro deve lavorare prima A.2 e poi A.1. Buon lavoro!
11.01.2022 - 21:36
![]() Ewa wrote:
Ewa wrote:
Hallo, in der Erklärung zum Diagramm steht, dass die Umschläge links verschränkt gestrickt werden. Es passt aber nicht zum Musterbild. Sollen die vielleicht rechts verschränkt gestrickt werden?
27.12.2021 - 11:36DROPS Design answered:
Liebe Ewa, danke für den Hinweis, den habe ich unser Designteam weiterleitet, hier würde ich die Umschläge im Muster stricken, dh immer verschränkt aber entweder rechts oder links, je nach der nächsten Runde. Viel Spaß beim stricken!
03.01.2022 - 09:02
![]() Inger Marie Therkildsen wrote:
Inger Marie Therkildsen wrote:
Det er virkelig svært, at få det hele til at passe sammen. Jeg må desværre nok opgive..!
28.07.2021 - 18:50
|
||||||||||
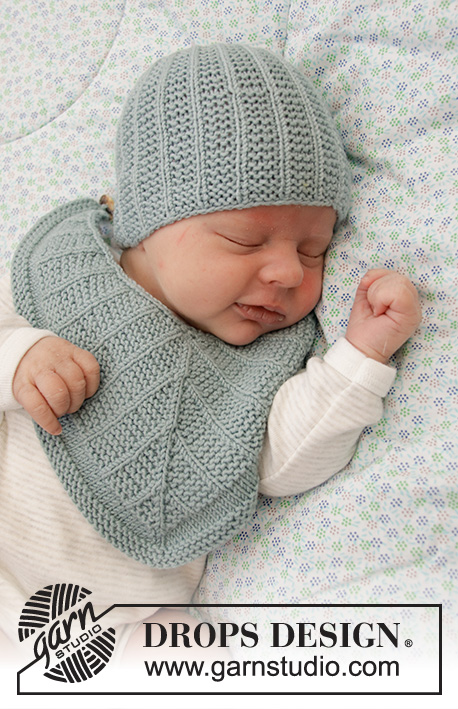
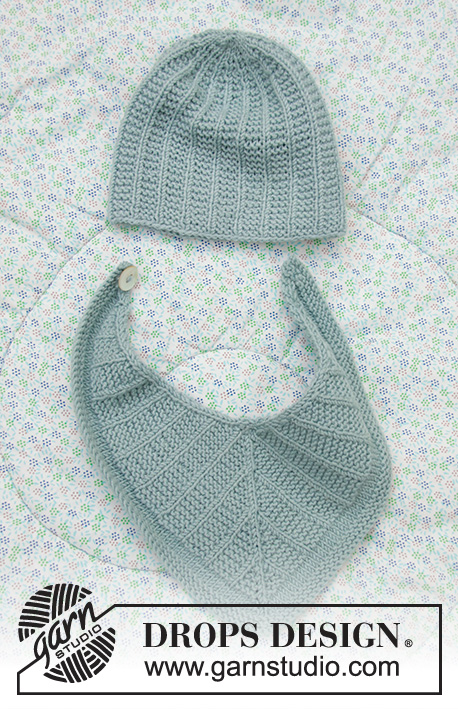
Baby Business Set#babybusinessset |
||||||||||
 |
 |
|||||||||
Knitted hat and bib for babies in DROPS BabyMerino with stocking stitch and garter stitch. Size premature to 4 year.
DROPS Baby 33-20 |
||||||||||
|
------------------------------------------------------- EXPLANATIONS FOR THE PATTERN: ------------------------------------------------------- RIDGE/GARTER STITCH (worked in the round): 1 ridge in height = 2 rounds; Knit 1 round and purl 1 round. RIDGE/GARTER STITCH (worked back and forth): Knit all rows. 1 ridge in height = Knit 2 rows. PATTERN: See diagrams A.1 and A.2. ------------------------------------------------------- START THE PIECE HERE: ------------------------------------------------------- HAT – SHORT OVERVIEW OF THE PIECE: The piece is worked in the round with double pointed needles, bottom up. HAT: Cast on (60) 72-84-88-96 (104-108) stitches with double pointed needles size 3 mm and Baby Merino. *Knit 1, work 3 stitches in garter stitch *, continue this pattern in the round (= (15)-18-21-22-24 (26-27) repeats). Continue until the piece measures approx. (10) 11-12-13-14 (14-15) cm. Then decrease each cm as follows: DECREASE 1: Knit together the first 2 stitches in each garter stitch section = (45) 54-63-66-72 (78-81) stitches. Continue with knit 1, 2 stitches in garter stitch over all stitches. DECREASE 2: Knit together the last 2 stitches in each garter stitch section = (30) 36-42-44-48 (52-54) stitches. Continue with knit 1, 1 stitch in garter stitch over all stitches. DECREASE 3: Knit all stitches together 2 and 2 = (15) 18-21-22-24 (26-27) stitches DECREASE 4: Knit all stitches together 2 and 2 = (8) 9-11-11-12 (13-14) stitches. ALL SIZES: Pull a double strand through the remaining stitches, tighten and fasten the strands well. The hat measures approx. (14) 15-16-17-18 (19-20) cm. ------------------------------------------------------- BIB – SHORT OVERVIEW OF THE PIECE: The piece is worked back and forth with circular needle, top down. BIB: Cast on 7 stitches with circular needle size 3 mm and Baby Merino. Insert 1 marker in the 4th stitch (= mid-stitch); allow the marker to follow your work onwards. Work as follows – from the right side: 1 stitch in GARTER STITCH – read description above, knit 1, A.1 (= 1 stitch), knit 1 (= mid-stitch), A.2 (= 1 stitch), knit 1, 1 stitch in garter stitch = 11 stitches. Continue this pattern onwards; 4 stitches are increased on each row from the right side and 2 stitches on each row from the wrong side. When A.1 and A.2 have been worked 1 time in height continue the pattern, as well as increasing on each side and towards the mid-stitch. When the piece measures 14-17 cm (measured along the mid-stitch), work stocking stitch over all stitches and continue to increase on each side and towards the mid-stitch as before. Work stocking stitch for 1 cm, then work 3 ridges over all stitches without further increases. Cast off. The bib measures approx. 16-19 cm. Fasten a button to one end of the bib (the button is buttoned between the 1 stitch in garter stitch and 1 knitted stitch at the other end). |
||||||||||
Diagram explanations |
||||||||||
|
||||||||||
 |
||||||||||
Have you finished this pattern?Tag your pictures with #dropspattern #babybusinessset or submit them to the #dropsfan gallery. Do you need help with this pattern?You'll find 19 tutorial videos, a Comments/Questions area and more by visiting the pattern on garnstudio.com. © 1982-2025 DROPS Design A/S. We reserve all rights. This document, including all its sub-sections, has copyrights. Read more about what you can do with our patterns at the bottom of each pattern on our site. |
||||||||||


With over 40 years in knitting and crochet design, DROPS Design offers one of the most extensive collections of free patterns on the internet - translated to 17 languages. As of today we count 320 catalogues and 12093 patterns translated into English (UK/cm). 12093
We work hard to bring you the best knitting and crochet have to offer, inspiration and advice as well as great quality yarns at incredible prices! Would you like to use our patterns for other than personal use? You can read what you are allowed to do in the Copyright text at the bottom of all our patterns. Happy crafting!
Post a comment to pattern DROPS Baby 33-20
We would love to hear what you have to say about this pattern!
If you want to leave a question, please make sure you select the correct category in the form below, to speed up the answering process. Required fields are marked *.