
Popular categories
Looking for a yarn?


Comments / Questions (218)
![]() Vigs wrote:
Vigs wrote:
Hi. But if we increase (raglan) only in the body and not on the sleeves, how we managed to have 62 stitches in the sleeves to put on hold? Because without increasing on the sleeves, we have only 30. And the piece starts with 2knitt +2 purl, that belongs to the sleeves, so the work/row starts in the middle of a sleeve and not in the middle of the back as it has been said. The instructions are very confusing! Some help is really appreciate.
23.06.2022 - 16:26DROPS Design answered:
Dear Vigs, for size XL, you have 45 stitches for each sleeve in the neck edge at the start. After 3 cm, you work increases over the sleeve stitches. When you start the yoke, you should already have enough stitches for the sleeves, that's why we only need to increase for the front/ back. In the neck edge, you work a specific rib stitch over the body as well (purl 2/ knit 2), while you work over the sleeve as you will later on (Purl 1, knit 2). After 3 cm, you increase over the sleeves to have as well knit 2/ purl 2 in the sleeve. So the beggining of the work is correct, in the middle of the back. Happy knitting!
23.06.2022 - 20:38
![]() Violena wrote:
Violena wrote:
Hi there, I’m trying to work out where to put the raglan increases. I have beginning of round marker (BORM) from back piece and right sleeve (section A), right sleeve to front piece (section B), front piece to left sleeve (section C), left sleeve to back piece (section D) and back piece to BORM (section E). Am I supposed to do the raglan at the beginning and end of section C and then at the beginning of section E and the end of section A? Any help is greatly appreciated, I'm fairly new!
30.05.2022 - 15:51DROPS Design answered:
Dear Violena, you are increasing only on body (= back piece + front pieces) not on sleeve, rounds start on mid back, you don't increase on mid back, you increase for raglan before 1st marker thread + after 4th marker thread on back piece and after 2nd marker + before 3rd marker thread on front piece. You will increase first 2 sts at each marker thread (= 8 sts on the round) then only 1 st at each marker thread (= 4 sts on the round). Hope this will help. Happy knitting!
30.05.2022 - 16:29
![]() Katarina Von Wachenfeldt wrote:
Katarina Von Wachenfeldt wrote:
Hej! Jag är precis härdig med ok. Då kommer denna mening som jag inte förstår. Nu är oket färdigt. Sedan stickas den yttersta maskan i varje sida av framstycket och bakstycket in på ärmarna. Vad betyder det? Något jag ska göra eller bara info? Om göra, vad I så fall. Tycker det som kommer efter med uppdelning sv maskor till ärmar och fram och bak stämmer om jag inte gör "nåt extra". Tacksam för hjälp. Mvh Kattis
19.04.2022 - 18:17DROPS Design answered:
Hej Katarina, ja du følger bare opskriften, vi skriver det for at forklare hvorfor den yderste maske i hver side af for og bagstykke tilhører ærmerne :)
22.04.2022 - 14:14
![]() Montserraqt wrote:
Montserraqt wrote:
He terminado de hacer la cenefa del escote y ahora que voy a empezar con el canesú no entiendo lo siguiente: Como tengo que trabajar los puntos que se quedan fuera de las ranglan para que sea todo junto jersey si dice que se trabaja derecho sobre derecho y revés sobre revés? Y los aumentos que se quedan dentro del ranglán???? como se trabajan. Saludos, Montse
17.03.2022 - 15:40DROPS Design answered:
Hola Montserrat, en la parte de las mangas, que está en punto elástico, se continua como se ha trabajado en la cenefa del escote: derecho sobre derecho y revés sobre revés. Las partes del delantero y la espalda se trabajan en punto jersey. Puedes ver la distribución de los puntos justo antes del apartado canesú. Los aumentos del raglán se trabajan en punto jersey, en las partes del delantero y la espalda.
20.03.2022 - 18:15
![]() Lori Ann wrote:
Lori Ann wrote:
For the Body: I am making size S. Pattern says “When piece measures 4 cm from division, decrease 1 stitch on each side of marker threads (Done!😀 ) . Then it says “Decrease like this approx. every 8-7-6-5-4-3 cm , 2 TIMES in total = 128-140-154-170-196-216 stitches. Do the decreases at 4cm count as one of the two total decreases? Or am I to decrease 3 times (at 4cm, 8cm and another 8 cm)?
15.01.2022 - 23:37DROPS Design answered:
Dear Lori Ann, you have to decrease only 2 times, so the decreases at 4 cm is count as one of the two total decreases. Second one is done at 8 cm. Happy knitting!
16.01.2022 - 23:52
![]() Aurélie wrote:
Aurélie wrote:
Bonjour, Je tricote ce modèle en M, j'ai fait 3 cm de côtes pour le col = 118 mailles (m) (9+39+20+39+11). Comment faire les augmentations (aug) au tour suivant pour obtenir un total de 156 m? J'ai tricoté : 9 m en côtes; 39 m +3 aug endroit; 20 m + 5 aug uniquement sur l'envers; 39 m +6 aug endroit; 20 m + 5 aug uniquement sur l'envers; 11 m + 3 aug endroit (déplacement du marqueur de début de rang = milieu dos) total : 140 m pour 1 rang (ou 160 m tricotées pour cette partie)
08.12.2021 - 11:52DROPS Design answered:
Bonjour Aurélie, il vous manque quelques augmentations: 9 m + 3 = 12 m pour le demi-dos, 39+13 = 52 m pour la manche, 20+6 = 26 m pour le devant, 39+13 = 52 m pour la manche et 11+3= 14 m pour le demi-dos, soit: 12+52+26+52+14=156 m tricotées au-dessus de 9+39+20+39+11=118 m. Bon tricot!
08.12.2021 - 13:45
![]() Heather wrote:
Heather wrote:
How much ease is recommended for this?
01.11.2021 - 18:06DROPS Design answered:
Dear Heather, the modell is vearing the piece with a slight ease, but I would suggest that you take a piece that fits the intended wearer, and compare its measurements to the ones given on the schematic drawing. The piece actually can be used different ways, with negative ease it would shouwing off the figure, with a positive ease it would be sportier, it is up to you to decide. Happy Knitting!
02.11.2021 - 01:21
![]() Linda wrote:
Linda wrote:
Esiste un versione bambina grazie
06.08.2021 - 07:47DROPS Design answered:
Ciao Linda, sfortunatamente no. Distinti saluti
06.08.2021 - 09:50
![]() Soline wrote:
Soline wrote:
Bonjour je souhaite faire la taille L mais je ne comprends pas les explications du rang 2 : « placer un fil marqueur ici (= à la transition entre le dos et la manche droite), 1 m endroit, (1 m envers/ 2 m endroit) au-dessus des 36 mailles suivantes, 1 maille envers, 1 m endroit, placer un fil marqueur ici. » selon moi je place le marqueur puis je fais 1 m end, 1 m envers, 2 m end / 2 m env pour obtenir 36 mailles et je dois faire ensuite 1 m env 1 m end puis marqueur ?
01.08.2021 - 22:08DROPS Design answered:
Bonjour Soline, les mailles des manches se tricotent en côtes 2/2 mais celles du devant et du dos se tricotent en côtes 2 mailles endroit/1 maille envers soit après le marqueur: 12 fois (1 m env, 2 m end) = 36 m. Bon tricot!
02.08.2021 - 07:41
![]() Jeanet wrote:
Jeanet wrote:
Hallo onderstaande mail had ik eerder gestuurd. Heb je al antwoord van de ontwerp afdeling? Hallo. Ik ben bezig met het lijf en moet nu gaan minderen bij een hoogte van 4 cm vanaf de scheiding . Er staat "Minder zo ongeveer ieder 8-9-6-5-4-3 cm 2 keer in totaal enz. Ik heb mt 38 en moet dus (de tweede maat) volgens het patroon ieder 9 cm minderen. Moet dit niet 7 zijn ? Groetjes
18.06.2021 - 11:40DROPS Design answered:
Dag Jeanet,
Nee, helaas nog geen antwoord gekregen. In mijn vorige antwoord zei ik dat ik dacht dat het 9 cm moet zijn, maar ik bedoelde 7 cm 🙈.
23.06.2021 - 20:43
|
|
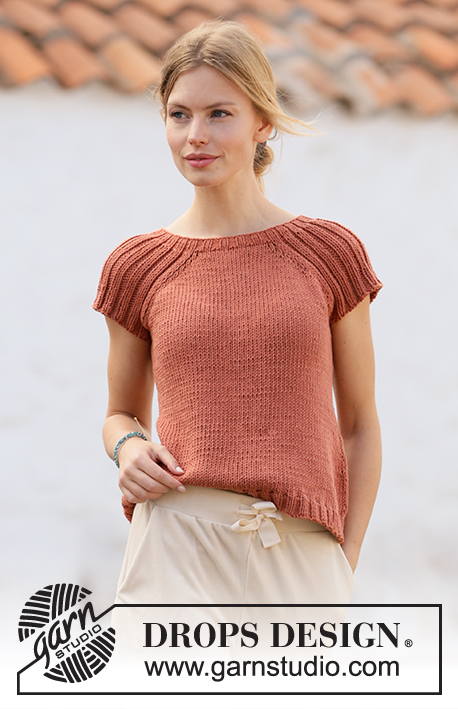
Canyon Clay#canyonclaytop |
|
 |
 |
Knitted top with raglan in DROPS Paris. Piece is knitted top down with rib. Size: S - XXXL
DROPS 212-15 |
|
|
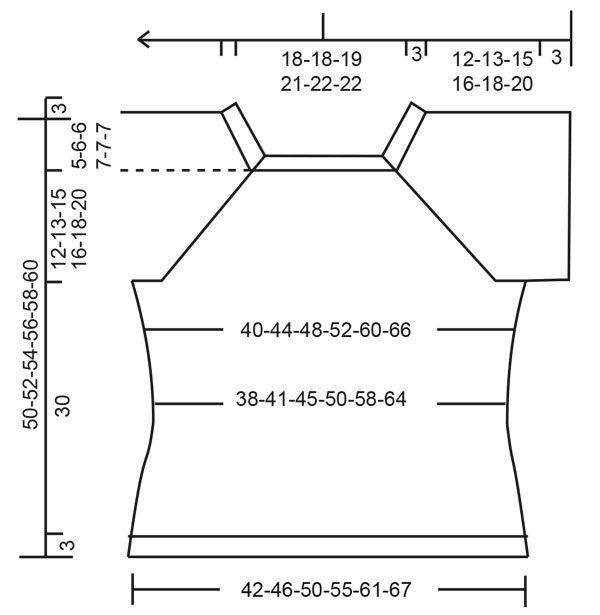
---------------------------------------------------------- EXPLANATION FOR THE PATTERN: ---------------------------------------------------------- INCREASE TIP-1 (evenly): To calculate how to increase evenly, count the stitches to be increased (e.g. 9 stitches) and divide by stitches of increases to be done (e.g. 2) = 4.5. In this example increase by making 1 yarn over after alternately every 4th and 5th stitch. On next row work yarn overs twisted to avoid holes. INCREASE TIP-2: Increase 1 stitch by making 1 yarn over. On next round purl yarn over twisted to avoid holes. Purl the new stitches. INCREASE TIP-3 (applies to sides of body): Work until 2 stitches remain before marker thread, 1 yarn over, knit 4 (marker thread is in the middle of these stitches), 1 yarn over. On next round knit yarn overs twisted to avoid holes. Then work the new stitches in stocking stitch. DECREASE TIP: Decrease 1 stitch on each side of marker thread as follows: Work until 3 stitches remain before marker thread and knit 2 together, knit 2 (marker thread is between these stitches), slip 1 stitch knitwise, knit 1, pass slipped stitch over stitch worked. RAGLAN: In the beginning increase 2 stitches towards each raglan on front and back piece (= 8 stitches increased on round), and thereafter increase 1 stitch towards each raglan on front and back piece (= 4 stitches increased on round). Increase 2 stitches before marker thread as follows: Work until 2 stitches remain before marker thread: 1 yarn over, knit 1, 1 yarn over, knit 1, marker thread is here. Increase 2 stitches after marker thread as follows: Knit 1, 1 yarn over, knit 1, 1 yarn over. Increase 1 stitch before marker thread as follows: Work until 1 stitch remains before marker thread: 1 yarn over, knit 1, marker thread is here. Increase 1 stitch after marker thread as follows: Knit 1, 1 yarn over. On next round knit yarn overs twisted to avoid holes. Then work the new stitches in stocking stitch. CAST-OFF TIP: To avoid a tight cast-off edge you may use a larger needle. If this also is too tight, make 1 yarn over after approx. every 4th stitch and cast off these as regular stitches. ---------------------------------------------------------- START THE PIECE HERE: ---------------------------------------------------------- TOP - SHORT OVERVIEW OF THE PIECE: Work neck edge and yoke in the round on circular needle from mid back, top down. Now divide yoke for body and sleeves. Work body in the round on circular needle. Work sleeves in the round on double pointed needles/short circular needle, top down. NECK EDGE: Cast on 112-118-126-138-144-144 stitches on circular needle size 3.5 mm with Paris. Knit 1 round. Work next round as follows: (Knit 2/purl 2) over the first 8-8-12-12-12-12 stitches, knit 1, insert a marker thread here (= in transition between back piece and right sleeve), knit 1, (purl 1/knit 2) over the next 33-36-36-42-45-45 stitches, purl 1, knit 1, insert a marker thread here (= in transition between right sleeve and front piece), knit 1, (purl 2/knit 2) over the next 16-16-20-20-20-20 stitches, purl 2, knit 1, insert a marker thread here (= in transition between front piece and left sleeve), knit 1, (purl 1/knit 2) over the next 33-36-36-42-45-45 stitches, purl 1, knit 1, insert a marker thread here (= in transition between left sleeve and back piece), knit 1, (purl 2/knit 2) over the next 8-8-8-8-8-8 stitches, purl 2. Continue in the round like this until rib measures 3 cm. When rib is done, work next round as follows: Knit until first marker thread and increase at the same time 2-3-3-3-3-4 stitches evenly – read INCREASE TIP-1, knit over knit and purl over purl until next marker thread and increase at the same time 1 stitch in every purl section – read INCREASE TIP-2, knit until next marker thread and increase at the same time 4-6-5-5-6-8 stitches evenly, knit over knit and purl over purl until next marker thread and increase at the same time 1 stitch in every purl section, knit the last 11-11-11-11-11-11 stitches and increase at the same time 2-3-2-2-3-4 stitches evenly = 144-156-162-178-188-192 stitches. Work 1 row with knit over knit and purl over purl (work the yarn overs twisted to avoid holes). Switch to circular needle size 5 mm. Insert 1 marker at the beginning of round (= approx. mid back), measure yoke from this marker! YOKE: Knit over knit and purl over purl. On first round start increase for RAGLAN – read explanation above. Only increase on front piece and back piece towards each raglan. Increase 2 stitches every other round 9-9-8-10-12-13 times in total, then increase 1 stitch every other round 2-4-6-6-8-8 times = 224-244-250-282-316-328 stitches. REMEMBER THE KNITTING TENSION! Continue with knit over knit and purl over purl until piece measures 12-13-15-16-18-20 cm from marker. The yoke is finished. Then work in the outermost stitch in each side of front piece and back piece in on sleeves. Work next round as follows: Work the first 30-33-37-41-47-50 stitches, slip the next 50-54-54-62-66-66 stitches on a stitch holder for sleeve and cast on 6-6-10-10-10-14 stitches on needle (= in the side under sleeve), work the next 62-68-71-79-92-98 stitches (= front piece), slip the next 50-54-54-62-66-66 stitches on a stitch holder for sleeve and cast on 6-6-10-10-10-14 stitches on needle (= in the side under sleeve), work the remaining 32-35-34-38-45-48 stitches on needle. Then finish body and sleeves separately. NOW MEASURE PIECE FROM HERE! BODY: = 136-148-162-178-204-224 stitches. Insert 1 marker thread in the in each side, in middle of the new stitches cast-on under the sleeves (= 3-3-5-5-5-7 new stitches on each side of marker thread). Move the marker threads upwards when working; they should be used for increase later in the sides. Work in stocking stitch in the round. When piece measures 4 cm from division, decrease 1 stitch on each side of marker threads - read DECREASE TIP. Decrease like this approx. every 8-7-6-5-4-3 cm 2 times in total = 128-140-154-170-196-216 stitches. When piece measures 20-18-16-14-12-10 cm from division, increase 1 stitch on each side of marker threads - read INCREASE TIP-3. Increase like this approx. every 3-4-4-5-6-6 cm 4-4-4-4-3-3 times in total = 144-156-170-186-208-228 stitches. When piece measures 30 cm from division (3 cm remain until finished measurements - work to desired length), knit 1 round while increasing 28-28-34-38-40-44 stitches = 172-184-204-224-248-272 stitches. Switch to circular needle size 3.5 mm. Work rib (knit 2/purl 2) in the round for 3 cm. Cast off with knit over knit and purl over purl - read CAST-OFF TIP. Top measures total 50-52-54-56-58-60 cm in total from shoulder and down. SLEEVE: Slip the 50-54-54-62-66-66 stitches from stitch holder in one side back on double pointed needles/circular needle size 5 mm, and pick up 1 stitch in each of the 6-6-10-10-10-14 stitches cast on under the sleeve = 56-60-64-72-76-80 stitches. Work rib (knit 2/purl 2) in the round. When sleeve measures 3 cm from division, cast off with knit over knit and purl over purl - remember CAST-OFF TIP. Work the other sleeve the same way. |
|
 |
|
Have you finished this pattern?Tag your pictures with #dropspattern #canyonclaytop or submit them to the #dropsfan gallery. Do you need help with this pattern?You'll find 25 tutorial videos, a Comments/Questions area and more by visiting the pattern on garnstudio.com. © 1982-2026 DROPS Design A/S. We reserve all rights. This document, including all its sub-sections, has copyrights. Read more about what you can do with our patterns at the bottom of each pattern on our site. |
|


With over 40 years in knitting and crochet design, DROPS Design offers one of the most extensive collections of free patterns on the internet - translated to 17 languages. As of today we count 325 catalogues and 12298 patterns translated into English (UK/cm). 12298
We work hard to bring you the best knitting and crochet have to offer, inspiration and advice as well as great quality yarns at incredible prices! Would you like to use our patterns for other than personal use? You can read what you are allowed to do in the Copyright text at the bottom of all our patterns. Happy crafting!
Post a comment to pattern DROPS 212-15
We would love to hear what you have to say about this pattern!
If you want to leave a question, please make sure you select the correct category in the form below, to speed up the answering process. Required fields are marked *.