
Popular categories
Looking for a yarn?


Comments / Questions (218)
![]() Esther Heiliegers wrote:
Esther Heiliegers wrote:
Mijn pas is klaar! Daarna volgt: Brei dan in de buitenste steek aan elke kant van het voorpand en het achterpand in op de mouwen. Wat wordt daar mee bedoeld? Als het goed is gaat het om 4 steken. Alvast bedankt voor Uw reactie!
29.01.2024 - 21:22
![]() Anna wrote:
Anna wrote:
Als je de steken van de hals verdeling bij elkaar opteld kom ik voor maat M op 104 steken, terwijl ik er 118 op moet zetten. Waar laat ik dan die andere 14 steken? En als je gaat meerderen in 2 recht, 2 averecht dan verschieten de steken toch? Met andere woorden dan zitten ze niet meer tegenover elkaar. Graag hulp
24.10.2023 - 10:46
![]() Nay wrote:
Nay wrote:
In the neck edge, the pattern said to work 1 row with knit over knit and purl over purl (work the yarn overs twisted to avoid holes), I am confused which yarn over stitch for knit or purl, and what kind of rib will be formed after this round?
23.08.2023 - 04:40DROPS Design answered:
Hi Nay, You increase in each purled section on the rib, so these yarn overs will be purled on the next round to give a new rib (K2, P3). Happy knitting!
23.08.2023 - 06:38
![]() Roxanne wrote:
Roxanne wrote:
At the end of the neck edge the pattern reads “ Switch to circular needle size 5 mm = US 8. Insert 1 marker at the beginning of round (= approx. mid back), “ I had to cut the yarn as I had started at the neck edge on the transition from back to right sleeve. Did I get mixed up? Is the starting point of the neck piece the centre of the back?
13.08.2023 - 18:45DROPS Design answered:
Hi Roxanne, Yes, the neck is also worked from mid-back but, if you don't mind cutting and fastening the strands, you can now begin from mid-back for the yoke without undoing the neck. Happy knitting!
14.08.2023 - 06:42
![]() Roxanne wrote:
Roxanne wrote:
In the knit and yoke sections the pattern calls for increasing stitches. You continue with K over K and P over P. When the increase has been added in every P section I consider the additional stitch a P. When it is knitting and P with increases how do you determine what the additional stitch is? Issue is when you add evenly over a K/P section. When you add between a K and a P is the new stitch a K or P?
13.08.2023 - 18:38DROPS Design answered:
Dear Roxanne, when increasing on the yoke (with diagram A.5) you have to work the stitches on next row after A.5 (from RS) with pattern A.4 as before (= 1 stitch in English rib, P3). Happy knitting!
14.08.2023 - 10:12
![]() Roxanne wrote:
Roxanne wrote:
When rib is done, work next round as follows: Knit until first marker thread and increase ….. Knit the last 11-11-11-11-11-11 stitches and increase …..My question is,Is this just K stitch versus K,P? If so I end up with the 2 knit sections together. What part of the sweater is this and why is it just K?
13.08.2023 - 18:30DROPS Design answered:
Dear Roxanne, you should knit until first marker thread, work the stitches til next marker thread with K over K and P over P increasing P1 in each P section, knit the stitches til next marker thread, etc... so that the stitches on front and back pieces are knitted and the stitches on sleeves are worked in rib, with K over K and P over P. Happy knitting!
14.08.2023 - 10:43
![]() Inge wrote:
Inge wrote:
Jeg følger opskriften med at tage 10 masker op under ærmet, men der kommer store huller før og efter optagningerne og demasker som er på pinden. Hvordan undgår jeg det ?
10.07.2023 - 22:25DROPS Design answered:
Hei Inge. Det vil alltid komme noen små hull før og etter en opplukkning, men stram tråden evnt ta opp tråden mellom maskene og strikk den sammen med neste maske. Eller så kan du sy noen maskesting i maskene rundt og i hullet med en egen tråd til slutt, slik at det ikke blir hull. mvh DROPS Design
24.07.2023 - 13:58
![]() Inge wrote:
Inge wrote:
Efter indtagning på ryg og forstykke skal der tages masker ud. Jeg ønsker den ikke bredere og tager derfor ikke ud. Hvad gør jeg med ribkanten og aflukning ?
03.07.2023 - 21:44DROPS Design answered:
Hej Inge, du sørger for at have et maskeantal som kan deles med 4, så du kan strikke 2ret, 2 vrang hele vejen rundt :)
04.07.2023 - 07:59
![]() Karin Gmach wrote:
Karin Gmach wrote:
1. Runde nach der Halsblende: vor dem 2. Markierungsfaden soll ich rechte Masche rechts und linke Maschen links stricken und gleichzeitig IN jeder Linksrippe 1 Masche zunehmen. Ich habe aber doch nur 1 linke Masche, weil das Muster 1 links und 2 rechts ist. Soll ich jetzt vor oder nach der linken Masche 1 Masche zunehmen? Im Voraus lieben Dank für die Antwort
02.07.2023 - 20:13DROPS Design answered:
Liebe Frau Gmach, Sie hatten Bündchen 1 M links, 2 M rechts, und jetzt nehmen Sie zu 2 M links, 2 M rechts (= 1 M links in jedem Links-Partei) zu. Viel Spaß beim stricken!
03.07.2023 - 11:02
![]() Alejandra Hernandez wrote:
Alejandra Hernandez wrote:
Is there any way to adapt the pattern if my chest's measurement is between xl and xxl?
01.07.2023 - 06:38DROPS Design answered:
Dear Mrs Hernandez, probably but note that the measurements in the chart are the finished measurements of piece, not the measurements on body. Measure a similar garment you have and like the shape to find out which size would fit best; if you are still between 2 sizes, choose the smaller one for a more fitting shape or the larger one for a looser shape. Read more here. Happy knitting!
03.07.2023 - 09:37
|
|
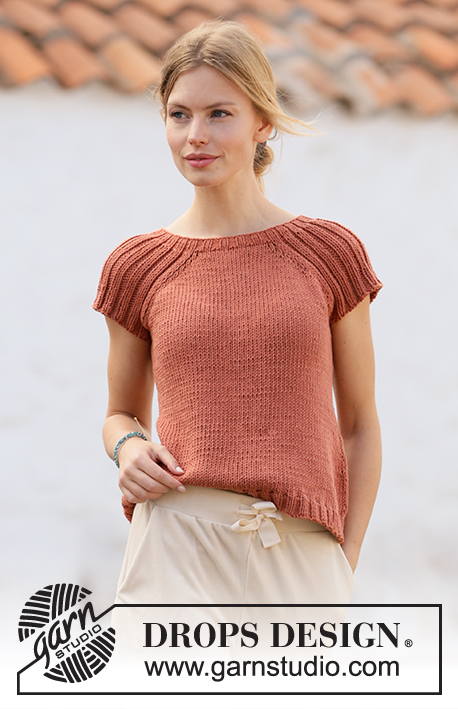
Canyon Clay#canyonclaytop |
|
 |
 |
Knitted top with raglan in DROPS Paris. Piece is knitted top down with rib. Size: S - XXXL
DROPS 212-15 |
|
|
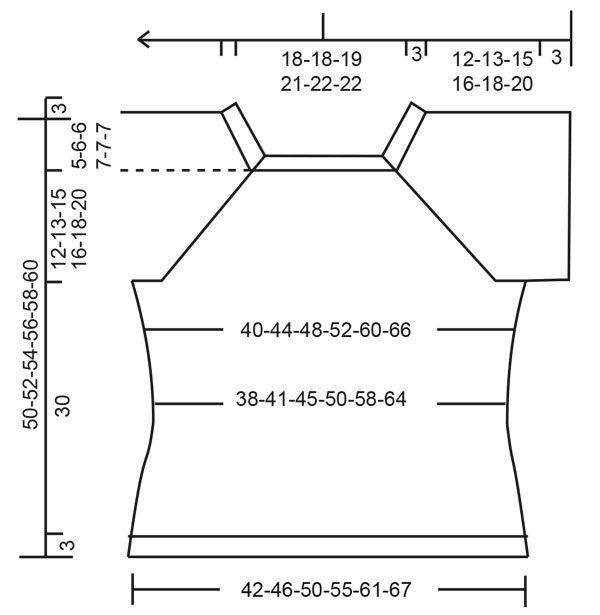
---------------------------------------------------------- EXPLANATION FOR THE PATTERN: ---------------------------------------------------------- INCREASE TIP-1 (evenly): To calculate how to increase evenly, count the stitches to be increased (e.g. 9 stitches) and divide by stitches of increases to be done (e.g. 2) = 4.5. In this example increase by making 1 yarn over after alternately every 4th and 5th stitch. On next row work yarn overs twisted to avoid holes. INCREASE TIP-2: Increase 1 stitch by making 1 yarn over. On next round purl yarn over twisted to avoid holes. Purl the new stitches. INCREASE TIP-3 (applies to sides of body): Work until 2 stitches remain before marker thread, 1 yarn over, knit 4 (marker thread is in the middle of these stitches), 1 yarn over. On next round knit yarn overs twisted to avoid holes. Then work the new stitches in stocking stitch. DECREASE TIP: Decrease 1 stitch on each side of marker thread as follows: Work until 3 stitches remain before marker thread and knit 2 together, knit 2 (marker thread is between these stitches), slip 1 stitch knitwise, knit 1, pass slipped stitch over stitch worked. RAGLAN: In the beginning increase 2 stitches towards each raglan on front and back piece (= 8 stitches increased on round), and thereafter increase 1 stitch towards each raglan on front and back piece (= 4 stitches increased on round). Increase 2 stitches before marker thread as follows: Work until 2 stitches remain before marker thread: 1 yarn over, knit 1, 1 yarn over, knit 1, marker thread is here. Increase 2 stitches after marker thread as follows: Knit 1, 1 yarn over, knit 1, 1 yarn over. Increase 1 stitch before marker thread as follows: Work until 1 stitch remains before marker thread: 1 yarn over, knit 1, marker thread is here. Increase 1 stitch after marker thread as follows: Knit 1, 1 yarn over. On next round knit yarn overs twisted to avoid holes. Then work the new stitches in stocking stitch. CAST-OFF TIP: To avoid a tight cast-off edge you may use a larger needle. If this also is too tight, make 1 yarn over after approx. every 4th stitch and cast off these as regular stitches. ---------------------------------------------------------- START THE PIECE HERE: ---------------------------------------------------------- TOP - SHORT OVERVIEW OF THE PIECE: Work neck edge and yoke in the round on circular needle from mid back, top down. Now divide yoke for body and sleeves. Work body in the round on circular needle. Work sleeves in the round on double pointed needles/short circular needle, top down. NECK EDGE: Cast on 112-118-126-138-144-144 stitches on circular needle size 3.5 mm with Paris. Knit 1 round. Work next round as follows: (Knit 2/purl 2) over the first 8-8-12-12-12-12 stitches, knit 1, insert a marker thread here (= in transition between back piece and right sleeve), knit 1, (purl 1/knit 2) over the next 33-36-36-42-45-45 stitches, purl 1, knit 1, insert a marker thread here (= in transition between right sleeve and front piece), knit 1, (purl 2/knit 2) over the next 16-16-20-20-20-20 stitches, purl 2, knit 1, insert a marker thread here (= in transition between front piece and left sleeve), knit 1, (purl 1/knit 2) over the next 33-36-36-42-45-45 stitches, purl 1, knit 1, insert a marker thread here (= in transition between left sleeve and back piece), knit 1, (purl 2/knit 2) over the next 8-8-8-8-8-8 stitches, purl 2. Continue in the round like this until rib measures 3 cm. When rib is done, work next round as follows: Knit until first marker thread and increase at the same time 2-3-3-3-3-4 stitches evenly – read INCREASE TIP-1, knit over knit and purl over purl until next marker thread and increase at the same time 1 stitch in every purl section – read INCREASE TIP-2, knit until next marker thread and increase at the same time 4-6-5-5-6-8 stitches evenly, knit over knit and purl over purl until next marker thread and increase at the same time 1 stitch in every purl section, knit the last 11-11-11-11-11-11 stitches and increase at the same time 2-3-2-2-3-4 stitches evenly = 144-156-162-178-188-192 stitches. Work 1 row with knit over knit and purl over purl (work the yarn overs twisted to avoid holes). Switch to circular needle size 5 mm. Insert 1 marker at the beginning of round (= approx. mid back), measure yoke from this marker! YOKE: Knit over knit and purl over purl. On first round start increase for RAGLAN – read explanation above. Only increase on front piece and back piece towards each raglan. Increase 2 stitches every other round 9-9-8-10-12-13 times in total, then increase 1 stitch every other round 2-4-6-6-8-8 times = 224-244-250-282-316-328 stitches. REMEMBER THE KNITTING TENSION! Continue with knit over knit and purl over purl until piece measures 12-13-15-16-18-20 cm from marker. The yoke is finished. Then work in the outermost stitch in each side of front piece and back piece in on sleeves. Work next round as follows: Work the first 30-33-37-41-47-50 stitches, slip the next 50-54-54-62-66-66 stitches on a stitch holder for sleeve and cast on 6-6-10-10-10-14 stitches on needle (= in the side under sleeve), work the next 62-68-71-79-92-98 stitches (= front piece), slip the next 50-54-54-62-66-66 stitches on a stitch holder for sleeve and cast on 6-6-10-10-10-14 stitches on needle (= in the side under sleeve), work the remaining 32-35-34-38-45-48 stitches on needle. Then finish body and sleeves separately. NOW MEASURE PIECE FROM HERE! BODY: = 136-148-162-178-204-224 stitches. Insert 1 marker thread in the in each side, in middle of the new stitches cast-on under the sleeves (= 3-3-5-5-5-7 new stitches on each side of marker thread). Move the marker threads upwards when working; they should be used for increase later in the sides. Work in stocking stitch in the round. When piece measures 4 cm from division, decrease 1 stitch on each side of marker threads - read DECREASE TIP. Decrease like this approx. every 8-7-6-5-4-3 cm 2 times in total = 128-140-154-170-196-216 stitches. When piece measures 20-18-16-14-12-10 cm from division, increase 1 stitch on each side of marker threads - read INCREASE TIP-3. Increase like this approx. every 3-4-4-5-6-6 cm 4-4-4-4-3-3 times in total = 144-156-170-186-208-228 stitches. When piece measures 30 cm from division (3 cm remain until finished measurements - work to desired length), knit 1 round while increasing 28-28-34-38-40-44 stitches = 172-184-204-224-248-272 stitches. Switch to circular needle size 3.5 mm. Work rib (knit 2/purl 2) in the round for 3 cm. Cast off with knit over knit and purl over purl - read CAST-OFF TIP. Top measures total 50-52-54-56-58-60 cm in total from shoulder and down. SLEEVE: Slip the 50-54-54-62-66-66 stitches from stitch holder in one side back on double pointed needles/circular needle size 5 mm, and pick up 1 stitch in each of the 6-6-10-10-10-14 stitches cast on under the sleeve = 56-60-64-72-76-80 stitches. Work rib (knit 2/purl 2) in the round. When sleeve measures 3 cm from division, cast off with knit over knit and purl over purl - remember CAST-OFF TIP. Work the other sleeve the same way. |
|
 |
|
Have you finished this pattern?Tag your pictures with #dropspattern #canyonclaytop or submit them to the #dropsfan gallery. Do you need help with this pattern?You'll find 25 tutorial videos, a Comments/Questions area and more by visiting the pattern on garnstudio.com. © 1982-2026 DROPS Design A/S. We reserve all rights. This document, including all its sub-sections, has copyrights. Read more about what you can do with our patterns at the bottom of each pattern on our site. |
|


With over 40 years in knitting and crochet design, DROPS Design offers one of the most extensive collections of free patterns on the internet - translated to 17 languages. As of today we count 325 catalogues and 12298 patterns translated into English (UK/cm). 12298
We work hard to bring you the best knitting and crochet have to offer, inspiration and advice as well as great quality yarns at incredible prices! Would you like to use our patterns for other than personal use? You can read what you are allowed to do in the Copyright text at the bottom of all our patterns. Happy crafting!
Post a comment to pattern DROPS 212-15
We would love to hear what you have to say about this pattern!
If you want to leave a question, please make sure you select the correct category in the form below, to speed up the answering process. Required fields are marked *.