
Popular categories
Looking for a yarn?


Comments / Questions (27)
![]() Suzie wrote:
Suzie wrote:
Bonjour, j\'adore ce modèle. Est-ce qu\'il y a des explications à quelques part pour le tricoter de bas en haut ?
07.07.2020 - 16:15DROPS Design answered:
Bonjour Suzie, ce modèle existe uniquement en version "top down" - retrouvez dans cette leçon un pas à pas pour un pull tricoté ainsi de haut en bas ou bien consultez nos modèles tricotés de bas en haut ici. Bon tricot!
07.07.2020 - 16:48
![]() Cristina Pradas wrote:
Cristina Pradas wrote:
La verdad es que no entiendo muy bien el patrón , gracias
16.05.2020 - 14:53
![]() Cristina Pradas wrote:
Cristina Pradas wrote:
Cómo se hace el dibujo de la chaqueta, no entiendo muy bien, sé que son dos puntos juntos, pero que frecuencia llevan ,y luego cuando se echa la hebra, gracias
16.05.2020 - 14:52DROPS Design answered:
Hola Cristina. Para trabajar el dibujo tienes que seguir los diagramas que tienes bajo el patrón. Si tienes dificultades para entender el diagrama, lee esta lección: https://www.garnstudio.com/lesson.php?id=68&cid=23
21.11.2020 - 20:35
![]() Gunbritt Andersson wrote:
Gunbritt Andersson wrote:
Jag tycker det borde finnas bild på koftan också utan modell. Baksida och framsida och även kortsidan under ärmen så man ser ordentligt hur det ser ut. Det gäller allt tycker jag fin bild med modell och bra bilder på plagget utan. Det vore toppen. Något att tänka på. Ev beskrivning på garnets karaktär också
22.03.2020 - 13:02
![]() Gunbritt Andersson wrote:
Gunbritt Andersson wrote:
Jag undrar lite över storlekarna ... jag har stickat oket och tycker det ser väldigt smått ut. Vad motsvarar m? Är det så att man stickar A5 mellan fram och bakstycke från armhål och ner till midjan?
18.03.2020 - 11:45DROPS Design answered:
Hej Längst ner på mönstret har vi en måttskiss där du kan se mått i cm på alla storlekar. Det stämmer att du fortsätter att sticka A5 hala vägen ner på fram- och bakstycket. Lycka till!
18.03.2020 - 12:16
![]() Gunbritt Andersson wrote:
Gunbritt Andersson wrote:
Jag läste igenom mönstret igen och har redan en fråga. När man tagit bort för armarna så ska man sticka A5 under armarna fattar jag det rätt som i mitten på det 10 nya maskor man lägger upp så raden av hål går från armhålor ner mot midjan mellan framstycket och bakstycket? En sak om garnet Paris jag tycker det är mycket svårstickat det töjer sig lätt och själva spinningen av trådarna är dålig då det lätt skruvar upp sig. Inge bra val
10.03.2020 - 14:05
![]() Inga-Marie Andersson wrote:
Inga-Marie Andersson wrote:
Jag håller på med en kofta i Drops Paris, mönster 202-31. Jag får ingen ordning på raglanökningarna på oket. Första varvet verkar ok, men när jag ska göra nästa varv med ökningar, får jag maskor över på ärmarna. Framstycken och bakstycke verkar stämma. Jag förstår inte vad jag gör för fel. Har repat upp många gånger. Gör jag fel, eller är det möjligtvid något fel på mönstret (hämtat på nätet) Med vänlig hälsning Inga-Marie Andersson
05.03.2020 - 17:27DROPS Design answered:
Hej Jag vet inte riktigt vad du kan göra för fel då, men efter varje raglanökning kommer du få 1 m mer på varje framstycke , 2 m mer på varje ärm och 2 m mer på bakstycket. Mvh DROPS design
06.03.2020 - 13:53
![]() Gunbritt wrote:
Gunbritt wrote:
Jag har repat upp och gjort om minst åtta gånger. Jag läser och räknar och får inte ihop hålmönstrat på första omgången. Hur ska man räkna för det ska bli rätt och det ska ligga på varv 6? Var ska man räkna in de nya maskorna som blir A1? I mitten eller var??? Jag stickar i ljusgult det blir smutsigt av alla upprepningar trots handtvätt. HJÄLP😖 hur ska man göra
03.03.2020 - 17:44DROPS Design answered:
Hej Gunbritt, om du sätter en märktråd mellan varje diagram/rapport, så är det lättare att se var du skall öka och var du skall sticka mönstret. Lycka till!
05.03.2020 - 15:57
![]() Miu wrote:
Miu wrote:
Thank you for your further instructions, and I get it now that I need to knit all 18 rows of the diagrams. I am knitting a size L. Sequence of the diagram according to the written instruction in the YOKE section, band then A1, A2, raglan, sleeve, raglan then A3, A1 (2xs) A2, raglan, sleeve, raglan, then A3, A4 then band. I ended up with 2 holes in left front, 5 holes in back with the 2nd and 3rd hole only 4 STITCHES apart, right front has 2 holes but last 14 st 0 holes. Is that right???
20.02.2020 - 05:30DROPS Design answered:
Dear Miu, - edit 16/11/2021 - sorry for late reply, diagrams have been checked and there should be the correct number of holes on both front pieces, A1+A.2 = 2 holes in width; A.3+A.4 = 2 holes in width (the 2nd hole is worked here in A.3 and not in A.4). Happy knitting!
20.02.2020 - 10:35
![]() Miu wrote:
Miu wrote:
Thank you for responding so quickly, I do have further questions. I am in the middle of the diagram, finished row 14 ready to start row 15, which is the holes row. So do I start with A1, with a yarn over then knit 2 together? But the picture of the model does not show a hole right next to the band? With your answer, sounds like on row 15, I start with A1 then A1 again then A2 then raglan increase, then A3 and A1 (3 times) then A2 then raglan increase, then A3 and A4 (2 times) then band?
18.02.2020 - 18:30DROPS Design answered:
Dear Miu, after diagrams have been worked one time in height, you work A2/A.3 towards raglan as before and A.1/A.4 over the stitches increased in previous A.2/A.3, so that after band, continue A.1 as before, work A.1 one more time in width over new stitches then work A.2 (left front piece), work sleeve, then back piece: A.3, repeat A.1 in width and finish with A.2 before sleeve, work sleeve and for right front piece work: A.3 and repeat A.4 to the front band stitches, ie just as before but with more repeats of A.1/A.4 than on 1st repeat of diagrams in height. Happy knitting!
19.02.2020 - 09:01
|
||||||||||
Awakening Spring Jacket#awakeningspringjacket |
||||||||||
 |
 |
|||||||||
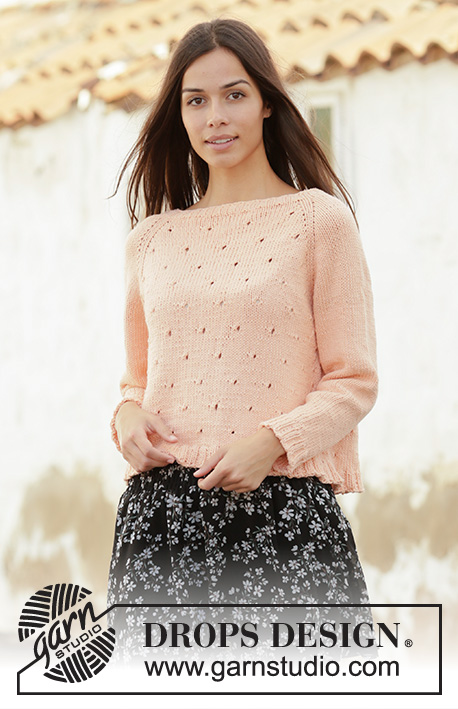
Knitted jacket with raglan in DROPS Paris. Piece is knitted top down with lace pattern. Size: S - XXXL
DROPS 202-31 |
||||||||||
|
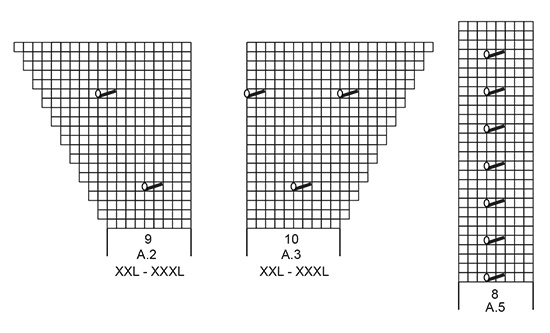
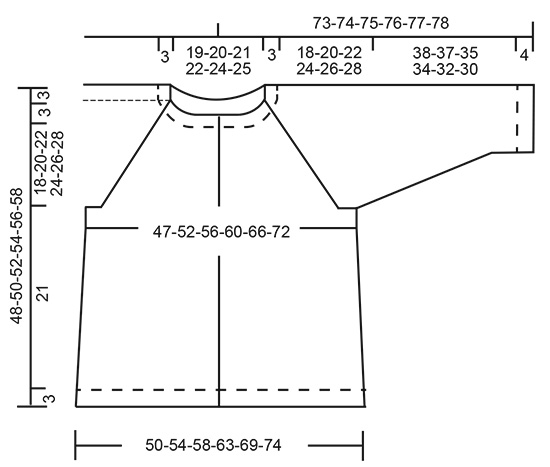
---------------------------------------------------------- EXPLANATION FOR THE PATTERN: ---------------------------------------------------------- GARTER STITCH (back and forth): Knit all rows. 1 ridge vertically = knit 2 rows. PATTERN: See diagrams A.1 to A.5. Choose diagram for your size (applies to A.2 and A.3). Diagrams show all rows in pattern seen from the right side. DECREASE TIP-1 (evenly): To calculate how to decrease evenly, use the total number of stitches on row (e.g. 102 stitches), minus bands (e.g. 8 stitches) and divide the remaining stitches by number of decreases to be done (e.g. 9) = 10.4. In this example decrease by knitting alternately every 9th and 10th stitch and every 10th and 11th stitch together. DECREASE TIP-2 (applies to sleeves): All decreases are done from the right side! Decrease 1 stitch on each side of A.5 as follows: Work until 2 stitches remain before A.5, knit 2 together, work A.5, slip 1 stitch knitwise, knit 1, pass slipped stitch over stitch worked (= 2 stitches decreased). INCREASE TIP-1 (applies to sides of body): Increase 4 stitches on row as follows: Increase 1 stitch on each side of A.5 by making 1 yarn over. On next row (wrong side) purl yarn overs twisted to avoid holes. Work the new stitches in stocking stitch. INCREASE TIP-2 (evenly): To calculate how to increase evenly, use the total number of stitches on row (e.g. 177 stitches), minus bands (e.g. 8 stitches) and divide the remaining stitches by number of increases to be done (e.g. 35) = 4.8. In this example increase by making 1 yarn over after approx. every 5th stitch. On next row (wrong side) work yarn overs twisted to avoid holes. RAGLAN: All increases are done from the right side. Increase 1 stitch in each side of 2 knit stitches in every transition between front/back piece and sleeves (= 8 stitches increased on row). Increase 1 stitch by making 1 yarn over. On next row (wrong side) purl yarn overs twisted to avoid holes. Then work the new stitch in stocking stitch on sleeves and work them into pattern on front and back piece. BUTTONHOLES: Decrease for buttonholes on right band (when garment is worn). Decrease from right side when 3 stitches remain on row as follows: Make 1 yarn over, knit the next 2 stitches together, knit last stitch. On next row knit yarn over to make holes. Decrease first buttonhole when rib in neck measures approx. 1½-2 cm. Then decrease the next 5 approx. 8-8-9-9-9-10 cm between each. ---------------------------------------------------------- START THE PIECE HERE: ---------------------------------------------------------- JACKET - SHORT OVERVIEW OF THE PIECE: Worked back and forth on circular needle, top down. Work sleeves in the round on double pointed needles/a short circular needle, top down. NECK EDGE: Cast on 102-106-114-118-126-130 stitches (including 4 band stitches in garter stitch in each side towards mid front) on circular needle size 4 mm with Paris. Purl 1 row from wrong side. Then work rib as follows from right side: 4 band stitches in GARTER STITCH - read explanation above, (knit 2/purl 2) until 6 stitches remain on needle, knit 2, 4 band stitches in garter stitch. Continue back and forth like this until rib measures 2½ cm - remember BUTTONHOLES - read explanation above. Knit 1 row while decreasing 9-13-13-17-17-21 stitches evenly - read DECREASE TIP-1 (evenly) = 93-93-101-101-109-109 stitches. Purl 1 row from wrong side (work the 4 band stitches in each side in garter stitches). YOKE: Switch to circular needle size 5 mm. Work in PATTERN - read explanation above, as follows: 4 band stitches in garter stitch, A.1 over the next 10 stitches, A.2 - choose diagram for your size, over the next 5-5-7-7-9-9 stitches, make 1 yarn over, knit 1, insert a marker thread here (= left front piece), knit 1, make 1 yarn over, knit 8, make 1 yarn over, knit 1, insert a marker thread here (= sleeve), knit 1, 1 yarn over, A.3 - choose diagram for your size, over the next 6-6-8-8-10-10 stitches, A.1 over the next 20 stitches (= 2 repetitions), A.2 over the next 5-5-7-7-9-9 stitches, 1 yarn over, knit 1, insert a marker thread here (= back piece), knit 1, make 1 yarn over, knit 8, make 1 yarn over, knit 1, insert a marker thread here (= sleeve), knit 1, make 1 yarn over, A.3 over the next 6-6-8-8-10-10 stitches, A.4 over the next 9 stitches, 4 band stitches in garter stitch (= right front piece). 8 stitches have been increased for RAGLAN - read explanation above. Continue pattern back and forth like this and increase every other row 18-22-23-26-28-30 times in total = 237-269-285-309-333-349 stitches. REMEMBER THE KNITTING TENSION. When diagrams have been worked vertically, continue pattern the same way. I.e. work according to A.2/A.3 towards raglan line on front pieces and back piece, and there is now from for 1 more repetition of A.1 before A.2 and after A.3 on front pieces and back piece. Continue sleeves in stocking stitch. When all increases for raglan are done, piece measures approx. 21-23-25-27-29-31 cm from cast-on edge and down mid front. Work next row from wrong side as follows: NOTE: Work some of the stitches (= 1-1-0-1-1-3 stitches) on sleeves on to needle for body, so that the transition between body and sleeves are now longer at the marker threads. Work the first 39-43-45-49-53-57 stitches, slip the next 44-52-56-60-64-64 stitches on a stitch holder (= sleeve), cast on 10-10-12-12-14-16 new stitches on needle (= in the side under sleeve), work the next 71-79-83-91-99-107 stitches (= back piece), slip the next 44-52-56-60-64-64 stitches on a stitch holder (= sleeve), cast on 10-10-12-12-14-16 new stitches on needle (= in the side under sleeve), work the remaining 39-43-45-49-53-57 stitches on needle. NOW MEASURE PIECE FROM HERE! BODY: = 169-185-197-213-233-253 stitches. Work A.5 (= 8 stitches) over the middle 8 stitches under sleeves, 4 band stitches in garter stitch in each side towards mid front and work as many repetitions lace pattern that will fit out towards each side (pattern should fit pattern on yoke!), work the remaining stitches in stocking stitch. When piece measures 4 cm, increase 1 stitch on each side of A.5 in each side - READ INCREASE TIP-1. Increase like this every 6 cm 2 times in total in all sizes = 177-193-205-221-241-261 stitches. Continue until piece measures 21 cm (adjust to finish after a lace pattern vertically + some rows in stocking stitch). Now increase 33-41-41-45-49-53 stitches evenly – read INCREASE TIP-2 = 210-234-246-266-290-314 stitches. Switch to circular needle size 4 mm. Work rib from right side as follows: 4 band stitches in garter stitch, (knit 2/purl 2) until 6 stitches remain on row, knit 2, 4 band stitches in garter stitch. When rib measures 3 cm, cast off with knit over knit and purl over purl. Make sure that the cast-off edge is not too tight. Use a larger needle size when casting off. Jacket measures approx. 48-50-52-54-56-58 cm from shoulder and down. SLEEVE: Slip the 44-52-56-60-64-64 stitches from stitch holder in one side back on a short circular needle/double pointed needles size 5 mm. Pick in addition up 1 stitch in each of the 10-10-12-12-14-16 stitches under sleeve = 54-62-68-72-78-80 stitches. Continue in the round with stocking stitch and work A.5 over the middle 8 stitches under sleeve. When piece measures 4 cm, decrease 2 stitches under sleeves - read DECREASE TIP-2. Decrease in the different sizes as follows: Size S: Decrease like this every 3 cm 5 times and every 4 cm 4 times (= 9 decreases in total). Size M: Decrease like this every 2 cm 6 times and every 3 cm 6 times (= 12 decreases in total). Size L: Decrease like this every 2 cm 14 times in total. Size XL: Decrease like this every cm 8 times and every 2 cm 8 times (= 16 decreases in total). Size XXL: Decrease like this every cm 9 times and every 2 cm 9 times (= 18 times in total). Size XXXL: Decrease like this every cm 9 times and every 2 cm 9 times (= 18 decreases in total). When all decreases on sleeve are done there are 36-38-40-40-42-44 stitches on round. Continue until sleeve measures 38-37-35-34-32-30 cm (shorter measurements in the larger sizes because of longer yoke). Now increase 8-6-8-8-10-8 stitches evenly – remember INCREASE TIP-2 = 44-44-48-48-52-52 stitches. Switch to double pointed needles size 4 mm. Work rib (knit 2/purl 2) for 4 cm. Cast off stitches with knit over knit and purl over purl. Make sure that the cast-off edge is not too tight. Use a larger needle size when casting off. Sleeve measures approx. 42-41-39-38-36-34 cm. Work the other sleeve the same way. ASSEMBLY: Sew the buttons on to left band. |
||||||||||
Diagram explanations |
||||||||||
|
||||||||||

|
||||||||||

|
||||||||||
|
||||||||||
|
||||||||||
Have you finished this pattern?Tag your pictures with #dropspattern #awakeningspringjacket or submit them to the #dropsfan gallery. Do you need help with this pattern?You'll find 24 tutorial videos, a Comments/Questions area and more by visiting the pattern on garnstudio.com. © 1982-2025 DROPS Design A/S. We reserve all rights. This document, including all its sub-sections, has copyrights. Read more about what you can do with our patterns at the bottom of each pattern on our site. |
||||||||||


With over 40 years in knitting and crochet design, DROPS Design offers one of the most extensive collections of free patterns on the internet - translated to 17 languages. As of today we count 314 catalogues and 11820 patterns translated into English (UK/cm). 11820
We work hard to bring you the best knitting and crochet have to offer, inspiration and advice as well as great quality yarns at incredible prices! Would you like to use our patterns for other than personal use? You can read what you are allowed to do in the Copyright text at the bottom of all our patterns. Happy crafting!
Post a comment to pattern DROPS 202-31
We would love to hear what you have to say about this pattern!
If you want to leave a question, please make sure you select the correct category in the form below, to speed up the answering process. Required fields are marked *.