
Popular categories
Looking for a yarn?


Comments / Questions (33)
![]() Lizandra wrote:
Lizandra wrote:
Olá. Sou brasileira e amo seus modelos. Tenho uma dúvida em relação às carreiras encurtadas. A laçada é antes ou depois do fio marcador?
25.08.2018 - 02:40DROPS Design answered:
Olá, A laçada é feita depois do fio marcador. Bom tricô!
27.08.2018 - 11:29
![]() Cathrine Gulbrandsen wrote:
Cathrine Gulbrandsen wrote:
Når man skal begynne å strikke bare natur står det: gjenta 1. Og 2. Pinne hvilke 1. Og 2. Pinne er det da snakk om?
23.08.2018 - 23:13DROPS Design answered:
Hei Cathrine, Det er pinne 1 og 2 av de 4 pinnene beskrevet i oppskriften. God fornøyelse!
24.08.2018 - 08:34
![]() MARTINE MERCIER wrote:
MARTINE MERCIER wrote:
Bonjour, j\\\'ai deux questions : 1) au niveau des rangs raccourcis couleur unie (pêche), il faut faire une fois rg 1 avec augmentation AVANT le fil de repère, rg2, rg3 et rg4, puis une fois rg1 avec augmentation APRES le fil de repère, rg2, rg3 et rg4, puis recommencer autant de fois que nécessaire? Si oui, je dois recommencer… 2) Dans la partie rayée, les rangs couleur naturel, sur la partie raccourcies forment bien 2 cotes aux extrémités (1 cote de pt mousse au milieu). Merci.
30.06.2018 - 11:00DROPS Design answered:
Bonjour Mme Mercier, le RANG 1 se fait en 3 parties: tric. d'abord sur l'end jusqu'au 1er marqueur (1 augm en début de rg), tournez et tric. le rg retour, puis tric. 1 rg sur l'end en augm. avant chaque marqueur (= comme avant sur toutes les m = 6 augm.). Le RANG 2 se fait aussi en 3 parties: 1 rang sur l'env jusqu'au 1er marqueur (1 augm en début de rg), tournez et tric. le rg retour. Tric. ensuite 1 rg sur l'envers sur toutes les m comme avant. = 8 augm. Tric. ensuite 2 rgs end sur toutes les mailles. Répétez ces 4 rgs mais augm. cette fois après les fils marqueurs. Et continuez ainsi, en augm. 1 fois avant les fils et la fois suivante après les fils marqueurs. Bon tricot!
02.07.2018 - 10:32
![]() Margret Gehring wrote:
Margret Gehring wrote:
Ich würde so gern das Tuch "Strawberry Sorbet" stricken. Leider lässt sich bei mir nur die erste Seite ausdrucken. Jedes andere Modell lässt sich problemlos komplett ausdrucken. Liebe Grüße Margret
29.05.2018 - 15:44DROPS Design answered:
Liebe Frau Gehring, wir haben dieses Modell gerade gedruckt und es hat geklappt, prüfen Sie mal die Einstellungen von Ihrem Drücker so daß alle Seiten gedrückt werden. Viel Spaß beim stricken!
29.05.2018 - 17:12Sarah wrote:
Hi, I'm a little bit confused right from the beginning. Am I supposed to start the increases right after the casting on row? Thank you for your help!!
27.05.2018 - 23:50DROPS Design answered:
Dear Sarah, that's right, you cast on 7 sts and on first row from RS (= next row after cast on edge), increase to 13 sts as explained. Happy knitting!
28.05.2018 - 09:40
![]() Ewa wrote:
Ewa wrote:
Hallo. Bei der zweiten verkürzten Reihe verschwindet bei mir der Umschlag der ersten Reihe nach der markierten Masche. Das Muster wirkt dann ja nicht mehr. Was kann ich dagegen tun? Sollen bei den verkürzten Reihen die Umschläge nach den zwei rechten Maschen als Löcher stehen oder sollte man diese verschränkt abstricken? Vielen Dank 😁
08.05.2018 - 22:28DROPS Design answered:
Liebe Ewa, die Zunahmen werden bei der 3. Reihe unter 1. VERKÜRZTE REIHE (= Hin-Reihe) (= die Reihe über alle Maschen) gestrickt. Bei der letzen Reihe unter 2. VERKÜRZTE REIHE (=Rück-Reihe) (= die Reihe über alle Maschen) werden die Zunahmen wie zuvor gestrickt. Viel Spaß beim stricken!
09.05.2018 - 08:48
![]() Polly wrote:
Polly wrote:
This is a pretty pattern, however I find it very confusing. How can I get better instructions?
06.05.2018 - 21:18DROPS Design answered:
Dera Polly, follow pattern step by step, you can ask any question here or contact the store where you bought your yarn for any further individual assistance. Happy knitting!
07.05.2018 - 09:34
![]() Margareta Ekelund wrote:
Margareta Ekelund wrote:
Undrar bara var resten av mönstren i katalog nr 190 är.
09.04.2018 - 16:30
![]() Andrea wrote:
Andrea wrote:
Hallo! Hübsch, aber wo sind denn die Häkelanleitungen aus dem Heft 190, ich würde nämlich gerne das Titelbild nacharbeiten. Ich weiß klingt ein bisschen unverschämt, wo ihr so viele tolle und kostenlose Anleitungen habt. Über eine Antwort würde ich mich sehr freuen. LG Andrea
08.04.2018 - 16:13DROPS Design answered:
Liebe Andrea, alle Anleitungen der Summer Kollektion sind noch nicht hochgeladen, dh neue Anleitungen kommen noch :)
09.04.2018 - 10:35
![]() Heike wrote:
Heike wrote:
Hallo, wie wird der Markierungsfaden denn mitgeführt? Das ist mir nicht klar. Oder kann man auch Maschenmarkierer zwischen den Maschen nutzen?
24.03.2018 - 17:21DROPS Design answered:
Liebe Heike, ja Sie können auch einen Maschenmarkierer benutzen, das bleibe Ihnen überlassen. Ein Markierungsfaden ist die einfachste Methode - einfach ein Stückchen kontrastfarbenen Faden nehmen, zwischen die Maschen hängen und nach jeder gestrickten Reihe um eine Reihe nach oben versetzen.
02.04.2018 - 10:00
|
||||||||||||||||
Strawberry Sorbet#strawberrysorbetshawl |
||||||||||||||||
 |
 |
|||||||||||||||
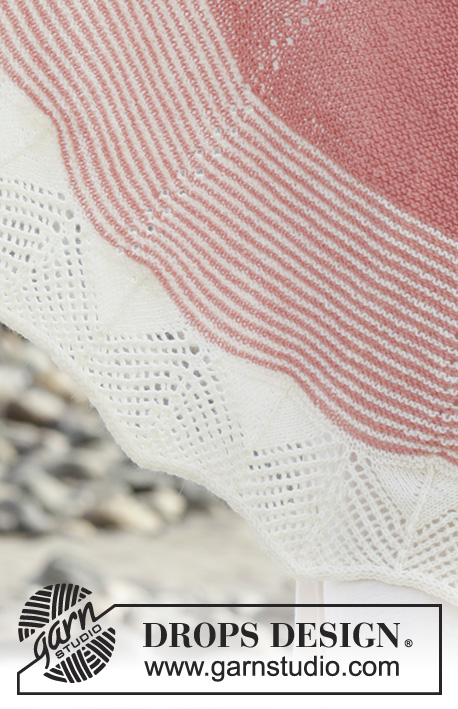
Knitted shawl with garter stitch, lace pattern and semi-circle shape. The piece is worked top down in DROPS Flora.
DROPS 190-15 |
||||||||||||||||
|
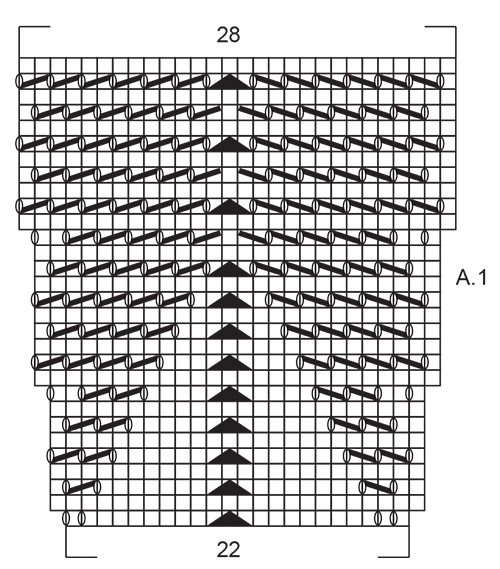
INFORMATION FOR THE PATTERN: RIDGE/GARTER STITCH (worked back and forth): 1 ridge = Knit 2 rows. PATTERN: See diagram A.1. The diagram shows all the rows in the pattern seen from the right side. ---------------------------------------------------------- SHAWL: The shawl is worked top down. Work back and forth on circular needle so that you have room for all the stitches. Cast on 7 stitches with circular needle size 4.5 mm and peach pink. Work as follows from the right side: Knit 1 stitch, * 1 yarn over, knit1 stitch *, repeat from *-* a total of 6 times = 13 stitches. Knit 1 row from the wrong side. Now insert 6 marker threads in the piece without working the stitches, the marker threads are inserted in the stitches and follow your work upwards. Insert the marker threads in the following stitches: Stitch 2, stitch 4, stitch 6, stitch 8, stitch 10 and stitch 12. Then work and increase as follows: Knit 1 row and increase by making a yarn over before each stitch with a marker thread = 6 yarn overs. NOTE! All yarn overs are then knitted to leave holes. Knit 1 row from the wrong side, knit 1 row from the right side (without increasing) and knit 1 row from the wrong side = 19 stitches. Knit 1 row and increase by making a yarn over after each stitch with a marker thread = 6 yarn overs. Knit 1 row from the wrong side, knit 1 row from the right side (without increasing) and knit 1 row from the wrong side = 25 stitches. Knit 1 row and increase by making a yarn over before each stitch with a marker thread = 6 yarn overs. Knit 1 row from the wrong side, knit 1 row from the right side (without increasing) and knit 1 row from the wrong side = 31 stitches. Knit 1 row and increase by making a yarn over after each stitch with a marker thread = 6 yarn overs. Knit 1 row from the wrong side, knit 1 row from the right side (without increasing) and knit 1 row from the wrong side = 37 stitches. Continue with the same increases, but in addition, you will work short rows. Work as follows: ROW 1 with short row (= right side): Knit 2 stitches, 1 yarn over and knit to first stitch with a marker thread on this row, turn and knit back from the wrong side. Then knit 1 row from the right side where you increase before/after the marker thread stitches. ROW 2 with short row (= wrong side): Knit 2 stitches, 1 yarn over and knit to first stitch with a marker thread on this row, turn and knit back from the right side. Then knit 1 row from the wrong side = a total of 8 stitches increased on rows 1-2. ROW 3 (= right side): Knit. ROW 4 (= wrong side): Knit. Continue by repeating rows 1-4 (increase alternately before and after the marker thread stitches as before) until the piece measures approx. 35 cm (rows 1-4 have been worked a total of 30 times) and there are 277 stitches on the needle. Now work stripes with off white and peach pink as follows: * Change to off white and work rows 1 and 2 (with short rows). Change to peach pink and work rows 3 and 4 *. Repeat from *-* until the piece measures approx. 51 cm (rows 1-4 are worked with stripes a total of 16 times) and there are 405 stitches on the needle. From here, work with off white to finished length. Repeat rows 1-2 one more time = 413 stitches on needle. Work 1 RIDGE - see description above, and increase 10 stitches evenly on the first row of these ridges as follows: Knit 22 stitches, * 1 yarn over, knit 41 stitches *, repeat from *-* a total of 9 times and make 1 yarn over and knit 22 stitches. Knit 1 row where all yarn overs are knitted twisted = 423 stitches (the number of stitches is divisible by 22 + 5 stitches). Now continue working according to diagram A.1 with off white and stocking stitch. (Row 1 = right side): Work 2 edge stitches in garter stitch, work A.1 over the next 418 stitches (= 19 times in width and there are 3 stitches left on the row), work 1 stitch stocking stitch and 2 edge stitches in garter stitch. Work the diagram like this 1 time in height. The piece measures approx. 63 cm and there are 537 stitches on the needle. CASTING OFF: On the next row from the right side, you will cast off with i-cord casting off. It is important that the edge is cast off loosely so that the shawl has a nice shape and hangs neatly. You can use a larger needle size to cast off if necessary and make sure that all stitches are loose. Work and cast off as follows: * Knit 2 stitches, the next 2 stitches are knitted twisted together. Push the 3 stitches from the right needle back onto the left needle (in the same order) *, repeat from *-* until all stitches on the left needle have been cast off and there are 3 stitches left on the right needle. Push the stitches onto the left needle and cast them off with knit. Cut the strand and sew together the cast-off from the last 3 stitches so that the end of the shawl is neat. Fasten all loose strands. |
||||||||||||||||
Diagram explanations |
||||||||||||||||
|
||||||||||||||||
|
||||||||||||||||
Have you finished this pattern?Tag your pictures with #dropspattern #strawberrysorbetshawl or submit them to the #dropsfan gallery. Do you need help with this pattern?You'll find 22 tutorial videos, a Comments/Questions area and more by visiting the pattern on garnstudio.com. © 1982-2025 DROPS Design A/S. We reserve all rights. This document, including all its sub-sections, has copyrights. Read more about what you can do with our patterns at the bottom of each pattern on our site. |
||||||||||||||||


With over 40 years in knitting and crochet design, DROPS Design offers one of the most extensive collections of free patterns on the internet - translated to 17 languages. As of today we count 314 catalogues and 11820 patterns translated into English (UK/cm). 11820
We work hard to bring you the best knitting and crochet have to offer, inspiration and advice as well as great quality yarns at incredible prices! Would you like to use our patterns for other than personal use? You can read what you are allowed to do in the Copyright text at the bottom of all our patterns. Happy crafting!
Post a comment to pattern DROPS 190-15
We would love to hear what you have to say about this pattern!
If you want to leave a question, please make sure you select the correct category in the form below, to speed up the answering process. Required fields are marked *.