
Popular categories
Looking for a yarn?


Comments / Questions (16)
![]() Nuala Brummitt wrote:
Nuala Brummitt wrote:
As the last short row for the back of neck elevation, is a purl row, how do you get back to knit rows, or 'stocking stitch' on circular needles?
24.01.2018 - 21:47DROPS Design answered:
Dear Mrs Brummitt, when you have worked the last short ro from RS, turn and P all sts to the end of row (= to mid back again). Turn and continue now from RS. Happy knitting!
25.01.2018 - 08:18
![]() Ramona Schmitt wrote:
Ramona Schmitt wrote:
Ich denke, Monika Westmeyer hat Recht, so wie es hier beschrieben ist, wird die Erhöhung schief. Man muss noch einmal wenden und 66 Maschen stricken, bevor man zur Mitte zurückkehrt. So hat man auf beiden Seiten der Mitte jeweils erst 11, dann 22 und dann 33 Maschen gestrickt.
14.01.2018 - 21:20
![]() Josephine Hillmann wrote:
Josephine Hillmann wrote:
Hallo, da ich sehr empfindlich bin, bevorzuge ich Baumwolle. Kann ich diesen Pulli auch mit der DROPS Paris stricken? Bzw. gibt es eine andere Alternative als Garn? Vielen Dank
11.01.2018 - 14:37DROPS Design answered:
Liebe Frau Hillmann, gerne können Sie Paris auch als Alternativgarn stricken, beide Garne sind selben Garngruppe (= C) oder auch mit 2 Fäden Garngruppe A. Hier lessen Sie mehr über Garnalternativen. Sollten Sie Hilfe brauchen, um den gewünschten Farben zu wählen, hilft Ihnen gerne Ihr DROPS Laden mit, auch telefonisch oder per Mail. Viel Spaß beim stricken!
11.01.2018 - 15:04
![]() Marit Solvang wrote:
Marit Solvang wrote:
Vi får ikke denne oppskrifta til å stemme. Halskant (L): har lagt opp 82 masker, skal videre øke 2 masker 11 ganger=22 masker, videre øke 4 masker 11 ganger=44 masker, til slutt øke 2 masker. Alt dette skal i følge oppskrifta bli 112 masker. Hvordan er dette mulig? Skal all øking skje i en omgang ? Håper på snarlig svar, Marit S
22.11.2017 - 17:16DROPS Design answered:
Hei Marit. Når du har lagt opp 82 masker (str L) og strikket 2 riller, bytter du til rundpinne 5 og strikker slik: 15 masker glattstrikk samtidig som det økes med 2 masker (= 17 masker), så strikker du 1 kast, 1 rett totalt 11 ganger (= 22 masker), strikk 30 masker samtidig som det økes med 4 masker (= 34 masker), så strikker du 1 kast, 1 rett totalt 11 ganger (= 22 masker), deretter strikker du 15 masker glattstrikk samtidig som det økes med 2 masker (= 17 masker). Da har du 17+22+34+22+17 = 112 masker. God Fornøyelse!
27.11.2017 - 08:41
![]() Monika Westmeyer wrote:
Monika Westmeyer wrote:
Hallo, die Erhöhung am Rückenteil ist bei diesem Modell meiner Meinung nach nicht richtig beschrieben. So wie es erklärt ist, wird es schief. Kann das sein? Lieben Gruß Monika
16.11.2017 - 18:26DROPS Design answered:
Liebe Frau Westmeyer, das Video unten zeigt wie man eine solche Erhöhung strickt. Viel Spaß beim stricken!
17.11.2017 - 09:02
![]() Jeanne wrote:
Jeanne wrote:
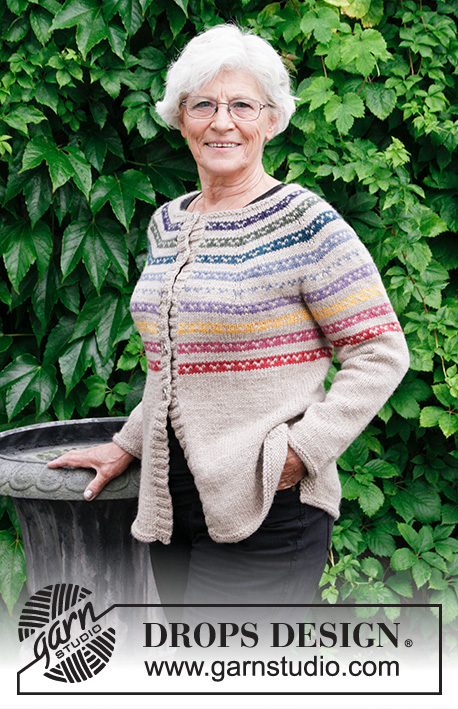
Bravo pour votre choix de mannequin plus âgé. Je m'identifie beaucoup plus à cette dame qu'à la jeune fille tellement menue et sans formes. Du coup je me rends compte que ce pull et le gilet assorti me plaisent énormément et me font très envie.
14.11.2017 - 16:49
|
|||||||||||||||||||||||||||||||
Rainbow Hugs#rainbowhugssweater |
|||||||||||||||||||||||||||||||
 |
 |
||||||||||||||||||||||||||||||
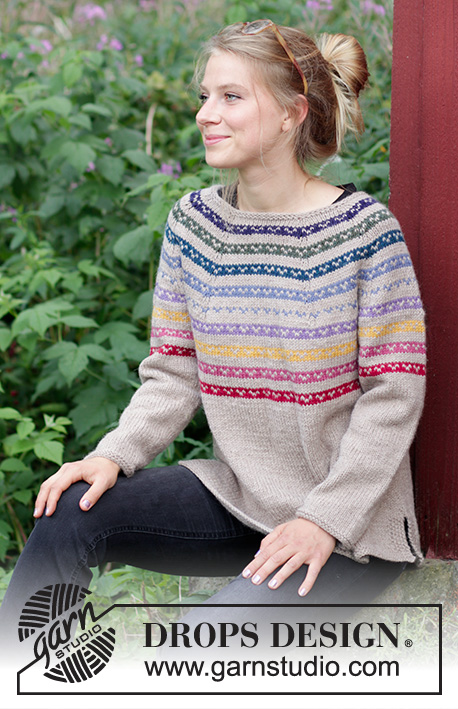
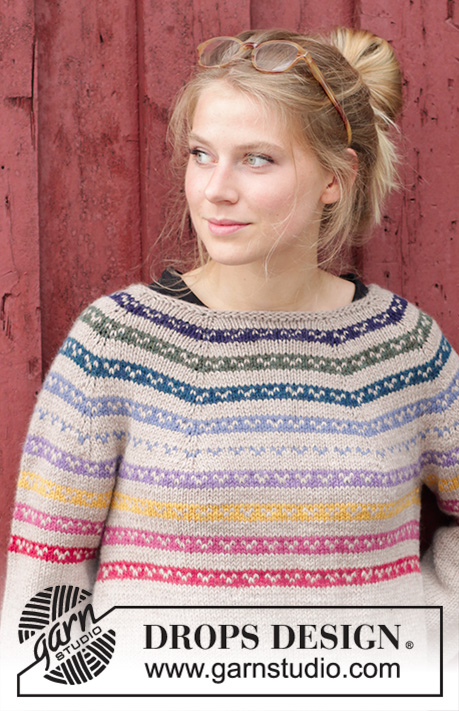
Knitted jumper with Nordic Fana pattern, round yoke, stripes, worked top down with split in sides. Sizes S - XXXL. The piece is worked in DROPS Nepal.
DROPS 183-25 |
|||||||||||||||||||||||||||||||
|
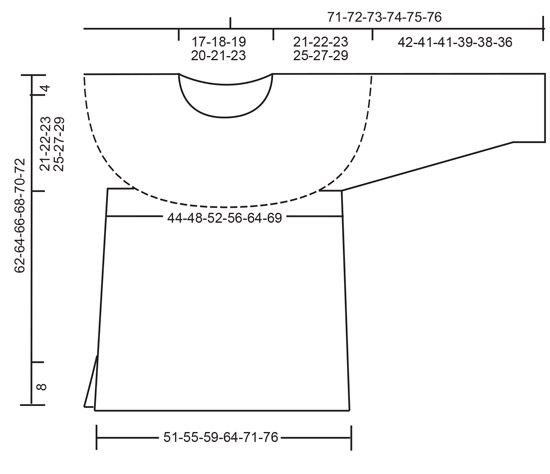
INFORMATION FOR THE PATTERN: RIDGE/GARTER STITCH (worked back and forth - for the front and back pieces): 1 ridge = Knit 2 rows. RIDGE/GARTER STITCH (worked in the round – for yoke and sleeves): 1 ridge = 2 rounds. Knit 1 round and purl 1 round. MOSS STITCH: ROW 1: * Knit 1, purl 1 *, work from *-*. ROW 2: Knit over purl and purl over knit. Repeat row 2. PATTERN: See diagram A.1. The whole pattern is worked in stocking stitch. ROUND YOKE: Increase on yoke on each side of the stitches with markers (= 16 increased stitches per row – see arrows in A.1) as follows: Make 1 yarn over on each side of stitch with marker. On next row purl yarn overs twisted to avoid holes. INCREASE TIP (for body): Work until there are 2 stitches left before marker thread, make 1 yarn over (= 1 stitch increased), knit 4 stitches (marker thread sits in middle of these 4 stitches), make 1 yarn over (= 1 stitch increased). Increase in this way at both marker threads (= a total of 4 stitches increased). Knit the yarn overs twisted on next row to avoid holes. DECREASE TIP (for sleeves): Decrease 1 stitch on each side of marker thread as follows: Work until there are 3 stitches left before marker thread, slip 1 stitch as if to knit, knit 1, pass slipped stitch over, knit 2 (marker thread sits in middle of these 2 stitches), knit the next 2 stitches together. The stitches which do not fit into the pattern are worked in background colour. ---------------------------------------------------------- JUMPER: The piece is worked in the round with circular needle from mid back, top down. You can work an elevation in back of neck for a better fit, so that the neck is a little higher at back. You can skip this elevation if you wish; the neck will then be the same front and back – see description of elevation further down in text. After the yoke, the body is worked in the round with circular needle. The sleeves are worked in the round with double pointed needles, top down. NECKLINE: Cast on 74-78-82-86-90-96 stitches with circular needle size 4 mm and beige. Work 2 RIDGES – see description above. Change to circular needle size 5 mm. Work as follows from mid back: Work 13-14-15-16-17-18 stitches stocking stitch and increase 0-2-2-2-3-5 stitches evenly over these stitches, * 1 yarn over, knit 1 *, work from *-* a total of 11 times, 26-28-30-32-34-37 stitches stocking stitch and increase 0-4-4-4-6-9 stitches evenly over these stitches, * 1 yarn over, knit 1 *, work from *-* a total of 11 times, 13-14-15-16-17-19 stitches stocking stitch and increase 0-2-2-2-3-4 stitches evenly = 96-108-112-116-124-136 stitches. Work the yarn overs twisted, there should be no holes. Now you can work an elevation in back of neck or go straight to yoke if you do not want an elevation. ELEVATION IN BACK OF NECK: Skip this section if you do not want an elevation. Insert 1 marker at the beginning of round (= mid back). Start from the right side with beige and knit until you have reached 11-11-12-13-13-14 stitches past the marker, turn, tighten strand and purl 22-22-24-26-26-28 stitches. Turn, tighten strand and knit 33-33-36-39-39-42 stitches, turn, tighten strand and purl 44-44-48-52-52-56 stitches. Turn, tighten strand and knit 55-55-60-65-65-70 stitches, turn, tighten strand and purl 66-66-72-78-78-84 stitches. Turn, tighten strand and knit to mid back. YOKE: Insert 8 marker threads in the piece as follows: Work 5-7-6-8-9-8 stitches stocking stitch, insert 1 marker in next stitch, * 11-12-13-13-14-16 stitches stocking stitch, insert 1 marker in next stitch *, work from *-* a total of 7 times, finish with 6-9-7-9-9-8 stitches stocking stitch. On the next round work A.1 (= 24-27-28-29-31-34 repeats of 4 stitches) AT THE SAME TIME as you increase 1 stitch on each side of each marker – read ROUND YOKE, on the rounds marked with an arrow in A.1. REMEMBER THE KNITTING TENSION! Increase a total of 9-10-11-12-13-14 times (when you have increased this number of times, you no longer increase on the rounds marked with arrows in the diagram) = 240-268-288-308-332-360 stitches. Continue with pattern without increases until the piece measures 21-22-23-25-27-29 cm from the cast-on edge mid front. The next round is worked as follows – adjust so that it is a round worked with beige: Work 34-38-40-44-49-54 stitches (= half back piece), place the next 52-58-64-66-68-72 stitches on 1 thread (= sleeve), cast on 6-6-8-8-10-10 new stitches on needle (= under sleeve), work 68-76-80-88-98-108 stitches (= front piece), place the next 52-58-64-66-68-72 stitches on 1 thread (= sleeve), cast on 6-6-8-8-10-10 new stitches on needle (= under sleeve) and work the remaining 34-38-40-44-49-54 stitches (= half back piece). BODY: = 148-164-176-192-216-236 stitches. Insert 1 marker in piece, THE PIECE IS NOW MEASURED FROM HERE! Insert 1 marker thread in each side, in the middle of the new 6-6-8-8-10-10 stitches that where cast on. Let the marker thread follow piece from now on. Continue with A.1. When A.1 has been completed in height, continue working with beige. When the piece measures 3 cm from where sleeves were placed on 1 thread, increase 1 stitch on each side of each marker thread (= 4 stitches increased) – read INCREASE TIP! Increase in this way every 5 cm a total of 6 times = 172-188-200-216-240-260 stitches. When the piece measures 29-30-31-31-31-31 cm from where the piece was separated, divide the piece at the marker threads and front and back pieces are finished separately (= 8 cm split). BACK PIECE: = 86-94-100-108-120-130 stitches. The piece is continued back and forth. Work stocking stitch with 5 stitches MOSS STITCH – see description above, in each side of piece. When piece measures 36-37-38-38-38-38 cm from the marker, change to circular needle size 4 mm and work 2 ridges – see description above, over all stitches. Then cast off with circular needle size 5 mm (this is so the cast-off edge will not be tight). The piece measures a total of approx. 62-64-66-68-70-72 cm measured from the shoulder. FRONT PIECE: Work as for back piece. SLEEVE: The piece is worked in the round with double pointed needles. Place the 52-58-64-66-68-72 stitches from the thread in one side of the piece on double pointed needles size 5 mm and, in addition, knit up 1 stitch in each of the 6-6-8-8-10-10 new stitches cast on under sleeve = 58-64-72-74-78-82 stitches. THE PIECE IS NOW MEASURED FROM HERE! Insert a marker thread in the middle of the new stitches. Continue with stocking stitch and A.1. When A.1 has been completed in height, continue with beige. When the piece measures 3 cm decrease 2 stitches mid under sleeve – read DECREASE TIP. Decrease in this way every 3-3-2-2-1½-1½ cm a total of 10-12-16-16-17-18 times = 38-40-40-42-44-46 stitches. When piece measures 41-40-40-38-37-35 cm, change to double pointed needles size 4 mm and work 2 RIDGES – see description above, over all stitches. Cast off with double pointed needles size 5 mm (this is so the cast-off edge will not be tight). The sleeve measures approx. 42-41-41-39-38-36 cm from where it was separated from body. Work the other sleeve in the same way. |
|||||||||||||||||||||||||||||||
Diagram explanations |
|||||||||||||||||||||||||||||||
|
|||||||||||||||||||||||||||||||

|
|||||||||||||||||||||||||||||||
|
|||||||||||||||||||||||||||||||
Have you finished this pattern?Tag your pictures with #dropspattern #rainbowhugssweater or submit them to the #dropsfan gallery. Do you need help with this pattern?You'll find 36 tutorial videos, a Comments/Questions area and more by visiting the pattern on garnstudio.com. © 1982-2025 DROPS Design A/S. We reserve all rights. This document, including all its sub-sections, has copyrights. Read more about what you can do with our patterns at the bottom of each pattern on our site. |
|||||||||||||||||||||||||||||||


With over 40 years in knitting and crochet design, DROPS Design offers one of the most extensive collections of free patterns on the internet - translated to 17 languages. As of today we count 314 catalogues and 11820 patterns translated into English (UK/cm). 11820
We work hard to bring you the best knitting and crochet have to offer, inspiration and advice as well as great quality yarns at incredible prices! Would you like to use our patterns for other than personal use? You can read what you are allowed to do in the Copyright text at the bottom of all our patterns. Happy crafting!
Post a comment to pattern DROPS 183-25
We would love to hear what you have to say about this pattern!
If you want to leave a question, please make sure you select the correct category in the form below, to speed up the answering process. Required fields are marked *.