
Popular categories
Looking for a yarn?


Comments / Questions (42)
![]() Karin Lundh wrote:
Karin Lundh wrote:
Jag kan inte skriva ut mönstret
07.12.2020 - 18:47DROPS Design answered:
Hej Karin. Om du trycker på knappen "Skriv ut" och väljer mönster så ska du kunna skriva ut det. Om det inte fungerar får du ev. se över dina skrivare-inställningar. Mvh DROPS Design
08.12.2020 - 07:07
![]() Sharon wrote:
Sharon wrote:
I can see now that you knit the band stitches in the green too. This is not clear in the pattern. I went ahead and carried the white across. I think it looks much nicer if you keep it white where the pattern is and only change to green when you have finished the yoke.
27.01.2020 - 02:19
![]() Sharon wrote:
Sharon wrote:
When knitting the all green rows of the pattern. Do you carry the white across the back catching every 5 sts or do you add another ball of the white to do the band on the other side?
26.01.2020 - 09:59DROPS Design answered:
Dear Sharon, if you just work in green, let the white yarn and get it on next round, if you work with both colours, carry the yarn - see our both videos for US/UK method and continental method. Happy knitting!
27.01.2020 - 09:04
![]() Sharon wrote:
Sharon wrote:
I purchased the Drops Flora to knit this pattern and am struggling to get gauge. If I use 3mm needles, I get 33 sts per 10cm. If I use 3.75mm, I get 28 sts and not the best fabric. What brand of needle is used for the suggested gauge? Are metal or wooden needles best with the Flora?
11.01.2020 - 07:30DROPS Design answered:
Dear Sharon, the knitting tension is very individual, you have to adjust the needle size (and eventually the needles materials), but remember also to watch and block your swatch, then measure your swatch again and check if you need to use larger needle, then work a new swatch and repeat the process until you get correct gauge blocked. Your DROPS store will have also even more tipps for you even per mail or telephone. Happy knitting!
13.01.2020 - 08:43
![]() MarjoB-W wrote:
MarjoB-W wrote:
Ik wil graag een foto sturen van het vest wat ik met dit patroon gebreid heb. Hoe doe ik dat?
06.10.2019 - 15:09
![]() Luzia wrote:
Luzia wrote:
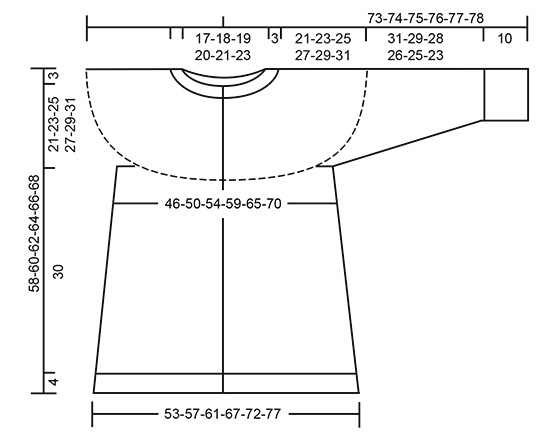
Oh thank you for your quick reply to my question, but I meant to ask about the measurements for sizes so I can pick my size to start knitting it, sorry I wasn't more clear in my first question.
05.08.2019 - 18:59DROPS Design answered:
Dear Luzia, the drawing at the bottom of the page shows the final measurement expressed in cm, so you can choose your size. Happy crafting!
05.08.2019 - 19:02
![]() Luzia wrote:
Luzia wrote:
Hello! What are the Finished Measurements on this piece? Thanks!
05.08.2019 - 15:07DROPS Design answered:
Dear Luzia, for the finished measurements, please see the schematics drawing below the pattern, at the bottom od the page. Happy Knitting!
05.08.2019 - 16:11
![]() Lisbeth Vindstad wrote:
Lisbeth Vindstad wrote:
Hei. Diagram A.1A, omgang 3: skal jeg lage et kast etter hver 6 maske, og så øke 1 maske etter hver 6 maske på omgang 4?
17.06.2019 - 23:47DROPS Design answered:
Hei Lisbeth. Når du lager kast er dette en økning. Omgang 3 strikkes fra retten (diagrammet leses da fra høyre mot venstre), så du begynner med å lage 1 kast, så strikker du 6 masker. Du øker altså 1 maske i hver rapport av A.1A på omgang 3. På omgang 4 (=vrangen) er det ingen økinger, alle masker strikkes vrang fra vrangen med natur. På omgang 5 (= retten) strikkes 7 masker, og så lages 1 kast om pinnen (= 1 maske økt). God fornøyelse
18.06.2019 - 07:36
![]() Kathy wrote:
Kathy wrote:
How do you carry the yarn across the garter stitch band
16.05.2019 - 15:49DROPS Design answered:
Dear Kathy, the garter stitch band stitches are worked with the background colour, just carry the secondary colour on next row from previous row. Happy knitting!
16.05.2019 - 16:03
![]() Margit Larsen wrote:
Margit Larsen wrote:
Jeg har strikket rigtig mange trøjer og bluser fra drops men denne trøje har jeg problemer. Jeg er startet på A3A men 3. og 4. Udtagning kan jeg ikke få maskerne til at passe med mønster. Hvad gør jeg.
10.03.2019 - 16:26DROPS Design answered:
Hej Margit, Hvis det er de største størrelser du strikker så får du efter 3.udtagning 4 hvide imellem de grønne 3 gange, men sidste gang i diagrammet får du kun 3 hvide. God fornøjelse!
12.03.2019 - 14:16
|
|||||||||||||||||||
Perles du Nord Jacket#perlesdunordjacket |
|||||||||||||||||||
 |
 |
||||||||||||||||||
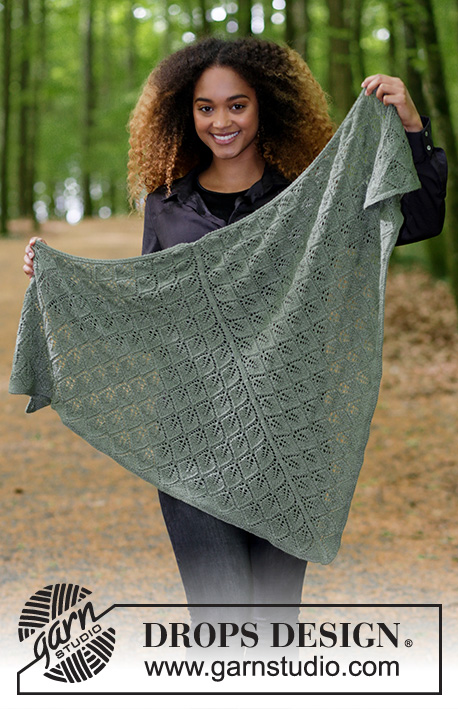
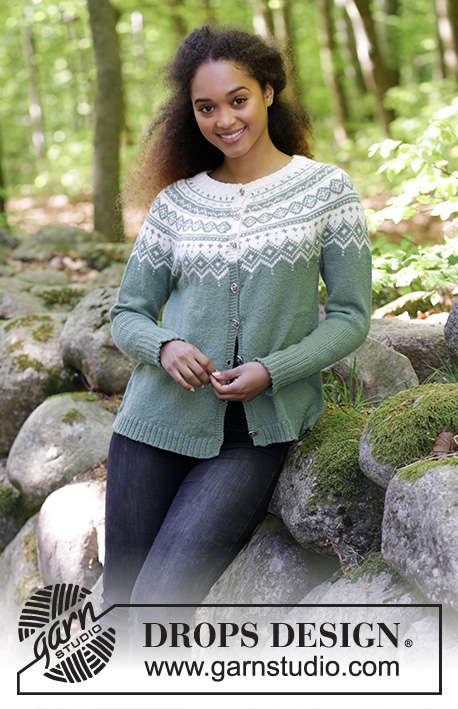
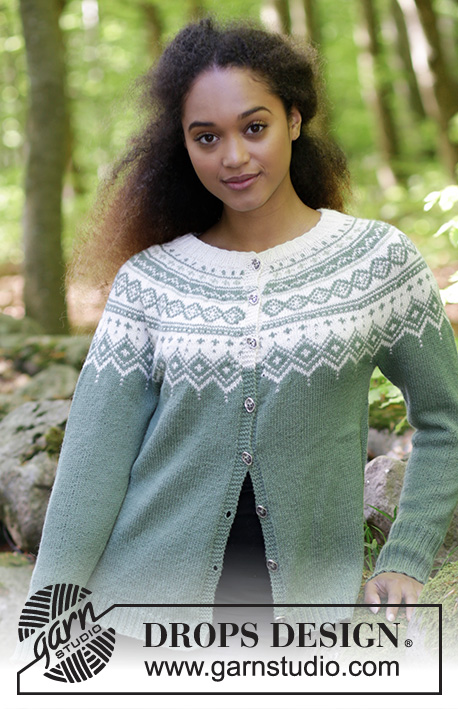
Knitted jacket with round yoke, multi-coloured Norwegian pattern and A-shape, worked top down. Sizes S - XXXL. The piece is worked in DROPS Flora.
DROPS 180-4 |
|||||||||||||||||||
|
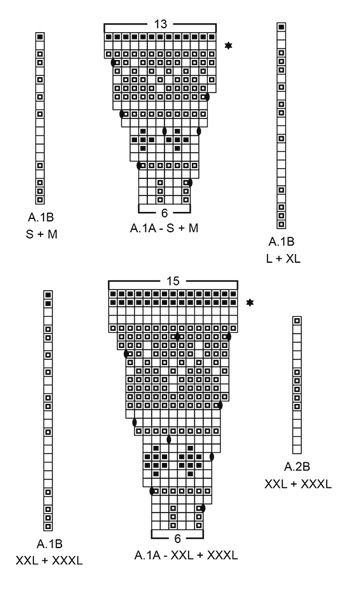
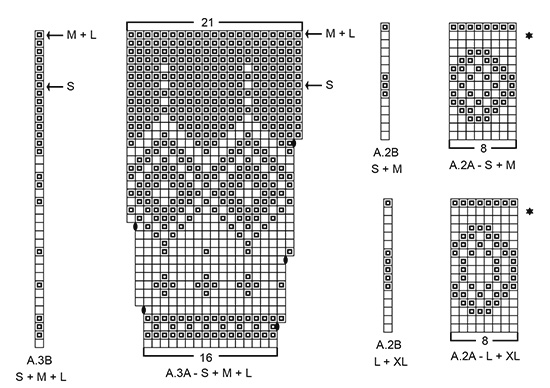
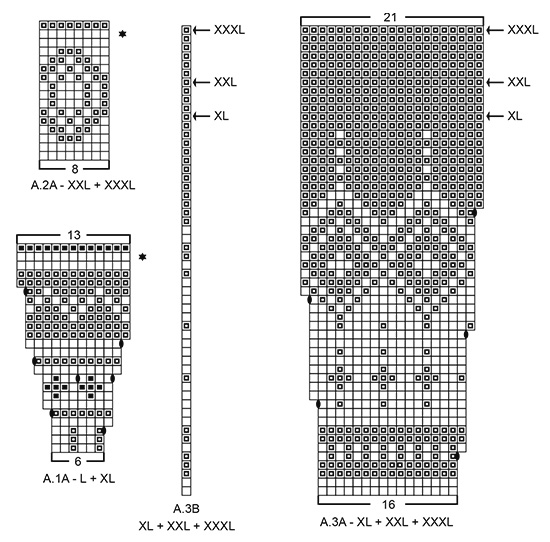
INFORMATION FOR THE PATTERN: RIDGE/GARTER STITCH (worked back and forth): 1 ridge = Knit 2 rows. DECREASE/INCREASE TIP: To work out how to decrease/increase evenly, count the total number of stitches on the needle (e.g. 132 stitches) minus the bands (e.g. 10 stitches) and divide by the number of decreases/increases to be made (e.g. 19) = 6.4. In this example, decrease by knitting alternately every 5th and 6th stitch and every 6th and 7th stitch together. Do not decrease over the bands. If you are increasing, do this after alternately every 6th and 7th stitch (increase 1 stitch by making 1 yarn over, on the next round, knit the yarn overs twisted and into the pattern so that there are no holes). ELEVATION: Insert 1 marker mid back. Start from the right side with off white and knit until you have worked 10-10-11-12-12-13 stitches past the marker, turn, tighten the strand and purl 20-20-22-24-24-26 stitches. Turn, tighten the strand and knit 30-30-33-36-36-39 stitches, turn, tighten the strand and purl 40-40-44-48-48-52 stitches. Turn, tighten the strand and knit 50-50-55-60-60-65 stitches, turn, tighten the strand and purl 60-60-66-72-72-78 stitches. Turn, tighten the strand and knit 70-70-77-84-84-91 stitches, turn, tighten the strand and purl to end of row (the band is knitted). PATTERN: See diagrams A.1 to A.3. Choose diagram for your size. The diagrams show all the rows in the pattern seen from the right side. The whole pattern is worked in stocking stitch. KNITTING TIP-1 (for the bands): When working the pattern edge with two colours on the yoke, work the background colour in the pattern also over the 5 band stitches in each side. KNITTING TIP-2: To prevent the knitting tension from becoming tighter when working pattern, it is important that the strands do not tighten at the back of the piece. You can increase the size of your needle when working pattern if you find you are working too tightly. INCREASE TIP (for the sides on body): All increases are from the right side! Start 2 stitches before the marker thread, make 1 yarn over, knit 4 (marker thread sits in the middle of these 4 stitches), make 1 yarn over (= 2 stitches increased). On the next row (wrong side) purl the yarn overs twisted to prevent holes. DECREASE TIP (for mid under sleeve): Work until there are 4 stitches left before the marker thread, knit 2 together, knit 4 (the marker thread sits in the middle of these 4 stitches), slip 1 stitch as if to knit, knit 1, pass the slipped stitch over the knitted stitch (= 2 stitches decreased). BUTTONHOLES: Decrease for buttonholes on the right band (when garment is worn): Knit from the right side until there are 3 stitches left at the end of the row, make 1 yarn over, knit the next 2 stitches together and knit the final stitch. On the next row knit the yarn over to make a hole. The first buttonhole is worked when the band at the neck measures approx. 1½-2 cm. Then work the next 7 buttonholes with approx. 7½-8-8-8½-8½-9 cm between each. ---------------------------------------------------------- JACKET: The piece is worked back and forth with circular needle from mid front and is worked top down. The sleeves are worked in the round with short circular needle, top down, change to double pointed needles when you have decreased enough stitches. NECKLINE: Cast on 132-136-140-144-152-160 stitches (including 5 band stitches in each side towards mid front) with circular needle size 2.5 mm and off white. Purl 1 row (= wrong side). The next row is worked as follows from the right side: Work 5 band stitches in GARTER STITCH – see description above, * knit 2, purl 2 *, repeat from *-* until there are 7 stitches left on the needle, knit 2 and finish with 5 band stitches in garter stitch. Continue the rib in this way – remember BUTTONHOLES on right band – see description above. When the rib measures 3 cm knit 1 row from the right side where you decrease 19-17-15-13-15-17 stitches evenly on row – read DECREASE/INCREASE TIP = 113-119-125-131-137-143 stitches. Continue by working the yoke as described below. YOKE: Change to circular needle size 3 mm. Purl 1 row from wrong side with 5 band stitches in each side. For a better fit, you can now work an ELEVATION at the back of the neck – see description above. When you have completed the elevation, work the next row as follows from the right side: 5 band stitches in garter stitch, work A.1A until there are 6 stitches left on the needle (= 17-18-19-20-21-22 repeats of 6 stitches), work A.1B (= 1 stitch) and finish with 5 band stitches in garter stitch. Continue the pattern in this way and increase as shown in the diagram. Read KNITTING TIP-1 and KNITTING TIP-2. REMEMBER THE KNITTING TENSION! On the row marked with a star in A.1 (i.e. the last row from the right side in A.1) there are 232-245-258-271-326-341 stitches on the needle, increase at the same time 11-22-33-36-21-22 stitches evenly on row – read DECREASE/INCREASE TIP = 243-267-291-307-347-363 stitches. When A.1 has been completed, work the next row from the right side as follows: 5 band stitches in garter stitch, work A.2A until there are 6 stitches left on the needle (= 29-32-35-37-42-44 repeats of 8 stitches), work A.2B (= 1 stitch) and finish with 5 band stitches in garter stitch. Continue the pattern in this way, but on the row marked with a star in A.2 (i.e. the last row from the right side in A.2) increase 8-16-24-24-16-16 stitches evenly on row = 251-283-315-331-363-379 stitches. When A.2 has been completed, work the next row as follows from the right side: 5 band stitches in garter stitch, work A.3A until there are 6 stitches left on the row (= 15-17-19-20-22-23 repeats of 16 stitches), work A.3B (= 1 stitch) and finish with 5 band stitches in garter stitch. Continue the pattern in this way and increase as shown in the diagram. When the last row in A.3 remains (marked with an arrow in each size) there are 326-368-410-431-473-494 stitches on the needle, increase at the same time 11-11-1-11-0-5 stitches evenly on the last row from the wrong side = 337-379-411-442-473-499 stitches. The piece now measures approx. 24-26-28-30-32-34 cm from the cast-on edge measured mid front. NOTE: If the piece is shorter than this, continue working stocking stitch with green and 5 band stitches in garter stitch in each side to required length. The next row is worked as follows from the right side with green: Knit 55-60-64-70-76-81 stitches (= front piece), place the next 64-75-83-86-90-93 stitches on a thread for the sleeve, cast on 10-10-12-12-14-16 new stitches on the needle (= in the side under the sleeve), knit 99-109-117-130-141-151 stitches (= back piece), place the next 64-75-83-86-90-93 stitches on a thread for the sleeve, cast on 10-10-12-12-14-16 new stitches on the needle (= in the side under the sleeve) and knit the remaining 55-60-64-70-76-81 stitches (= front piece). The body and sleeves are now finished separately. THE PIECE IS MEASURED FROM HERE! BODY: = 229-249-269-294-321-345 stitches. Insert 1 marker thread 60-65-70-76-83-89 stitches in from each side = 109-119-129-142-155-167 stitches between marker threads on the back piece. Continue with green and work stocking stitch back and forth with 5 band stitches in each side towards mid front. When the piece measures 2 cm from the division increase 1 stitch on each side of both marker threads – read INCREASE TIP (= 4 stitches increased). Increase in this way every 10th row (approx. every 3 cm) to finished length (if the knitting tension is correct in height, there should be approx. 9 increase rows in each side). When the piece measures 30 cm from the division in all sizes, there are 265-285-305-330-357-381 stitches on the needle. Purl 1 row from wrong side where you increase 83-87-95-106-115-123 stitches evenly on row – read DECREASE/INCREASE TIP = 348-372-400-436-472-504 stitches. Change to circular needle size 2.5 mm and work the next row from the right side as follows: Work 5 band stitches in garter stitch, * knit 2, purl 2 *, repeat from *-* until there are 7 stitches left on the needle, knit 2 and finish with 5 band stitches in garter stitch. Continue rib in this way for 4 cm. Then cast off with garter stitch over garter stitch, knit over knit and purl over purl, but to prevent the cast-off edge being tight, you can make 1 yarn over after every 4th stitch AT THE SAME TIME as you cast off (the yarn overs are cast off as normal stitches). The jacket measures approx. 58-60-62-64-66-68 cm from the shoulder down. SLEEVE: Place the 64-75-83-86-90-93 stitches from the thread on the one side of the piece on a short circular needle size 3 mm and in addition, knit up 1 stitch in each of the 10-10-12-12-14-16 stitches cast on under the sleeve = 74-85-95-98-104-109 stitches on the needle. Insert 1 marker thread in the middle of the 10-10-12-12-14-16 stitches under the sleeve. Start the round here and work stocking stitch in the round with green. When the sleeve measures 2 cm from the division decrease 2 stitches mid under the sleeve – read DECREASE TIP. Decrease in this way a total of 11-15-19-19-21-22 times in S: Every 9th round, in M: Every 6th round, in L and XL: Every 4th round, in XXL: Alternately every 3rd and 4th round and in XXXL: Every 3rd round = 52-55-57-60-62-65 stitches. When the sleeve measures 31-29-28-26-25-23 cm from the division (shorter measurements in the larger sizes due to longer yoke), knit 1 round where you increase 16-17-19-20-18-19 stitches evenly = 68-72-76-80-80-84 stitches. Change to double pointed needles size 2.5 mm and work rib in the round (= knit 2 / purl 2). When the rib measures 10 cm (or the desired length) cast off with knit over knit and purl over purl, but to prevent the cast-off edge being tight you can make 1 yarn over after every 4th stitch AT THE SAME TIME as you cast off (the yarn overs are cast off as normal stitches). The sleeve measures approx. 41-39-38-36-35-33 cm from the division. Work a second sleeve in the same way. ASSEMBLY: Sew the buttons onto the left band. |
|||||||||||||||||||
Diagram explanations |
|||||||||||||||||||
|
|||||||||||||||||||
 |
|||||||||||||||||||
 |
|||||||||||||||||||
 |
|||||||||||||||||||
 |
|||||||||||||||||||
Have you finished this pattern?Tag your pictures with #dropspattern #perlesdunordjacket or submit them to the #dropsfan gallery. Do you need help with this pattern?You'll find 34 tutorial videos, a Comments/Questions area and more by visiting the pattern on garnstudio.com. © 1982-2026 DROPS Design A/S. We reserve all rights. This document, including all its sub-sections, has copyrights. Read more about what you can do with our patterns at the bottom of each pattern on our site. |
|||||||||||||||||||


With over 40 years in knitting and crochet design, DROPS Design offers one of the most extensive collections of free patterns on the internet - translated to 17 languages. As of today we count 325 catalogues and 12291 patterns translated into English (UK/cm). 12291
We work hard to bring you the best knitting and crochet have to offer, inspiration and advice as well as great quality yarns at incredible prices! Would you like to use our patterns for other than personal use? You can read what you are allowed to do in the Copyright text at the bottom of all our patterns. Happy crafting!
Post a comment to pattern DROPS 180-4
We would love to hear what you have to say about this pattern!
If you want to leave a question, please make sure you select the correct category in the form below, to speed up the answering process. Required fields are marked *.