
Popular categories
Looking for a yarn?


Comments / Questions (268)
![]() Grenier wrote:
Grenier wrote:
Bonjour, je suis arrivée au moment où l’on doit former les emmanchures rabattre 10 mailles 5 mailles cela ne tombe pas en face des augmentations dos et devant est ce normal ?merci de votre réponse
02.02.2026 - 16:28DROPS Design answered:
Bonjour Mme Grenier, lorsque vous placez le dos, le devant et les manches sur la même aiguille circulaire, vous allez tricoter A.2 à chaque transition, les autres mailles se tricoteront comme avant pour continuer le motif. Bon tricot!
02.02.2026 - 17:19
![]() Bertorello wrote:
Bertorello wrote:
Bonjour, Pourriez vous m envoyer une photo de dessous les manches à partir du poignet jusqu aux aisselles. Le point fantaisie n est pas Jolie sous les manches , j ai 13 cm de point mousse 13 cm de point fantaisie 13 cm de point mousse etc... Merci
22.01.2026 - 07:32
![]() Bertorello wrote:
Bertorello wrote:
Bonjour, Pourriez vous m envoyer une photo de dessous les manches à partir du poignet jusqu aux aisselles. Le point fantaisie n est pas Jolie sous les manches , j ai 13 cm de point mousse 13 cm de point fantaisie 13 cm de point mousse etc... Merci
22.01.2026 - 07:30DROPS Design answered:
Bonjour Mme Bertorello, nous n'avons pas de photos autres que celles déjà en ligne. Lorsque vous augmentez pour les manches, pensez que le motif doit s'élargir de chaque côté de la maille au milieu sous la manche, vous devez ainsi avoir toujours 2 m point mousse sous la manche, et tricoter les augmentations en fonction de la maille précédente au début du tour et en fonction de la maille suivante à la fin du tour, donc indépendamment des 2 m point mousse sous la manche, le motif doit s'élargir, cf réponses précédentes. Bon tricot!
23.01.2026 - 09:28
![]() Bertorello wrote:
Bertorello wrote:
Bonjour, Pourriez vous me dire au niveau des manches tailles s lorsque je fais les augmentations, je n arrive pas à retrouver le point fantaisie. J ai 1 endroit 1 envers marqueurs 1 envers 1 endroit j augmente entre le marqueur donc 1 endroit 1 aug 1 envers marqueurs 1 envers 1 aug 1 end .Al augmentation sur l' endroit . Au tour suivant 1 end l Aug à l envers , 1env marqueur1env Aug à l env 1 end . Comment faire à la prochaine Aug . Merci
18.01.2026 - 22:23DROPS Design answered:
Bonjour Mme Bertorello, les 2 premières augmentations vont se tricoter au point mousse, puis lorsque vous augmentez la 3ème fois, le motif tombera juste sous la manche: 1 m end, 2 m point mousse (= les 2 premières augmentations), 1 m endroit (3ème augmentation), 1 m point mousse, marqueur, 1 m point mousse, 1 m endroit (3ème augmentation), 2 m point mousse (les 2 premières augmentations), 1 m endroit. Bon tricot!
19.01.2026 - 11:11
![]() Bertorello wrote:
Bertorello wrote:
Bonjour, merci pour vos réponses. Encore une question . Tailles S modèle 174-14 Entre le dos et le devant sur un côté j ai 4 augmentations . Je me retrouve à partir de 13cm du bas avec 6 mailles point mousse ( augmentations)jusqu à 41cm . Je n ai plus de fantaisie sur 4cm. Est ce normal ?
06.01.2026 - 11:41DROPS Design answered:
Bonjour Mme Bertorello, tout à fait, continuez ainsi avec 6 m point mousse de chaque côté. Bon tricot!
07.01.2026 - 07:18
![]() Bertorello wrote:
Bertorello wrote:
Bonjour, je suis au niveau des manches . après avoir fait les 9 cm , mon marqueur se situe entre 2 mailles envers . Quand il reste 1 m avant le marqueur je fais un jeté comment tricoter la m suivante . Le tour suivant, comment tricoter le jeté et la maille suivante j' ai essayé de faire la manche , le point fantaisie a disparu je n' avais que du point mousse comme entre le dos et le devant Merci.
06.01.2026 - 07:05DROPS Design answered:
Bonjour Mme Bertorello, les augmentations doivent être incorporées au point fantaisie, autrement dit, la 1ère et la 2ème augmentation seront tricotées au point mousse de chaque côté des 2 m au milieu sous la manche, vous avez ainsi effectivement 8 m point mousse avec le marqueur au milieu, la 3ème augmentation est tricotée en jersey, ainsi vous avez de nouveau juste 2 m point mousse au milieu sous la manche. Continuez à augmenter ainsi en incorporant les nouvelles mailles au point fantaisie. Bon tricot!
06.01.2026 - 09:40
![]() Bertorello wrote:
Bertorello wrote:
Bonjour, Au niveau du dessous des manches lorsque je fais les augmentations, est ce normal que le point fantaisie disparaît, je me retrouve que avec du point mousse Sur les 13 fois 8 mailles de chaque côté du marqueur. Merci de me dire comment je peux retrouver le motif
05.01.2026 - 23:21DROPS Design answered:
Bonjour Mme Bertorello, vous devez juste toujours avoir 2 mailles point mousse au milieu sous la manche, les augmentations faites de part et d'autre de ces 2 mailles doivent être incorporées au point fantaisie, ainsi, le point fantaisie va s'élargir jusqu'au milieu sous la manche, et on aura toujours au moins 2 mailles point mousse (plus quand on n'a pas encore suffisamment de mailles pour tricoter la maille jersey du motif). Bon tricot!
06.01.2026 - 09:29
![]() Bertorello wrote:
Bertorello wrote:
Bonjour, Je veux faire le pull taille . taille de mon mari 1m62 et 59 kg . La taille S trop grand , j ai pris de la laine acrylique pour des aiguilles 4 et demi . 10x10= 18m et 28rgs . J aimerais suivre les explications de la taille S avec des aiguilles 4 et demi . Qu est ce que vous en pensez? Le pull sera peut être un peu plus petit ? Merci
26.12.2025 - 13:53DROPS Design answered:
Bonjour Mme Bertorello, découvrez ici comment choisir la taille appropriée, le modèle est calculé sur un échantillon de 17 m x 24 rangs en point fantaisie A.1 = 10 x 10 cm, si votre tension est différente, essayez avec d'autres aiguilles ou bien il peut s'avérer plus simple de choisir un modèle adapté à votre tension. Bon tricot!
02.01.2026 - 12:26
![]() Helene Jakobsen wrote:
Helene Jakobsen wrote:
Hej Jeg er nu nået til halsen (80m i str. L). Der skal strikkes rib (1 ret, 2 vrang=3 m) 80 er ikke deleligt med 3?
20.12.2025 - 04:35DROPS Design answered:
Hei Helene. Oppskriften er oversendt til Design avd. slik at de kan ta en dobbeltsjekk (men ville bare ha plukket opp 1 maske og tilpasset den med mønstret). mvh DROPS Design
22.12.2025 - 14:04
![]() Jürgen wrote:
Jürgen wrote:
Hallo. Wo finde ich eine Liste der Abkürzungen der Strickanleitungen ? LG Jürgen
15.12.2025 - 06:45
|
|||||||
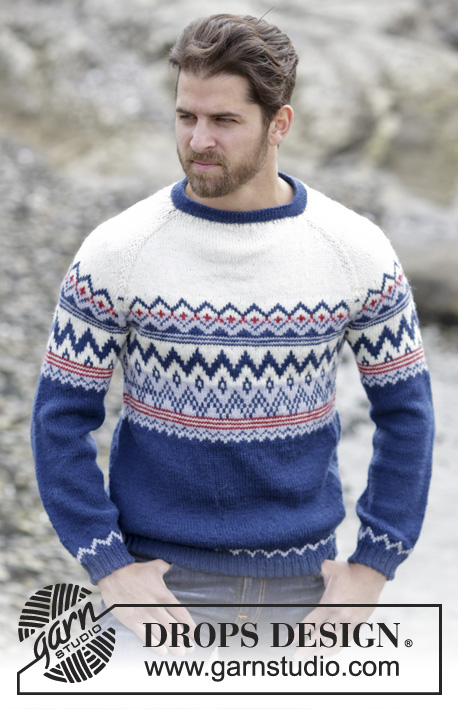
Twin River#twinriversweater |
|||||||
 |
 |
||||||
Knitted DROPS men’s jumper with textured pattern and raglan in Nepal. Size: S - XXXL.
DROPS 174-14 |
|||||||
|
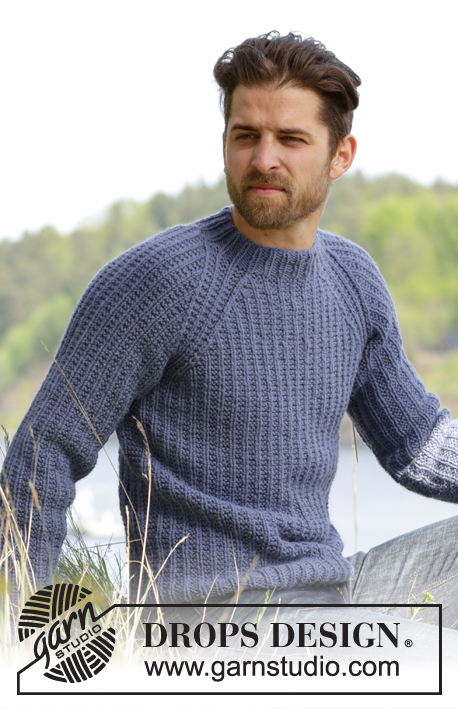
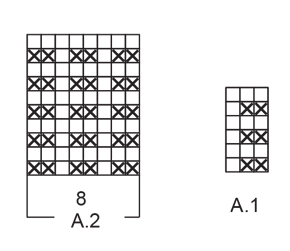
PATTERN: See diagrams A.1 and A.2. RAGLAN: Dec as follows before A.2: Work until 2 sts remain before A.2, K the next 2 tog. Dec as follows after A.2: Slip 1 st as if to K, K 1, psso INCREASE TIP (BODY): Inc 4 sts on round as follows: Work until 1 st remains before marker in the side, 1 YO, work 2 sts in garter st, 1 YO (= 2 sts inc). Repeat inc in the other side of piece. On next round work YO twisted to avoid holes. Work the new sts in garter st. INCREASE TIP (SLEEVE): Inc as follows mid under sleeve: Work until 1 st remains before marker, 1 YO, work 2 sts in garter st, 1 YO. On next round work YO twisted to avoid holes. Work the inc sts gradually in the pattern. NOTE: Work sts on each side of marker in garter st. RAGLAN DEC (ELEVATION): All dec are done from RS! Dec as follows after A.2: K 3 twisted tog. Dec as follows before A.2: Work until 3 sts remain before A.2, K 3 tog. ---------------------------------------------------------- JUMPER: Worked in the round. BODY: Cast on 150-162-168-192-210-234 sts with Nepal on circular needle size 5 mm. * P 1, (K 1, P 2), repeat from (-) 23-25-26-30-33-37 more times, K 1, P 1, insert a marker here (= side) *, repeat from *-* 1 more time. NOTE: Move the markers upwards when working. Continue rib in the round like this until piece measures 4 cm. Now work pattern A.1 as follows: Work the last 2 sts in A.1, then repeat A.1 the entire round until 1 st remains on round, work the first st in A.1. REMEMBER THE KNITTING TENSION When piece measures 13-13-14-14-15-15 cm, inc 1 st on each side of each marker – see INCREASE TIP (BODY). Repeat inc when piece measures 27-28-29-29-30-30 cm = 158-170-176-200-218-242 sts. When piece measures 41-41-42-42-42-42 cm (adjust so that next round worked is 2nd round in A.1), cast off sts for armholes as follows: Cast off the first 5 sts on round, work the next 69-75-78-90-99-111 sts, cast off the next 10 sts for armhole, work the next 69-75-78-90-99-111 sts, cast off the remaining 5 sts. Cut the yarn. Put piece aside and knit the sleeves. SLEEVE: Work sleeves in the round on double pointed needles. Cast on 42-42-42-48-48-48 sts with Nepal on double pointed needles size 5 mm. Insert a marker at beg of round = mid under sleeve. Work rib as follows: P 1, K 1, * P 2, K 1 *, repeat from *-* until 1 st remains on round, P 1. Continue like this in the round until rib measures 4 cm. Now work pattern as follows: Work the last 2 sts in A.1, A.1 until 1 st remains on round, work the first st in A.1. When piece measures 9-8-7-6-10-9 cm, inc 1 st on each side of marker – see INCREASE TIP (SLEEVE). Inc like this approx. every 13th-9th-7th-7th-6th-5th round 8-11-14-14-14-17 times in total = 58-64-70-76-76-82 sts. When piece measures 51-50-49-48-47-46 cm - adjust so that next round worked is 2nd round in A.1, cast off the middle 10 sts under sleeve (= 5 sts on each side of marker) = 48-54-60-66-66-72 sts. Knit another sleeve the same way. YOKE: Slip sleeves on to same circular needle size 5 mm as body where armholes were cast off = 234-258-276-312-330-366 sts. This is done without working the sts. Insert a marker in every transition between sleeves and body = 4 markers. Beg round on back piece, 4 sts after marker between sleeve and back piece. Now continue pattern as before and work in addition A.2 (= 8 sts) in every transition between body and sleeves (markers are in the middle of A.2). On next round start dec for RAGLAN – see explanation above! NOTE: Dec differently on body and sleeves as follows: RAGLAN BODY: Dec every other round 21-24-24-24-26-26 times and then every round 0-0-0-6-7-13 times (= 21-24-24-30-33-39 times in total). RAGLAN SLEEVES: Dec every 4th round 6-6-4-3-5-5 times and then every other round 9-12-17-21-19-22 times (= 15-18-21-24-24-27 times in total). When all dec are done, 90-90-96-96-102-102 sts remain on round (= 144-168-180-216-228-264 sts in total dec). Now work pattern as before over the first 72-72-78-78-84-84 sts. Insert marker here (= between A.2 and right sleeve). Then work an elevation back and forth in neck in pattern as before AT THE SAME TIME dec for raglan on every row from RS over the sts worked – READ RAGLAN DEC (ELEVATION) as follows: NOTE: Tighten yarn at every turn to avoid holes. ROW 1 (= RS): Work 55-55-58-58-61-61 sts (including the 8 dec sts), ROW 2 (= WS): Turn and work 45-45-48-48-51-51 sts, ROW 3: Turn and work 43-43-46-46-49-49 sts (including the 8 dec sts), ROW 4: Turn and work 33-33-36-36-39-39 sts. There are now 74-74-80-80-86-86 sts on round. Turn and continue in the round with rib as follows: Work K over K and P over sts in garter st until rib measures 4 cm. Cast off sts with K over K and P over P. Jumper measures 64-66-68-70-72-74 cm from cast-on edge and up to shoulder. Fasten off. ASSEMBLY: Sew the openings under the sleeves. |
|||||||
Diagram explanations |
|||||||
|
|||||||
 |
|||||||
 |
|||||||
Have you finished this pattern?Tag your pictures with #dropspattern #twinriversweater or submit them to the #dropsfan gallery. Do you need help with this pattern?You'll find 26 tutorial videos, a Comments/Questions area and more by visiting the pattern on garnstudio.com. © 1982-2026 DROPS Design A/S. We reserve all rights. This document, including all its sub-sections, has copyrights. Read more about what you can do with our patterns at the bottom of each pattern on our site. |
|||||||


With over 40 years in knitting and crochet design, DROPS Design offers one of the most extensive collections of free patterns on the internet - translated to 17 languages. As of today we count 325 catalogues and 12291 patterns translated into English (UK/cm). 12291
We work hard to bring you the best knitting and crochet have to offer, inspiration and advice as well as great quality yarns at incredible prices! Would you like to use our patterns for other than personal use? You can read what you are allowed to do in the Copyright text at the bottom of all our patterns. Happy crafting!
Post a comment to pattern DROPS 174-14
We would love to hear what you have to say about this pattern!
If you want to leave a question, please make sure you select the correct category in the form below, to speed up the answering process. Required fields are marked *.