
Popular categories
Looking for a yarn?


Comments / Questions (268)
![]() Patricia wrote:
Patricia wrote:
Adding to Coni's question: ok, we knit 58 st on RS (in continuation to the 78st) and decr 8 st (4 times before and after A2, each time 2 st, by knitting 3 tog). Indeed we are left with 50 st on the needle (besides the 38 st left for A2+front side+A2); when we turn on WS we knit only 48 st. what happens with the remaining 2 st? this obviously changes the next row where we are asked to knit 46 st, but then we have only 44 st left. Like this we cannot keep the symmetry. please advise.
21.01.2020 - 21:51DROPS Design answered:
Dear Patricia, you are working short rows, that's why you only work 46 sts on next row (incl. the 8 sts to decrease = 38 sts remain), on next row you work 36 sts (= 2 sts less). Happy knitting!
22.01.2020 - 09:13
![]() Coni wrote:
Coni wrote:
Hello good afternoon!! Sorry to insist but can you answer my question dated 21/12/19? I would like to complete my project. Thank you very much. Coni
29.12.2019 - 00:25
![]() Coni wrote:
Coni wrote:
Hello good afternoon. I am working on size L. I am ready to start working on Row 1 and 58 sts. Should I continue decreasing 1 st before and after A2? Or should I apply above instructions (RAGLAN DEC (ELEVATION): All dec are done from RS! Dec as follows after A.2: K 3 twisted tog.) Either way the numbers do not match . I can’t go down from 58 to 48 sts following either instructions. I am frustrated! Please help! Thank you!!
21.12.2019 - 20:20DROPS Design answered:
Dear Coni, you continue working the raglan decreases as before (= every other round) but with short rows for the elevation (the dec for raglan will be worked from RS): work from RS first 58 sts dec 8 sts as before (50 sts remain on needle), turn and work 48 sts from WS, turn and work from RS 46 sts dec 8 sts as before, turn and work 36 sts from WS. There are now 80 sts on needle (you have decreased 16 sts = 8 sts on row 1 and 8 sts on row 3). Happy knitting!
02.01.2020 - 09:46
![]() Clémence wrote:
Clémence wrote:
Bonjour ! Je suis en train de faire le corps de ce pull et je vais entamer les premières augmentations. J'aimerai être sûre de comprendre, on augmente 1 maille de chq côté de chq marqueur (donc 4 au total) ce qui casse le motif A1 qui se fait sur 3 mailles. Je vais donc avoir le motif A1 sur le dos et le devant mais il y aura une colonne de point mousse sur les côtés qui va s'élargir avec les augmentations c'est bien ça ?
20.12.2019 - 16:26DROPS Design answered:
Bonjour Clémence, le motif va effectivement être "cassé" sur les côtés, on tricote les augmentations au point mousse, on aura ainsi 4 m point mousse de chaque côté après la 1ère augmentation (= 1 m end, 1 m augmentée au point mousse, 1 m point mousse (dernière m du tour = avant le marqueur), 1 m point mousse (1ère m du tour = après le marqueur), 1 m augmentée au point mousse, 1 m end), après la 2ème augmentation, on aura 6 m point mousse sur chacun des côtés - cf AUGMENTATIONS (DOS & DEVANTS). Bon tricot!
20.12.2019 - 16:36
![]() Eva Sakellariou wrote:
Eva Sakellariou wrote:
Hej jag stickar M och efter resåren ska man sticka mönster i A.1 alltså ska sticka de 2 sista m i A1, sedan upprepas A.1 runt helav. Min fråga är ska de 2 sista m vara am ocg ska sedan upprepa A.1. då får jag flera am i varvet. Vd gör jag för fel
12.12.2019 - 15:15
![]() Eva Sakellariou wrote:
Eva Sakellariou wrote:
Jag skulle föreslå att ni skriver( inom parentes om de är am eller rm) Jag syftar på de två sista m i A 1 och likaså när det återstår 1v på varvet,sticka den första . i A. 1. Det blir då klart för mig som är ovan.-FRAM -OCH BACKST
10.12.2019 - 17:31
![]() Eva Sakellariou wrote:
Eva Sakellariou wrote:
Hej! Jag stickar stl M och undrar vad 25 ggr til betyder ifram och bak Jag har redan stickat 8 varv i resåren och detta motsvarar ca 4 cm. Vad syftar 25 ggr till Tack på förhand
08.12.2019 - 10:37DROPS Design answered:
Hei Eva! 25 ggr står for 25 ganger, det vil si at (1 rett maske, 1 vrang maske) skal gjentas 25 ganger på omgangen før det settes en markør, deretter gjentas det igjen. Om du ønsker å lese mer om strikketerminologi og om hva de forskjellige termene står for kan du gjøre det her . Lykke til!
09.12.2019 - 11:07
![]() Isabel wrote:
Isabel wrote:
En el diagrama hay una cruz, este es punto del derecho o revés ??
19.11.2019 - 19:32DROPS Design answered:
Hola Isabel. Tienes las abreviaturas encima de los diagramas. Cuadrado blanco = derecho; cuadrado con x = revés
24.11.2019 - 23:13
![]() Annemieke Duterloo wrote:
Annemieke Duterloo wrote:
Het lukt me niet om dit patroon met een rondbreinaald of op 4 naalden te breien.\\r\\nkunt u ook een beschrijving opsturen voor het breien met 2 naalden?\\r\\nIk ben al begonnen aan het lijf met het halve aantal steken, maar de raglan breien is voor mij niet te doen met deze beschrijving. Graag een aangepast patrroon. A. Duterloo
17.11.2019 - 11:43DROPS Design answered:
Dag Annemieke,
Helaas is het voor ons niet mogelijk om patronen aan te passen naar persoonlijke wensen. Om patronen aan te passen om ze met rechte naalden te breien hebben we een instructie op de site gezet. Deze vindt je hier.
23.11.2019 - 15:32
![]() Martine wrote:
Martine wrote:
Bonsoir, je viens de commencer l'ouvrage et je rencontre une difficulté. Il est indiqué, pour la taille M, de monter 162m et de tricoter en rond selon le schéma suivant : (1m env + 25x(1m end + 2m env) + 1m end + 1m env) x 2. Or cela fait (1m+75m+2m)x2 soit 78mx2 soit 156m. Pour tomber sur 162m il faudrait faire 26 répétitions et non pas 25 comme indiqué. S'agit-il d'une erreur et dois-je bien faire 26 répétitions. Merci d'avance.
16.11.2019 - 22:53DROPS Design answered:
Bonjour Martine, on doit répéter (1 m end, 2 m env) encore 25 fois, soit 26 fois au total. Bon tricot!
18.11.2019 - 09:59
|
|||||||
Twin River#twinriversweater |
|||||||
 |
 |
||||||
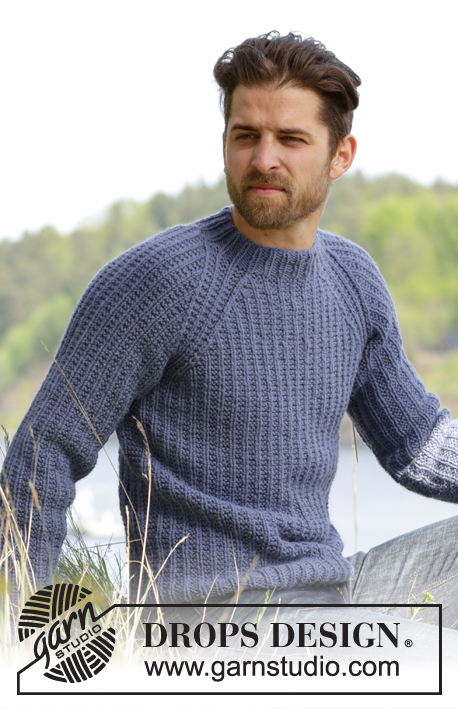
Knitted DROPS men’s jumper with textured pattern and raglan in Nepal. Size: S - XXXL.
DROPS 174-14 |
|||||||
|
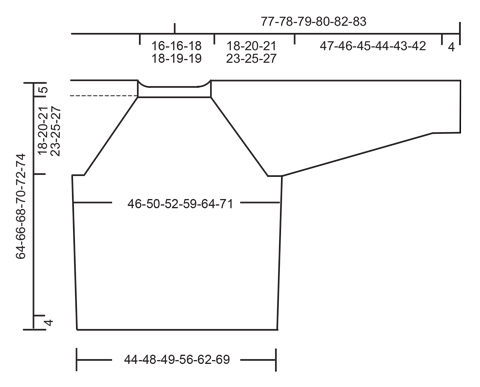
PATTERN: See diagrams A.1 and A.2. RAGLAN: Dec as follows before A.2: Work until 2 sts remain before A.2, K the next 2 tog. Dec as follows after A.2: Slip 1 st as if to K, K 1, psso INCREASE TIP (BODY): Inc 4 sts on round as follows: Work until 1 st remains before marker in the side, 1 YO, work 2 sts in garter st, 1 YO (= 2 sts inc). Repeat inc in the other side of piece. On next round work YO twisted to avoid holes. Work the new sts in garter st. INCREASE TIP (SLEEVE): Inc as follows mid under sleeve: Work until 1 st remains before marker, 1 YO, work 2 sts in garter st, 1 YO. On next round work YO twisted to avoid holes. Work the inc sts gradually in the pattern. NOTE: Work sts on each side of marker in garter st. RAGLAN DEC (ELEVATION): All dec are done from RS! Dec as follows after A.2: K 3 twisted tog. Dec as follows before A.2: Work until 3 sts remain before A.2, K 3 tog. ---------------------------------------------------------- JUMPER: Worked in the round. BODY: Cast on 150-162-168-192-210-234 sts with Nepal on circular needle size 5 mm. * P 1, (K 1, P 2), repeat from (-) 23-25-26-30-33-37 more times, K 1, P 1, insert a marker here (= side) *, repeat from *-* 1 more time. NOTE: Move the markers upwards when working. Continue rib in the round like this until piece measures 4 cm. Now work pattern A.1 as follows: Work the last 2 sts in A.1, then repeat A.1 the entire round until 1 st remains on round, work the first st in A.1. REMEMBER THE KNITTING TENSION When piece measures 13-13-14-14-15-15 cm, inc 1 st on each side of each marker – see INCREASE TIP (BODY). Repeat inc when piece measures 27-28-29-29-30-30 cm = 158-170-176-200-218-242 sts. When piece measures 41-41-42-42-42-42 cm (adjust so that next round worked is 2nd round in A.1), cast off sts for armholes as follows: Cast off the first 5 sts on round, work the next 69-75-78-90-99-111 sts, cast off the next 10 sts for armhole, work the next 69-75-78-90-99-111 sts, cast off the remaining 5 sts. Cut the yarn. Put piece aside and knit the sleeves. SLEEVE: Work sleeves in the round on double pointed needles. Cast on 42-42-42-48-48-48 sts with Nepal on double pointed needles size 5 mm. Insert a marker at beg of round = mid under sleeve. Work rib as follows: P 1, K 1, * P 2, K 1 *, repeat from *-* until 1 st remains on round, P 1. Continue like this in the round until rib measures 4 cm. Now work pattern as follows: Work the last 2 sts in A.1, A.1 until 1 st remains on round, work the first st in A.1. When piece measures 9-8-7-6-10-9 cm, inc 1 st on each side of marker – see INCREASE TIP (SLEEVE). Inc like this approx. every 13th-9th-7th-7th-6th-5th round 8-11-14-14-14-17 times in total = 58-64-70-76-76-82 sts. When piece measures 51-50-49-48-47-46 cm - adjust so that next round worked is 2nd round in A.1, cast off the middle 10 sts under sleeve (= 5 sts on each side of marker) = 48-54-60-66-66-72 sts. Knit another sleeve the same way. YOKE: Slip sleeves on to same circular needle size 5 mm as body where armholes were cast off = 234-258-276-312-330-366 sts. This is done without working the sts. Insert a marker in every transition between sleeves and body = 4 markers. Beg round on back piece, 4 sts after marker between sleeve and back piece. Now continue pattern as before and work in addition A.2 (= 8 sts) in every transition between body and sleeves (markers are in the middle of A.2). On next round start dec for RAGLAN – see explanation above! NOTE: Dec differently on body and sleeves as follows: RAGLAN BODY: Dec every other round 21-24-24-24-26-26 times and then every round 0-0-0-6-7-13 times (= 21-24-24-30-33-39 times in total). RAGLAN SLEEVES: Dec every 4th round 6-6-4-3-5-5 times and then every other round 9-12-17-21-19-22 times (= 15-18-21-24-24-27 times in total). When all dec are done, 90-90-96-96-102-102 sts remain on round (= 144-168-180-216-228-264 sts in total dec). Now work pattern as before over the first 72-72-78-78-84-84 sts. Insert marker here (= between A.2 and right sleeve). Then work an elevation back and forth in neck in pattern as before AT THE SAME TIME dec for raglan on every row from RS over the sts worked – READ RAGLAN DEC (ELEVATION) as follows: NOTE: Tighten yarn at every turn to avoid holes. ROW 1 (= RS): Work 55-55-58-58-61-61 sts (including the 8 dec sts), ROW 2 (= WS): Turn and work 45-45-48-48-51-51 sts, ROW 3: Turn and work 43-43-46-46-49-49 sts (including the 8 dec sts), ROW 4: Turn and work 33-33-36-36-39-39 sts. There are now 74-74-80-80-86-86 sts on round. Turn and continue in the round with rib as follows: Work K over K and P over sts in garter st until rib measures 4 cm. Cast off sts with K over K and P over P. Jumper measures 64-66-68-70-72-74 cm from cast-on edge and up to shoulder. Fasten off. ASSEMBLY: Sew the openings under the sleeves. |
|||||||
Diagram explanations |
|||||||
|
|||||||
 |
|||||||
 |
|||||||
Have you finished this pattern?Tag your pictures with #dropspattern #twinriversweater or submit them to the #dropsfan gallery. Do you need help with this pattern?You'll find 26 tutorial videos, a Comments/Questions area and more by visiting the pattern on garnstudio.com. © 1982-2026 DROPS Design A/S. We reserve all rights. This document, including all its sub-sections, has copyrights. Read more about what you can do with our patterns at the bottom of each pattern on our site. |
|||||||


With over 40 years in knitting and crochet design, DROPS Design offers one of the most extensive collections of free patterns on the internet - translated to 17 languages. As of today we count 325 catalogues and 12291 patterns translated into English (UK/cm). 12291
We work hard to bring you the best knitting and crochet have to offer, inspiration and advice as well as great quality yarns at incredible prices! Would you like to use our patterns for other than personal use? You can read what you are allowed to do in the Copyright text at the bottom of all our patterns. Happy crafting!
Post a comment to pattern DROPS 174-14
We would love to hear what you have to say about this pattern!
If you want to leave a question, please make sure you select the correct category in the form below, to speed up the answering process. Required fields are marked *.