
Popular categories
Looking for a yarn?


Comments / Questions (268)
![]() Defer Isa wrote:
Defer Isa wrote:
Gmrgen, klopt het dat de boordsteek identiek is aan de steek voor de rest van de trui?
02.09.2021 - 11:43DROPS Design answered:
Dag Isa,
Nee, niet helemaal. De boordsteek is 1 recht, 2 averecht. De rest van het patroon is 1 recht, 2 ribbelsteek.
03.09.2021 - 09:19
![]() Raquel wrote:
Raquel wrote:
Buenos días, gracias por el tutorial de este suéter, mi pregunta es para hacer la disminución de la delantera, el arco a partir de dónde empiezo? Me cuesta mucho entender sisa, ranglan, términos de confeccionar. Es decir del pecho para el hombro, me tiene confundida. Gracias.
20.08.2021 - 09:36DROPS Design answered:
Hola Raquel, entiendo que te refieres a las disminuciones en la línea del raglán para la forma de las mangas. Este vídeo puede ayudarte a entender mejor cómo trabajarlo: https://www.garnstudio.com/video.php?id=122&lang=es
20.08.2021 - 21:33
![]() Paula wrote:
Paula wrote:
Hola no me queda claro las disminuciones del ranglan del cuerpo y manga. ¿Cómo diferencio las disminuciones del cuerpo y de la manga? ¿es sólo en la transición? y si me apuede ayudar con las veces que se debe disminuir cada 4 vueltas por ejemplo : Dism cada 4ª vta 4 vcs y cada vta 17= corresponde a 21 veces en total. No lo entiendo. gracias por su ayuda
04.07.2021 - 16:59DROPS Design answered:
Hola Paula, tenemos las mangas y la parte del cuerpo. Sobre los puntos del cuerpo, se trabajan las disminuciones según RAGLÁN EN EL CUERPO, mientras que sobre los puntos de la manga se trabaja según RAGLÁN MANGAS. En cuanto al número de disminuciones, son 4 veces cada 4ª vta (es decir, en la vuelta 4, 8, 12 y 16) y cada vuelta 17 veces (es decir, en las siguientes 17 vueltas).
15.07.2021 - 00:35
![]() Paula Farias wrote:
Paula Farias wrote:
Gracias por responder. EL punto elástico es 1d, 1r? porque dice que (1d, 2r). Estoy haciendo el cuerpo. Mi otra duda, es patrón A1(trabajar los últimos 2 pts de A.1= 2D?), después repetir A.1 en toda la vta, ¿sólo la primera fila y luego seguir con las otras? hasta que quede 1 pt y trabajar aquí el primer pt de A.1 (1 revés?) gracias!!!
12.05.2021 - 15:55DROPS Design answered:
Hola Paula. El elástico es 1 derecho, 2 reveses ( ya lo hemos corregido en la respuesta anterior). El patrón A.1 (2 reveses, 1 derecho), en la siguiente vuelta trabajar todos los puntos de derecho. Para adaptar mejor el patrón al punto elástico , se empieza con 1 revés, 1 derecho ( los últimos 2 puntos del patrón), se repite A.1 toda la vuelta y se termina con 1 revés (primer punto del patrón). Así se trabajan todas las filas que tienen puntos de revés.
15.05.2021 - 20:28
![]() Paula wrote:
Paula wrote:
Hola, soy novata en tejido, me cuesta leer los patrones. Quisiera saber si en esta parte *1 r., (1 d., 2 r.), repetir de (-) 23-25-26-30-33-37 vcs más, 1 d., 1 r., insertar 1 MP aquí (= lado) *, repetir de *a* 1 vez más. Al comenzar se unen ya los puntos, para que sea redondo? o esto se cierra cuando comienza el únto elástico? éste es 1dy 1r? cuando dice repetir 26 veces (en mi caso) es continuo? independiente si paso por el comienzo nuevamente? muchas gracias!
08.05.2021 - 02:36DROPS Design answered:
Hola Paula, el cuerpo se trabaja en redondo. Se une después de montar los puntos. Empezamos a trabajar el elástico según el patrón: 1 revés, y repetimos 26 veces (1 derecho, 2 reveses), terminamos con un 1 derecho y 1 revés e insertamos un marcapuntos (= delantero). Ahora hacemos lo mismo para la espalda, desde 1 revés, (1 derecho, 2 reveses)...
09.05.2021 - 20:04
![]() Vera wrote:
Vera wrote:
Hartelijk dank voor het antwoord op mijn vraag. Ik begrijp nu dat ik de beschrijving niet goed gelezen heb. Hierin wordt twee keer het minderen beschreven, ik heb de onderste beschrijving, de verkeerde gebruikt voor de raglan, ik minderde daardoor steeds 2 steken per keer en niet 1. Daardoor ging het minderen twee keer zo snel waardoor iksteken tekort kwam.
09.04.2021 - 09:56
![]() Vera wrote:
Vera wrote:
Vraag, daarom nog maar eens: ik begrijp het minderen voor de raglan niet. Ik kom steken te kort, als ik elke 2e naald zowel op de rug als de borst minder. Toch lijkt dat er te staan. Moet ik op de rug 1 keer per 4 naalden aan beide kanten minderen en ook op de voorkant 1 keer per 4 naalden en dit dan afwisselend doen?
07.04.2021 - 11:57DROPS Design answered:
Dag Vera,
De minderingen op de rug en op de borst (dus op het lijf) zijn hetzelfde in aantal. Afhankelijk van je maat, minder je 21-24-24-24-26-26 keer om de naald (dus de ene naald wel en de ander naald niet. Daarna meerder je voor het lijf nog eens 0-0-0-6-7-13 keer op iedere naald. Tegelijkertijd meerder je op de mouwen zoals beschreven staat bij RAGLAN MOUWEN.
08.04.2021 - 09:20
![]() Irene Mattson wrote:
Irene Mattson wrote:
När man börjar med raglanintagningarna sätter man en märktråd på bakstycket.. Varvet börjar på bakst, 4 m efter markören mellan hö ärm och bakst. Var börjar man räkna efter intagningarna när man stickar de 72 m? Man hamnar inte vid hö eller vä ärm om man utgår från märkningen i början. Hur räknar man de 8 intagningarna? Är det vanliga raglan int eller förhöjd raglanminskn?
18.03.2021 - 23:32DROPS Design answered:
Hej Irene, du fortsætter med raglanindtagningerne på samme sted som tidligere når du starter med forhøjningen bagpå. Du har 90 masker på pinden. Når du har strikket de første 72 masker, bør du havne lige før første ærme på forstykket, nu starter du med 55 masker fra retsiden , vend og strik 45 masker tilbage osv. God fornøjelse!
08.04.2021 - 09:50
![]() Alex wrote:
Alex wrote:
Hi, are there specific measurements for S/M/L sizes? Like what cm breast size would Small fit?
16.03.2021 - 17:31DROPS Design answered:
Hi Alex, there is not. It depends on garment shape. Please see the lesson DROPS HERE. Happy knitting!
16.03.2021 - 18:53
![]() Irene wrote:
Irene wrote:
Om man minskar för raglan tre maskor tillsammans så finn det inga maskor kvar när man har gjort det antal gånger som det står i mönstret. Vad har jag missat?
14.03.2021 - 17:33DROPS Design answered:
Hej Irene. Det är bara när du stickar förhöjning du minskar 3 maskor på varje sida av markören vid raglan. Annars minskar du enligt förklaring "RAGLAN: Minska så här före A.2: Sticka tills det återstår 2 m före A.2, sticka de 2 nästa m räta tills, Minska så här efter A.2: Lyft 1 m, 1 rm, drag den lyfta m över." Mvh DROPS Design
17.03.2021 - 08:07
|
|||||||
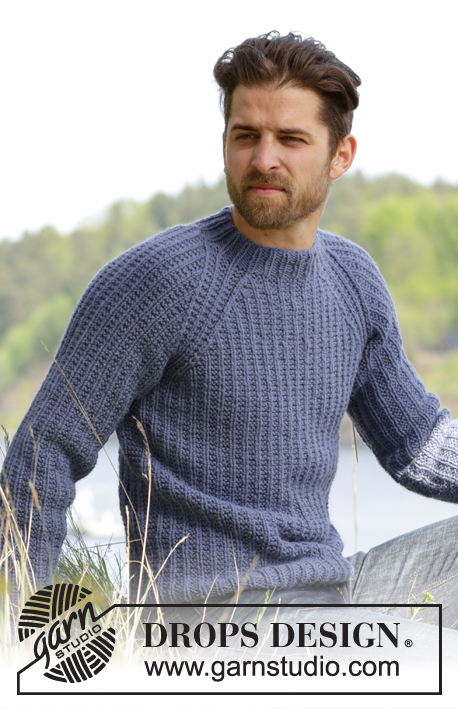
Twin River#twinriversweater |
|||||||
 |
 |
||||||
Knitted DROPS men’s jumper with textured pattern and raglan in Nepal. Size: S - XXXL.
DROPS 174-14 |
|||||||
|
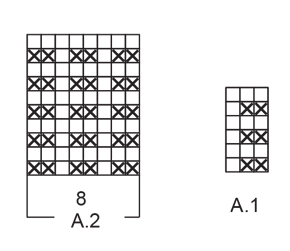
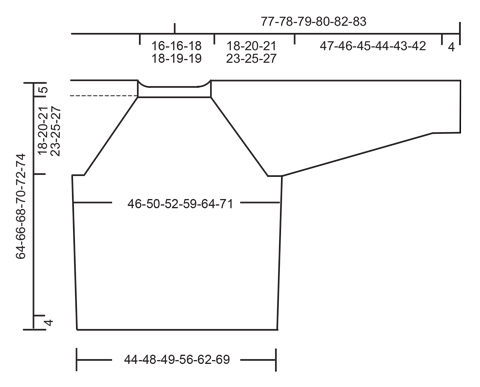
PATTERN: See diagrams A.1 and A.2. RAGLAN: Dec as follows before A.2: Work until 2 sts remain before A.2, K the next 2 tog. Dec as follows after A.2: Slip 1 st as if to K, K 1, psso INCREASE TIP (BODY): Inc 4 sts on round as follows: Work until 1 st remains before marker in the side, 1 YO, work 2 sts in garter st, 1 YO (= 2 sts inc). Repeat inc in the other side of piece. On next round work YO twisted to avoid holes. Work the new sts in garter st. INCREASE TIP (SLEEVE): Inc as follows mid under sleeve: Work until 1 st remains before marker, 1 YO, work 2 sts in garter st, 1 YO. On next round work YO twisted to avoid holes. Work the inc sts gradually in the pattern. NOTE: Work sts on each side of marker in garter st. RAGLAN DEC (ELEVATION): All dec are done from RS! Dec as follows after A.2: K 3 twisted tog. Dec as follows before A.2: Work until 3 sts remain before A.2, K 3 tog. ---------------------------------------------------------- JUMPER: Worked in the round. BODY: Cast on 150-162-168-192-210-234 sts with Nepal on circular needle size 5 mm. * P 1, (K 1, P 2), repeat from (-) 23-25-26-30-33-37 more times, K 1, P 1, insert a marker here (= side) *, repeat from *-* 1 more time. NOTE: Move the markers upwards when working. Continue rib in the round like this until piece measures 4 cm. Now work pattern A.1 as follows: Work the last 2 sts in A.1, then repeat A.1 the entire round until 1 st remains on round, work the first st in A.1. REMEMBER THE KNITTING TENSION When piece measures 13-13-14-14-15-15 cm, inc 1 st on each side of each marker – see INCREASE TIP (BODY). Repeat inc when piece measures 27-28-29-29-30-30 cm = 158-170-176-200-218-242 sts. When piece measures 41-41-42-42-42-42 cm (adjust so that next round worked is 2nd round in A.1), cast off sts for armholes as follows: Cast off the first 5 sts on round, work the next 69-75-78-90-99-111 sts, cast off the next 10 sts for armhole, work the next 69-75-78-90-99-111 sts, cast off the remaining 5 sts. Cut the yarn. Put piece aside and knit the sleeves. SLEEVE: Work sleeves in the round on double pointed needles. Cast on 42-42-42-48-48-48 sts with Nepal on double pointed needles size 5 mm. Insert a marker at beg of round = mid under sleeve. Work rib as follows: P 1, K 1, * P 2, K 1 *, repeat from *-* until 1 st remains on round, P 1. Continue like this in the round until rib measures 4 cm. Now work pattern as follows: Work the last 2 sts in A.1, A.1 until 1 st remains on round, work the first st in A.1. When piece measures 9-8-7-6-10-9 cm, inc 1 st on each side of marker – see INCREASE TIP (SLEEVE). Inc like this approx. every 13th-9th-7th-7th-6th-5th round 8-11-14-14-14-17 times in total = 58-64-70-76-76-82 sts. When piece measures 51-50-49-48-47-46 cm - adjust so that next round worked is 2nd round in A.1, cast off the middle 10 sts under sleeve (= 5 sts on each side of marker) = 48-54-60-66-66-72 sts. Knit another sleeve the same way. YOKE: Slip sleeves on to same circular needle size 5 mm as body where armholes were cast off = 234-258-276-312-330-366 sts. This is done without working the sts. Insert a marker in every transition between sleeves and body = 4 markers. Beg round on back piece, 4 sts after marker between sleeve and back piece. Now continue pattern as before and work in addition A.2 (= 8 sts) in every transition between body and sleeves (markers are in the middle of A.2). On next round start dec for RAGLAN – see explanation above! NOTE: Dec differently on body and sleeves as follows: RAGLAN BODY: Dec every other round 21-24-24-24-26-26 times and then every round 0-0-0-6-7-13 times (= 21-24-24-30-33-39 times in total). RAGLAN SLEEVES: Dec every 4th round 6-6-4-3-5-5 times and then every other round 9-12-17-21-19-22 times (= 15-18-21-24-24-27 times in total). When all dec are done, 90-90-96-96-102-102 sts remain on round (= 144-168-180-216-228-264 sts in total dec). Now work pattern as before over the first 72-72-78-78-84-84 sts. Insert marker here (= between A.2 and right sleeve). Then work an elevation back and forth in neck in pattern as before AT THE SAME TIME dec for raglan on every row from RS over the sts worked – READ RAGLAN DEC (ELEVATION) as follows: NOTE: Tighten yarn at every turn to avoid holes. ROW 1 (= RS): Work 55-55-58-58-61-61 sts (including the 8 dec sts), ROW 2 (= WS): Turn and work 45-45-48-48-51-51 sts, ROW 3: Turn and work 43-43-46-46-49-49 sts (including the 8 dec sts), ROW 4: Turn and work 33-33-36-36-39-39 sts. There are now 74-74-80-80-86-86 sts on round. Turn and continue in the round with rib as follows: Work K over K and P over sts in garter st until rib measures 4 cm. Cast off sts with K over K and P over P. Jumper measures 64-66-68-70-72-74 cm from cast-on edge and up to shoulder. Fasten off. ASSEMBLY: Sew the openings under the sleeves. |
|||||||
Diagram explanations |
|||||||
|
|||||||
 |
|||||||
 |
|||||||
Have you finished this pattern?Tag your pictures with #dropspattern #twinriversweater or submit them to the #dropsfan gallery. Do you need help with this pattern?You'll find 26 tutorial videos, a Comments/Questions area and more by visiting the pattern on garnstudio.com. © 1982-2026 DROPS Design A/S. We reserve all rights. This document, including all its sub-sections, has copyrights. Read more about what you can do with our patterns at the bottom of each pattern on our site. |
|||||||


With over 40 years in knitting and crochet design, DROPS Design offers one of the most extensive collections of free patterns on the internet - translated to 17 languages. As of today we count 325 catalogues and 12298 patterns translated into English (UK/cm). 12298
We work hard to bring you the best knitting and crochet have to offer, inspiration and advice as well as great quality yarns at incredible prices! Would you like to use our patterns for other than personal use? You can read what you are allowed to do in the Copyright text at the bottom of all our patterns. Happy crafting!
Post a comment to pattern DROPS 174-14
We would love to hear what you have to say about this pattern!
If you want to leave a question, please make sure you select the correct category in the form below, to speed up the answering process. Required fields are marked *.