
Popular categories
Looking for a yarn?


Comments / Questions (240)
![]() Chantal Denis wrote:
Chantal Denis wrote:
Bonjour, Les rangs raccourcis sur la bordure, vous dites à tous les 5 rangs... il s'agit de 5 rangs aller-retour (10 rangs) ou 5 rangs allers....
26.04.2020 - 18:21DROPS Design answered:
Bonjour Mme Denis, on compte 1 rang à chaque fois que l'on tricote les mailles d'un rang, autrement dit 10 rangs = 10 rangs tricotés au total (en comptant les rangs sur l'endroit et les rangs sur l'envers). Bon tricot!
27.04.2020 - 09:23
![]() Lina Vallezza wrote:
Lina Vallezza wrote:
Guten Morgen , bin jetzt an den Ärmel aber irgendwie blockiert , komme nicht mehr weiter mit den Zunahmen der Ärmel Mitte ,wenn ich es richtig verstanden habe muss ich einen markierer nur an der letzten Masche machen 1masche zunehmen 1 str 1 zunehme nächste reihe hinten normal stricken, ab hier meine Frage die nächsten zunahmen verschieben sich immer das heisst ich habe immer 1 masche mehr von aussen ? und die zuhname ist nur auf eine Seite nicht auf beiden seiten? danke
18.04.2020 - 08:48DROPS Design answered:
Liebe Frau Vallezza, die Zunahmen werden im Muster A.3 gestrickt, dh mitte unter der Ärmel haben Sie 1 Masche kraus rechts (= die letzte Masche in A.3A), die neuen Maschen sollen Sie so stricken daß das Muster am Anfang und am Ende der Runde anpasst: die erste Zunahme wird krausrechts gestrickt, die 6 nächsten glatt rechts und diese 7 Zunahmmen so wiederholen. Viel Spaß beim stricken!
20.04.2020 - 09:34
![]() Leslie Carroll wrote:
Leslie Carroll wrote:
Can this pattern be knitted flat in sections (front; back; each sleeve) -- and then be stitched together?
17.04.2020 - 07:47DROPS Design answered:
Dear Mrs Carroll, you will find how to adapt a pattern into straight needles here. Happy knitting!
17.04.2020 - 09:20
![]() Sofysofy7 wrote:
Sofysofy7 wrote:
Hello Could sleeves be worked on circular needles?
17.04.2020 - 02:23DROPS Design answered:
Dear Sofysofy7, sure you can either work with a smaller circular needle (40 cm) and even with a longer but using the magic loop technique. Happy knitting!
17.04.2020 - 09:12
![]() Fatma Imam wrote:
Fatma Imam wrote:
Hi Which double pointed needle lenght needed to work the sleeves for this pattern (20,15,or 10cm)?
17.04.2020 - 01:33DROPS Design answered:
Dear Mrs Imam, our double pointed needles are 20 cm. Happy knitting!
17.04.2020 - 09:08
![]() Dennis wrote:
Dennis wrote:
Hallo, ich bin gerade am linken Voderteil und habe durch die insgesamt 14 Abnahmen vor der Blende und dem Kragen auch 2 Maschen für den Zopf abgenommen. Wenn im Muster nun als nächstes ein Zopf kommt, verzopfe ich dann nur noch 5 und 3 Maschen miteinander, oder nehme ich 2 aus der Blende, sodass es wieder 5 und 5 Maschen für den Zopf sind? Vielen Dank schon mal
16.04.2020 - 14:52DROPS Design answered:
Lieber Dennis, wenn Sie nicht genügend Maschen für den Zopf haben, stricken Sie die Maschen einfach rechts über rechts und links über links (= wie sie aussehen), den Zopf strickt man dann nicht weiter. Viel Spaß beim stricken!
16.04.2020 - 15:43
![]() Sofy Imam wrote:
Sofy Imam wrote:
Hi \"AT THE SAME TIME inc 1 st for shawl collar towards mid front. 18 times\" Do I work the short rows 18 times as well?
28.03.2020 - 00:37DROPS Design answered:
Dear Mrs Imam, the short rows are worked only once over the front band stitches, after they have been worked, you now increase for shawl collar (and decrease for neck). Happy knitting!
30.03.2020 - 08:59
![]() Jane Ackroyd wrote:
Jane Ackroyd wrote:
Drops174-1 knitting tip to keepbands from contracting vertically Begin mid front and k 10sts=band turn piece slip1st stars if to k,tighten yarn and k the rest of row. I do not understand this tip. Is it just working on one stitch?
13.03.2020 - 00:51DROPS Design answered:
Dear Jane, basicalli you knit a short row, by knitting 10 stitch, and then turn, and after turning you just slip the 1st stitch without knitting it, then knit the rest of the stitches back. I hope this helps. Happy Knitting!
14.03.2020 - 21:58
![]() Hanan Salah wrote:
Hanan Salah wrote:
Bonsoir madame, comment faire les augmentations de la manche pour garder la symétrie sur taille xxxL?
08.03.2020 - 20:32DROPS Design answered:
Bonjour Mme Salah, je ne suis pas bien sûre de comprendre votre question, vous allez augmenter pour la manche avant la maille point mousse du milieu sous la manche + après cette même maille, la symétrie va donc être conservée en tricotant les augmentations en A.3 - cf réponse précédente. Bon tricot!
09.03.2020 - 12:18
![]() Hanan Salah wrote:
Hanan Salah wrote:
Bonsoir Madame, pour les augmentations de la manche ,au 2ème rang on va tricoter les jetées envers ou endroit ? Merci bcp
06.03.2020 - 18:31DROPS Design answered:
Bonjour Mme Salah, les augmentations sous la manche vont se tricoter comme dans A.3. Vous augmentez avant et après la m point mousse = cette première augmentation va se tricoter au point mousse (vous aurez donc 3 m point mousse au milieu sous la manche), puis les 5 augmentations suivantes vont se tricoter à l'endroit (le motif tombera juste à la fin de cette dernière augmentation = 5 m end, 1 m point mousse tout le tour) et ainsi de suite. Bon tricot!
09.03.2020 - 09:28
|
|||||||||||||||||||
Jackson#jacksoncardigan |
|||||||||||||||||||
 |
 |
||||||||||||||||||
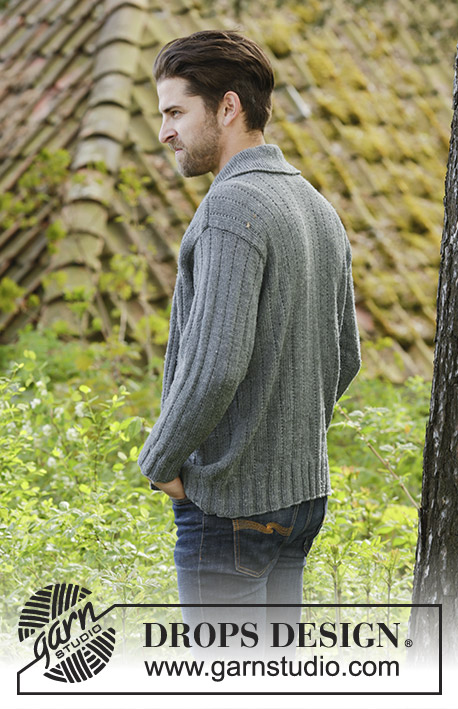
Knitted DROPS men’s jacket with simple cable, textured pattern and shawl collar in Karisma. Size: XS - XXXL.
DROPS 174-1 |
|||||||||||||||||||
|
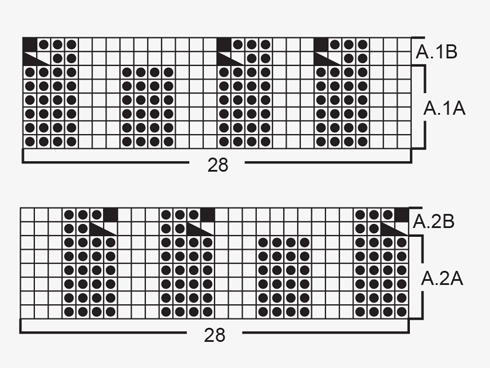
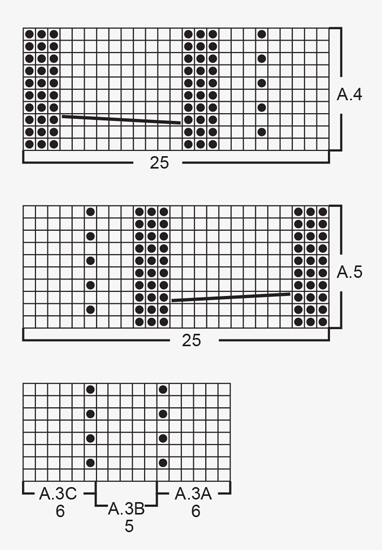
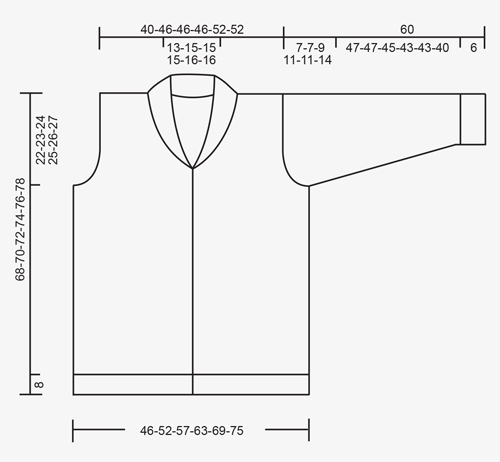
GARTER ST (back and forth): K all rows. 1 ridge = 2 rows K. PATTERN: See diagrams A.1 to A.5. The diagrams show all rows in pattern seen from RS. KNITTING TIP (applies to bands): To keep the bands from contracting vertically work short rows over bands as follows: * Beg mid front and K the outermost 10 sts (= band), turn piece, slip 1st st as if to K, tighten yarn and K the rest of row *, repeat from *-* after approx. every 10 rows in piece. INCREASE TIP-1 (applies to shawl collar): Inc 1 st in next to last st towards mid front by K in front and back loop of same st. INCREASE TIP-2 (applies to mid under sleeve): Inc 1 st on each side of st with marker mid under sleeve. Inc 1 st by making 1 YO, on next round work YO twisted to avoid holes. Work the inc sts in the pattern A.3. DECREASE TIP (applies to neckline): Dec inside 10 band sts in garter st + inc sts for shawl collar. All dec are done from RS! Dec as follows before band + collar: K 2 tog. Dec as follows after collar + band: Slip 1 st as if to K, K 1, psso. BUTTONHOLES: Dec for buttonholes from RS on left band (when garment is worn). 1 buttonhole = work 6 band sts as before, slip next to last st on right needle over outermost st on right needle, K 1, slip next to last st on right needle over outermost st on right needle (2 sts cast off), K the last 3 sts. On next row cast on 2 new sts over the cast off sts. Dec for buttonholes when piece measures: SIZE XS/S: 2, 12, 21, 31, 40 and 50 cm. SIZE M: 2, 12, 21, 31, 41 and 51 cm. Size L: 2, 12, 22, 32, 42 and 52 cm. SIZE XL: 3, 13, 23, 33, 43 and 53 cm. Size XXL: 3, 13, 23, 33, 43 and 54 cm. SIZE XXXL: 3, 13, 24, 34, 45 and 55 cm. ---------------------------------------------------------- JACKET: Worked back and forth on circular needle from mid front. BODY: Cast on 243-271-299-327-355-383 sts (incl 10 band sts in each side towards mid front) on circular needle size 3 mm with Karisma. P 1 row from WS. Work next row as follows from RS: 10 band sts in GARTER ST – see explanation above, A.1A (= 28 sts), * K 3, P 4 *, repeat from *-* 11-13-15-17-19-21 times in total, K 3, P 7 (= mid back), * K 3, P 4 *, repeat from *-* 11-13-15-17-19-21 times in total, K 3, A.2A (= 28 sts) and 10 band sts in garter st. Work back from WS with garter st over garter st, P over P, K over K. Continue rib until piece measures 8 cm, remember BUTTONHOLES on left band – see explanation above and KNITTING TIP. Work next row as follows from RS: 10 band sts as before, A.1B (= 28 sts dec to 25 sts), * K 3, P 2, P 2 tog *, repeat from *-* 11-13-15-17-19-21 times in total, K 3, P 2 tog, P 3, P 2 tog, * K 3, P 2, P 2 tog *, repeat from *-* 11-13-15-17-19-21 times in total, K 3, A.2B (= 28 sts dec to 25 sts) and 10 band sts as before = 213-237-261-285-309-333 sts. Work back from WS with garter st over garter st, P over P, K over K, (work A.1B and A.2B as shown in diagram). Switch to circular needle size 4 mm and work next row from RS as follows: 10 band sts as before, A.4 (= 25 sts), work A.3A over the next 72-84-96-108-120-132 sts (= 12-14-16-18-20-22 repetitions of 6 sts), work A.3B (= 5 sts), work A.3C over the next 66-78-90-102-114-126 sts (= 11-13-15-17-19-21 repetitions of 6 sts), work A.5 (= 25 sts) and finish with 10 band sts as before. Insert 1 marker in the 59th-65th-71st-77th-83rd-89th st in from each side (markers are in a st in garter st in the sides on body). Continue the pattern like this and move the markers upwards when working. REMEMBER THE KNITTING TENSION When piece measures 46-47-48-49-50-51 cm, cast off 7 sts in each side for armholes (i.e. cast off st with marker + 3 sts on each side of this). Then finish front and back piece separately. BACK PIECE: = 89-101-113-125-137-149 sts. Continue A.3 on back piece as before and cast off for armholes at beg of every row in each side as follows: Cast off 2 sts 0-0-2-5-5-7 times and 1 st 2-2-4-4-4-6 times = 85-97-97-97-109-109 sts. Continue to work until piece measures 66-68-70-72-74-76 cm. Now cast off the middle 23-27-27-27-29-29 sts for neck and finish each shoulder separately. Cast off 2 st on next row from neck = 29-33-33-33-38-38 sts remain on the shoulder. Continue to work until piece measures 68-70-72-74-76-78 cm and loosely cast off. Repeat on the other shoulder. LEFT FRONT PIECE: = 55-61-67-73-79-85 sts. Continue the pattern as before and cast off for armhole at beg of every row from the side as on back piece. AT THE SAME TIME when 2 rows have been worked after last buttonhole on band work 1 ridge (i.e. 2 rows K) over only the outermost 10 band sts towards mid front (do not work the other sts on row). Then work over all sts on row as before. AT THE SAME TIME inc 1 st for shawl collar towards mid front – READ INCREASE TIP-1. Inc like this every other row 18-18-18-20-20-20 times in total. AT THE SAME TIME when piece measures 52-53-54-55-56-57 cm (2 cm should now be worked after last buttonhole), dec 1 st for neckline towards mid front - READ DECREASE TIP. Dec like this every other row (i.e. every row from RS) a total of 10-12-12-12-13-13 times and then every 4th row (i.e. every other row from RS) 4 times in total in all sizes. After all inc and dec, there are 57-61-61-63-68-68 sts on needle. When piece measures 68-70-72-74-76-78 cm, cast off the outermost 29-33-33-33-38-38 sts on shoulder = 28-28-28-30-30-30 sts remain for collar. Continue back and forth in garter st over these sts as follows: * 1 ridge over all sts, 1 ridge over only the outermost 18-18-18-20-20-20 sts *, repeat from *-* until collar measures approx. 9-9-9-10-10-10 cm inside on the most narrow (collar measures approx. 18-18-18-20-20-20 cm at the edge on the widest). Cast off. RIGHT FRONT PIECE: Work as left but reversed. NOTE: Do not dec for buttonholes on right band. When working 1 ridge over only the outermost 10 sts towards mid front, adjust according to left front piece. SLEEVE: Cast on 56-56-63-63-63-70 sts on double pointed needles size 3 mm with Karisma. K 1 round. Work next round as follows: * K 3, P 4 *, repeat from *-* the entire round. When piece measures 6 cm, work next round as follows: * K 3, P 2, P 2 tog *, repeat from *-* the entire round = 48-48-54-54-54-60 sts. Switch to double pointed needles size 4 mm and work pattern in the round according to diagram A.3A. Insert 1 marker in last st on round (i.e. in st in garter st = mid under sleeve) and move the marker upwards. When piece measures 8 cm, inc 2 sts mid under sleeve - READ INCREASE TIP-2. Inc a total of 18-20-20-22-25-25 times in Size S: On every 7th round, in size M + L: On every 6th round, in size XL: On every 5th round, in size XXL: Alternately on every 4th and 5th round and size XXXL: On every 4th round = 84-88-94-98-104-110 sts. When piece measures 53-53-51-49-49-46 cm (NOTE: Shorter measurements in the larger sizes because of longer sleeve cap and wider shoulders) cast off the middle 7 sts under sleeve (cast off st with marker + 3 sts on each side of this). Now work sleeve cap back and forth on circular needle. Continue with the pattern while AT THE SAME TIME casting off at beg of every row in each side as follows: Cast off 3 sts 1 time, 2 sts 1-1-2-3-3-4 time and 1 st 2-2-3-3-3-6 times. Continue to cast off 2 sts in each side of piece until piece measures 59 cm in all sizes, cast off 3 sts 1 time in each side and cast off the remaining sts. Sleeve measures approx. 60 cm in all sizes. Knit another sleeve the same way. ASSEMBLY: Sew the shoulder seams. Sew collar tog mid back (make sure that seam is not visible when collar is folded down). Sew collar to neckline in the back of neck. Sew in sleeves. Sew the buttons on to the right band. |
|||||||||||||||||||
Diagram explanations |
|||||||||||||||||||
|
|||||||||||||||||||
 |
|||||||||||||||||||
 |
|||||||||||||||||||
 |
|||||||||||||||||||
Have you finished this pattern?Tag your pictures with #dropspattern #jacksoncardigan or submit them to the #dropsfan gallery. Do you need help with this pattern?You'll find 26 tutorial videos, a Comments/Questions area and more by visiting the pattern on garnstudio.com. © 1982-2026 DROPS Design A/S. We reserve all rights. This document, including all its sub-sections, has copyrights. Read more about what you can do with our patterns at the bottom of each pattern on our site. |
|||||||||||||||||||


With over 40 years in knitting and crochet design, DROPS Design offers one of the most extensive collections of free patterns on the internet - translated to 17 languages. As of today we count 324 catalogues and 12285 patterns translated into English (UK/cm). 12285
We work hard to bring you the best knitting and crochet have to offer, inspiration and advice as well as great quality yarns at incredible prices! Would you like to use our patterns for other than personal use? You can read what you are allowed to do in the Copyright text at the bottom of all our patterns. Happy crafting!
Post a comment to pattern DROPS 174-1
We would love to hear what you have to say about this pattern!
If you want to leave a question, please make sure you select the correct category in the form below, to speed up the answering process. Required fields are marked *.