
Looking for a yarn?


Comments / Questions (177)
![]() Sharon Kerr wrote:
Sharon Kerr wrote:
I have just started this pattern. It\'s gorgeous, but I\'m having trouble. I have two questions: #1: Do I do a first round of eight 8 double crochets and then start A1 with the round of 17 doubles?
21.03.2018 - 15:52DROPS Design answered:
Dear Mrs Kerr, you first start with a magic loop and 9 dc, then crochet A.1 (= 2 dc in each dc in 1st round in A.1 = 18 dc after first round in A.1).
06.04.2018 - 09:56
![]() Sharon Kerr wrote:
Sharon Kerr wrote:
#2: I started the A1 diagram, but instead of getting a flat circle, I keep getting a bowl. I've re-started 4 different times now, adapting in a few ways: making chain stitches really loose, adding additional chain stitches. Not only does this not solve the problem, but I'm afraid I'm going to mess things up for future rounds. Is there a secret to getting this to lie flat? This may relate back to question 1.
21.03.2018 - 15:50
![]() Sharon Kerr wrote:
Sharon Kerr wrote:
I have just started this pattern. It\'s gorgeous, but I\'m having trouble. I have two questions: #1: Do I do a first round of eight 8 double crochets and then start A1 with the round of 17 doubles?
21.03.2018 - 15:49
![]() Anne-Marthe wrote:
Anne-Marthe wrote:
Hei. Jeg holder på med denne genseren, men har et spørsmål til A2. Skal mønsteret hekles rundt og rundt slik som på A1, eller skal jeg kun hekle det som står av mønster og da hekle dette fram og tilbake, men gjøre dette på "4 steder" ? Eller skal jeg hekle rundt og rundt 4 ganger dette mønsteret? Håper dere forstod spørsmålet mitt.. Mvh Anne-Marthe.
05.02.2018 - 17:59DROPS Design answered:
Hei Anne-Marthe. Når du er ferdig med A.1 (sirkelen), fortsetter du med A.2 rundt sirkelen, det hekles 4 rapporter av A.2 rundt sirkelen. God Fornøyelse!
06.02.2018 - 08:41
![]() Annelie Friedenthal wrote:
Annelie Friedenthal wrote:
Good day, when I saw the picture of this pattern I fell instantly in love with it, and although I don't mean to be rude, the love faded quickly. The pattern is not user friendly. The descriptions is too broad. The videos are fantastic but not enough.
26.01.2018 - 10:51DROPS Design answered:
Dear Mrs Friedenthal, remember you can always ask your question about a pattern here. When you need any further personnal assistance, your DROPS store will provide you some more individual help, even per mail, telephone or via the social medias. Happy crocheting!
26.01.2018 - 13:27
![]() REBEYROL wrote:
REBEYROL wrote:
Est il important de commencer l'encolure sur le rang où se trouve les picots ? mon ouvrage fait 54 cm mais sur le rang : 1 bride ... 4 m en l'air. Est ce que ça change quelque chose ????? .
08.08.2017 - 11:46DROPS Design answered:
Bonjour Mme Rebeyrol, ce qui compte, ce sont les mesures pour avoir la bonne profondeur d'encolure. Bon crochet!
08.08.2017 - 12:32
![]() REBEYROL wrote:
REBEYROL wrote:
Je suis au dernier rang du diagramme de A2 .... j'ai 1B dans la m , 3ml , 1B dans la m , 3 ml , 1 DB dans la m , 3 ml , 1 DB dans la m , 3 ml , 1 DB dans la m , 3 ml , 1 DB dans la m , 3 ml , 1 DB autour de l'arceau , 3 ml , 1 DB autour de l'arceau , 3 ml , mais ..... à partir de là , j'ai 3 DB dans la m et 4 B dans la m ..... au lieu des 4 DB et 2B qui sont sur la première moitié de mon diagramme .... est ce normal ????
04.08.2017 - 11:53DROPS Design answered:
Bonjour Mme Rebeyrol, vous avez raison, après le coin, vous crochetez 4 DB (= 4 x 1 DB, 3 ml), le diagramme sera bientôt corrigé, merci. Bon crochet!
04.08.2017 - 14:27
![]() REBEYROL wrote:
REBEYROL wrote:
J'ai regardé la vidéo et j'ai compris comment faire le diagramme A2.
30.07.2017 - 16:37
![]() REBEYROL wrote:
REBEYROL wrote:
J'arrive au diagramme A2 mais je ne comprend pas le deuxième rang avec les picots et les brides .... 1 bride 1 picot, 1bride 1 picot , etc ..... Mais comment faire ????? MERCI INFINIMENT
30.07.2017 - 14:09DROPS Design answered:
Bonjour Mme Rebeyrol, crochetez 1 bride (= 3 ml au début du tour), puis *3 ml, 1 bride dans la 1ère de ces 3 ml, et 1 bride dans la bride suivante*, répétez de *-* tout le tour. Vous aurez ainsi 1 bride dans chaque bride du tour précédent et au-dessus de l'arceau de 3 ml du tour précédent, vous aurez 1 picot (= 3 ml, 1 bride dans la 1ère de ces 3 ml). Bon crochet!
31.07.2017 - 10:03
![]() Martina Schmidt wrote:
Martina Schmidt wrote:
Hallo habe mit der Anleitung in der letzten Runde ein Problem. Bei A4 in der letzten Runde wird in Diagramm gezeigt dass man in die vorletzte Stäbchenmasche der vier Stäbchen der Vorrunde einstechen soll. Im Video ist es allerdings das zweite Stäbchen. Ich komme ganz anders an das Eck hin. Was ist richtig. Besser wäre ein Diagramm der ecke. Ich bin schon zu weit und es ist ein ganz toller Pullover ich würde gerne weitermachen. Danke für die Hilfe. Liebe Grüße aus Nürnberg
07.07.2017 - 11:45DROPS Design answered:
Liebe Frau Schmidt, meinen Sie bei A.3? In jedem Ecke häkeln Sie 1 DStb, 3 Lm, 1 Dstb, und A.3 vor und nach den Ecken. Viel Spaß beim häkeln!
07.07.2017 - 11:51
|
||||||||||||||||||||||||||||||||||||||||||||||
Janis#janissweater |
||||||||||||||||||||||||||||||||||||||||||||||
|
|
||||||||||||||||||||||||||||||||||||||||||||||
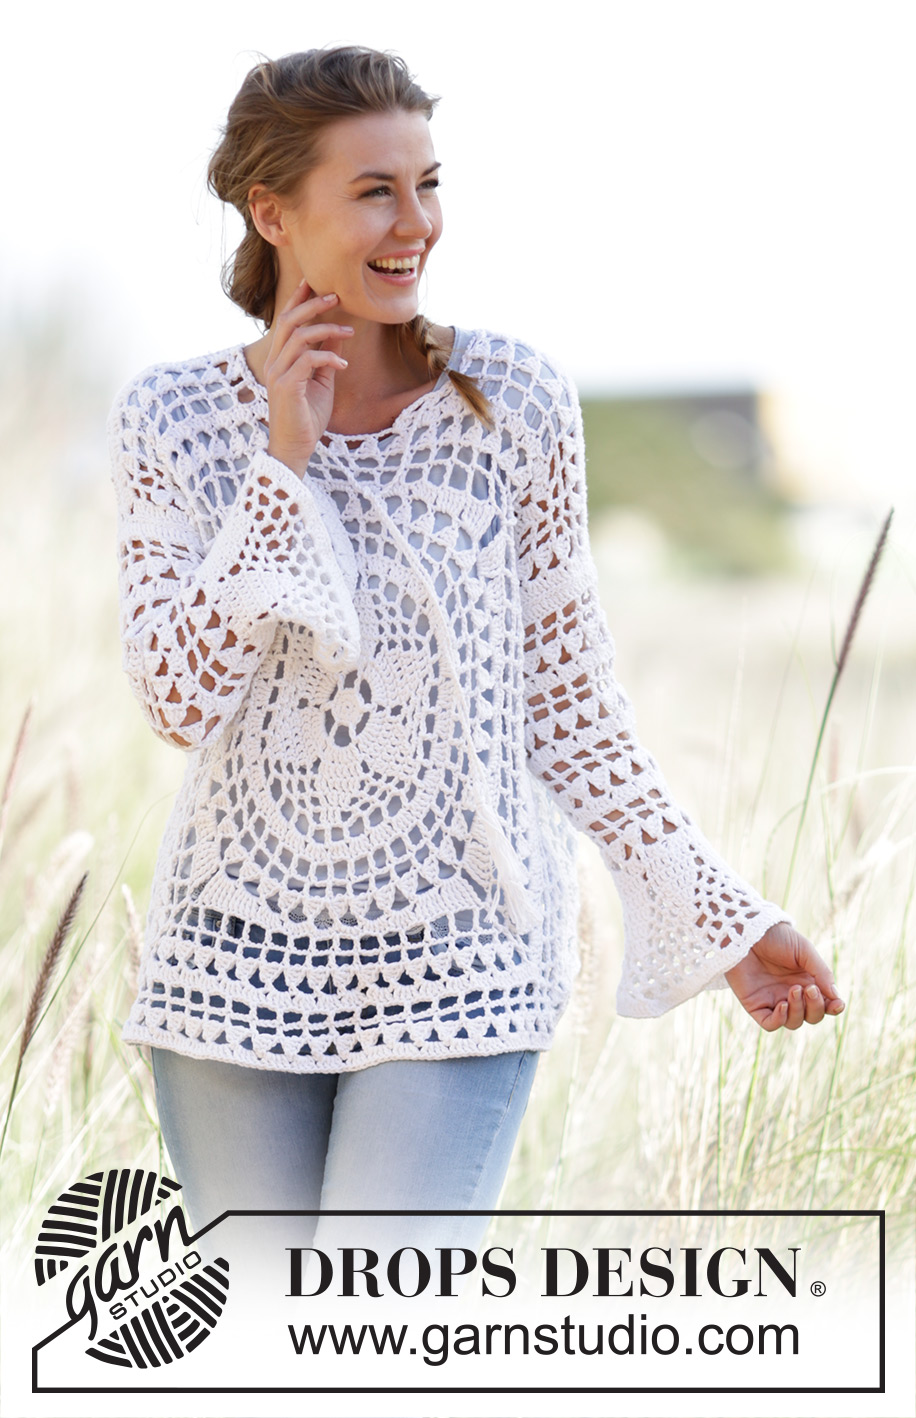
Crochet DROPS jumper worked in a square with flounce sleeves and lace pattern in ”Paris”. Size: S - XXXL.
DROPS 170-2 |
||||||||||||||||||||||||||||||||||||||||||||||
|
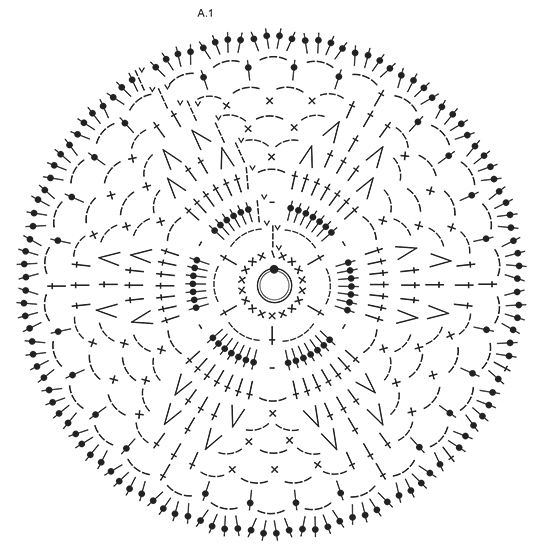
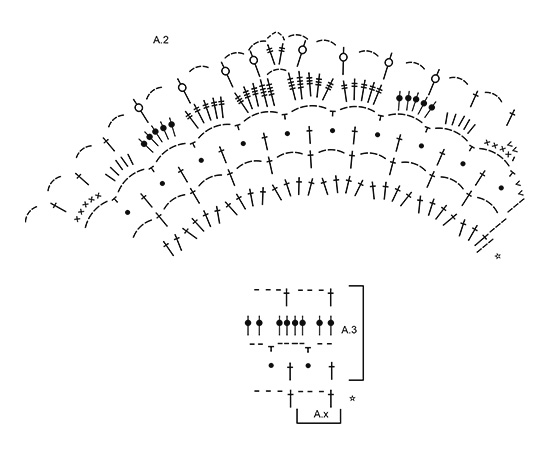
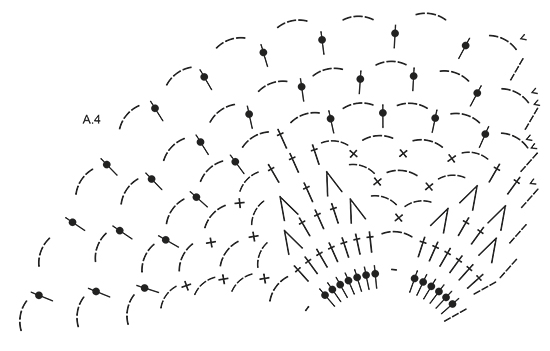
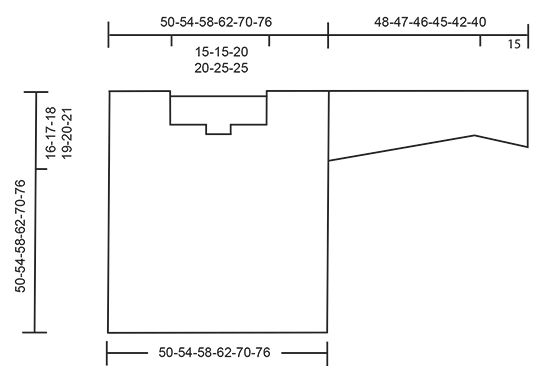
MAGIC CIRCLE: To avoid hole in the middle beg with this technique: Hold yarn end in the left hand and make a loop around left index finger (from left to right). Hold the loop with left thumb and index finger. Insert hook through loop, get the yarn from ball, pull yarn through loop, make 1 YO on hook and pull YO through st on hook = 1 dc, then work 8 dc around loop, finish with 1 sl st in first dc = 9 dc. Continue as explained in pattern – AT THE SAME TIME pull yarn end so that loop is tighten tog and the hole disappears. CROCHET INFO: Replace first dc on round with 1 ch. Finish round with one sl st in first ch from beg of round. Replace first tr on round/row with 3 ch. Finish round with one sl st in third ch from beg of round. PATTERN: See diagrams A.1 to A.4. QUADRUPLE TR: Make 4 YOs on hook, insert hook around ch-space and pull yarn around ch-space, * 1 YO on hook, pull yarn through the next 2 loops on hook *, repeat from *-* 4 more times = 1 loop on hook. DECREASE TIP: Dec 1 tr by working the next 2 tr tog as follows: Work 1 tr but wait with last pull through (= 2 loops on hook), then work next tr but on last pull through, pull yarn through all 3 loops on hook. ---------------------------------------------------------- JUMPER: BACK PIECE: Work back piece in a circle, then as a square from mid back. Work up along one side of square for shoulder/neck at the end. Work a MAGIC CIRCLE on hook size 4.5 mm with Paris – see explanation above = 9 dc around circle. Then work according to A.1 (on first round in A1 work 2 dc in each of the 9 dc = 18 dc). REMEMBER THE CROCHET TENSION! READ CROCHET INFO! When A.1 has been worked, there are 120 tr on round and piece measures approx. 22 cm in diameter. Then work according to A.2, work 4 repetitions of A.2 around the circle - beg on second round in A.2. NOTE: Sl sts at beg of A.2 are only worked at beg of round. When A.2 has been worked, continue according to A.3. A.x shows 1 repetition of A.3 in width. Work A.3, in every corner work 1 dtr + 3 ch + 1 dtr, work 2 repetitions more of A.3 between every corner for every round worked. Continue with A.3 until piece measures 23-25-27-29-33-36 cm from centre (46-50-54-58-66-72 cm in total), there are now approx. 18-20-22-24-28-30 repetitions of A.3 along each side of square. Now work piece back and forth and dec for neck in the middle of the first side of square. Cut the yarn and skip the middle 6-6-8-8-10-10 repetitions (= neck) on the first side of square, continue A.3 with inc in the corners until row has been worked, do not work over the 6-6-8-8-10-10 repetitions skipped at beg of row. Fasten off, piece measures 25-27-29-31-35-38 cm from centre (50-54-58-62-70-76 cm in total), there are approx. 7-8-8-9-10-11 repetitions on each shoulder, and approx. 20-22-24-26-30-32 repetitions along each of the other 3 sides. Insert 1 marker in each side, 16-17-18-19-20-21 cm down from shoulder, this shows where sleeve is sewn in. FRONT PIECE: Work as back piece until piece measures 17-19-21-23-27-30 cm from centre (32-36-40-44-52-58 cm in total), there are now approx. 14-16-18-20-24-26 repetitions of A.3 along each side of square. Now work piece back and forth and dec for neck in the middle of the first side of square. Cut the yarn and skip the middle 2 repetitions (= neck) on the first side of square, continue with A.3 with inc in the corners until row has been worked, do not work over the 2 repetitions skipped at beg of row. Turn and work a row from WS. Cut the yarn, skip the first 2-2-3-3-4-4 repetitions, continue with A.3 and inc in the corners, but turn when 2-2-3-3-4-4 repetitions remain on row, 6-6-8-8-10-10 repetitions have been dec mid front for neck. Continue back and forth with A.3 and inc until piece measures 25-27-29-31-35-38 cm from centre (50-54-58-62-70-76 cm in total), there are approx. 7-8-8-9-10-11 repetitions on each shoulder, and approx. 20-22-24-26-30-32 repetitions along each of the other 3 sides, adjust according to back piece. Fasten off. Insert 1 marker in each side, 16-17-18-19-20-21 cm down from shoulder, this shows where sleeve is sewn in. SLEEVE: Sleeve is worked in the round, top down. Work 64-64-69-69-74-74 ch and form a ring with one sl st in first ch. Work 3 ch (= 1 tr), 1 tr in each of the next 6-6-3-3-0-0 ch, skip 1 ch, * work 1 tr in each of the next 7 ch, skip 1 st *, repeat from *-* the entire round = 56-56-60-60-64-64 tr. Remember CROCHET INFO! Then work in the round and according to A.3. On 3rd round in A.3 dec 8 tr evenly - READ DECREASE TIP. Repeat dec every time 3th round in diagram is worked 3 times in total = 32-32-36-36-40-40 tr. Work A.3 until piece measures 33-32-31-30-27-25 cm, finish after 2nd or 4th round in A.3. Work 40-40-40-48-48-48 tr in total around ch-spaces. Then work according to A.4 (5-5-5-6-6-6 repetitions in width, diagram shows 2 repetitions in width), work first round as follows: * Work 1 tr in each of the first 7 tr, 1 ch, skip 1 tr *, repeat from *-* 4-4-4-5-5-5 more times. NOTE: Sl sts at beg of A.4 are only worked at beg of round. Work A.4 1 time vertically. Work now 1 round with tr: 1 tr in each tr, 3 tr around each ch-space. Fasten off. Sleeve measures approx. 48-47-46-45-42-40 cm. Work another sleeve the same way. ASSEMBLY: Sew the shoulder seams. Sew side seams from markers in the side and down. Sew in sleeves. TWINED STRING: Cut 2 lengths of 3 metres each. Twine the strands tog until they resist, fold the string double so that it twines again. Make a knot at each end. Thread tie up and down around the neck. Cut 8 lengths of yarn of 20 cm. Thread the ends through the end of the tie and fold them double. Twine one of the strand around the top of tassel. Make another fringe in the other end of tie. |
||||||||||||||||||||||||||||||||||||||||||||||
Diagram explanations |
||||||||||||||||||||||||||||||||||||||||||||||
|
||||||||||||||||||||||||||||||||||||||||||||||
 |
||||||||||||||||||||||||||||||||||||||||||||||
 |
||||||||||||||||||||||||||||||||||||||||||||||
 |
||||||||||||||||||||||||||||||||||||||||||||||
 |
||||||||||||||||||||||||||||||||||||||||||||||
Have you finished this pattern?Tag your pictures with #dropspattern #janissweater or submit them to the #dropsfan gallery. Do you need help with this pattern?You'll find 16 tutorial videos, a Comments/Questions area and more by visiting the pattern on garnstudio.com. © 1982-2025 DROPS Design A/S. We reserve all rights. This document, including all its sub-sections, has copyrights. Read more about what you can do with our patterns at the bottom of each pattern on our site. |
||||||||||||||||||||||||||||||||||||||||||||||


With over 40 years in knitting and crochet design, DROPS Design offers one of the most extensive collections of free patterns on the internet - translated to 17 languages. As of today we count 320 catalogues and 12094 patterns translated into English (UK/cm). 12094
We work hard to bring you the best knitting and crochet have to offer, inspiration and advice as well as great quality yarns at incredible prices! Would you like to use our patterns for other than personal use? You can read what you are allowed to do in the Copyright text at the bottom of all our patterns. Happy crafting!
Post a comment to pattern DROPS 170-2
We would love to hear what you have to say about this pattern!
If you want to leave a question, please make sure you select the correct category in the form below, to speed up the answering process. Required fields are marked *.