
Looking for a yarn?


Comments / Questions (177)
![]() Helena Sillerström wrote:
Helena Sillerström wrote:
Jag undrar om mönstret av ärmarna stämmer? Det står att man ska virka A4 en gång på höjden och sen ta av garnet men på bilden ser det ut som varvet avslutats med stolpar. Hur gör jag? I övrigt mycket lättförståeligt mönster och jätterolig virkning.
29.06.2016 - 14:48DROPS Design answered:
Hej Helena. Opskriften burde vaere korrekt. Undskyld du ikke har faaet nogen reaktion tidligere!
10.11.2016 - 16:26Efi Tsalikoglou wrote:
Thank you very much. I would like you to tell me the total amount of picots because I am confused with the corners. If the number you tell me is the one I did then it should be fine!
20.06.2016 - 19:31Efi Tsalikoglou wrote:
On A3 how many picots should there be?
20.06.2016 - 18:27DROPS Design answered:
Dear Mrs Tsalikoglou, there is 1 picot in each A.3 in width. Happy crocheting!
20.06.2016 - 18:49
![]() Monica wrote:
Monica wrote:
Salve io sto facendo la taglia s . Ho finito il diagramma A3 sia davanti che dietro ma non riasco a continuare. Devo lavorare tutt'intorno o devo lavorare solo le spalle nel alto superiore? Vi ringrazio Monica
15.06.2016 - 18:08DROPS Design answered:
Buonasera Monica. Deve lavorare solo sulle spalle, su un solo lato del quadrato. Buon lavoro!
15.06.2016 - 18:46
![]() Plaisance wrote:
Plaisance wrote:
Est ce que le travail doit rester plat ? Et il faut bien crocheté A2 quatre fois? cordialement
10.06.2016 - 11:16DROPS Design answered:
Bonjour Mme Plaisance, après le rond (A.1), on va faire un carré (A.2) qui doit être bien plat. On doit crocheter 1 fois A.2 en hauteur mais on le répète 4 fois en largeur pour former les 4 coins (aux 4ème et 5ème tours). Bon crochet!
13.06.2016 - 08:27
![]() Gerda Van Den Hof wrote:
Gerda Van Den Hof wrote:
Ik ben klaar met A2, ik was bezig met A3 maar ik snap het meerderen niet, meerder ik in elke toer 2x per kant er bij? en wat meerder ik dan? met driehoekjes bedoel ik de picotjes. krijg in de eerste toer 16 picotjes, dan een toer met 18x ax en dan 20 keer stokjes, per zijkant dus...
08.06.2016 - 20:21DROPS Design answered:
Hoi Gerda. Door het haken van A.3 en 1 dstk en 3 l en 1 dstk in elke hoek krijg je steeds 2 patroonherhalingen meer van A.3 (A.X is één herhaling) tussen elke hoek. Dus je hebt bjvoorbeeld eerst 16x herhaling van A.X, dan 18x, 20x enzovoort.
17.06.2016 - 12:02
![]() Gerda Van Den Hof wrote:
Gerda Van Den Hof wrote:
Goedenavond, ik maak maat S ik ben bij A3, met de driehokjes bedoel ik de toer met de picotjes :)
08.06.2016 - 20:15
![]() Gerda wrote:
Gerda wrote:
De eerst toer met driehoekjes in A3 zijn dat er 16? Dan daarover heen de stokjes met de 3 lossen en 2 x extra stokje 3 lossen zodat dit er 18 zijn? En dan dit weer opvullen met de stokjes? Ik wil zo graag verder...
07.06.2016 - 16:16DROPS Design answered:
Hoi Gerda. Driehoekjes? Welke teken is dat in A.3.
08.06.2016 - 16:24
![]() Gerda Van Den Hof wrote:
Gerda Van Den Hof wrote:
Hallo, Ik kom er niet uit met wanneer en wat ik meerder op de hoeken. Ik heb blijkbaar ergens een fout gemaakt want ik kan niet 6 herhalingen overslaan in het midden omdat ik een oneven aantal heb... Ik haak met Parijs en dat word er niet mooier op met al dat uithalen. Is er iemand die hem al af heeft en een foto kan plaatsen, of een link zodat ik kan kijken waar ik fout zit?
03.06.2016 - 13:06DROPS Design answered:
Hoi Gerda. Kan je misschien even aangeven welke maat je maakt en waar in het patroon je precies bent? Dan kan ik makkelijker meekijken en helpen :)
08.06.2016 - 16:30
![]() Suzy wrote:
Suzy wrote:
Is there any photos of the back of the garment? - I think it would help people understand what to do if they could see the whole garement.
03.06.2016 - 10:00DROPS Design answered:
Dear Suzy, we do not have any pictures of back piece, but for any individual assistance, remember you will get help from the store where you bought your yarn. Happy crocheting!
03.06.2016 - 11:18
|
||||||||||||||||||||||||||||||||||||||||||||||
Janis#janissweater |
||||||||||||||||||||||||||||||||||||||||||||||
|
|
||||||||||||||||||||||||||||||||||||||||||||||
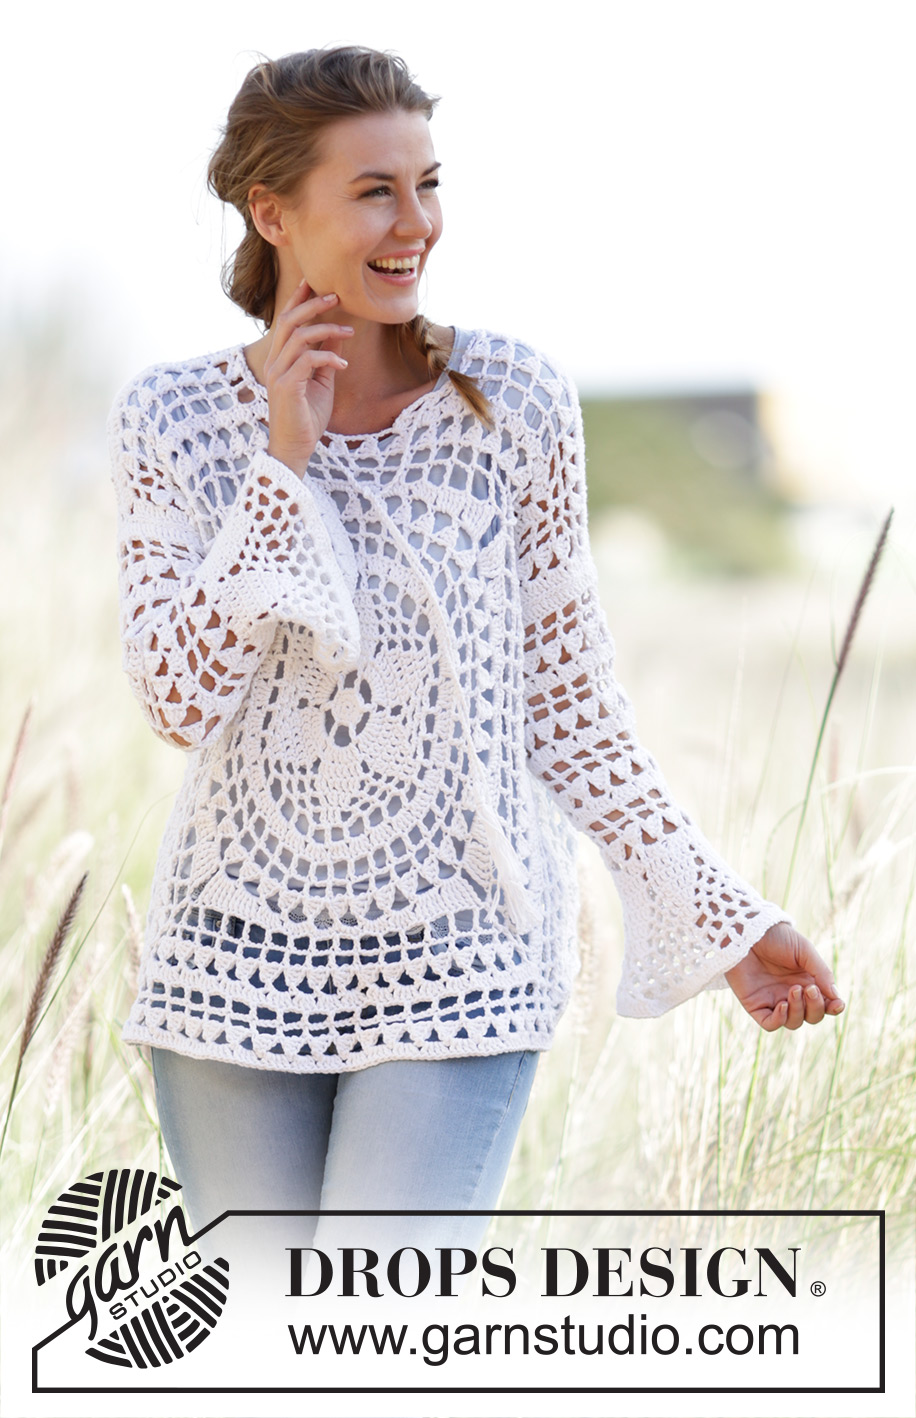
Crochet DROPS jumper worked in a square with flounce sleeves and lace pattern in ”Paris”. Size: S - XXXL.
DROPS 170-2 |
||||||||||||||||||||||||||||||||||||||||||||||
|
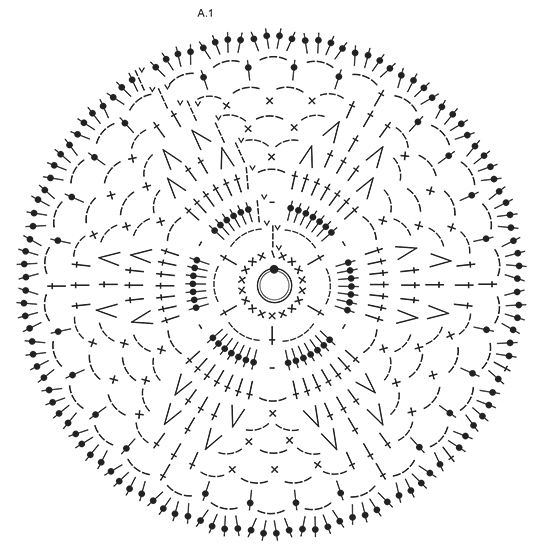
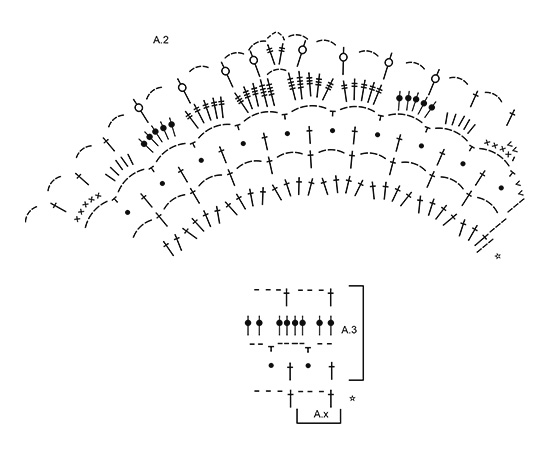
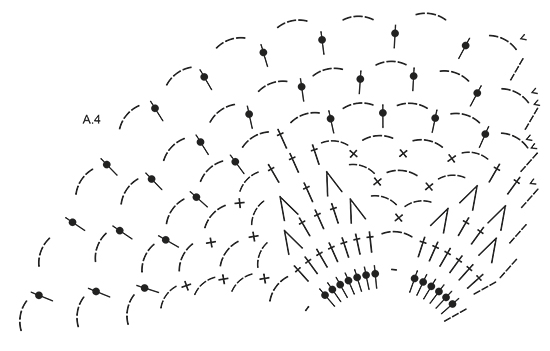
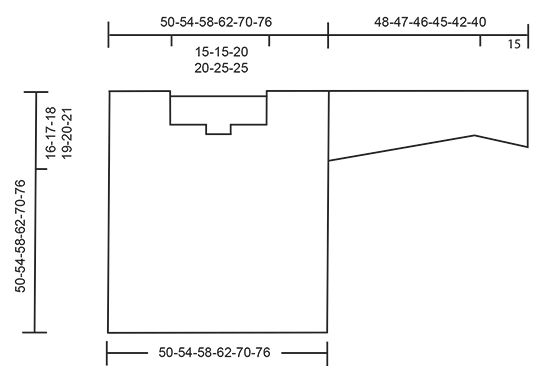
MAGIC CIRCLE: To avoid hole in the middle beg with this technique: Hold yarn end in the left hand and make a loop around left index finger (from left to right). Hold the loop with left thumb and index finger. Insert hook through loop, get the yarn from ball, pull yarn through loop, make 1 YO on hook and pull YO through st on hook = 1 dc, then work 8 dc around loop, finish with 1 sl st in first dc = 9 dc. Continue as explained in pattern – AT THE SAME TIME pull yarn end so that loop is tighten tog and the hole disappears. CROCHET INFO: Replace first dc on round with 1 ch. Finish round with one sl st in first ch from beg of round. Replace first tr on round/row with 3 ch. Finish round with one sl st in third ch from beg of round. PATTERN: See diagrams A.1 to A.4. QUADRUPLE TR: Make 4 YOs on hook, insert hook around ch-space and pull yarn around ch-space, * 1 YO on hook, pull yarn through the next 2 loops on hook *, repeat from *-* 4 more times = 1 loop on hook. DECREASE TIP: Dec 1 tr by working the next 2 tr tog as follows: Work 1 tr but wait with last pull through (= 2 loops on hook), then work next tr but on last pull through, pull yarn through all 3 loops on hook. ---------------------------------------------------------- JUMPER: BACK PIECE: Work back piece in a circle, then as a square from mid back. Work up along one side of square for shoulder/neck at the end. Work a MAGIC CIRCLE on hook size 4.5 mm with Paris – see explanation above = 9 dc around circle. Then work according to A.1 (on first round in A1 work 2 dc in each of the 9 dc = 18 dc). REMEMBER THE CROCHET TENSION! READ CROCHET INFO! When A.1 has been worked, there are 120 tr on round and piece measures approx. 22 cm in diameter. Then work according to A.2, work 4 repetitions of A.2 around the circle - beg on second round in A.2. NOTE: Sl sts at beg of A.2 are only worked at beg of round. When A.2 has been worked, continue according to A.3. A.x shows 1 repetition of A.3 in width. Work A.3, in every corner work 1 dtr + 3 ch + 1 dtr, work 2 repetitions more of A.3 between every corner for every round worked. Continue with A.3 until piece measures 23-25-27-29-33-36 cm from centre (46-50-54-58-66-72 cm in total), there are now approx. 18-20-22-24-28-30 repetitions of A.3 along each side of square. Now work piece back and forth and dec for neck in the middle of the first side of square. Cut the yarn and skip the middle 6-6-8-8-10-10 repetitions (= neck) on the first side of square, continue A.3 with inc in the corners until row has been worked, do not work over the 6-6-8-8-10-10 repetitions skipped at beg of row. Fasten off, piece measures 25-27-29-31-35-38 cm from centre (50-54-58-62-70-76 cm in total), there are approx. 7-8-8-9-10-11 repetitions on each shoulder, and approx. 20-22-24-26-30-32 repetitions along each of the other 3 sides. Insert 1 marker in each side, 16-17-18-19-20-21 cm down from shoulder, this shows where sleeve is sewn in. FRONT PIECE: Work as back piece until piece measures 17-19-21-23-27-30 cm from centre (32-36-40-44-52-58 cm in total), there are now approx. 14-16-18-20-24-26 repetitions of A.3 along each side of square. Now work piece back and forth and dec for neck in the middle of the first side of square. Cut the yarn and skip the middle 2 repetitions (= neck) on the first side of square, continue with A.3 with inc in the corners until row has been worked, do not work over the 2 repetitions skipped at beg of row. Turn and work a row from WS. Cut the yarn, skip the first 2-2-3-3-4-4 repetitions, continue with A.3 and inc in the corners, but turn when 2-2-3-3-4-4 repetitions remain on row, 6-6-8-8-10-10 repetitions have been dec mid front for neck. Continue back and forth with A.3 and inc until piece measures 25-27-29-31-35-38 cm from centre (50-54-58-62-70-76 cm in total), there are approx. 7-8-8-9-10-11 repetitions on each shoulder, and approx. 20-22-24-26-30-32 repetitions along each of the other 3 sides, adjust according to back piece. Fasten off. Insert 1 marker in each side, 16-17-18-19-20-21 cm down from shoulder, this shows where sleeve is sewn in. SLEEVE: Sleeve is worked in the round, top down. Work 64-64-69-69-74-74 ch and form a ring with one sl st in first ch. Work 3 ch (= 1 tr), 1 tr in each of the next 6-6-3-3-0-0 ch, skip 1 ch, * work 1 tr in each of the next 7 ch, skip 1 st *, repeat from *-* the entire round = 56-56-60-60-64-64 tr. Remember CROCHET INFO! Then work in the round and according to A.3. On 3rd round in A.3 dec 8 tr evenly - READ DECREASE TIP. Repeat dec every time 3th round in diagram is worked 3 times in total = 32-32-36-36-40-40 tr. Work A.3 until piece measures 33-32-31-30-27-25 cm, finish after 2nd or 4th round in A.3. Work 40-40-40-48-48-48 tr in total around ch-spaces. Then work according to A.4 (5-5-5-6-6-6 repetitions in width, diagram shows 2 repetitions in width), work first round as follows: * Work 1 tr in each of the first 7 tr, 1 ch, skip 1 tr *, repeat from *-* 4-4-4-5-5-5 more times. NOTE: Sl sts at beg of A.4 are only worked at beg of round. Work A.4 1 time vertically. Work now 1 round with tr: 1 tr in each tr, 3 tr around each ch-space. Fasten off. Sleeve measures approx. 48-47-46-45-42-40 cm. Work another sleeve the same way. ASSEMBLY: Sew the shoulder seams. Sew side seams from markers in the side and down. Sew in sleeves. TWINED STRING: Cut 2 lengths of 3 metres each. Twine the strands tog until they resist, fold the string double so that it twines again. Make a knot at each end. Thread tie up and down around the neck. Cut 8 lengths of yarn of 20 cm. Thread the ends through the end of the tie and fold them double. Twine one of the strand around the top of tassel. Make another fringe in the other end of tie. |
||||||||||||||||||||||||||||||||||||||||||||||
Diagram explanations |
||||||||||||||||||||||||||||||||||||||||||||||
|
||||||||||||||||||||||||||||||||||||||||||||||
 |
||||||||||||||||||||||||||||||||||||||||||||||
 |
||||||||||||||||||||||||||||||||||||||||||||||
 |
||||||||||||||||||||||||||||||||||||||||||||||
 |
||||||||||||||||||||||||||||||||||||||||||||||
Have you finished this pattern?Tag your pictures with #dropspattern #janissweater or submit them to the #dropsfan gallery. Do you need help with this pattern?You'll find 16 tutorial videos, a Comments/Questions area and more by visiting the pattern on garnstudio.com. © 1982-2025 DROPS Design A/S. We reserve all rights. This document, including all its sub-sections, has copyrights. Read more about what you can do with our patterns at the bottom of each pattern on our site. |
||||||||||||||||||||||||||||||||||||||||||||||


With over 40 years in knitting and crochet design, DROPS Design offers one of the most extensive collections of free patterns on the internet - translated to 17 languages. As of today we count 320 catalogues and 12094 patterns translated into English (UK/cm). 12094
We work hard to bring you the best knitting and crochet have to offer, inspiration and advice as well as great quality yarns at incredible prices! Would you like to use our patterns for other than personal use? You can read what you are allowed to do in the Copyright text at the bottom of all our patterns. Happy crafting!
Post a comment to pattern DROPS 170-2
We would love to hear what you have to say about this pattern!
If you want to leave a question, please make sure you select the correct category in the form below, to speed up the answering process. Required fields are marked *.