Comments / Questions (46)
![]() Siri Granum wrote:
Siri Granum wrote:
Det står ikke forklaring på hvordan å strikker mønsteret på boken. Tegn er en runding med skrå strek
09.01.2020 - 17:25DROPS Design answered:
Hej Siri, cirklen betyder kast og den skrå strek er 2 rett sammen. God fornøjelse!
15.01.2020 - 15:43
![]() Élodie wrote:
Élodie wrote:
Bonjour, J'ai choisi une laine en taille 3,5 au lieu de 3. Pouvez vous me donner des indications sur l'échantillon à réaliser pour vérifier la taille ? Merci.
05.11.2019 - 12:43DROPS Design answered:
Bonjour Élodie, l'échantillon est primordial pour réussir l'ouvrage conformément aux explications - plus d'infos ici. Bon tricot!
05.11.2019 - 14:50
![]() Noora Voutilainen wrote:
Noora Voutilainen wrote:
Hei! Minulla on ongelmia kaarrokkeen kanssa. Ohjeessa käsketään siirtää kaarrokkeen alussa samalle pyöröpuikolle kaikki silmukat, myös hihojen silmukat. Näin tehdessä kainaloiden päätellyt silmukat kiristävät työtä (kaikki hihan silmukat kerralla puikolla)siten, että hihan neulominen on lähes mahdotonta. Mikä neuvoksi??
09.05.2019 - 14:39DROPS Design answered:
Neulominen on aluksi hankalaa, kun kaarrokkeen osat on yhdistetty, se kuitenkin helpottuu joka kerroksen jälkeen. Voit neuloa kaarrokkeen ensimmäiset kerrokset kahdella pyöröpuikolla, mikä voi tehdä neulomisesta hieman helpompaa.
08.01.2020 - 16:54
![]() Sylvie wrote:
Sylvie wrote:
A l’empiècement, j’ai mes 365m, je fais les dim raglan ce qui ôte 200m (25x8), reste donc 165m. Je diminue de 40m (5x8)= 125m. Encolure = -7m = 118m. Commt peut-il rester 85m SVP ? Moi j’ai +33m ! Merci de bien vouloir m’éclairer SVP.
15.04.2019 - 23:16DROPS Design answered:
Bonjour Sylvie, n'oubliez pas L'ENCOLOURE: "EN MÊME TEMPS, quand l'ouvrage mesure environ 48 (1-2 rangs après la dernière boutonnière), glisser les 13 premières m au début des 2 rangs suivants sur un arrêt de mailles pour l'encolure" - vous avez lors 26 m sur les aiguilles auxiliaires (365-200-40-26=99 m). Et au total 7 m diminuees pour l'encolure de chaque cote: 7x2=14. 99-14=85 m. Bon tricot!
16.04.2019 - 16:24
![]() Marina wrote:
Marina wrote:
Ja, hier nochmals ich, das bis dahin habe ich ja verstanden nur in der Anleitung steht das ich wenn das Muster A1 fertig ist ich nur noch 223 Maschen auf der Nadel sind. Wo sind die Maschen geblieben??? Das ist vor dem Mustersatz A2 wenn ich zur Nadel 3 wechsle. Ich weiß nicht weiter😢
25.01.2019 - 14:56DROPS Design answered:
Liebe Marina, bei der letzte Reihe in A.1A und A.1B werden Sie 2 Masche abnehmen -siehe letzte Diagram symbol = es sind nur noch 8 M in jedem A.1A (2 M in jedem Zopf) und 5 in A.1B (= 2 M im Zopf), dann haben Sie: 5 Blendemaschen, 26 x 8 M (A.1A), 5 M (A.1B), 5 Blendemaschen = 223 M. Viel Spaß beim stricken!
25.01.2019 - 16:31
![]() Marina wrote:
Marina wrote:
Hallo, ich habe da ein Problem ich stricke diese Strickjacke in Größe M, habe 277 Maschen auf der Nadel bevor ich mit dem Muster A1A/A1B Anfange. Wenn die Mustersätze fertig sind sollen nur noch 223 Maschen auf der Nadel sein. Wo bleiben die Maschen, in dem Muster werden keine Maschen abgenommen bzw. nix zusammen gestrickt. Der Mustersatz A1A besteht durchgängig aus 10 Maschen. Hilfe.... ich stehe auf dem Schlauch. 😩
25.01.2019 - 11:15DROPS Design answered:
Liebe Marina, so stricken Sie die 277 M: 5 Blendemaschen, A.1A (= 10 M = 2 M re, 3 M li, 2 M re, 3 M li bei der 1. Reihe) x 26 (= über die nächsten 260 M), dann stricken Sie A.1B (= 7 M = 2 M re, 3 M li, 2 M re) und 5 Blendemaschen = 5 + 260 + 7 + 5 = 277 M. Viel Spaß beim stricken!
25.01.2019 - 14:05
![]() Hanicka wrote:
Hanicka wrote:
Dobrý den, není možné, že vzory A2 a A3... jsou zakresleny špatně? Podle obrázku vypadá vzor A2 krátky a podle nákresu je delší než A1, který má sám o sobě mít 7 cm? I v trupu (vzory A3) je mezi vzorovými oky jedna řada - vždyt podle nákresu to má být ale následující... Děkuji
09.04.2018 - 12:57DROPS Design answered:
Milá Hanicko, nákresy vzorků by měly být v pořádku. 7 cm měří celý dolní lem, nikoli vzor A.1 - schéma A.1 zobrazuje jen horní část lemu, křížení copánku. Dolní část lemu (cca 4 cm) pleteme běžným pružným vzorem dle slovního popisu v návodu, na uvedených místech postupně ujmeme. Hodně zdaru! Hana
09.04.2018 - 16:18
![]() Dea wrote:
Dea wrote:
"ATTENZIONE: Nel corso del 7° giro del diagramma A.2, lavorare a dir l’ultima m del giro (per le taglie: L + XL + XXL). " La stessa cosa vale anche per la taglia M, le maglie sono dispari e alla fine ne rimane una da sola. ^_^
03.04.2018 - 15:24DROPS Design answered:
Buonasera Dea. Abbiamo corretto il testo. La ringraziamo per la segnalazione. Buon lavoro!
03.04.2018 - 15:29
![]() Dea wrote:
Dea wrote:
Buongiorno, ho trovato un altro piccolo problema. Quando dice "ATTENZIONE: Nel corso del 7° ferro del diagramma (A2) lavorare a dir l’ultima m prima del bordo davanti." non ne rimane una, ma due dopo l'ultima gettata perchè le maglie sono pari. Scusate se ho scritto ancora.
19.03.2018 - 09:10
![]() Dea wrote:
Dea wrote:
Buonasera, dove parla delle ASOLE c'è scritto " intrecciare la 3a e la 4a m dal centro;" secondo me è meglio scrivere "dal bordo".
18.03.2018 - 20:23DROPS Design answered:
Buonasera Dea. Abbiamo modificato il testo. La ringraziamo per la segnalazione. Buon lavoro!
18.03.2018 - 21:07
Jolly May#jollymaycardigan |
||||||||||||||||||||||||||||
 |
 |
|||||||||||||||||||||||||||
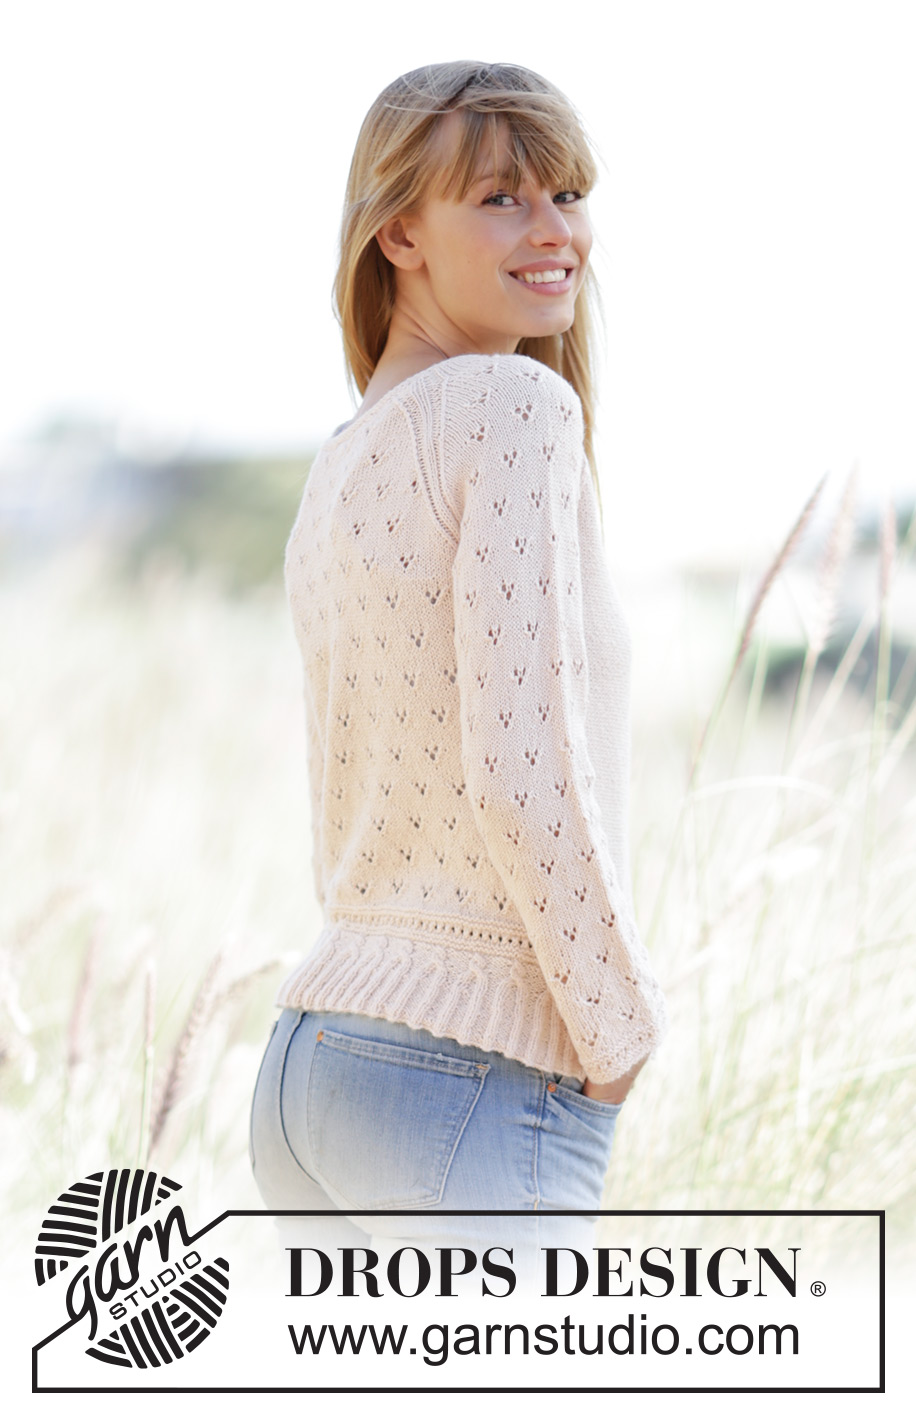
Knitted DROPS jacket with a small cable edge, lace pattern and raglan in ”BabyMerino”. Size: XS - XXXL.
DROPS 169-27 |
||||||||||||||||||||||||||||
|
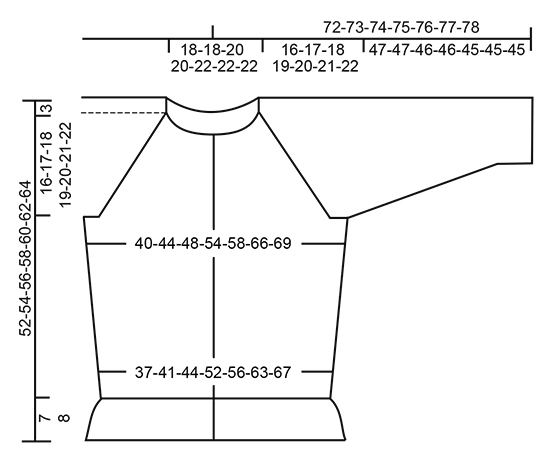
GARTER ST (back and forth): K all rows. 1 ridge = 2 rows K. GARTER ST (worked in the round): 1 ridge = 2 rounds. * K 1 round and P 1 round *, repeat from *-*. PATTERN: See diagrams A.1 to A.4. The diagrams show all rows in pattern seen from RS. INCREASE TIP: Inc 1 st on each side of marker as follows: Work until 1 sts remain before marker: Make 1 YO, work 2 sts in stocking st (marker is in the middle of these 2 sts), make 1 YO. On next row work YOs twisted to avoid holes - NOTE: Work inc sts in stocking st on front piece and in stocking st until they fit pattern on back piece and on sleeves. RAGLAN: Dec for raglan on each side of A.4 in every transition between sleeves and body. DEC AS FOLLOWS FROM RS: Beg 2 sts before A.4, K 2 tog, A.4 (= 6 sts), slip 1 st as if to K, K 1, psso (= 2 sts dec). DEC AS FOLLOWS FROM WS: Beg 2 sts before A.4, P 2 twisted tog, A.4 (= 6 sts), P 2 tog (= 2 sts dec). BUTTONHOLES: Dec for buttonholes on right band. 1 buttonhole = cast off third and fourth st from edge and cast on 2 new sts on next row over these sts. Dec for buttonholes when piece measures (first buttonhole should be in the middle of A.2): SIZE XS: 9, 17, 24, 31, 38 and 45 cm. SIZE S: 9, 17, 25, 33, 40 and 47 cm. SIZE M: 9, 17, 25, 33, 41 and 49 cm. SIZE L: 9, 16, 23, 29, 36, 43 and 50 cm SIZE XL: 10, 17, 24, 31, 38, 45 and 52 cm SIZE XXL: 10, 18, 25, 32, 39, 46 and 53 cm SIZE XXXL: 10, 18, 25, 33, 40, 48 and 55 cm DECREASE TIP (applies to neck edge): To calculate how often dec should be done, use the total no of sts on row (e.g. 126 sts), minus bands (e.g. 10 sts) and divide the remaining sts by no of dec to be done (e.g. 14) = 8.3. I.e. in this example work approx. every 7th and 8th st tog (and do not dec of bands). ---------------------------------------------------------- BODY: Worked back and forth on circular needle from mid front. Cast on 327-355-383-453-481-551-579 sts (incl 5 band sts in each side towards mid front) on circular needle size 2.5 mm with Baby Merino. P 1 row from WS. Work next row as follows from RS: 5 band sts in GARTER ST - see explanation above - * K 2, P 5 *, repeat from *-* until 7 sts remain on needle, finish with K 2 and 5 bands sts in garter st. Continue rib like this. When piece measures 3-3-3-3-4-4-4 cm, dec 1 st in every P-section by working the first 2 sts in every P-section P tog (from RS). Repeat dec when piece measures 4-4-4-4-5-5-5 cm, but now work the last 2 sts in every P-section P tog = 237-257-277-327-347-397-417 sts on needle. Work next row as follows from RS: 5 band sts as before, work pattern according to diagram A.1A until 12 sts remain on row (= 22-24-26-31-33-38-40 repetitions of 10 sts), work A.1B (= 7 sts) and finish with 5 band sts as before. When A.1 has been worked vertically, 191-207-223-263-279-319-335 sts remain on needle and piece measures approx. 7-7-7-7-8-8-8 cm. P 1 row from WS (continue bands as before) while dec 5-2-1-5-2-6-5 sts evenly - READ DECREASE TIP! (do not dec over bands) = 186-205-222-258-277-313-330 sts. Switch to circular needle size 3 mm and work next row from RS as follows - remember BUTTONHOLES on band - see explanation above: 5 band sts as before, work pattern according to diagram A.2 until 5 sts remain on row, and finish with 5 band sts in garter st as before. Continue the pattern like this - NOTE: On 7th row in diagram K last st before band. After A.2 insert 1 marker 49-54-58-67-72-81-85 sts in from each side (= 88-97-106-124-133-151-160 sts between markers on back piece). Then work as follows (1st row = RS): 5 band sts as before, K 1, P 2, work in stocking st until marker in the side, work A.3A (= 6 sts), repeat A.3B over the next 72-81-90-108-117-135-144 sts (= 8-9-10-12-13-15-16 repetitions of 9 sts), work A.3C (= 10 sts), marker, work in stocking st until 8 sts remain on row, finish with P 2, K 1 and 5 band sts as before. Continue pattern like this. REMEMBER THE KNITTING TENSION When piece measures 12 cm, inc 1 st on each side of marker in each side - READ INCREASE TIP (= 4 sts inc). Repeat inc every 5-5-6-8-10-10-10 cm a total of 4-4-4-3-3-3-3 times = 202-221-238-270-289-325-342 sts - NOTE: Work inc sts in stocking st on front piece and in stocking st until they fit pattern on back piece. When piece measures 33-34-35-36-37-38-39 cm, work next row from WS as follows: Work 50-55-58-66-70-79-83 sts (= left front piece), cast off 6-6-8-8-10-10-10 sts for armhole, work 90-99-106-122-129-147-156 sts (= back piece), cast off 6-6-8-8-10-10-10 sts for armhole and work the remaining 50-55-58-66-70-79-83 sts (= right front piece). Put piece aside and knit the sleeves. Worked in the round on double pointed needles. Cast on 52-52-61-61-61-70-70 sts on double pointed needles size 2.5 mm with Baby Merino. K 1 round. Then work pattern in the round according to diagram A.2 - NOTE: On 7th round in A.2 K last st on round (applies to size L + XL + XXL). When A.2 has been worked, switch to double pointed needles size 3 mm. Insert 1 marker at the beg of the round. Work next round as follows: Work A.3A (= 6 sts), work A.3B over the next 36-36-45-45-45-54-54 sts (= 4-4-5-5-5-6-6 repetitions of 9 sts) and finish with A.3C (= 10 sts). Continue pattern like this. When piece measures 5-6-6-7-5-9-9 cm, inc 2 sts mid under sleeve - READ INCREASE TIP. Repeat inc every 3.-2½.-3.-2½.-2½.-2½.-2. cm 14-16-13-15-16-14-17 times in total = 80-84-87-91-93-98-104 sts – NOTE: Work inc sts in stocking st until they fit the pattern again. Work until piece measures approx. 47-47-46-46-45-45-45 cm (NOTE: Shorter measurements in the larger sizes because of longer yoke) – adjust to work the same length in repetition of A.3 as on back piece before cast off for armholes. Work next round as follows: Cast off 3-3-4-4-5-5-5 sts, work 74-78-79-83-83-88-94 sts and cast off the remaining 3-3-4-4-5-5-5 sts. Put piece aside and knit another sleeve. YOKE: Slip sleeves on to same circular needle size 3 mm as body where armholes were cast off (without working them first) = 338-365-380-420-435-481-510 sts. Insert 1 marker in every transition between sleeves and body = 4 markers. Continue with pattern on sleeves and back piece as before and work in stocking st with bands on front piece. Work in addition A.4 now in every transition between body and sleeves (markers are in the middle of A.4). On first row from RS beg dec for RAGLAN – see explanation above (= 8 sts dec). Repeat dec for raglan on every other row (i.e. every row from RS) 24-25-28-29-32-34-34 times in total and then every row (i.e. both from RS and WS) 4-5-2-3-0-0-3 times in total - NOTE: Work sts that do not fit A.3 on back and sleeves in stocking st when dec. NECK: AT THE SAME TIME when piece measures approx. 46-48-50-51-53-54-56 cm (1-2 rows should be worked after last buttonhole on band), slip the first 10-13-16-18-22-26-27 sts at beg of the next 2 rows on 1 stitch holder for neck (work them before slipping them on stitch holder to avoid cutting the yarn). Continue with pattern and raglan as before and cast off for neck at beg of every row in each side as follows: Cast off 3 sts 0-0-0-1-1-2-2 times, 2 sts 2 times and 1 st 3-3-3-4-4-4-4 times. After all dec and cast offs for raglan and neck, 80-85-94-106-113-129-132 sts remain on needle. NECK EDGE: Pick up from RS approx. 114-126-140-164-179-209-214 sts (incl sts on stitch holders at the front) on circular needle size 2.5 mm. K 1 row from WS while dec evenly to 110-112-128-130-140-144-146 sts (i.e. dec approx. 4-14-12-34-39-65-68 sts) – READ DECREASE TIP. K 4 rows and loosely cast off with K from RS. ASSEMBLY: Sew the openings under the sleeves. Sew on buttons. |
||||||||||||||||||||||||||||
Diagram explanations |
||||||||||||||||||||||||||||
|
||||||||||||||||||||||||||||
 |
||||||||||||||||||||||||||||
 |
||||||||||||||||||||||||||||
 |
||||||||||||||||||||||||||||
Have you finished this pattern?Tag your pictures with #dropspattern #jollymaycardigan or submit them to the #dropsfan gallery. Do you need help with this pattern?You'll find 30 tutorial videos, a Comments/Questions area and more by visiting the pattern on garnstudio.com. © 1982-2025 DROPS Design A/S. We reserve all rights. This document, including all its sub-sections, has copyrights. Read more about what you can do with our patterns at the bottom of each pattern on our site. |
||||||||||||||||||||||||||||


Post a comment to pattern DROPS 169-27
We would love to hear what you have to say about this pattern!
If you want to leave a question, please make sure you select the correct category in the form below, to speed up the answering process. Required fields are marked *.