
Looking for a yarn?


Comments / Questions (50)
![]() Huguette wrote:
Huguette wrote:
Je ne comprends pas comment rabattre les mailles pour l’emmanchure. Je suis les instructions disant de rabattre « 3 mailles, tricoter 71 mailles, rabattre 6 mailles, tricoter 71 mailles et rabattre 3 mailles. « Je n’arrive pas à avoir les 3 mailles restantes à la fin du tour . Quelle méthode il faut utiliser pour rabattre ces mailles..
28.05.2020 - 15:37DROPS Design answered:
Bonjour Huguette, on utilise la technique classique (on tricote 2 mailles, on passe la 1ère par-dessys la 2ème, on tricote 1 m, on passe la 1ère par-dessus la 2ème et ainsi de suite). Comptez bien vos mailles pour en rabattre 3 au début du tour, tricotez 70 m (= vous en avez 71 sur l'aiguille), rabattez 6 m, tricotez en 70 (= vous en avez 71 sur l'aiguille), il reste 3 m, rabattez ces 3 m et coupez le fil. Bon tricot!
28.05.2020 - 16:24
![]() Patricia wrote:
Patricia wrote:
Pour le col rehausse, les rangs point mousse ajoutés ne vont-ils pas se voir car il y aura plus de rangs au-dessus du point ajouré derrière que devant ? Avez-vous une photo de ce que cela donne ?
10.05.2020 - 23:45DROPS Design answered:
Bonjour Patricia, effectivement, ces rangs point mousse supplémentaires vont automatiquement se voir car il n'y aura pas le même nombre sur le devant, mais ce sont ces rangs raccourcis de la réhausse qui feront que l'encolure dos sera plus haute que l'encolure devant. Bon tricot!
11.05.2020 - 10:32
![]() Rose Marie wrote:
Rose Marie wrote:
Bonjour, Pour le modèle cl-058, faut-il faire le diagramme sur les 26 mailles en jersey entre les marqueurs je vous remercie
19.09.2019 - 16:37DROPS Design answered:
Bonjour Rose Marie, en taille M et XL, on doit avoir 26 mailles jersey (= 13 de chaque côté de chacun des marqueurs) sur les côtés et les diagrammes A.1A, A.1B, A.1C entre ces 26 mailles jersey. On diminue et on augmente ensuite sur les côtés = dans les mailles jersey. Bon tricot!
20.09.2019 - 08:23
![]() Anne-marie Grenier wrote:
Anne-marie Grenier wrote:
J'ai fais ce pull et je l'adore. Je l'ai même lavé dans la laveuse et je l'ai séché à plat et il est resté besau.
12.07.2019 - 15:52Heathef wrote:
Thanks but how many stitches in do I strt it?
24.07.2018 - 21:36DROPS Design answered:
Dear Heather, you should start the elevation mid on back piece. Happy knitting!
25.07.2018 - 08:16
![]() ANNE DE LOOF wrote:
ANNE DE LOOF wrote:
Buongiorno, vorrei realizzare questo progetto per una bambina di circa 11 anni, c'è un modo per adattare la taglia? grazie mille e buon lavoro
02.07.2018 - 10:43DROPS Design answered:
Buongiorno Anne, può provare a vedere se le misure della taglia più piccola possono corrispondere a quelle che le servono, altrimenti per un aiuto più personalizzato si può rivolgere al suo rivenditore DROPS di fiducia. Buon lavoro!
02.07.2018 - 16:27
![]() Guiberteau wrote:
Guiberteau wrote:
A 6 cm il faut diminuer une maille avant le 1er marqueur et le 3eme puis le 2eme et 4eme pouvez vous m'aider
14.03.2018 - 13:49DROPS Design answered:
Bonjour Mme Guiberteau, à 6 cm, vous diminuez avant le 1er et le 3ème marqueur en tricotant 2 m ens à l'end juste avant le marqueur et après le 2ème et le 4ème marqueur en tricotant après le marqueur: glissez 1 m à l'end, 1 m end, passez la m glissée par-dessus la m tricotée = 4 m diminuées. Bon tricot!
14.03.2018 - 16:01
![]() Huguette wrote:
Huguette wrote:
Je crois m'être mal exprimée dans ma question précédente. Je précise: la partie inférieure tricotée en côtes se redresse et forme un angle de 90 degrés par rapport au tricot (il ne "roule" pas comme le ferait un tricot en jersey). Même chose avec le modèle 176-4 que j'ai tricoté. Comment résoudre ce problème? Merci !!
13.12.2017 - 22:09DROPS Design answered:
Bonjour Huguette, votre question avait été bien comprise et vous trouverez la réponse ci-dessous etsous l'autre modèle. Bon tricot!
14.12.2017 - 08:38
![]() Huguette wrote:
Huguette wrote:
J'ai terminé ce modèle récemment ainsi que le modèle 176-4. J'ai un problème avec les deux pulls: le devant inférieur "roule"; il y a comme un faux pli dans le tricot. Les deux pulls sont pour offrir; j'espère que vous m'aiderez à régler ce problème ! Merci !
13.12.2017 - 19:38DROPS Design answered:
Bonjour Huguette, vous pouvez simplement laver le pull en suivant bien les consignes de l'étiquette + les généralités ici et le faire sécher à plat aux mesures finales - vous pouvez ajouter quelques épingles (inoxydables) si nécessaire. Votre magasin DROPS pourra très certainement vous donner d'autres astuces. Bon tricot!
14.12.2017 - 08:33
![]() Christine wrote:
Christine wrote:
Hallo, wird die gesamte passe mit der kleinerenNadel 3,5 gestrickt? Gruß Christine
18.09.2017 - 08:13DROPS Design answered:
Liebe Christine, ja, Passe wird mit Nadel 3,5 bis zur Ende gestrickt. Viel Spaß beim stricken!
18.09.2017 - 09:30
|
||||||||||||||||
Clara#clarasweater |
||||||||||||||||
|
|
||||||||||||||||
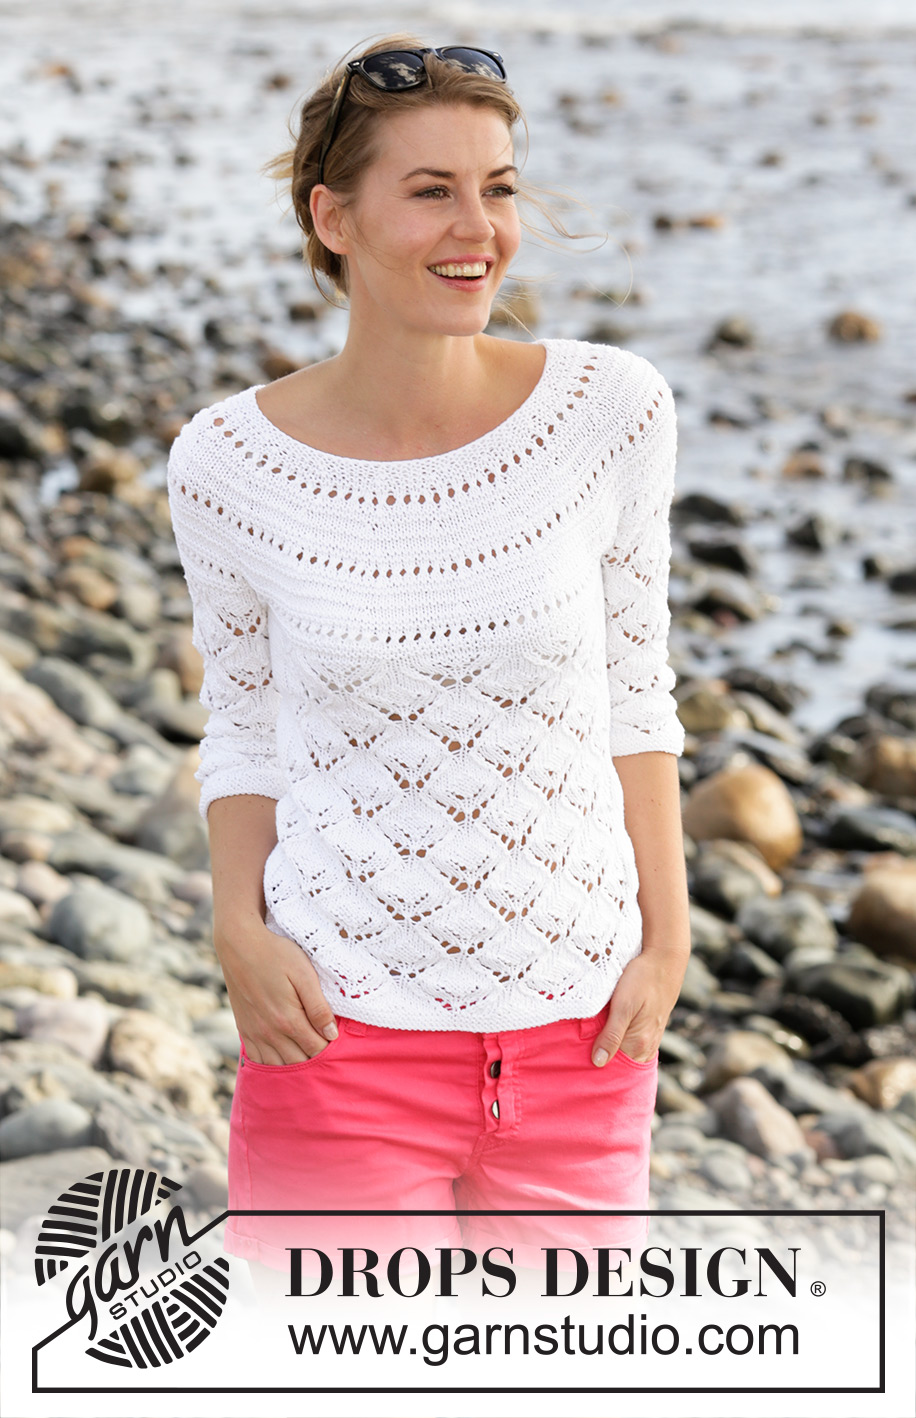
Knitted DROPS jumper with lace pattern, round yoke and ¾ sleeves in ”Cotton Light”. Size: S - XXXL
DROPS 170-7 |
||||||||||||||||
|
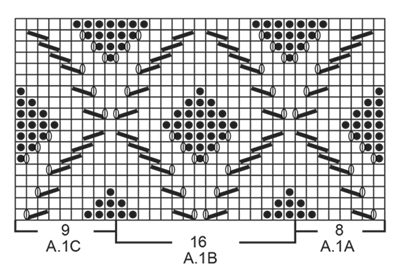
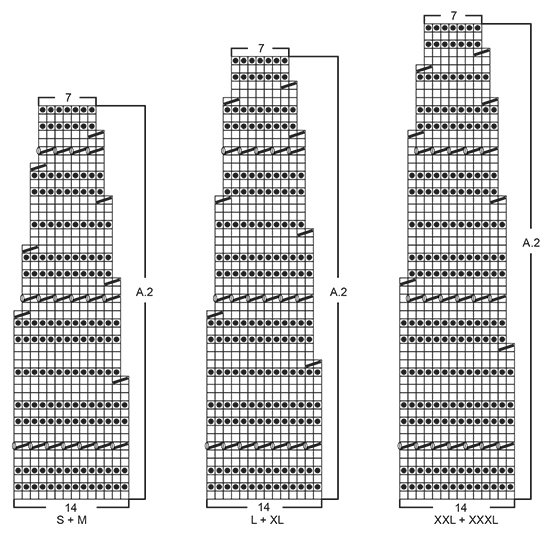
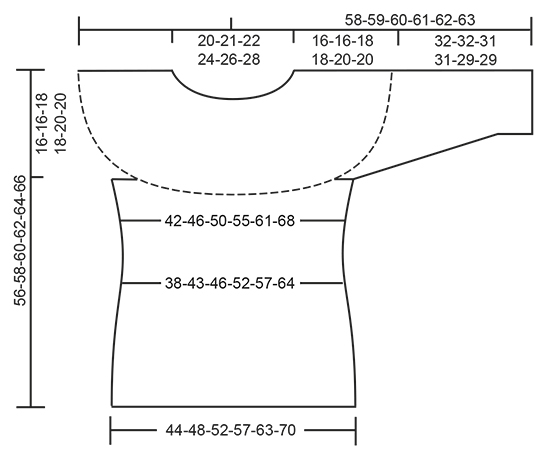
GARTER ST (worked in the round): 1 ridge = 2 rounds. * K 1 round and P 1 round *, repeat from *-*. PATTERN: See diagrams A.1 and A.2. NOTE: Note that on some rounds in A.1 there is pattern on EVERY round. DECREASE TIP-1: To calculate how often dec should be done, use the total no of sts on round (e.g. 184 sts) and divide by no of dec to be done (e.g. 22) = 8.4. I.e. in this example K approx. every 7th and 8th st tog. DECREASE TIP-2 (applies to sides of body): Dec as follows before first and third marker: Beg 2 sts before marker and K 2 tog. Dec as follows after second and fourth marker: Slip 1 st as if to K, K 1, psso. INCREASE TIP (applies to sides of body): Inc as follows before first and third and after second and fourth marker: Make 1 YO. On next round K YO twisted to avoid holes. ---------------------------------------------------------- BODY: Because of pattern in A.1 work piece in the round on circular needle. Cast on 184-202-218-240-264-294 sts on circular needle size 3.5 mm with Cotton Light. Work 3 ridges in GARTER ST - see explanation above. Switch to circular needle size 4 mm and K 1 round while dec 22-20-28-26-34-40 sts evenly - READ DECREASE TIP-1 = 162-182-190-214-230-254 sts. Work next round as follows: Work 8-13-7-13-9-7 sts in stocking st, insert 1 marker (= first marker), * work pattern according to diagram A.1A (= 8 sts), repeat A.1B over the next 48-48-64-64-80-96 sts (= 3-3-4-4-5-6 repetition of 16 sts), work A.1C (= 9 sts) *, insert 1 marker (= second marker), work 16-26-14-26-18-14 sts in stocking st, insert 1 marker (= third marker), repeat from *-* one more time, insert 1 marker (= fourth marker) and finish with 8-13-7-13-9-7 sts in stocking st. Continue pattern like this. REMEMBER THE KNITTING TENSION When piece measures 6 cm, dec before first and third and after second and fourth marker – READ DECREASE TIP-2 (= 4 sts dec). Repeat dec every 3 cm a total of 6 times = 138-158-166-190-206-230 sts. When piece measures 26 cm, inc before first and third and after second and fourth marker – READ INCREASE TIP (= 4 sts inc). Repeat inc every 3-4-4-4-4-5 cm a total of 4 times = 154-174-182-206-222-246 sts. When piece measures 40-42-42-44-44-46 cm, work next round as follows: Cast off 3-3-4-4-5-5 sts for armhole, K 71-81-83-95-101-113 (= back piece), cast off 6-6-8-8-10-10 sts for armhole, K 71-81-83-95-101-113 (= front piece) and cast off the last 3-3-4-4-5-5 sts for armhole. Put piece aside and knit the sleeves. SLEEVE: Because of pattern in A.1 work piece in the round on double pointed needles. Cast on 58-58-58-60-62-64 sts on double pointed needles size 3.5 mm with Cotton Light. Work 3 ridges. Switch to double pointed needles size 4 mm and K 1 round while dec 7 sts evenly = 51-51-51-53-55-57 sts. Work next round as follows: 1-1-1-2-3-4 sts in stocking st, work pattern according to diagram A.1A (= 8 sts), repeat A.1B over the next 32 sts (= 2 repetitions of 16 sts), work A.1C (= 9 sts) and finish with 1-1-1-2-3-4 sts in stocking st. Continue pattern like this. When piece measures 8 cm, inc 1 st on each side of the middle 2 sts mid under sleeve (inc by making 1 YO, on next round K YO twisted to avoid holes). Repeat inc every 5-4-3½-3-2½-2 cm 5-6-7-8-9-10 times in total = 61-63-65-69-73-77 sts. When piece measures 32-32-31-31-29-29 cm (NOTE: Shorter measurements in the larger sizes because of longer yoke) work next round as follows: Cast off 3-3-4-4-5-5 sts, K 55-57-57-61-63-67 and cast off the last 3-3-4-4-5-5 sts. Put piece aside and knit another sleeve. YOKE: Switch to circular needle size 3.5 mm and slip sleeves on to same circular needle as body where armholes were cast off (without working them first) = 252-276-280-312-328-360 sts. Then work pattern in the round according to diagram A.2 (choose diagram for correct size = 17-18-19-21-22-24 repetitions of 14 sts), AT THE SAME TIME dec 14-24-14-18-20-24 sts evenly on first round – READ DECREASE TIP-1 = 238-252-266-294-308-336 sts on needle. When diagram A.2 has been worked, there are 119-126-133-147-154-168 sts on needle and piece measures approx. 56-58-60-62-64-66 cm, cut the yarn. NECK EDGE WITH ELEVATION: Beg from RS mid back and work in garter st back and forth on circular needle size 3.5 as follows: K 7-7-8-9-9-10 sts, turn, tighten yarn and K 14-14-16-18-18-20 sts back. Turn, tighten yarn and K 21-21-24-27-27-30 sts, turn, tighten yarn and K 28-28-32-36-36-40 sts back. Continue back and forth like this and work 7-7-8-9-9-10 sts more on every turn until 56-56-64-72-72-80 sts in total have been worked (= 8 rows in total), turn piece, tighten yarn and K until mid back. K 1 round over all sts while dec 23-24-27-31-34-36 sts evenly = 96-102-106-116-120-132 sts on needle. P 1 round, K 1 round and P 1 round. Then loosely cast off with K. ASSEMBLY: Sew the openings under the sleeves. |
||||||||||||||||
Diagram explanations |
||||||||||||||||
|
||||||||||||||||
 |
||||||||||||||||
 |
||||||||||||||||
 |
||||||||||||||||
Have you finished this pattern?Tag your pictures with #dropspattern #clarasweater or submit them to the #dropsfan gallery. Do you need help with this pattern?You'll find 26 tutorial videos, a Comments/Questions area and more by visiting the pattern on garnstudio.com. © 1982-2025 DROPS Design A/S. We reserve all rights. This document, including all its sub-sections, has copyrights. Read more about what you can do with our patterns at the bottom of each pattern on our site. |
||||||||||||||||


With over 40 years in knitting and crochet design, DROPS Design offers one of the most extensive collections of free patterns on the internet - translated to 17 languages. As of today we count 320 catalogues and 12095 patterns translated into English (UK/cm). 12095
We work hard to bring you the best knitting and crochet have to offer, inspiration and advice as well as great quality yarns at incredible prices! Would you like to use our patterns for other than personal use? You can read what you are allowed to do in the Copyright text at the bottom of all our patterns. Happy crafting!
Post a comment to pattern DROPS 170-7
We would love to hear what you have to say about this pattern!
If you want to leave a question, please make sure you select the correct category in the form below, to speed up the answering process. Required fields are marked *.