
Looking for a yarn?


Comments / Questions (124)
![]() Heather Neumann wrote:
Heather Neumann wrote:
I love this set! I made 2 of them for 2 great nieces. Is there a matching hat pattern for adult sizes? If not, how would I adapt this pattern for a women's small or medium?
12.10.2019 - 19:51DROPS Design answered:
Dear Mrs Neumann, we do not have exactly the same pattern for adult, but you will . Happy knitting!
14.10.2019 - 09:59
![]() Christiane wrote:
Christiane wrote:
Danke für die sofortige Hilfe! Die Mütze ist fertig und wunderschön.
19.08.2019 - 16:50
![]() Christiane wrote:
Christiane wrote:
Bei der Mütze: "nach 12 cm die nächste Reihe stricken: 3 li., 2 li zusammen, wiederholen bis 4 M übrig sind, diese li str.=84 Maschen" . Ich verstehe das nicht, können sie mir weiterhelfen? Es handelt sich bei der Grösse um die 2. Grösse. Danke!
18.08.2019 - 18:11DROPS Design answered:
Liebe Christiane, bei dieser Runde werden Sie abnehmen, bei dem Sie * 3 li., 2 li. zusammen *, von *-* insgesamt 16 Mal wiederholen (über die ersten 80 Maschen) und die 4 letzten Maschen der Runde li. stricken = es bleiben nur noch 84 M nach dieser Runde. Viel Spaß beim stricken!
19.08.2019 - 10:32
![]() Margaret Mahony wrote:
Margaret Mahony wrote:
Thank you for your reply and explaination. much clearer now. just one question- you stated M2 should be another cable. but if i am reading this from the bottom uo, from right to left, i see 6 stitches of knit for the first 4 rows and then a cable. Am Inot reading this correctly? thank you Margaret
17.07.2019 - 06:25DROPS Design answered:
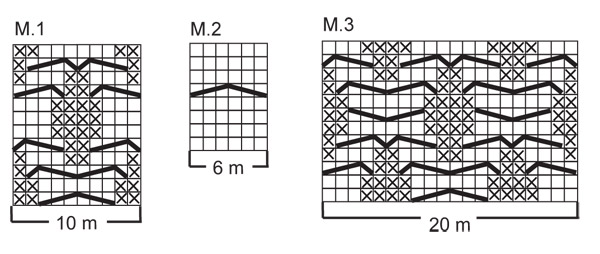
Dear Mrs Mahony, I just meant M.1 and M.2 are two different cables, when working diagrams, you will cross the stitches on different rows: in M.1 you cable on rows 1, 3, 5, 9 and 11 and in M.2 cables are on row 5 in diagram. See how to read diagrams - Several different diagrams worked consecutively on the round. Happy knitting!
17.07.2019 - 11:12
![]() Margaret Mahony wrote:
Margaret Mahony wrote:
I casted on 288 stitches. i am at the point where i have 228 stitches. there are only three cable (M1) stitches on the pancho? does that seen right? i am starting the pattern where the instructions state "continue in pattern". i understand the alternatint decrease stitches, but the stitches dont add up. the pattern is M1, dec (P2tog), P30,M2 dec (P2tog),P30. if i am decreasing on each row then the P30 is not correct? wouldnt the number of P stitches decrease with each row? thanks Margaret
16.07.2019 - 06:47DROPS Design answered:
Dear Mrs Mahony, in 2nd size there is a total of 6 cables, you work: *M.1 (= cables over 10 sts), P30, M.2 (= cable over 6 sts), P30*, repeat from *-* a total of 3 times. When decreasing in the purl section, the number of P stitches will decrease, ie on 1st decrease you work M.1, P28, P2 tog,, M.2, P28, P2 tog = there are now P29 between each cable. When all dec are done (23 times) = P7 remain in each P-section = (M1,P7, M2,P7)x3= 90 sts remain. Happy knitting!
16.07.2019 - 09:24
![]() Monica wrote:
Monica wrote:
Me ha gustado mucho todos tus cosas de punto. Quiero volver a tejer, cosas no muy difíciles por ahora. Gracias
18.06.2019 - 01:08
![]() DANIELLE wrote:
DANIELLE wrote:
Re bonjour..... pour bébé 1/3 Je viens de faire selon votre dernière explication "tricotez 1 tour endroit, et sur ce même tour, vous diminuez 3 m dans chaque motif M.1 et M.2....'' Ma question est la suivante et concerne la prochaine étape: On demande de : TRICOTER ENSUITE 1 TOUR END. , EN MÊME TEMPS, RÉPARTIR 10 AUGMENTATIONS = 76 M. J'étais déjà sur ''1 tour end''. Est-ce que cela signifie le diagramme au complet? Merci encore une fois, Danielle,
03.06.2019 - 23:24DROPS Design answered:
Bonjour Danielle, après le tour avec les diminutions dans les diagrammes on ne tricote plus les torsades, on a diminué dans les torsades pour conserver la bonne largeur, on tricote maintenant encore 1 tour endroit en répartissant cette fois 10 diminutions = il reste 76 m (et votre ouvrage mesure environ 20 cm), vous continuez maintenant avec l'aiguille 3,5 en côtes pendant 3 cm. Bon tricot!
04.06.2019 - 08:20
![]() DANIELLE wrote:
DANIELLE wrote:
Merci beaucoup pour vos réponses rapides. C'est vraiment apprécié.
03.06.2019 - 16:43
![]() DANIELLE wrote:
DANIELLE wrote:
Bonjour, est-ce possible d'avoir plus d'explications sur ceci: (bébé 1/3) TRICOTER ENSUITE 1 TOUR END. , EN MEME TEMPS, DIMINUER 3 M. DANS TOUS LES MOTIFS M.1 ET M.2 = 66 M. Est-ce diminuer 3 m. à chaque tours (rang) dans le motif? Merci beaucoup,
02.06.2019 - 23:30DROPS Design answered:
Bonjour Danielle, vous tricotez 1 tour endroit, et sur ce même tour, vous diminuez 3 m dans chaque motif M.1 et M.2 (= pour diminuer 1 m, tricotez 2 m ens à l'end à 3 reprises dans chaque M1 et chaque M2) = il doit vous rester 3 m dans chaque M.2 et 7 m dans chaque M.1 soit 66 m au total à la fin de ce tour. Bon tricot!
03.06.2019 - 10:32
![]() Margaret Mahony wrote:
Margaret Mahony wrote:
Thank you so much for the very quick response and the information - I am good to go now!
26.05.2019 - 21:30
|
|||||||||||||||||||
Baby Dove#babydoveset |
|||||||||||||||||||
|
|
|||||||||||||||||||
Set of knitted poncho and hat with cables plus socks for baby and children in DROPS Merino Extra Fine
DROPS Baby 17-5 |
|||||||||||||||||||
|
PONCHO: PATTERN: See diagram M.1 and M.2. The diagrams show the pattern from the RS. PONCHO: Worked from the bottom and up in the round on circular needle. Cast on 272-288-300 (340-360) sts on circular needle size 3.5 mm with Merino Extra Fine. Work 4 cm rib, K2/P2. Change to circular needle size 4 mm and K 1 round, AT THE SAME TIME dec 56-60-60 (68-72) sts evenly = 216-228-240 (272-288) sts. Work next round as follows: * M.1, P 28-30-32 (26-28), M.2, P 28-30-32 (26-28) *, repeat from *-* a total of 3-3-3 (4-4) times. REMEMBER THE KNITTING TENSION! Continue in pattern like this, AT THE SAME TIME on second round dec 1 st on the left side of each P-section by P2 tog. Repeat the dec on every 2-2-2 (3-3) round on the right and left side of each P-section alternately a total of 22-23-25 (20-21) times = 84-90-90 (112-120) sts. Now K 1 round, AT THE SAME TIME dec 3 sts on all M.1 and M.2 repeats = 66-72-72 (88-96) sts. K 1 round, AT THE SAME TIME inc 10-12-16 (12-12) sts evenly = 76-84-88 (100-108) sts. Piece now measures approx 20-21-23 (26-27) cm. Change to circular needle size 3.5 mm and work 3-4-4 (5-6) cm rib, K2/P2. Cast off in rib. Poncho measures approx 23-25-27 (31-33) cm. ---------------------------------------------------------- HAT: Head circumference: 40/42 - 44/46 - 46/48 (48/50 - 50/52) cm. PATTERN: See diagram M.2 and M.3. The diagrams show the pattern from the RS. ---------------------------------------------------------- HAT: Worked in the round on circular needle. Cast on 96-100-100 (104-112) sts on circular needle size 3.5 mm with Merino Extra Fine. K 1 round and continue in rib, K2/P2. When rib measures 4-4-5 (5-5) cm change to circular needle size 4 mm, K 1 round, P 1 round and then K 1 round, AT THE SAME TIME inc 4-4-8 (8-8) sts evenly = 100-104-108 (112-120) sts. Continue as follows: P 3-3-3 (4-5), M.2, P 6-7-8 (8-9), M.3, P 6-7-8 (8-9), M.2, P 6-6-6 (8-10), M.2, P 6-7-8 (8-9), M.3, P 6-7-8 (8-9), M.2, P 3-3-3 (4-5). When piece measures approx 11-12-13 (14-15) cm work next round as follows: * P3, P2 tog *, repeat from *-* until 0-4-3 (2-0) sts remain, P these = 80-84-87 (90-96) sts. Now P all sts, AT THE SAME TIME dec 17-18-19 (20-21) sts evenly on every other round a total of 4 times = 12-12-11 (10-12) sts. NOTE: change to double pointed needles when sts no longer fit circular needle. Cut the thread, pull through remaining sts and fasten. Hat measures approx 14-15-16 (17-18) cm. ---------------------------------------------------------- SOCK: HEEL DECREASES: Row 1 (= RS): Work row until 5-5-5 (6-6) sts remain, slip next st as if to K, K1, psso, turn piece, Row 2 (= WS): Work row until 5-5-5 (6-6) sts remain, slip next st as if to P, P1, psso, turn piece, Row 3 ( = RS): Work row until 4-4-4 (5-5) sts remain, slip next st as if to K, K1, psso, turn piece, Row 4 (= WS): Work row until 4-4-4 (5-5) sts remain, slip next st as if to P, P1, psso, turn piece. Continue dec like this with 1 less st between each dec until there are 7-9-9 (9-9) sts on row. DECREASING TIP: Dec as follows before marker: K2 tog. Dec as follows after marker: slip 1 st as if to K, K1, psso. -------------------------------------------------------- SOCK: Worked in the round on double pointed needles. Cast on 30-30-36 (36-36) sts on double pointed needles size 3 mm with Merino Extra Fine. Work 8-8-9 (9-10) cm rib, K3/P3, and then K 1 round, AT THE SAME TIME dec 2-0-4 (2-0) sts evenly = 28-30-32 (34-36) sts. P 1 round, K 1 round and P 1 round. Now keep the first 15-17-17 (19-19) sts on needle for heel and slip the remaining 13-13-15 (15-17) sts on a stitch holder = upper foot. Work 3-3.5-4 (4-4.5) cm stocking st on heel sts. Insert a marker in piece and now dec for heel – SEE ABOVE. After heel dec pick up 7-8-9 (9-10) sts on each side of heel and slip sts from stitch holder back on needles = 34-38-42 (42-46) sts. Continue in stocking st on all sts, AT THE SAME TIME dec 1 st on each side of the 13-13-15 (15-17) sts on upper foot as follows: K tog the 2 sts before the 13-13-15 (15-17) sts into back of loop and K tog the 2 sts after the 13-13-15 (15-17) sts. Repeat the dec on every other round a total of 4-6-6 (6-6) times = 26-26-30 (30-34) sts. Continue until piece measures approx 8-9-9.5 (11.5-12.5) cm from marker on heel (approx 2-2-2.5 (2.5-3.5) cm remain). Now insert a marker each side with 13-13-15 (15-17) sts on upper foot and 13-13-15 (15-17) sts under foot. Continue in stocking st, AT THE SAME TIME dec 1 st on each side of both markers – SEE DECREASING TIP - on every other round 2-2-3 (3-5) times and then on every round 3-3-3 (3-2) times = 6 sts left. Cut the thread, pull through remaining sts and fasten. Sock measures approx 10-11-12 (14-16) cm. |
|||||||||||||||||||
Diagram explanations |
|||||||||||||||||||
|
|||||||||||||||||||
 |
|||||||||||||||||||
 |
|||||||||||||||||||
Have you finished this pattern?Tag your pictures with #dropspattern #babydoveset or submit them to the #dropsfan gallery. Do you need help with this pattern?You'll find 20 tutorial videos, a Comments/Questions area and more by visiting the pattern on garnstudio.com. © 1982-2025 DROPS Design A/S. We reserve all rights. This document, including all its sub-sections, has copyrights. Read more about what you can do with our patterns at the bottom of each pattern on our site. |
|||||||||||||||||||


With over 40 years in knitting and crochet design, DROPS Design offers one of the most extensive collections of free patterns on the internet - translated to 17 languages. As of today we count 320 catalogues and 12095 patterns translated into English (UK/cm). 12095
We work hard to bring you the best knitting and crochet have to offer, inspiration and advice as well as great quality yarns at incredible prices! Would you like to use our patterns for other than personal use? You can read what you are allowed to do in the Copyright text at the bottom of all our patterns. Happy crafting!
Post a comment to pattern DROPS Baby 17-5
We would love to hear what you have to say about this pattern!
If you want to leave a question, please make sure you select the correct category in the form below, to speed up the answering process. Required fields are marked *.