
Looking for a yarn?


Comments / Questions (57)
![]() Anka wrote:
Anka wrote:
Leider ist auf dem Bild die Hose nicht so gut zu sehen, ein weiteres Bild wäre schön. Vielleicht können Sie sie ja auch noch mal neu auflegen, da sie hier etwas untergeht.
03.04.2015 - 19:11
![]() Sandra wrote:
Sandra wrote:
Meinen sie in der 4R 3 M li, 11 M re und 3 M li?
30.03.2015 - 21:11DROPS Design answered:
Ja richtig, das war ein Vertipper, Entschuldigung. Also: 1. R = Rück-R = li stricken. 2. R = Hin-R = 3 x 2 M re zusammenstricken, 6 Umschläge mit 5 Rechtsmaschen dazwischen, 3 x 2 M re überzogen zusammenstricken. 3. R = Rück-R = li stricken. 4. R = Hin-R = 3 M li, 11 M re, 3 M li.
31.03.2015 - 10:18
![]() Sandra wrote:
Sandra wrote:
Aber wenn ich in der 4R von M1 die Maschen in der Hinreihe li und und in der Rückreihe re Stricke, mit welcher R fange ich dann beim nächsten Muster wieder an? Mit der Rückreihe re oder mit der 2ten Reihe?
29.03.2015 - 21:39DROPS Design answered:
Die 4 R, die Sie in M.1 sehen, sind 1 Rück-R, 1 Hin-R, 1 Rück-R und 1 Hin-R. Sie stricken also die 1. R als Rück-R, d.h. alle M li. Dann stricken Sie die 2. R als Hin-R, also die R mit dem Zusammenstricken und den Umschlägen. Dann kommt die 3. R als Rück-R, also li, dann die 4. R als Hin-R mit zuerst 3 M re, 11 M re und 3 M li. Dann fangen Sie wieder mit der 1. R an, das ist dann ja wieder eine Rück-R.
30.03.2015 - 10:20
![]() Sandra wrote:
Sandra wrote:
Hallo, ich versteh das Muster nicht. Sind dort nur hinreihen oder hin- und Rückreihen angegebene? Vielen Dank schonmal für die Hilfe! Sandra
08.03.2015 - 20:20DROPS Design answered:
Es sind alle R eingezeichnet, sowohl Hin- als auch Rück-R, das gilt im Übrigen für die allermeisten unserer Anleitungen. In den Hin-R stricken Sie die Maschen zusammen und machen die Umschläge und in den Rück-R stricken Sie einfach glatt re. Die erste Muster-R bei der Jacke (nach den 3 R re) ist eine Rück-R. Viel Spaß beim Stricken!
09.03.2015 - 09:36
![]() Helle wrote:
Helle wrote:
Forstår ikke indtagningen på sokkerne. Hjælp ønskes.
22.12.2014 - 18:26DROPS Design answered:
Hej Helle. Du tager ind paa hver side af de 2 midterste masker. Du strikker rundt, saa de to midterste er sidste og förste maske paa pinden. Du tager ind i hver anden pind som beskrevet til det retstrikkede parti maaler 3, 4, 5, 5 eller 6 cm.
22.12.2014 - 19:42
![]() Barbara Dormann wrote:
Barbara Dormann wrote:
Kann ich für das modell auch eine andere wolle nehmen als vin ihnen vorgeschlagene ,wenn welche. m.f.g. B.Dormann
28.09.2014 - 10:52DROPS Design answered:
Alternative Garne finden Sie oben im Kopf neben dem Foto unter "Garnalternativen". Sie können also alle Garne aus der Garngruppe A verwenden. Bitte beachten Sie, dass sich bei einem anderen Garn auch der Verbrauch ändert. Diesen müssen Sie anhand der benötigten Lauflänge des Originalgarns für das Alternativgarn neu berechnen. Außerdem ist es wichtig, die Maschenprobe einzuhalten.
28.09.2014 - 11:42
![]() Corina wrote:
Corina wrote:
Hallo! Ich möchte die Hose in Größe 1-3 Monate stricken und wollte fragen, ob ich dafür die Rundstricknadel in 40 cm oder 60 cm Länge benötige. Oder wenn beide, ab welchem Zeitpunkt brauche ich die verschiedenen Längen? Vielen Dank, Corina
26.02.2014 - 18:08DROPS Design answered:
Liebe Corina, Sie benötigen ein Nadelspiel für die Beine und dann würde ich ihnen die 60 cm Rundnadel empfehlen, denn auch bei der kleinen Grösse haben Sie 150 M. Wenn es durch die Abnahmen dann unbequem zu stricken geht, können Sie nach Bedarf zur Rundnadel 40 cm wechseln.
28.02.2014 - 09:29
![]() Laura Silvestre Martins wrote:
Laura Silvestre Martins wrote:
Gostaria de perceber a seguinte legenda 32-36-41 (45-50) malhas, o que devo fazer? Não compreendo estas medidas em toda a legenda.
12.12.2013 - 01:01DROPS Design answered:
As indicações relativas à frente direita são as seguintes: A 18-19-22 (25-28) cm de altura total, tricotar a seguinte carreira pelo direito : 32-36-41 (45-49) ms/pts = frente direita. Esperamos tê-la ajudado. Não hesite em contactar-nos em caso de dúvida, Bom tricô!
17.12.2013 - 15:00
![]() Isabella wrote:
Isabella wrote:
Hallo, ich habe ein Problem, bei dem Kragen der Jacke steht "gegen die Mitte auf einen Hilfsfaden legen und dann gegen die Mitte Maschen abketten" wo ist gegen die Mitte und wie soll ich die Maschen dann von dem Faden abketten... Vielen Dank PS: Sorry habs vorher als Kommentar geschickt.
03.09.2013 - 14:13DROPS Design answered:
Liebe Isabella, "gegen die Mitte" bedeutet beim Vorderteil "an der vorderen Mitte" bzw. zum Halsausschnitt zu. Sie legen die angegebenen Maschen still (auf einen Faden oder Hilfsnadel - das sind die Maschen unten am Halsausschnitt) und ketten dann bei den Maschen auf der Nadel für die Halsrundung ab.
06.09.2013 - 07:44
![]() Verite wrote:
Verite wrote:
Bonjour, beaucoup de vos modéles sont à faire avec des aiguilles circulaires, je n'arrive pas à m'en servir, puis je faire vos modéles avec des aiguilles droites ? Merci Elisabeth Vérité
07.03.2013 - 09:11DROPS Design answered:
Bonjour Madame Verite, beaucoup de nos modèles se tricotent effectivement sur circulaire, mais parfois en allers et retours, vous pouvez donc utiliser des aiguilles droites, vos mailles seront juste plus serrées. Vous pouvez calculer le nombre de mailles nécessaire à chaque pièce et les répartir en ajoutant les m lis pour les coutures. Nous vous recommandons de visualiser nos vidéos pour apprendre à tricoter en rond, ce qui vous sera beaucoup plus facile. Bon tricot !
07.03.2013 - 14:08
|
||||||||||||||||||||||
Roly Poly#rolypolyset |
||||||||||||||||||||||
 |
 |
|||||||||||||||||||||
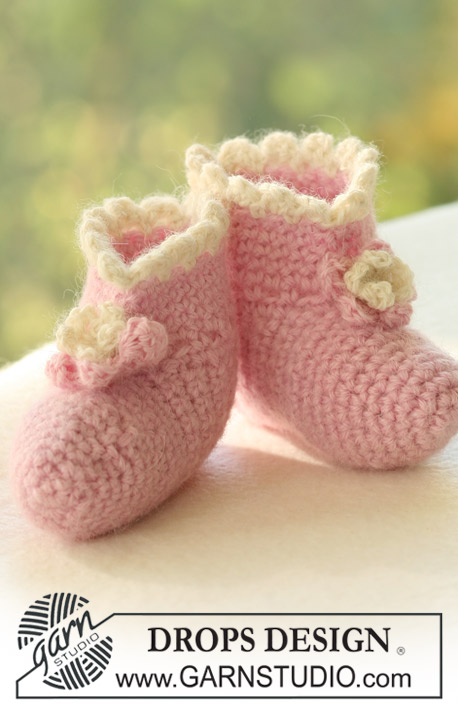
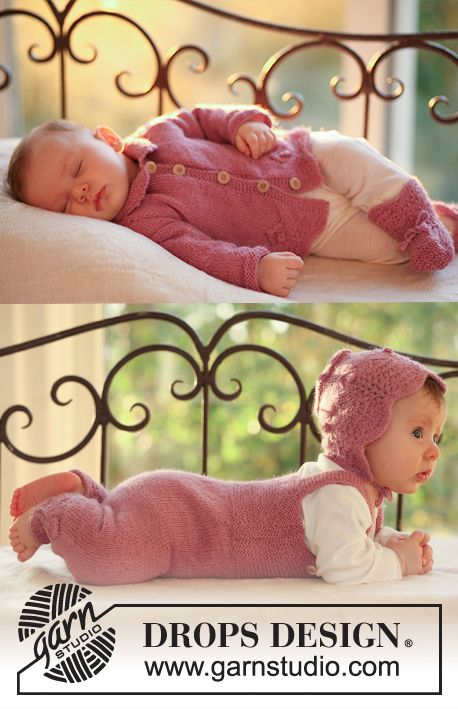
Set of baby jacket, jumpsuit, bonnet hat and socks in DROPS Alpaca
DROPS Baby 18-14 |
||||||||||||||||||||||
|
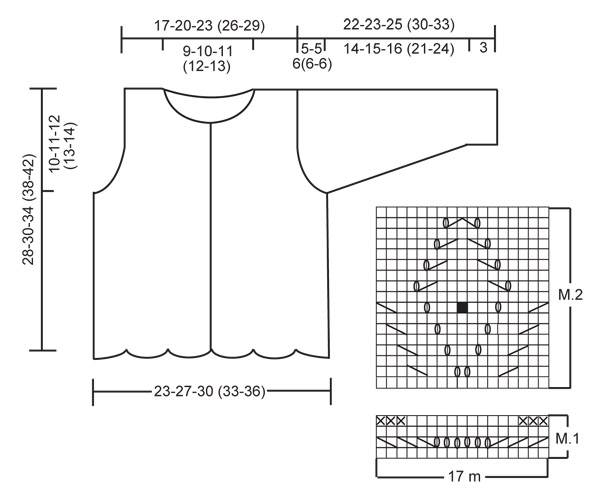
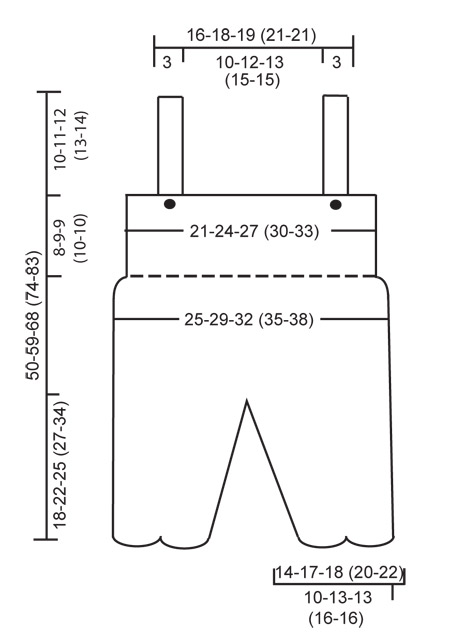
GARTER ST (in the round): K 1 round, P 1 round. GARTER ST (back and forth on needle): K all rows. PATTERN: See diagram M.1 and M.2 – the diagrams show the pattern from the RS. BUTTONHOLES: Make buttonholes on right front band. 1 buttonhole = cast off 3rd and 4th st from mid front and cast on 2 new sts on return row. Make buttonholes when piece measures: SIZE 1/3 months: 4, 9, 14 and 19 cm SIZE 6/9 months: 4, 10, 15 and 21 cm SIZE 12/18 months: 4, 9, 14, 19 and 24 cm SIZE 2 years: 4, 10, 16, 22 and 28 cm SIZE 3/4 years: 5, 12, 18, 25 and 31 cm NOTE: the last buttonhole is made on neckline. DECREASING TIP (applies to jumpsuit): Dec on each side of marker mid front and mid back. When 3 sts remain before marker K2 tog, K2 (marker sits between these 2 sts), slip 1 st as if to K, K1, psso. ------------------------------------------------------------------------------------------------------------------------ JACKET: BODY PIECE: Worked back and forth on circular needle from mid front. LOOSELY cast on 131-148-165 (182-199) sts (includes 5 front band sts each side towards mid front) on circular needle size 2.5 mm with Alpaca. K 3 rows (first row = RS). Work next row as follows from WS: 5 front band sts in garter st – SEE ABOVE - 1 stocking st, 7-8-9 (10-11) repeats of M.1 across the row, 1 stocking st, 5 front band sts in garter st. Work 3-3-4 (4-5) vertical repeats of M.1 like this, AT THE SAME TIME when piece measures 4 cm make buttonhole on right front band – SEE ABOVE. Now continue in M.2 with 1 stocking st and 5 garter sts each side. After M.2 piece measures approx 8-8-9 (9-10) cm. Now complete piece in stocking st with 5 garter sts each side. REMEMBER THE KNITTING TENSION! When piece measures 18-19-22 (25-28) cm work next row as follows from RS: 32-36-41 (45-49) sts = right front piece, cast off 6 sts for armhole, 55-64-71 (80-89) sts = back piece, cast off 6 sts for armhole, 32-36-41 (45-49) sts = left front piece. Now complete each piece separately. LEFT FRONT PIECE: = 32-36-41 (45-49) sts. Cast off to shape the armhole at the beg of every row from the side: 2 sts 1 time and 1 st 4-4-4 (4-5) times = 26-30-35 (39-42) sts. When piece measures 24-26-29 (33-37) cm slip 9-10-13 (14-14) sts towards mid front on a stitch holder for neck and cast off to shape the neckline at the beg of every row from mid front: 2 sts 2 times and 1 st 3 times = 10-13-15 (18-21) sts left on shoulder. Cast off when piece measures 28-30-34 (38-42) cm. RIGHT FRONT PIECE: Like left front piece, but mirrored – remember buttonholes! BACK PIECE: = 55-64-71 (80-89) sts. Cast off for armholes each side as described for front piece = 43-52-59 (68-75) sts. When piece measures 27-29-33 (37-41) cm cast off the middle 19-22-25 (28-29) sts for neck and complete each side separately. Cast off 2 sts on neckline on next row = 10-13-15 (18-21) sts left on shoulder. Cast off when piece measures 28-30-34 (38-42) cm. SLEEVE: Worked in the round on double pointed needles. Cast on 36-38-42 (44-46) sts on double pointed needles size 2.5 mm with Alpaca. Work 8 rows garter st – SEE ABOVE – and continue in stocking st. Insert a marker at beg of round = mid under arm. When piece measures 3 cm inc 1 st on each side of marker and repeat the inc on every 6-5-5 (6-6) round a total of 8-10-10 (12-13) times = 52-58-62 (68-72) sts. When piece measures 17-18-19 (24-27) cm cast off 6 sts mid under arm and complete piece back and forth on needle. Cast off to shape the sleeve cap each side at the beg of every row: 2 sts 2 times and 1 st 3-3-4 (4-4) times, then 2 sts each side until piece measures 21-22-24 (29-32) cm, now cast off 3 sts each side 1 time and cast off remaining sts. Piece measures approx 22-23-25 (30-33) cm. ASSEMBLY: Sew shoulder seams and set in sleeves. NECKLINE AND COLLAR: Pick up approx 65 to 85 sts round neckline on small circular needle size 2.5 mm (incl sts on stitch holders at front) and work garter st back and forth on needle from mid front. AT THE SAME TIME after 2 rows make 1 buttonhole in line with the others on front band. Work another 2 rows and now adjust no of sts evenly to 75-80-85 (90-95). Continue in garter st. When collar measures 4-4-5 (5-6) cm dec at the beg of every row each side: 1 st 3 times and 2 sts 1 times, cast off remaining sts. Sew on buttons. ----------------------------------------------------------- JUMPSUIT: Worked from bottom of legs towards the top, in the round on double pointed and circular needle. LEG: LOOSELY cast on 51-68-68 (85-85) sts with Alpaca on double pointed needles size 2.5 mm and work 4 rows garter st – SEE ABOVE. Work 3-3-4 (4-5) vertical repeats of M.1 and then continue in M.2. After M.2 piece measures approx 8-8-9 (9-10) cm. Insert a marker at beg of round (= inside of leg), and continue in stocking st. Now inc 1 st on each side of marker on every 2-4-4 (6-6) round a total of 12-9-13 (10-14) times = 75-86-94 (105-113) sts. AT THE SAME TIME when piece measures 16-20-23 (25-32) cm continue back and forth on needle from marker (to make it easier to slip both legs on the same circular needle afterwards) and cast on 1 new st each side for seam. When piece measures 18-22-25 (27-34) cm cast off 1 st each side and put piece aside. Knit the other leg. BODY PIECE: Slip legs on the same circular needle size 2.5 mm = 150-172-188 (210-226) sts. Insert 1 marker mid front and 1 marker mid back and continue in stocking st in the round. AT THE SAME TIME dec 1 st on each side of both markers – SEE DECREASING TIP - on every other round a total of 5-6-6 (7-7) times = 130-148-164 (182-198) sts. When piece measures 32-39-47 (51-59) cm work shortened rows mid back as follows (to make pants wider at the back) – beg by marker: work 10 sts, turn piece, work 20 sts (slip the first st as if to K to avoid a hole), turn piece. Continue like this working another 10 sts before each turn another 8-10-12 (14-16) times. Now work 1 round on all sts, AT THE SAME TIME dec 20-22-24 (26-26) sts evenly = 110-126-140 (156-172) sts. Now divide piece at the sides and complete front and back pieces separately. Slip the 55-63-70 (78-86) sts on back piece on a stitch holder. FRONT PIECE: = 55-63-70 (78-86) sts. Work garter st back and forth on needle. When piece in garter st measures 6-7-7-(8-8) cm make 2 buttonholes as follows: work 9-11-13 (15-18) sts, cast off 2 sts, work 33-37-40 (44-46) sts, cast off 2 sts, work 9-11-13 (15-18) sts. On return row cast on 2 new sts over cast off sts. Continue in garter st until piece in garter st measures 8-9-9 (10-10) cm (piece measures a total of 40-48-56 (61-69) cm) and cast off. BACK PIECE: = 55-63-70 (78-86) sts. Work 8-9-9 (10-10) cm garter st and then work next row as follows: cast off 6-8-10 (12-15) sts, work 8 sts, cast off 27-31-34 (38-40) sts, work 8 sts and cast off 6-8-10 (12-15) sts. Continue for braces on the 8 sts each side. Work garter st back and forth on needle until braces measures 22-24-26 (28-30) cm, cast off. ASSEMBLY: Sew legs tog at the top inside 1 edge st. Sew side seams, in outer loops of sts to avoid a chunky seam. Sew buttons on braces. ---------------------------------------------------------- BONNET: Worked back and forth on circular needle. LOOSELY cast on 89-93-106 (108-112) sts on circular needle size 2.5 mm with Alpaca. Work 4 rows garter st and work next row as follows from WS: 1 edge st in garter st, 1-3-1 (2-4) stocking sts, M.1 on the next 85-85-102 (102-102) sts, 1-3-1 (2-4) stocking sts and 1 edge st in garter st. Work 5-6-7 (8-9) vertical repeats of M.1 like this and then continue in M.2 with 1 edge st and 1-3-1 (2-4) stocking sts each side. After M.2 piece measures approx 10-11-12 (13-14) cm. Now continue in stocking st on all sts with 1 garter st each side, AT THE SAME TIME adjust no of sts to 88-94-102 (108-114) on first row. When piece measures 12-13-14 (15-16) cm cast off 5-5-6 (6-6) sts each side (i.e. cast off at the beg of the next 2 rows) = 78-84-90 (96-102) sts. Insert 6 markers in piece from RS as follows: First marker after 1 st and the next 5 markers with 13-14-15 (16-17) sts between each = 12-13-14 (15-16) sts left after the last marker. Now continue in garter st, AT THE SAME TIME K2 tog after each marker on every row from RS until there are 12 sts left on row. K2 tog across the row, cut thread, pull it through remaining sts and use thread-end to sew bonnet tog mid back – sew in outer loops of sts to avoid a chunky seam. (also sew tog the 5-5-6 (6-6) stocking sts cast off each side). CASING: Pick up approx 68 to 84 sts (divisible by 4) inside 1 edge st along bottom edge of bonnet on circular needle size 2.5 mm with Alpaca. K 1 row from WS, K 1 row from RS and continue as follows from WS: K2, * P2 tog, 1 YO, P2 *, repeat from *-* until 2 sts remain, K these. Now K 4 rows on all sts, cast off. TIE STRINGS: Cut 3 threads measuring approx 200 cm each, twist them hard, fold them double and let them twist again. Tie a knot each end and thread string through casing. ---------------------------------------------------------- SOCKS: Worked in the round on double pointed needles. LOOSELY cast on 51-51-51 (51-68) sts on double pointed needles size 2.5 mm with Alpaca. Work 4 rows garter st – SEE ABOVE – and then work 3-4-4 (5-5) vertical repeats of M.1. When piece measures approx 4-5-5 (6-6) cm work 1 round stocking st, AT THE SAME TIME adjust no of sts to 40-44-48 (52-56). Work 2 cm rib, K1/P1, and work next round as follows: * K2 tog, 1 YO *, repeat from *-* (= casing). On next round slip the first 15-17-18 (20-21) sts on a stitch holder, keep the next 10-10-12 (12-14) sts on needle and slip the last 15-17-18 (20-21) sts on a stitch holder. Work 3.5-4-5 (6-7) cm garter st back and forth on needle (= upper foot). Now pick up 9-11-13 (15-18) sts on each side of upper foot and slip sts from stitch holders back on needle = 58-66-74 (82-92) sts. Work garter st back and forth on needle from mid back, AT THE SAME TIME after 2-2.5-3 (3.5-4) cm dec as follows: K2 tog at the beg and at the end of row and K2 tog on each side of the 2 middle sts. Repeat the dec on every other row until piece in garter st measures 3-4-5 (5-6) cm. Cast off and sew sock tog under foot up to casing mid back – sew in outer loops of sts to avoid a chunky seam. TIE STRINGS: Cut 3 threads measuring approx 100 cm each, twist the hard, fold them double and let them twist again. Tie a knot each end and thread string through casing on sock. |
||||||||||||||||||||||
Diagram explanations |
||||||||||||||||||||||
|
||||||||||||||||||||||
 |
||||||||||||||||||||||
 |
||||||||||||||||||||||
Have you finished this pattern?Tag your pictures with #dropspattern #rolypolyset or submit them to the #dropsfan gallery. Do you need help with this pattern?You'll find 26 tutorial videos, a Comments/Questions area and more by visiting the pattern on garnstudio.com. © 1982-2025 DROPS Design A/S. We reserve all rights. This document, including all its sub-sections, has copyrights. Read more about what you can do with our patterns at the bottom of each pattern on our site. |
||||||||||||||||||||||


With over 40 years in knitting and crochet design, DROPS Design offers one of the most extensive collections of free patterns on the internet - translated to 17 languages. As of today we count 320 catalogues and 12094 patterns translated into English (UK/cm). 12094
We work hard to bring you the best knitting and crochet have to offer, inspiration and advice as well as great quality yarns at incredible prices! Would you like to use our patterns for other than personal use? You can read what you are allowed to do in the Copyright text at the bottom of all our patterns. Happy crafting!
Post a comment to pattern DROPS Baby 18-14
We would love to hear what you have to say about this pattern!
If you want to leave a question, please make sure you select the correct category in the form below, to speed up the answering process. Required fields are marked *.