
Looking for a yarn?


Comments / Questions (18)
![]() Rachel wrote:
Rachel wrote:
Bonjour, Je souhaite réaliser ce modèle en DROPS Brushed Alpaca Silk. Y a-t-il des modifications à apporter aux explications ? Nombre de mailles, ... Merci
01.07.2015 - 12:21DROPS Design answered:
Bonjour Rachel, vous pouvez tout à fait tricoter ce modèle en DROPS Brushed Alpaca Silk (même groupe de fils C que Vivaldi), il vous faudra juste recalculer la quantité de pelotes nécessaire - voir ici comment faire. Pensez toujours à faire votre échantillon et à ensuite conserver la bonne tension. Bon tricot!
01.07.2015 - 12:51
![]() Pflieger wrote:
Pflieger wrote:
Bonjour, je souhaiterai une explication pour réaliser des diminutions de l'encolure sur le dos du gilet? j'ai diminuer les 13m centrales après avoir fait 4rangs de côté, mais je ne comprend pas la suite : diminuer à 6m du bord sur l'endroit = 2m end ( m lis au point mousse, 1 m end, 1 m env, 1 m end, 1 m env). Après les 6m = glisser 1m à l'end, 1 m end, passer la m glissée par-dessus la m tricotée. Avant les 6m : 2m ens à l'end.
11.05.2013 - 16:20DROPS Design answered:
Bonjour Madame Pflieger, les diminutions pour l'encolure se font sur l'endroit, à 6 m point mousse des bords, ainsi pour l'un des côtés vous diminuerez après les 6 m point mousse de la bordure du col, pour l'autre côté vous diminuerez avant les 6 m point mousse. Bon tricot !
13.05.2013 - 09:18
![]() Marianne wrote:
Marianne wrote:
Hei! stolpemasker er rillestrikk, det er for at arbeidet ikke skal krølle seg e.l.
18.05.2008 - 17:12
![]() Sissel wrote:
Sissel wrote:
Hvordan strikker man stolpemasker??
18.05.2008 - 11:55
![]() DROPS Design wrote:
DROPS Design wrote:
The translations for the Diagrams for all Garnstudio patterns are included within the text of the Pattern itself. If you look you will find lines starting with an = sign. These are the translations, and they are given in the exact same vertical order as the chart symbols within the diagram.
22.03.2008 - 02:17
![]() Karen wrote:
Karen wrote:
I do not see the English translation for the symbols on chart. Also, the 4 lines beginning with "=" do not have symbols before them. Are these listed elsewhere? Thanks.
22.03.2008 - 01:16
![]() Jenny wrote:
Jenny wrote:
Som du ser på diagramet(M 1)så är det uppdelat i 3 delar:A,B,C.Läs noga igenom & räkna maskorna/mönsterdel så ska du se att det stämmer med ditt antal maskor(=din storlek)på stickan! Lyck till! Mvh.Jenny
23.11.2006 - 20:24
![]() kajsa wrote:
kajsa wrote:
Hej! jag undrar vad som menas med 1A och 1B i början av detta mönster.
12.11.2006 - 09:20
|
|||||||||||||
DROPS 88-14 |
|||||||||||||
 |
 |
||||||||||||
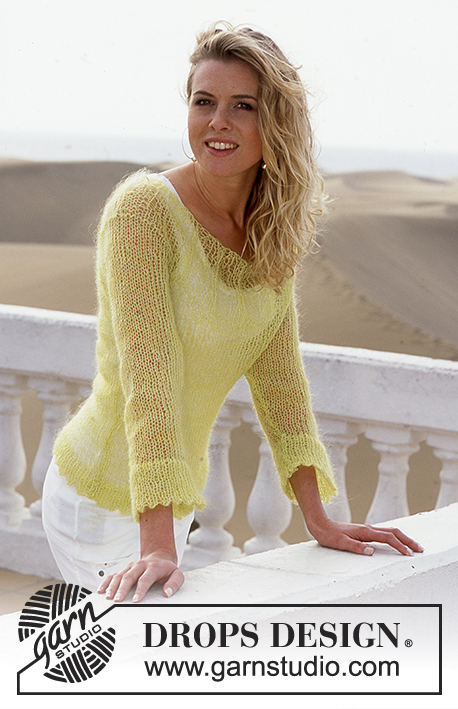
Knitted jacket with lace pattern in DROPS Vivaldi or Brushed Alpaca Silk
DROPS 88-14 |
|||||||||||||
|
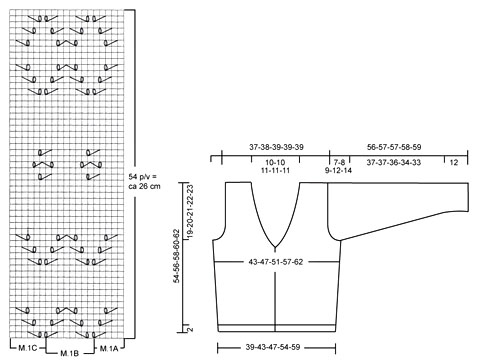
Knitting tension: Remember needle size is only a guide! 15 stitches x 21 rows with needle size 6 mm and stocking stitch = 10 x 10 cm. Rib: * K1, P1 *, repeat from *-*. Ridge/Garter stitch (back and forth on needle): 1 ridge = Knit 2 rows. Decrease tip (for neckline): Decrease inside the 6 edge/band stitches which are worked as follows: 2 stitches garter stitch, K1, P1, K1, P1. Decrease as follows after the 6 edge/band stitches: Slip 1 stitch as if to knit, K1, pass the slipped stitch over. Decrease as follows before the 6 edge/band stitches: K2 together. Pattern: See diagram M.1. The diagram shows the pattern seen from the right side. ----------------------------------------------------- Back piece: Cast on 61-67-73-83-91 stitches (incl. 1 edge stitch in each side) over 2 needles size 6 mm and Vivaldi or Brushed Alpaca Silk (this is so that the cast on edge is elastic). Remove one of the needles and purl 1 row from the wrong side. Then work 4 rows rib with 1 edge stitch and 1 purled stitch in each side. Continue with stocking stitch. Remember the knitting tension! When piece measures 3 cm work the next row as follows from the right side: 1 edge stitch, 0-3-2-3-3 stitches stocking stitch, M.1A (= 5 stitches), M.1B over the next 48-48-56-64-72 stitches, M.1C (= 6 stitches), 0-3-2-3-3 stitches stocking stitch, 1 edge stitch. Continue pattern in this way until piece measures 34-35-36-37-38 cm - adjust to after one of the lace patterns has been completed, then work stocking stitch to finished length. At the same time, when piece measures 9-9-9-13-13 cm, increase 1 stitch in each side every 9-9-9-13-13 cm a total of 3-3-3-2-2 times = 67-73-79-87-95 stitches - the increased stitches are worked in stocking stitch. When piece measures 35-36-37-38-39 cm, decrease for armhole in each side every 2nd row: 3 stitches 1 time, 2 stitches 1-1-2-3-4 times and 1 stitch 1-3-3-5-7 times = 55-57-59-59-59 stitches. When piece measures 50-52-54-56-58 cm, work 4 rows rib over the middle 23-23-25-25-25 stitches - start and end rib with P1 (the other stitches on the needle are worked in stocking stitch), then cast off the middle 11-11-13-13-13 stitches to neck - cast off in rib. Then decrease on each side of neck every 2nd row - see Decrease tip: 1 stitch 2 times = 20-21-21-21-21 stitches left on each shoulder. Cast off, the piece measures approx. 54-56-58-60-62 cm. Right front piece: Cast on 36-40-44-48-52 stitches (incl. 1 edge stitch in the side and 6 band stitches towards mid front) over 2 needles size 6 mm and Vivaldi or Brushed Alpaca Silk. Remove the one needle and purl 1 row from the wrong side. Then work 4 rows rib as follows from mid front: 2 stitches garter stitch, * K1, P1 *, repeat from *-* and finish with K1 and 1 edge stitch. Then work stocking stitch, but the outermost 6 stitches towards mid front are continued as before to finished length (= band). Read the whole of the next section before continuing! Pattern: When piece measures 3 cm, work the next row as follows from mid front (seen from the right side): 2 stitches garter stitch, K1, P1, K1, P1 (= band), 2-3-0-3-0 stitches stocking stitch, M.1A (= 5 stitches), M.1B over the next 16-16-24-24-32 stitches, M.1C (= 6 stitches), 0-3-2-3-2 stitches stocking stitch and 1 edge stitch. Continue the pattern in this way until piece measures 34-35-36-37-38 cm - adjust to match back piece - then work stocking stitch to finished length. Side increases: At the same time, when piece measures 9-9-9-13-13 cm, increase in side as for back piece. Neckline: At the same time, when piece measures 28-29-30-31-32 cm, decrease towards neck every 2nd row - see Decrease tip: 1 stitch 3-4-6-3-2 times and every 4th row 1 stitch 10-10-10-12-13 times - NOTE: The stitches which do not fit into M.1 as you decrease for neck are worked in stocking stitch. Armhole: At the same time, when piece measures 35-36-37-38-39 cm, decrease for armhole as for back piece. After all increases and decreases, there are 20-21-21-21-21 stitches left on shoulder. Continue with stocking stitch and the outermost 6 stitches towards mid front as before. Cast off when piece measures 54-56-58-60-62 cm. Left front piece: Cast on and work as for right, but in reverse. Sleeve: Cast on 39-39-41-41-45 stitches (incl. 1 edge stitch in each side) over 2 needles size 6 mm and Vivaldi or Brushed Alpaca Silk. Remove the one needle and work 2 ridges. Then continue with stocking stitch. When piece measures 12 cm, work the next row as follows from the right side: 1 edge stitch, 1-1-2-2-0 stitches stocking stitch, M.1A (= 5 stitches), M.1B over the next 24-24-24-24-32 stitches, M.1C (= 6 stitches), 1-1-2-2-0 stitches stocking stitch and 1 edge stitch. Continue the pattern in this way upwards - NOTE: When piece measures approx. 40 cm finish the lace-pattern you are working on and finish working in stocking stitch to finished length. At the same time, when piece measures 14-14-14-14-12 cm, increase 1 stitch in each side every 5.5-4-3.5-3-3 cm a total of 7-9-10-11-11 times = 53-57-61-63-67 stitches - the increased stitches are worked in stocking stitch. When sleeve measures 49-49-48-46-45 cm, decrease to sleeve cap in each side every 2nd row: 3 stitches 1 time, 2 stitches 2-2-2-3-4 times and 1 stitch 1-2-3-5-6 times. Then 2 stitches in each side until piece measures 55-56-56-57-58 cm, finally 3 stitches 1 time in each side. Cast off the remaining stitches, piece measures approx. 56-57-57-58-59 cm. Assembly: Sew shoulder seams. Sew in sleeves. Sew sleeve and side seams in one go inside the 1 edge stitch. Crochet edge: Work 1 row of chain-spaces around the bottom of each sleeve, down both front pieces and around the neck. Work with hook size 6 mm and 1 strand Vivaldi or Brushed Alpaca Silk as follows: 1 double crochet in first stitch, * 3 chain stitches, skip approx. 2.5 cm, 1 double crochet in next stitch *, repeat from *-*. Sew on buttons. Use chain-spaces in crochet edge for buttonholes. |
|||||||||||||
Diagram explanations |
|||||||||||||
|
|||||||||||||
 |
|||||||||||||
Have you finished this pattern?Tag your pictures with #dropspattern or submit them to the #dropsfan gallery. Do you need help with this pattern?You'll find 26 tutorial videos, a Comments/Questions area and more by visiting the pattern on garnstudio.com. © 1982-2025 DROPS Design A/S. We reserve all rights. This document, including all its sub-sections, has copyrights. Read more about what you can do with our patterns at the bottom of each pattern on our site. |
|||||||||||||


With over 40 years in knitting and crochet design, DROPS Design offers one of the most extensive collections of free patterns on the internet - translated to 17 languages. As of today we count 320 catalogues and 12091 patterns translated into English (UK/cm). 12091
We work hard to bring you the best knitting and crochet have to offer, inspiration and advice as well as great quality yarns at incredible prices! Would you like to use our patterns for other than personal use? You can read what you are allowed to do in the Copyright text at the bottom of all our patterns. Happy crafting!
Post a comment to pattern DROPS 88-14
We would love to hear what you have to say about this pattern!
If you want to leave a question, please make sure you select the correct category in the form below, to speed up the answering process. Required fields are marked *.