
Popular categories
Looking for a yarn?


Comments / Questions (4)
![]() Matelli wrote:
Matelli wrote:
Bonjour, Je voudrais faire le pull polar platine sweater et les explications ne sont pas claires; Comment commencer par le col ? combien de mailles faut 'il pour la taille 3/4 ans ? merci
21.02.2026 - 19:11DROPS Design answered:
Bonjour Mme Matelli, les étapes de la réalisation de ce pull sont indiquées juste avant le début des explications, pour bien visualiser comment on réalise ce type d'empiècement, rendez-vous sous l'onglet "Vidéos" à droite de l'onglet "Explications", pour y trouver des vidéos montrant comment réaliser ce type d'empiècement: dos, devants, dos/devant et manches etc.. Bon tricot!
23.02.2026 - 08:16
![]() Kathy wrote:
Kathy wrote:
Thanks for your reply. I perhaps didn’t explain myself very well - where is start of row in yoke section where I increase on both body and sleeve - I haven’t got to ‘divide for body and sleeve’ yet Thanks
10.02.2026 - 11:07DROPS Design answered:
Hi again, The first round on the yoke starts at the beginning of the left front piece. Regards, Drops team.
11.02.2026 - 07:05
![]() Kathy wrote:
Kathy wrote:
Where is start of row once I begin to knit the yoke.
09.02.2026 - 22:15DROPS Design answered:
Hi Kathy, The round begins under the armhole in the middle of the cast-on stitches. If necessary, work to mid-under the armhole and insert a marker there and continue in the round. Regards, Drops Team.
10.02.2026 - 06:49
![]() Airashii wrote:
Airashii wrote:
Hello, Drops Team. Would you be so kind and explain why do you keep writing gauge measurements in your patterns the wrong way, i.e. 10 x 10 cm, instead of 10 cm x 10 cm? It seems you know how to write it correctly when there are measurements given in inches, and since the gauge is the same in centimeters, I really wonder what is the reason for this difference in writing. I am looking forward for your explanation. Airashii
08.01.2026 - 18:26
|
|
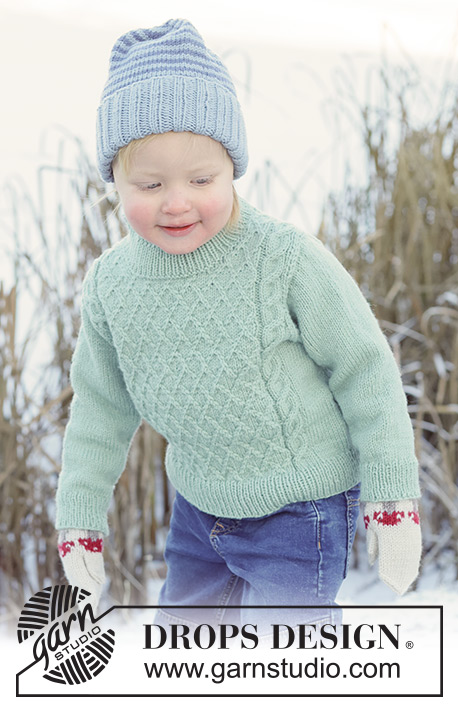
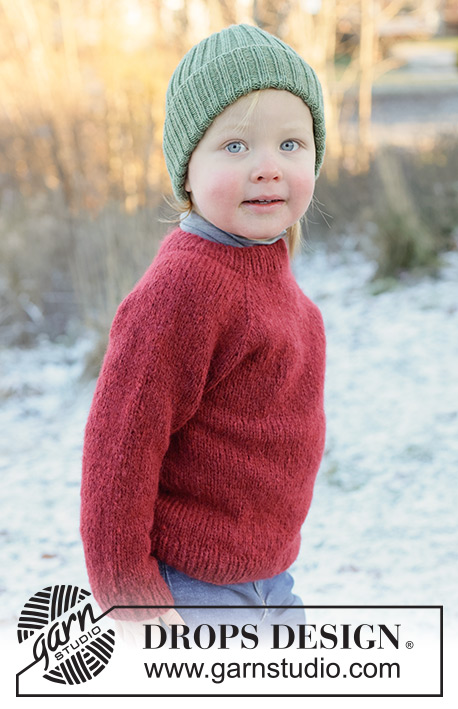
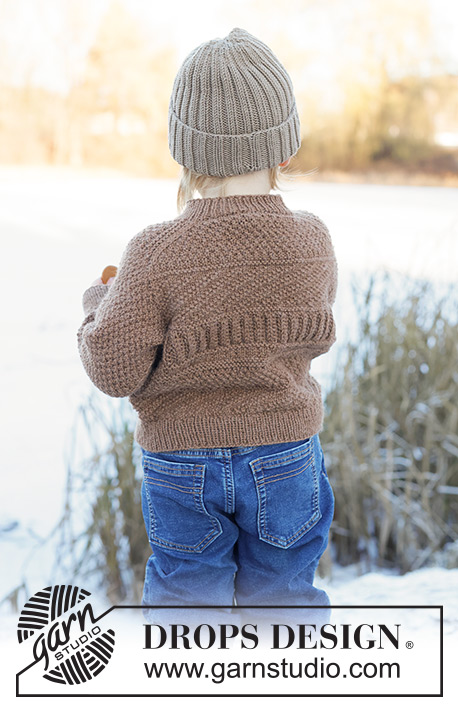
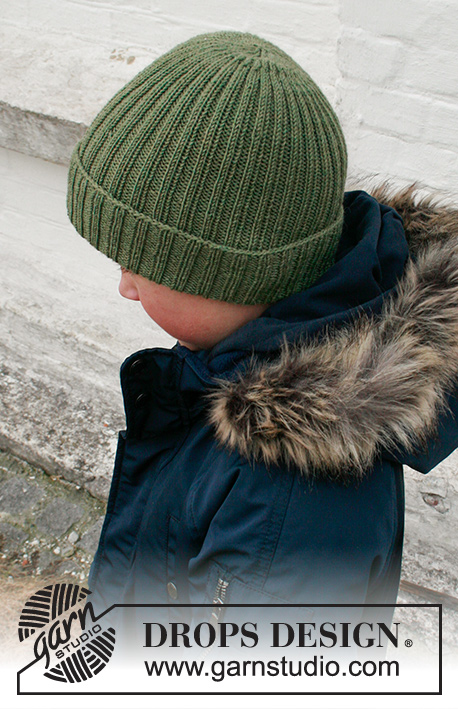
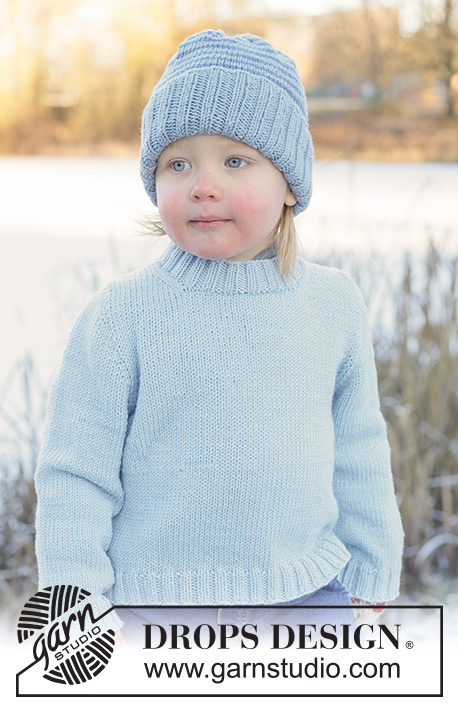
Polar Playtime Sweater#polarplaytimesweater |
|
 |
 |
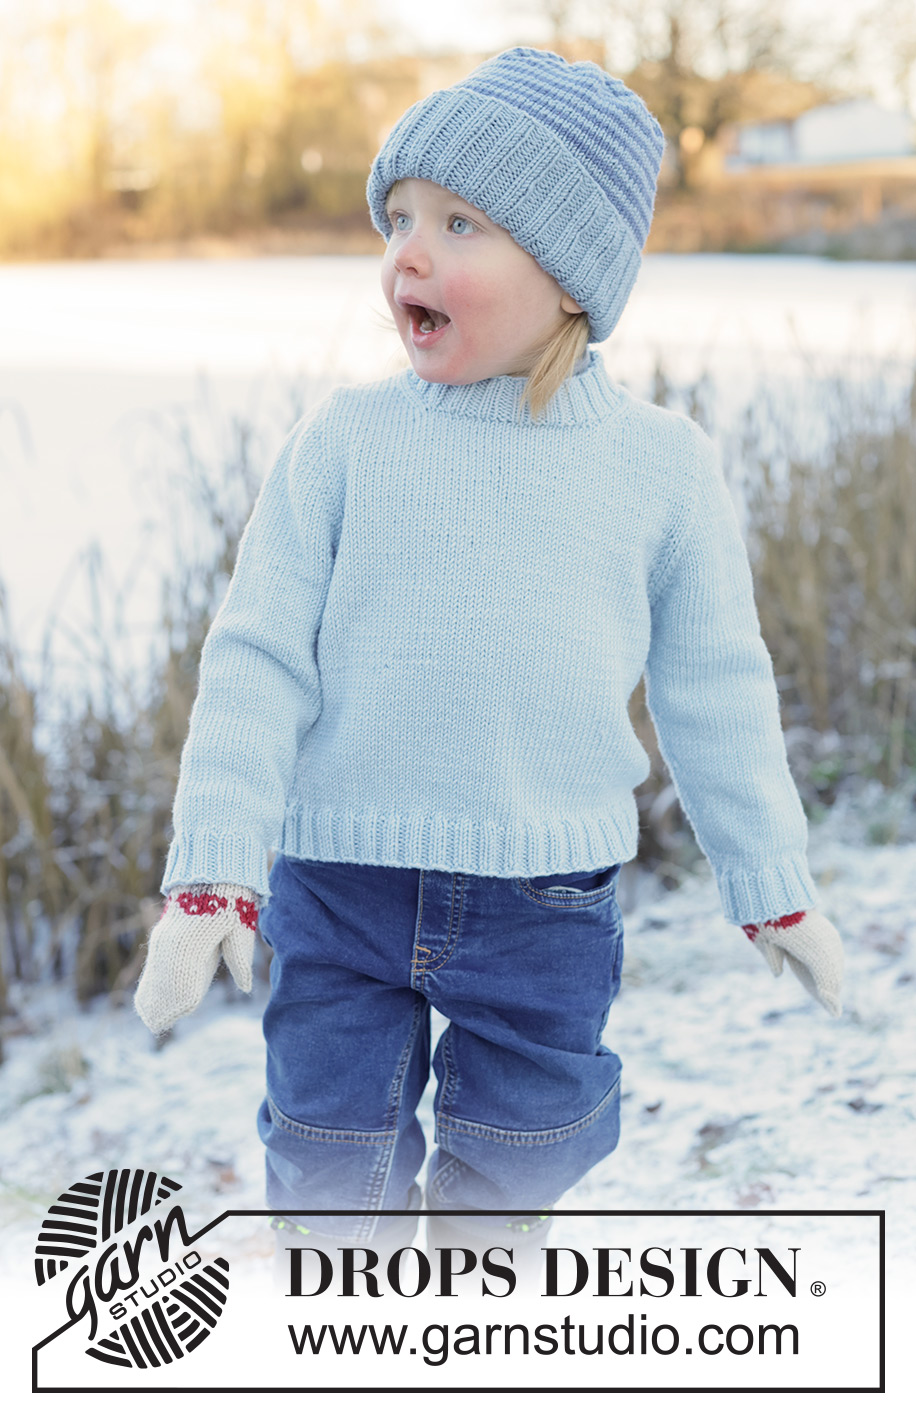
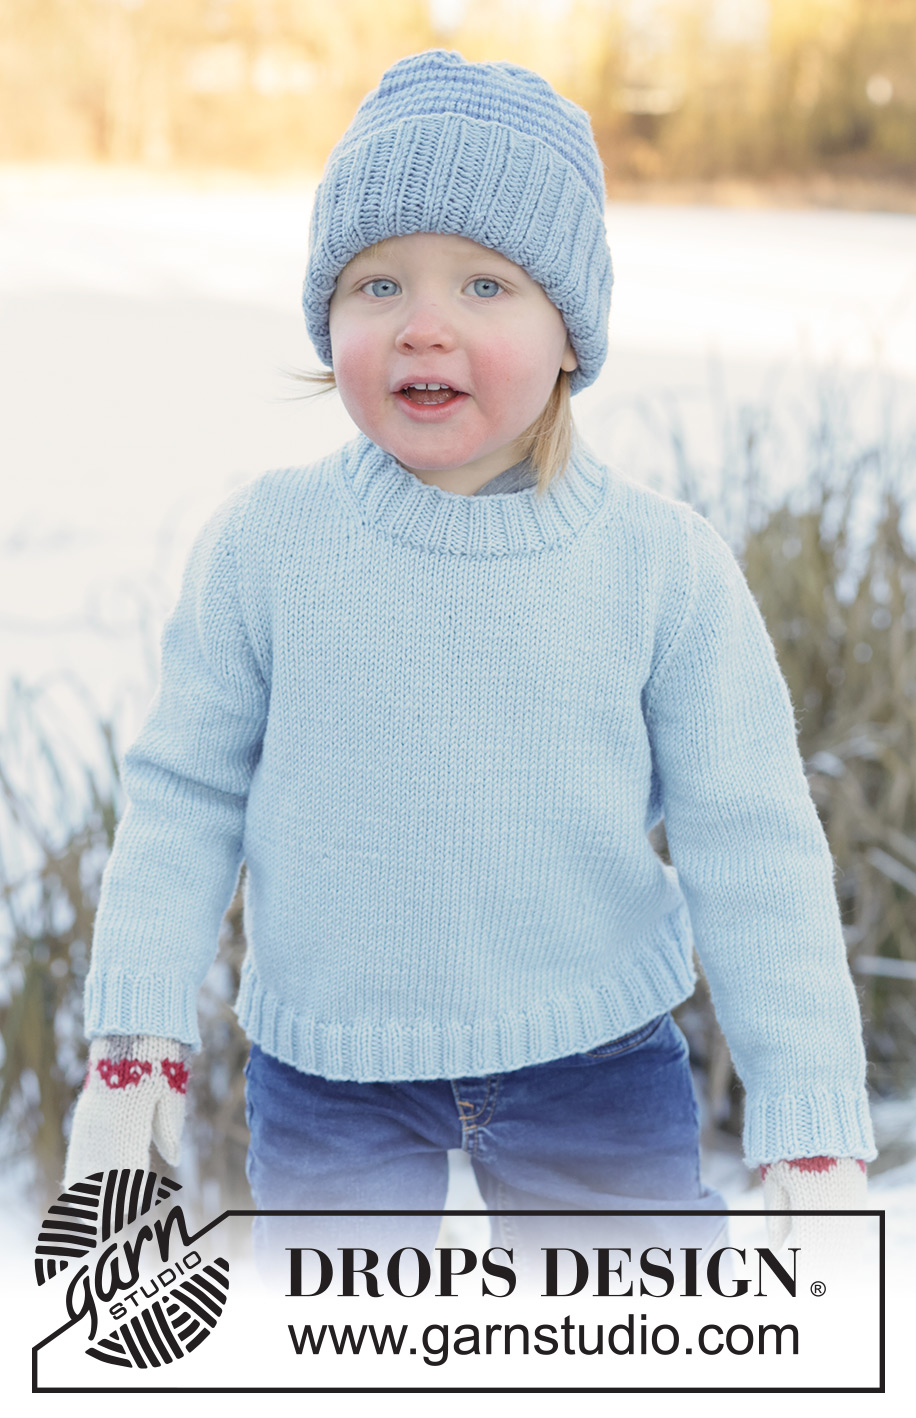
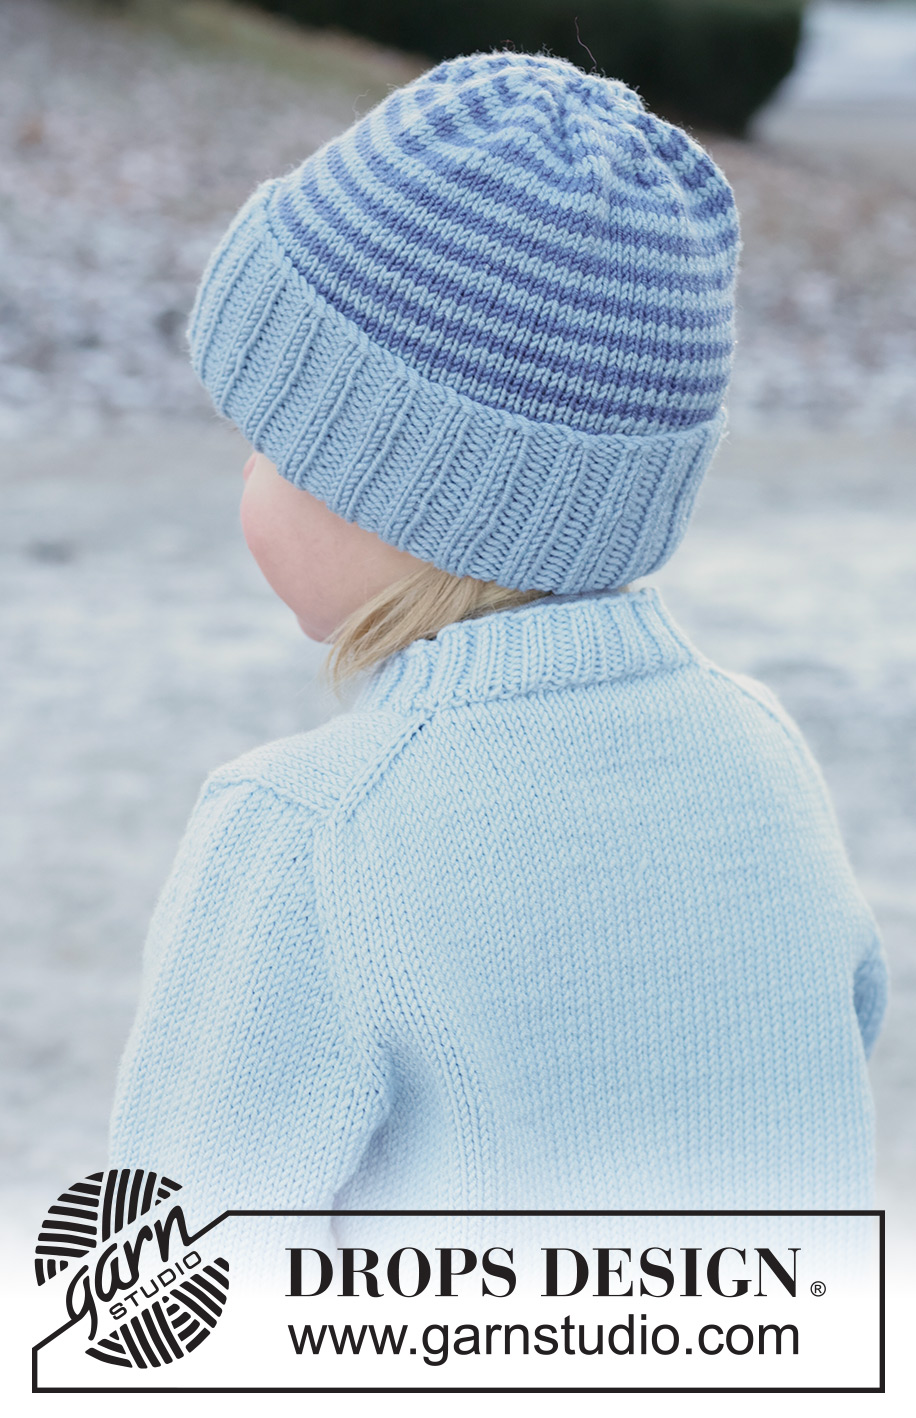
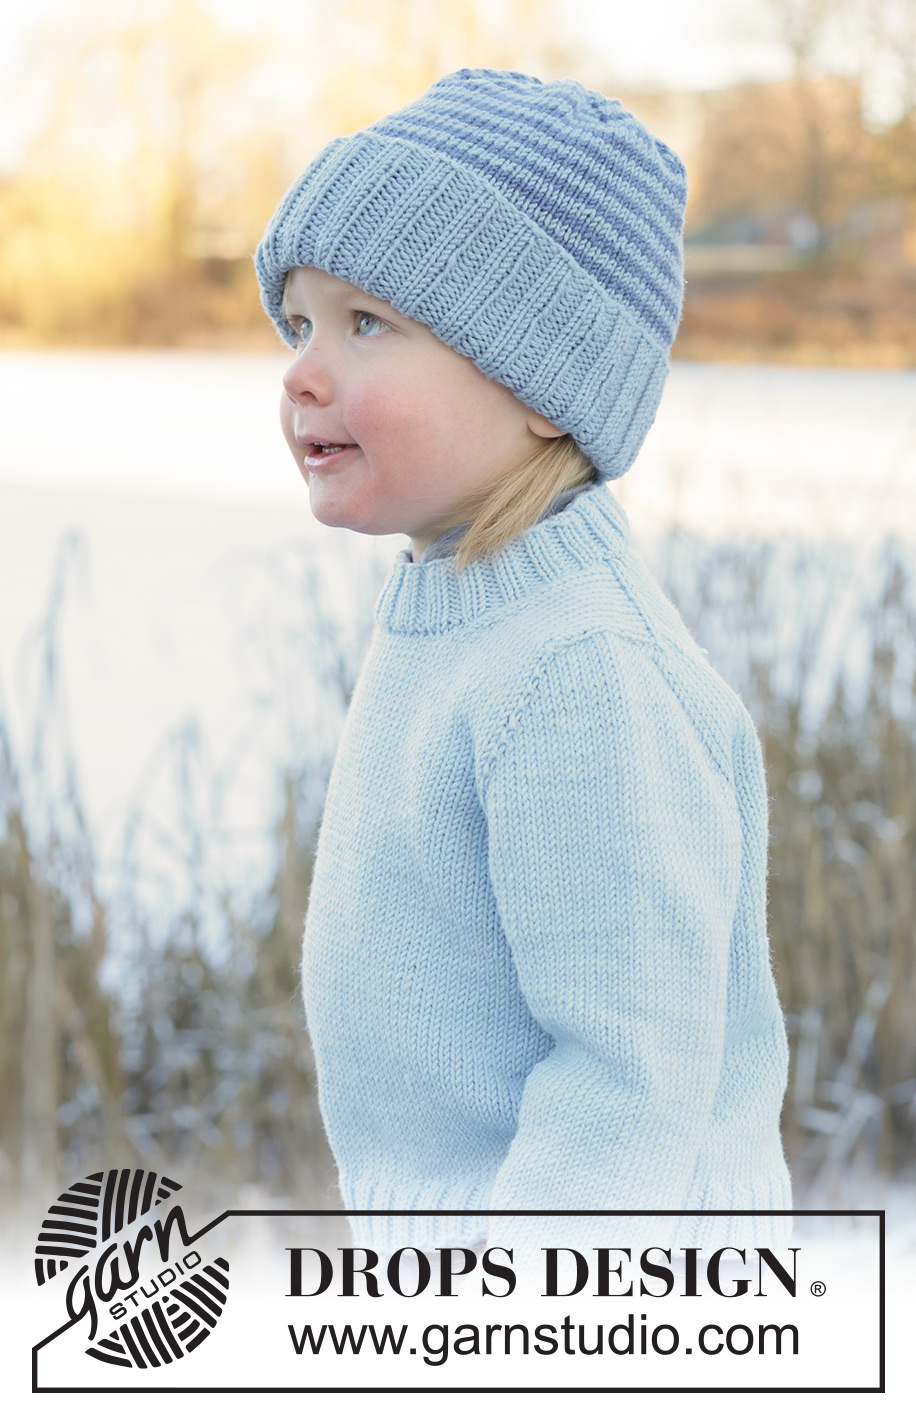
Knitted jumper and hat for children in DROPS Merino Extra Fine. The jumper is worked top down in stocking stitch, with European yoke. The hat is worked in the round with stripes. Sizes 2 - 14 years.
DROPS Children 50-17 |
|
|
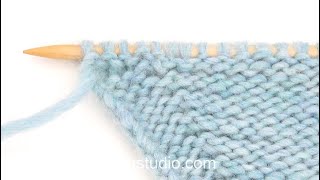
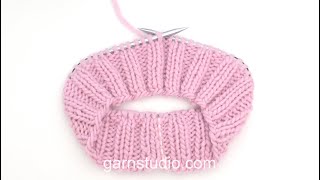
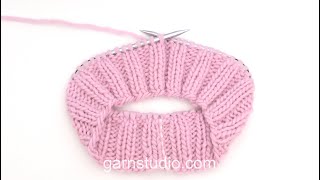
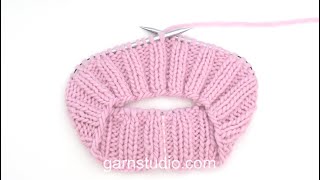
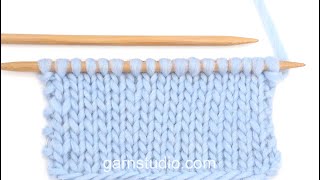
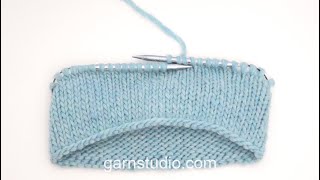
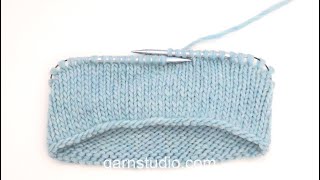
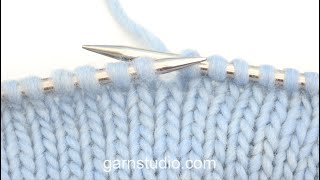
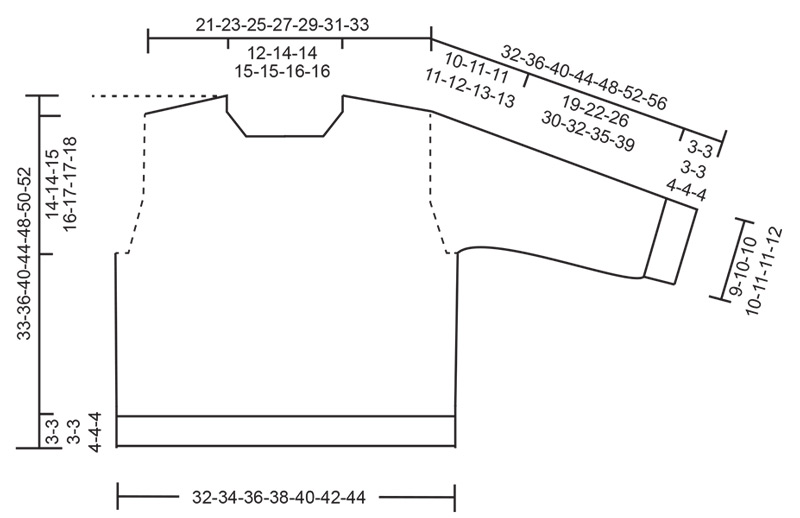
------------------------------------------------------- EXPLANATIONS FOR THE PATTERN: ------------------------------------------------------- INCREASE TIP-1: INCREASE 1 STITCH TOWARDS THE LEFT - from RIGHT SIDE: Use the left needle to pick up the strand between 2 stitches from the row below, pick up the strand from the front and knit through the stitch loop that is on the back of the needle. INCREASE 1 STITCH TOWARDS THE RIGHT - from RIGHT SIDE: Use the left needle to pick up the strand between 2 stitches from the row below, pick up the strand from the back and knit through the stitch loop that is on the front of the needle. INCREASE TIP-2: INCREASE 1 STITCH TOWARDS THE RIGHT - from WRONG SIDE: Use the left needle to pick up the strand between 2 stitches from the row below, pick up the strand from the back and purl through the stitch loop that is on the front of the needle. INCREASE 1 STITCH TOWARDS THE LEFT - from WRONG SIDE: Use the left needle to pick up the strand between 2 stitches from the row below, pick up the strand from the front and purl through the stitch loop that is on the back of the needle. SLEEVE TIP: When knitting up stitches under the sleeve, you can get a small hole in the transition between stitches on the body and sleeve. This hole can be closed by picking up the strand between 2 stitches and working this strand twisted together with the first stitch between body and sleeve. DECREASE TIP: Decrease 1 stitch on each side of the marker-thread as follows: Work until there are 3 stitches left before the marker-thread, knit 2 together, knit 2 (marker-thread sits between these 2 stitches), slip 1 stitch knit-wise, knit 1 and pass the slipped stitch over the knitted stitch (2 stitches decreased). STRIPES (for hat): * Work 2 rounds with colour Blue Fog then 2 rounds with colour Storm Blue *, work from *-* to finished length. ------------------------------------------------------- START THE PIECE HERE: ------------------------------------------------------- JUMPER – SHORT OVERVIEW OF THE PIECE: The pattern uses both long and short needles; start with the length which fits the number of stitches and change when necessary. Work according to points 1 – 5. 1. BACK PIECE: Cast on stitches for the back of the neck. Work the back piece back and forth, top down, increasing stitches on each side until the shoulder stitch-count has been achieved. The back piece has slightly diagonal shoulders. 2. FRONT PIECE: Worked in 2 sections (each side of neck). Start by knitting up stitches along one back shoulder, working downwards and increasing for the neckline. Repeat on the other shoulder. 3. YOKE: Place all the stitches on the same circular needle, work first one front piece, knit up stitches for one sleeve along the side of the front piece, work the back piece, knit up stitches for the second sleeve along the side of the other front piece, cast on stitches for the front neckline. The yoke is continued in the round. 4. INCREASE FOR BODY AND SLEEVES: While continuing the yoke, stitches are increased, first for the sleeves and later for both the body and sleeves. 5. BODY AND SLEEVES: When the increases and the yoke are finished, the yoke is divided for the body and sleeves. The body is finished in the round while the sleeves wait. Then the sleeves are worked in the round, top down. Stitches are knitted up around the neckline and the neck is worked to finish. BACK PIECE: Cast on 28-32-32-34-34-38-38 stitches with circular needle size 3.5 mm and DROPS Merino Extra Fine. Work back and forth as follows: ROW 1 (wrong side): Purl. ROW 2 (right side): Read INCREASE TIP-1. Knit 3, increase 1 stitch towards the left, knit until there are 3 stitches left on the row, increase 1 stitch towards the right, knit 3. ROW 3 (wrong side): Read INCREASE TIP-2. Purl 3, increase 1 stitch towards the right, purl until there are 3 stitches left on the row, increase 1 stitch towards the left, purl 3. AFTER ROW 3: Work ROWS 2 and 3 a total of 5-5-6-7-8-8-9 times (10-10-12-14-16-16-18 rows worked). After the last increase there are 48-52-56-62-66-70-74 stitches. Remember to maintain the knitting tension. Cut the strand and place the stitches on a stitch holder. RIGHT SHOULDER: Find the right back shoulder as follows: Lay the back piece flat, right side up, with the stitch holder towards you; right-hand side of piece = right shoulder. Start from the right side on the right back shoulder, by the armhole and knit up 1 stitch outermost on the corner of the shoulder (edge stitch), then knit up 1 stitch in each row worked, inside the outermost stitch (10-10-12-14-16-16-18 stitches) = 11-11-13-15-17-17-19 shoulder-stitches. Insert 1 marker by the neck. All lengths on the front piece are taken in the knitting direction from this marker. Work stocking stitch with the first row from the wrong side. When the piece measures 5-4-5-6-6-6-7 cm, increase for the neckline as follows: ROW 1 (right side): Knit until there are 3 stitches left on the row, increase 1 stitch towards the right, knit 3 - remember INCREASE TIP-1. ROW 2 (wrong side): Purl without increasing. Work ROWS 1 and 2 a total of 3-4-4-4-4-5-5 times (6-8-8-8-8-10-10 rows worked) = 14-15-17-19-21-22-24 stitches. Cut the strand, place the stitches on a stitch holder and work the left front shoulder. LEFT SHOULDER: Start from the right side on the left back shoulder by the neck and knit up 1 stitch in each row worked, inside the outermost stitch (10-10-12-14-16-16-18 stitches), then knit up 1 stitch outermost on the corner of the shoulder (edge stitch) = 11-11-13-15-17-17-19 shoulder-stitches. Insert 1 marker by the neck. All lengths on the front piece are taken in the knitting direction from this marker. Work stocking stitch, with the first row from the wrong side. When the piece measures 5-4-5-6-6-6-7 cm, increase for the neckline as follows: ROW 1 (right side): Remember INCREASE TIP-1. Knit 3, increase 1 stitch towards the left, knit to end of row. ROW 2 (wrong side): Purl without increasing. Work ROWS 1 and 2 a total of 3-4-4-4-4-5-5 times (6-8-8-8-8-10-10 rows worked) = 14-15-17-19-21-22-24 stitches. You now place the front and back pieces on the same circular needle, knit up stitches for the sleeves and cast on for the front neckline as follows: YOKE: ROW 1 (right side): Start from the right side on the left front piece. Knit 3, increase 1 stitch towards the left, knit until there are 2 stitches left on the front piece, slip 1 stitch, knit 1 and pass the slipped stitch over (1 edge stitch decreased), insert 1 marker, knit up 16-16-18-20-20-20-22 stitches along the side of the left front piece (= sleeve-stitches, knitted up inside the outermost stitch), insert 1 marker, place the back-piece stitches on the needle, knit the first 2 stitches together (1 edge stitch decreased), knit until there are 2 stitches left on the back piece, slip 1 stitch, knit 1 and pass the slipped stitch over (1 edge stitch decreased), insert 1 marker, knit up 16-16-18-20-20-20-22 stitches along the side of the right front piece (= sleeve-stitches, knitted up inside the outermost stitch), insert 1 marker, place the right front-piece stitches on the needle, knit the first 2 stitches together (1 edge stitch decreased), knit until there are 3 stitches left, increase 1 stitch towards the right, knit 3, then cast on 18-20-20-22-22-24-24 stitches for the neckline = 124-132-144-160-168-176-188 stitches. The neckline increases are finished. The piece measures approx. 7-7-8-9-9-9-10 cm from the marker: 2 cm of the neck-depth will lie on the back piece. Continue in the round. ROUND 1: Knit and increase 1 stitch on each side of each sleeve – remember INCREASE TIP-1 (increase towards the left at the beginning of the sleeve and towards the right at the end of the sleeve). The stitch count on the sleeves increases but remains the same on the front and back pieces (4 increased stitches). ROUND 2: Knit without increasing. Work ROUNDS 1 and 2 a total of 5-6-6-7-8-9-10 times (10-12-12-14-16-18-20 rounds worked: 26-28-30-34-36-38-42 stitches on each sleeve and 46-50-54-60-64-68-72 stitches on the front and back pieces) = 144-156-168-188-200-212-228 stitches. You now increase on both the sleeves and the body, increasing inside 2 stitches on each side of the front and back pieces, as follows: ROUND 1: Knit until there are 2 stitches left before the first marker, increase 1 stitch towards the right, knit 2, move the marker onto the right needle, increase 1 stitch towards the left, knit to the next marker, increase 1 stitch towards the right, move the marker onto the right needle, knit 2, increase 1 stitch towards the left, knit until there are 2 stitches left before the next marker, increase 1 stitch towards the right, knit 2, move the marker onto the right needle, increase 1 stitch towards the left, knit to the next marker, increase 1 stitch towards the right, move the marker onto the right needle, knit 2, increase 1 stitch towards the left, knit to end of round (8 stitches increased – 1 stitch on each side of 2 stitches in each transition between body and sleeves). ROUND 2: Knit without increasing. Work ROUNDS 1 and 2 a total of 10-10-11-10-10-10-10 times (20-20-22-20-20-20-20 rounds worked). A total of 15-16-17-17-18-19-20 increases in height on the sleeves and 10-10-11-10-10-10-10 increases in height on the body: 46-48-52-54-56-58-62 stitches on each sleeve and 66-70-76-80-84-88-92 stitches on the front and back pieces = 224-236-256-268-280-292-308 stitches. The sleeves measure approx. 10-11-11-11-12-13-13 cm. When the jumper is folded double at the shoulder, the piece measures approx. 14-14-15-16-17-17-18 cm from outermost on the shoulder down the armhole. If the piece is shorter than this continue working to the correct length without further increases. Now divide for the body and sleeves. DIVIDE FOR BODY AND SLEEVES: Knit to the first marker, place the next 46-48-52-54-56-58-62 stitches on a stitch holder for the sleeve, cast on 4 stitches (mid-under the sleeve), knit 66-70-76-80-84-88-92 (= back piece), place the next 46-48-52-54-56-58-62 stitches on a stitch holder for the sleeve, cast on 4 stitches (mid-under the sleeve), knit 66-70-76-80-84-88-92 (= front piece). The body and sleeves are finished separately. BODY: = 140-148-160-168-176-184-192 stitches. Continue stocking stitch in the round until the piece measures 28-31-35-39-42-44-46 cm from the cast-on edge mid-back. Change to circular needle size 2.5 mm. Work rib (knit 2, purl 2), AT THE SAME TIME increase 28-32-32-32-36-36-40 stitches evenly on the first round = 168-180-192-200-212-220-232 stitches. When the rib measures 3-3-3-3-4-4-4 cm, cast off with rib. The jumper measures approx. 31-34-38-42-46-48-50 cm from mid-back and 33-36-40-44-48-50-52 cm from the shoulder. SLEEVES: Place the 46-48-52-54-56-58-62 sleeve-stitches from one stitch holder onto circular needle size 3.5 mm and knit up 1 stitch in each of the 4 stitches cast on under the sleeve – read SLEEVE TIP = 50-52-56-58-60-62-66 stitches. Insert a marker-thread in the middle of the 4 stitches under the sleeve. The round starts by the marker-thread. Work stocking stitch in the round. AT THE SAME TIME, when the sleeve measures 1 cm from the division, decrease mid-under the sleeve – read DECREASE TIP as follows: Decrease 2 stitches every 4-4½-4½-5-5½-6-6 cm a total of 5-5-6-6-6-6-7 times = 40-42-44-46-48-50-52 stitches. Continue working until the sleeve measures 19-22-26-30-32-35-39 cm from the division. Change to double pointed needles size 2.5 mm. Work rib (knit 2, purl 2), AT THE SAME TIME increase 8-6-8-10-8-10-12 stitches evenly on the first round = 48-48-52-56-56-60-64 stitches. When the rib measures 3-3-3-3-4-4-4 cm, cast off with rib. The sleeve measures approx. 22-25-29-33-36-39-43 cm from the division. NECK: Use circular needle size 2.5 mm. Start from the right side on 1 shoulder-line and knit up approx. 76-84-88-96-96-100-104 stitches around the neckline, inside 1 stitch. Knit 1 round and adjust the stitch count if necessary; it must be divisible by 4. Work rib in the round (knit 2, purl 2) for 3-3-3-3-4-4-4 cm. Cast off with rib. ------------------------------------------------------- HAT - SHORT OVERVIEW OF THE PIECE: The hat is worked in the round, bottom up. Start with circular needle and change to double pointed needles when necessary, while decreasing for the top of the hat. HAT: Cast on 104-108-112-112-116-116-120 stitches with circular needle size 3 mm and colour Blue Fog DROPS Merino Extra Fine. Knit 1 round. Work rib in the round (knit 2, purl 2) for 12-12-12-12-13-13-13 cm. Knit 1 round and decrease 8-12-10-10-8-8-6 stitches evenly spaced = 96-96-102-102-108-108-114 stitches. Change to circular needle size 3.5 mm. Work stocking stitch and STRIPES – read explanation above, until the piece measures 23-24-25-26-27-28-28 cm from the cast-on edge (approx. 4-4-4-4-4-4-5 cm left to finished length). Remember to maintain the knitting tension. On the next round decrease 6-6-2-2-8-8-4 stitches evenly spaced = 90-90-100-100-100-100-110 stitches. Knit 1 round. Insert 10 markers, each marker inserted between 2 stitches and with 9-9-10-10-10-10-11 stitches between each one. On the next round decrease 1 stitch after each marker by slipping the first stitch onto the right needle, knitting 1 and passing the slipped stitch over the knitted stitch (10 stitches decreased on the round). Decrease like this every 2nd round 5 times, then every round 2-2-3-3-3-3-4 times = 20 stitches. On the next round knit all stitches together, 2 and 2 = 10 stitches. Cut the strand, thread it through the remaining stitches, tighten and fasten well. The hat measures approx. 27-28-29-30-31-32-33 cm. Fold up the bottom 8-8-8-9-9-9-10 cm to the right side and sew a couple of stitches to hold it in place. The hat measures approx. 19-20-21-21-22-23-23 cm with the fold-up. |
|
 |
|
Have you finished this pattern?Tag your pictures with #dropspattern #polarplaytimesweater or submit them to the #dropsfan gallery. Do you need help with this pattern?You'll find 45 tutorial videos, a Comments/Questions area and more by visiting the pattern on garnstudio.com. © 1982-2026 DROPS Design A/S. We reserve all rights. This document, including all its sub-sections, has copyrights. Read more about what you can do with our patterns at the bottom of each pattern on our site. |
|


With over 40 years in knitting and crochet design, DROPS Design offers one of the most extensive collections of free patterns on the internet - translated to 17 languages. As of today we count 324 catalogues and 12290 patterns translated into English (UK/cm). 12290
We work hard to bring you the best knitting and crochet have to offer, inspiration and advice as well as great quality yarns at incredible prices! Would you like to use our patterns for other than personal use? You can read what you are allowed to do in the Copyright text at the bottom of all our patterns. Happy crafting!
Post a comment to pattern DROPS Children 50-17
We would love to hear what you have to say about this pattern!
If you want to leave a question, please make sure you select the correct category in the form below, to speed up the answering process. Required fields are marked *.