
Popular categories
Looking for a yarn?


Comments / Questions (87)
![]() Becky Conners wrote:
Becky Conners wrote:
I have the bands made - and have c/o the stitches..... and purled - but unsure what to do next... increase for the v-neck inside the bands - is this where we have put the first thread and the last thread? Also where the transition is between the Front/back pieces? "Increase ... each transition between the front/back pieces" Is this where the middle two threads are? Do I stitch before and after the thread?
22.11.2023 - 21:53DROPS Design answered:
Dear Mrs Conners, after you have purled the first row over all sts (bands + neck), insert the marker threads for the transition: front piece before 1st marker, 1st sleeve between 1st and 2nd marker, back piece between 2nd and 3rd marker, 2nd sleeve between 3rd and 4th marker and right front piece after 4th marker. Now increase for V-neck and for raglan as explained for your size. Happy knitting!
23.11.2023 - 08:37
![]() Nina wrote:
Nina wrote:
Bij de raglan staat dat de meerderingen klaar zijn na 18x op het lijf en 9x op de mouw gemeerderd te hebben. Echter, ik kom dan niet uit op 288 steken (maat M) en er onder staat "alle maten . U heft in totaal 29 x op het lijf en 15 keer op de mouw gemeerderd", terwijl er verderop bij het lijf alleen één keer een meerdering van 19 steken omschreven staat. Kunt u het beter uitleggen?
09.11.2023 - 20:48DROPS Design answered:
Dag Nina,
Brei je maat M of maat S? Je hebt het over 18 keer op het lijf en 9x op de mouw, maar dat geldt voor maat S. Verder meerder je eerst al 6 keer iedere 2e naald op zowel het lijf als de mouwen en in de paragraaf boven alle maten staat nog eens 2 keer alleen op het lijf aangegeven. Om het totaal aantal steken te berekenen moet je ook de meerderingen van de biezen er bij optellen.
15.11.2023 - 14:14
![]() Coby Boom wrote:
Coby Boom wrote:
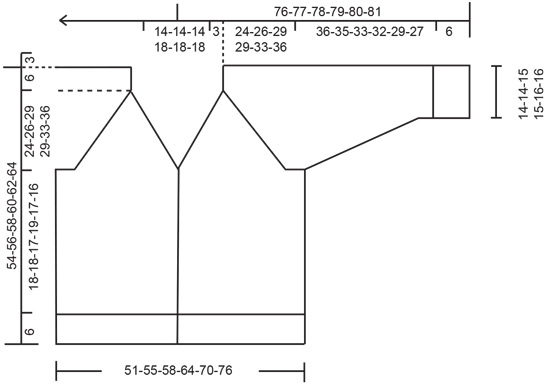
Ik brei maat L en begrijp de tekening niet. Volgens patroon is de pas 29 cm, lijf 17 en boord 6 cm . Samen 52 cm. Op de tekening staat tussen bies en pas nog 6 cm. Kan ik in de beschrijving niet terugvinden. Met die 6 cm kom je op de beschreven 58 cm . Kunt u mij dit uitleggen?
05.11.2023 - 08:45DROPS Design answered:
Dag Coby,
De lengte van de pas wordt op een gegeven moment in de beschrijving aangegeven, dit is inderdaad 29 cm. Als je het uiteindelijke werkstuk plat neer legt zit de mouw iets hoger. Als je de stippellijn die je aan de linkerkant van de maattekening ziet naar rechts doortrekt, dan is dat de bovenkant van midden achter. Hopelijk heb ik het zo goed uitgelegd.
05.11.2023 - 19:37
![]() Nina wrote:
Nina wrote:
Waar meerder je bij de mouwen? Dit is niet duidelijk. Er staat dat je voor de raglan 6x moet meerderen en dan door moet gaan elke 2e naald, maar voor de mouw elke 4e naald moet meerderen. Bij welke steek?
03.11.2023 - 11:21DROPS Design answered:
Dag Nina,
Bovenaan bij 'UITLEG VOOR HET PATROON' staat onder 'RAGLAN' aangegeven waar je precies moet meerderen.
05.11.2023 - 19:40
![]() Aisling wrote:
Aisling wrote:
What does ‘ Increase for the neck inside the bands ’ mean? Do I garter stitch 7 stitches always and then do a yo increase stitch?
20.10.2023 - 20:33DROPS Design answered:
Dear Aisling, yes, it means that you work the 7 stitches for the band and then increase with a yarn over. Happy knitting!
22.10.2023 - 23:42
![]() Susi wrote:
Susi wrote:
Die einfachgestrickten Blenden der Cardigans wirken durch die schweren Knöpfe wellig und instabil. Wie wäre es, einmal einen schlichten V- Cardigan von oben mit einer Blende im Doppelstrick (double face) zu kreieren? Siehe bei der Konkurrenz... ;-) Oder gibt es bereits ein Video zum Thema Doppelstrick (double face) ?
20.10.2023 - 10:37DROPS Design answered:
Liebe Susi, vielleicht können Ihnen diese beiden Modellen: Glazed Orange und Tweed Casual z.B. inspieren; passende Videos finden Sie unten nach der Anleitung. Viel Spaß beim stricken!
20.10.2023 - 14:12
![]() Jeanette Sørensen wrote:
Jeanette Sørensen wrote:
De to løse kanter der skal sys sammen midt bagpå er kortere end bredden halsen. Kan det passe at de skal strækkes noget mens de sys på?
04.10.2023 - 12:27DROPS Design answered:
Hei Jeanette. Når jakken er ferdig strikket sys halskanten sammen midt bak slik at sømmen vender inn. Strekk halskanten lett og sy den til halsringningen bak i nakken, den vil da legges seg fint rundt halsen. mvh DROPS Design
16.10.2023 - 11:42
![]() LotvK wrote:
LotvK wrote:
Helaas niet in XS
03.10.2023 - 08:50
![]() Liv-Marit Strøm Pedersen wrote:
Liv-Marit Strøm Pedersen wrote:
Jeg sendte et spørsmål i går om raglanfellinger og merker. Nå har begynt på nytt og løst problemet ved å forstå at de ytterste merkene IKKE var V-hals, men ermeraglan. V-halsen var ikke markert med merker!
21.09.2023 - 08:03DROPS Design answered:
Hej igen, flot at du selv fandt ud af det - god fornøjelse!
26.09.2023 - 15:17
![]() Liv-Marit Strøm Pedersen wrote:
Liv-Marit Strøm Pedersen wrote:
Jeg har delt inn med antall merker i henhold til oppskriften. Men forstår ikke hvordan den er delt inn i raglan forstykke/bakstykke og ermeraglan. To av merkene er V-hals og da er det bare to merker igjen. Jeg får ikke dette til å stemme... Det skal vel være fire raglanøkninger på bærestykket? Hos meg er det bare to!
20.09.2023 - 14:07DROPS Design answered:
Hej Liv-Marit, de 4 mærker er til raglan. Når du tager ud til V-hals gør du det indenfor stolperne i hver side (ikke ved mærkerne) :)
26.09.2023 - 15:06
|
|
No Nonsense Cardigan#nononsensecardigan |
|
 |
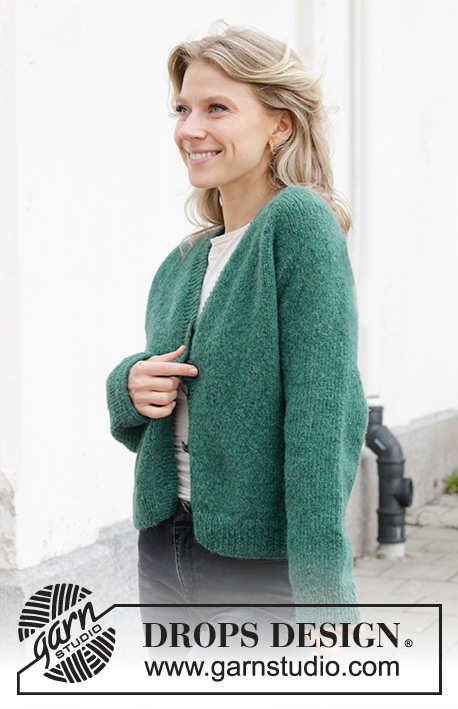 |
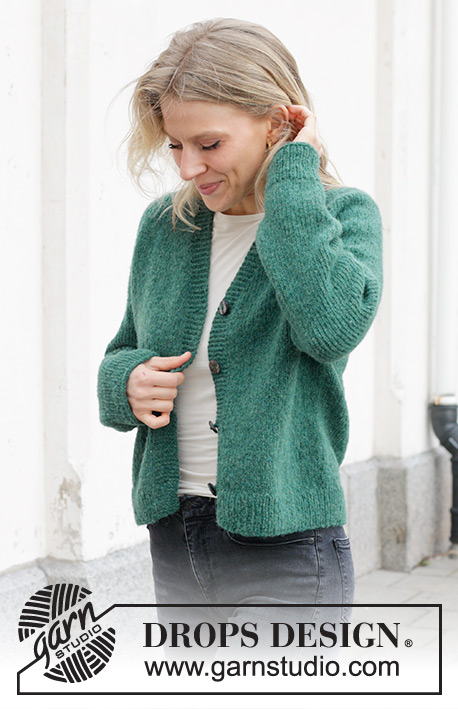
Knitted jacket in DROPS Air. The piece is worked top down with raglan and V-neck. Sizes S - XXXL.
DROPS 244-8 |
|
|
------------------------------------------------------- EXPLANATIONS FOR THE PATTERN: ------------------------------------------------------- GARTER STITCH (worked back and forth): Knit all rows. 1 ridge = knit 2 rows. RAGLAN: Increase 1 stitch before/after 2 stitches in each transition between the body and sleeves; the marker-thread sits between these 2 stitches. Increase 1 stitch by making 1 yarn over which is worked twisted on the next row/round to avoid a hole. The new stitches are then worked in stocking stitch. BUTTONHOLES: Work buttonholes on the right band (when the garment is worn). Work from the right side when there are 4 stitches left on the row as follows: Make 1 yarn over, knit 2 together and knit 2. On the next row (wrong side), knit the yarn over to leave a hole. The first buttonhole is worked 1 cm after the last increase for the V-neck, then the other 3 buttonholes with approx. 7-8-8½-7½-8-9 cm between each one. DECREASE TIP (for sleeves): Start 3 stitches before the marker-thread, knit 2 together, knit 2 (marker-thread sits between these 2 stitches), slip 1 stitch knit-wise, knit 1 and pass the slipped stitch over the knitted stitch (2 stitches decreased). ------------------------------------------------------- START THE PIECE HERE: ------------------------------------------------------- JACKET – SHORT OVERVIEW OF THE PIECE: Piece is worked back and forth, top down. Start by working 2 loose bands in garter stitch. Stitches are cast on between the 2 bands for the shoulders and back neck and the yoke continued back and forth with circular needle from mid-front. Stitches are increased for raglan and the V-neck. The yoke is divided for the body and sleeves and the body continued back and forth with circular needle. The sleeves are worked in the round with short circular needle/double pointed needles. RIGHT BAND (when the garment is worn): Cast on 7 stitches with circular needle size 5 mm and DROPS Air. Work GARTER STITCH – read description above, until the band measures 17-17-17-19-19-19 cm, finishing after a row from the wrong side. Lay the piece to one side. LEFT BAND: Cast on 7 stitches with circular needle size 5 mm and DROPS Air. Work garter stitch until the band measures 17-17-17-19-19-19 cm, finishing after a row from the right side. Do not cut the strand. Cast on 68-68-68-74-74-74 stitches at the end of this row, then knit the right band stitches = 82-82-82-88-88-88 stitches. Work 1 row with garter stitch over each band and purling the cast-on stitches. Insert 4 marker-threads (used when increasing for RAGLAN – read explanation above), without working the stitches and inserting them between 2 stitches as follows: Count 9 stitches, insert marker-thread 1, count 20 stitches, insert marker-thread 2, count 24-24-24-30-30-30 stitches, insert marker-thread 3, count 20 stitches, insert marker-thread 4, there are 9 stitches left on the row. YOKE: REMEMBER THE KNITTING TENSION! Continue back and forth with stocking stitch and garter stitch over each band. At the same time increase for the V-neck and raglan as described below. Read the next 2 sections before continuing. Start mid-front, from the right side. V-NECK: Increase for the neck inside the bands every 4th row 11-11-11-14-14-14 times by making 1 yarn over, which is worked twisted on the next row to avoid a hole. 1 cm after the last increase for the neck begin working the BUTTONHOLES – read description above. RAGLAN: Increase on each side of 2 stocking stitches in each transition between the front/back pieces and the sleeves every 2nd row (each row from the right side = 8 increased stitches) 6 times – read description above. Continue to increase for raglan every 2nd round but every 2nd increase is only on the front/back pieces (4 increased stitches), i.e., increase on the front/back pieces every 2nd row (each row from the right side) and on the sleeves every 4th row (every 2nd row from the right side). Increase like this 18-22-26-26-30-30 times on the body (9-11-13-13-15-15 times on the sleeves). SIZES S, M, XL, XXL and XXXL (the increases in size L are finished): Continue with stocking stitch and increase for raglan but now only increase on the body every 2nd row (the sleeve increases are finished) 2-1-1-1-5 times. ALL SIZES: You have increased a total of 26-29-32-32-37-41 times on the body and 15-17-19-19-21-21 times on the sleeves. After the last increase there are 268-288-308-324-348-364 stitches. Continue with stocking stitch and the bands in garter stitch until the yoke measures 24-26-29-29-33-36 cm, measured mid-back. Divide for the body and sleeves as follows: Work the first 46-49-52-56-60-64 stitches (front piece), place the next 50-54-58-58-62-62 stitches on a thread for the sleeve, cast on 10-10-10-12-14-16 stitches (in side under sleeve), work 76-82-88-96-104-112 stitches (back piece), place the next 50-54-58-58-62-62 stitches on a thread for the sleeve, cast on 10-10-10-12-14-16 stitches (in side under sleeve), work the last 46-49-52-56-60-64 stitches (front piece). BODY: = 188-200-212-232-252-272 stitches. Continue with stocking stitch and the bands in garter stitch for a further 18-18-17-19-17-16 cm. Knit 1 row from the right side and increase 19-21-21-23-25-27 stitches evenly spaced (do not increase over the bands) = 207-221-233-255-277-299 stitches. Change to circular needle size 4 mm and work as follows from the wrong side: 7 band stitches in garter stitch, * purl 1, knit 1 *, work from *-* until there are 8 stitches left, purl 1 and 7 band stitches in garter stitch. Continue this rib for 6 cm. Cast off. The jacket measures approx. 54-56-58-60-62-64 cm from the shoulder. SLEEVES: Place the 50-54-58-58-62-62 stitches from the thread on the one side of the piece on short circular needle/double pointed needles size 5 mm and knit up 1 stitch in each of the 10-10-10-12-14-16 stitches cast on under the sleeve = 60-64-68-70-76-78 stitches. Insert a marker-thread in the middle of the new stitches under the sleeve. Work stocking stitch in the round. When the sleeve measures 4 cm, decrease 2 stitches under the sleeve – read DECREASE TIP. Decrease like this every 5-3½-2½-2½-2-1½ cm a total of 6-8-9-10-11-11 times = 48-48-50-50-54-56 stitches. Continue working until the sleeve measures 36-35-33-32-29-27 cm from the division. Knit 1 round and increase 8-8-10-10-10-12 stitches evenly spaced = 56-56-60-60-64-68 stitches. Change to double pointed needles size 4 mm and work rib (knit 1, purl 1) for 6 cm. Cast off. The sleeve measures approx. 42-41-39-38-35-33 cm from the division. Work the other sleeve in the same way. ASSEMBLY: Sew the buttons onto the left band. Sew together the 2 loose bands mid-back and sew them to the neckline. |
|
|
|
Have you finished this pattern?Tag your pictures with #dropspattern #nononsensecardigan or submit them to the #dropsfan gallery. Do you need help with this pattern?You'll find 28 tutorial videos, a Comments/Questions area and more by visiting the pattern on garnstudio.com. © 1982-2025 DROPS Design A/S. We reserve all rights. This document, including all its sub-sections, has copyrights. Read more about what you can do with our patterns at the bottom of each pattern on our site. |
|


With over 40 years in knitting and crochet design, DROPS Design offers one of the most extensive collections of free patterns on the internet - translated to 17 languages. As of today we count 314 catalogues and 11820 patterns translated into English (UK/cm). 11820
We work hard to bring you the best knitting and crochet have to offer, inspiration and advice as well as great quality yarns at incredible prices! Would you like to use our patterns for other than personal use? You can read what you are allowed to do in the Copyright text at the bottom of all our patterns. Happy crafting!
Post a comment to pattern DROPS 244-8
We would love to hear what you have to say about this pattern!
If you want to leave a question, please make sure you select the correct category in the form below, to speed up the answering process. Required fields are marked *.