
Looking for a yarn?


Comments / Questions (17)
![]() Sonia wrote:
Sonia wrote:
Love this pattern, has a great fit. I included the back neck extension which definitely improved the shape. I don’t like big necklines on warm winter sweaters and the neck line is perfect for a nice warm DK/8ply wool. Thank you for making it size inclusive too! I’d tall so made it longer of course.
25.05.2025 - 15:43
![]() Elisa wrote:
Elisa wrote:
Salve, per cortesia vorrei un chiarimento: nella taglia M dopo fare le ripetizioni di aumenti per la manica e il centro avanti/dietro; la quantità di maglie per le maniche coincidono,ma le 61 maglie fra motivo a1 e A3 , non risultano. mi trovo con 51 maglie anzi che 61\\r\\nDovrei continuare ad aumentare? Anche se in teoria ho già fatto tutte le 23 ripetizioni?\\r\\nGrazie mille!
06.02.2025 - 13:38DROPS Design answered:
Buonasera Elisa, al momento non sono segnalati errori nelle spiegazioni: ha lavorato tutti gli aumenti in modo corretto? Buon lavoro!
13.02.2025 - 23:02
![]() Elisa wrote:
Elisa wrote:
Salve, per cortesia vorrei un chiarimento: nella taglia M dopo fare le ripetizioni di aumenti per la manica e il centro avanti/dietro; la quantità di maglie per le maniche coincidono,ma le 61 maglie fra motivo a1 e A3 , non risultano. mi trovo con 51 maglie anzi che 61\\r\\nDovrei continuare ad aumentare? Anche se in teoria ho già fatto tutte le 23 ripetizioni?\\r\\nGrazie mille!
05.02.2025 - 10:53DROPS Design answered:
Buonasera Elisa, al momento non sono segnalati errori nelle spiegazioni: ha lavorato tutti gli aumenti in modo corretto? Buon lavoro!
13.02.2025 - 23:03
![]() Agnese wrote:
Agnese wrote:
Ciao, mi serve un chiarimento. Sto seguendo la taglia S, sono arrivata alle 284 maglie dello sprone, poi le istruzioni dicono "continuare fino ad avere 22 cm dal segnapunti al centro davanti." Si intende la diagonale che dal segnapunti dell' inizio del motivo va al centro del davanti alla base del collo ? In orizzontale non sono previsti aumenti quindi non possono aumentare i cm. Non mi è chiaro da dove a dove devo prendere questa misura.
10.09.2023 - 22:26DROPS Design answered:
Buonasera Agnese, abbiamo aggiornato il testo: deve misurare i 22 cm dal segnapunti inserito sul collo. Buon lavoro!
12.09.2023 - 19:44
![]() MK wrote:
MK wrote:
Hello, I'm confused about where the rounds begin and end on the yoke. After the first decrease round, it says to begin the next round with chart A1, A2, A3, which I understood to be the whole front/back motif. At the end of the neck it says to insert a marker in the middle of the round, at center front. But if you start the yoke round on one side of the front/back design, doesn't that mean that the beg./end of the round will then be in one of the raglan seams, rather then at center back?
31.08.2023 - 02:01DROPS Design answered:
Dear MK, the rounds start before back piece, just after the left sleeve (when garment is worn) and you increase for raglan as shown in A.1/A.3 on front and back piece and after the marker thread at the beginning of sleeve + before the marking thread at the end of sleeve - marker on mid front is to measure piece from. Happy knitting!
31.08.2023 - 09:38
![]() Anna-Maria wrote:
Anna-Maria wrote:
Hallo, stricke an der Passe und komme nicht auf die nötigen 284 Maschen (Gr. S). Habe entsprechend der Anleitung A1, A2,A3 im Diagramm einmal in der Höhe gestrickt und gleichzeitig die Raglanzunahmen an den Ärmeln in jeder 2. Runde gearbeitet. Aktuell sind es 140 Maschen auf der Rundnadel. Wenn ich nun weitere 20x die letzten zwei Runden der Diagramme wiederhole, sind es noch 80 Maschen die dazukommen – ein Total von 220 Maschen. Könnt Ihr mir hier bitte weiterhelfen? Danke!
20.06.2023 - 19:17DROPS Design answered:
Liebe Anna-Maria, für die Ärmel werden 22 Mal 4 Maschen (je 2 für jeden Ärmel) zugenommen (= 88 Maschen insgesamt) und beim Rumpfteil nehmen Sie zuerst 8 Maschen in A.1 (2 in jedem A.1/A.3) dann wird es 16 M in jedem A.2 zugenommen; und dann 20 Mal 4 Maschen (wie die 2 letzten Reihen A.2) = 8+16+80=104 Maschen insgesamt. Es waren 92 Maschen + 88 Zunahmen (Ärmel) +104 Zunahmen (Vorder- + Rückenteil) =284 Maschen. Viel Spaß beim stricken!
21.06.2023 - 08:01
![]() Ann wrote:
Ann wrote:
What is a marker thread? what purpose is it for ?
24.03.2023 - 01:52DROPS Design answered:
Dear Ann, this video shows how to place and use a marker thread; and this other video shows another way to use marker threads. They are used to mark areas and mark where to increase/decrease. Happy knitting!
24.03.2023 - 08:41
![]() Patricia Fuchs wrote:
Patricia Fuchs wrote:
Könnte man theoretisch die Halsblende direkt mit 100-104-108-112-116-120 Maschen stricken und dann bei Runde 3 des Diagramms einsteigen? Ich finde die Anleitung allgemein sehr schwer verständlich. Es ist nicht so ganz klar, wo denn der Rundenbeginn ist. Zwischen linkem Arm und dem Rücken? Oder doch an der vorderen Mitte, wo man den Markierungsfaden platzieren soll? Danke :-)
10.03.2023 - 13:58DROPS Design answered:
Liebe Frau Fuchs, am besten stricken Sie wie in der Anleitung, denn am Ende der 1. Runde mit A.1,A.2, A.3 beginnen schon die Zunahmen für die Passe, Runden beginnen am Anfang Rückenteil, von *bis* und das zweite Mal stricken Sie von *-* wieder wird das Vorderteil sein. Viel Spaß beim stricken!
10.03.2023 - 16:42
![]() Alma wrote:
Alma wrote:
Ik heb de hals dubbel gebreid, 7 cm, daarna de pas in patroon, 24 cm, maar op de tekening staat nog 4 cm tussen hals en pas. Ik begrijp niet waar die 4 cm voor staat, kunnen jullie helpen?
31.01.2023 - 21:44DROPS Design answered:
Dag Alma,
Je kunt gewoon de beschrijving aanhouden, dus 7 cm voor de hals en daarna 24 cm voor de pas. De 4 cm is denk ik vanaf de schouder tot het begin van de pas, wanneer je het werk plat neerlegt.
01.02.2023 - 20:27
![]() Alma wrote:
Alma wrote:
Ik heb de hals dubbel gebreid, 7 cm, daarna de pas in patroon, 24 cm, maar op de tekening staat nog 4 cm tussen hals en pas. Ik begrijp niet waar die 4 cm voor staat, kunnen jullie helpen?
31.01.2023 - 21:43
|
||||||||||
Spice Market#spicemarketsweater |
||||||||||
 |
 |
|||||||||
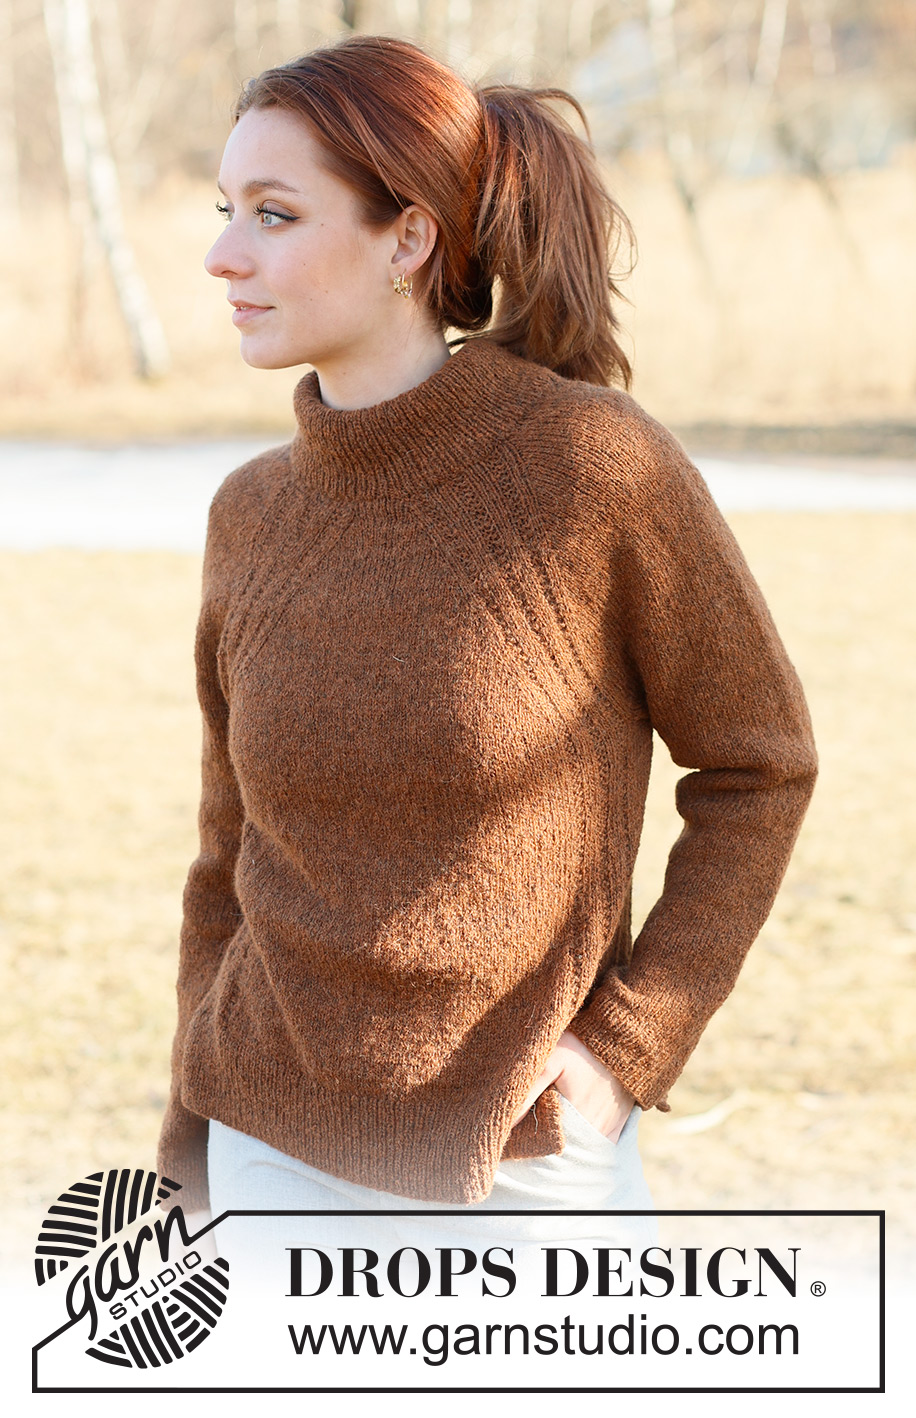
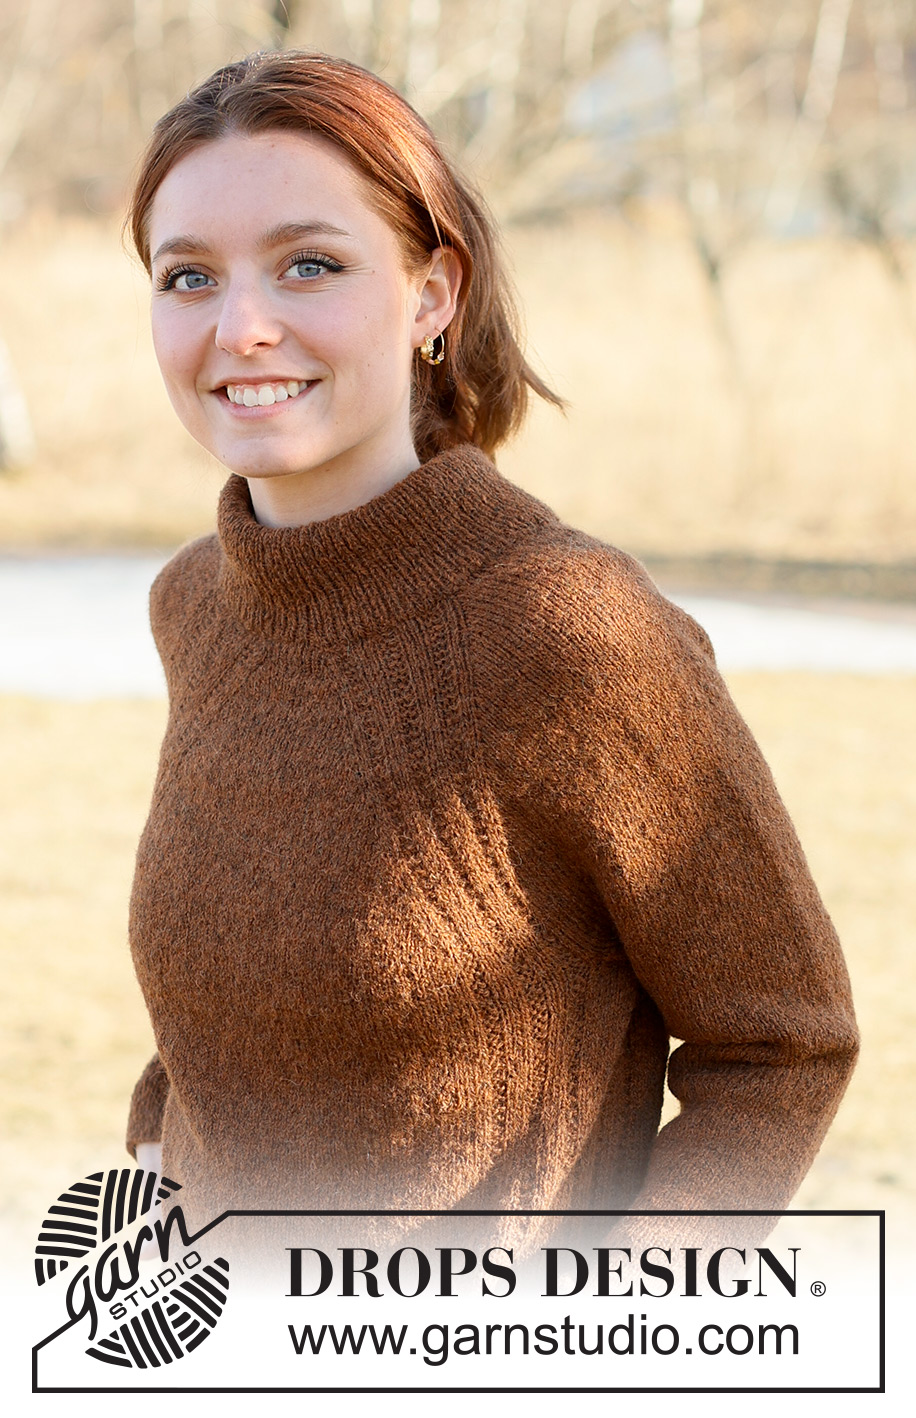
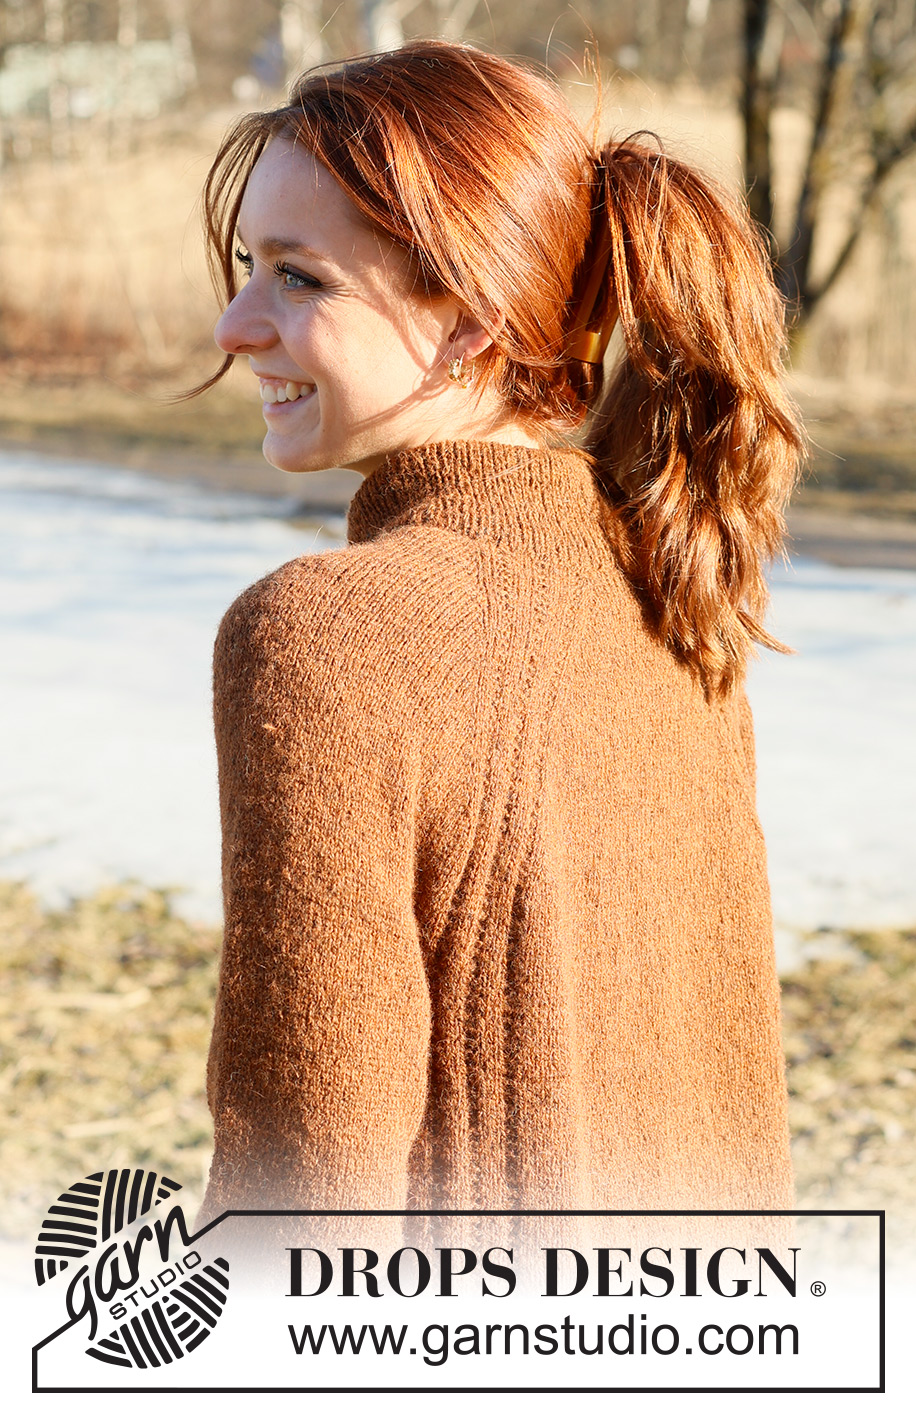
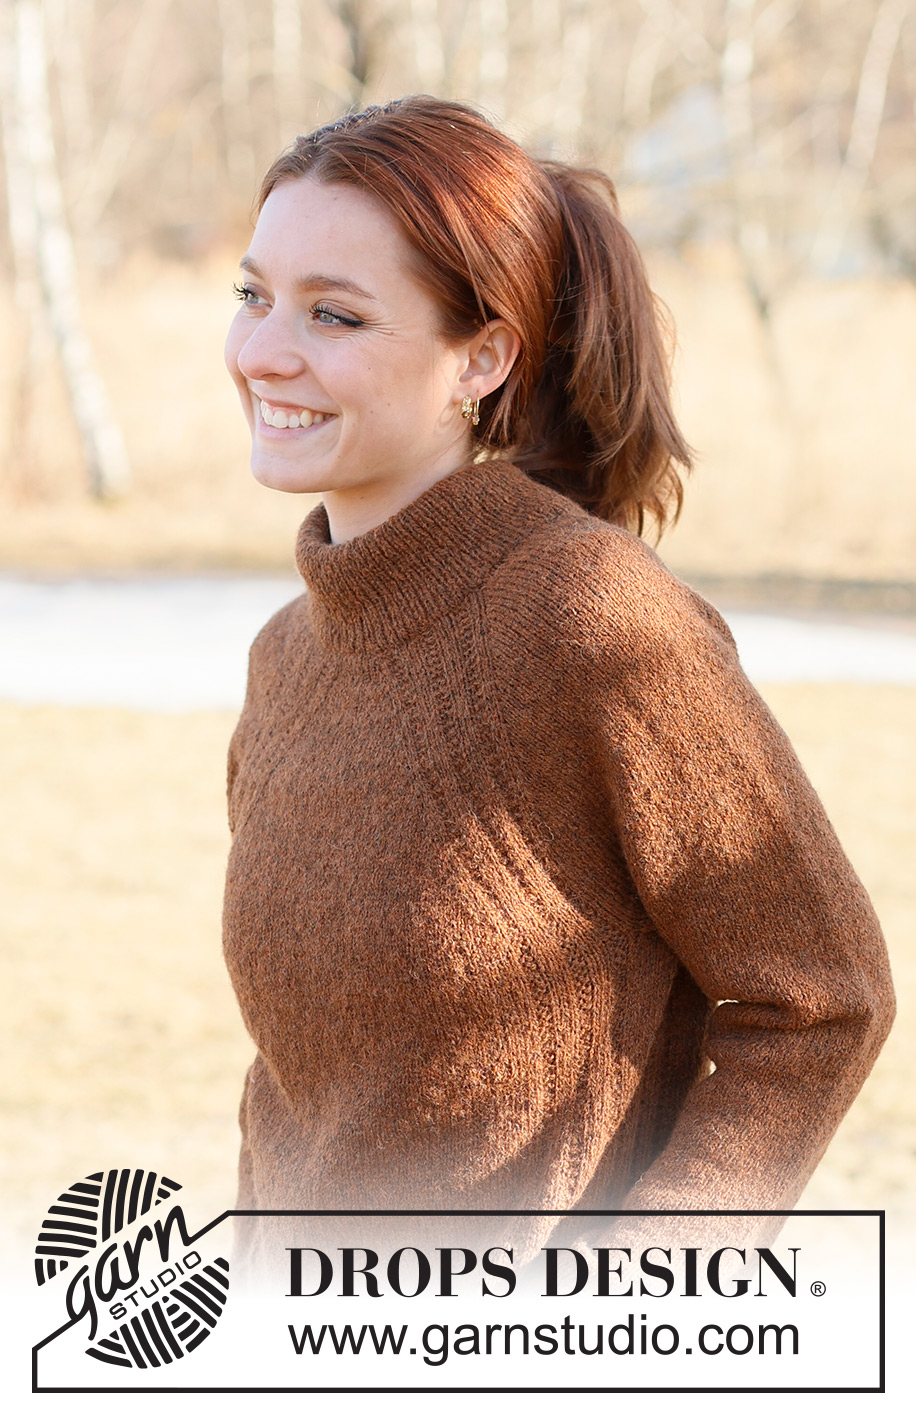
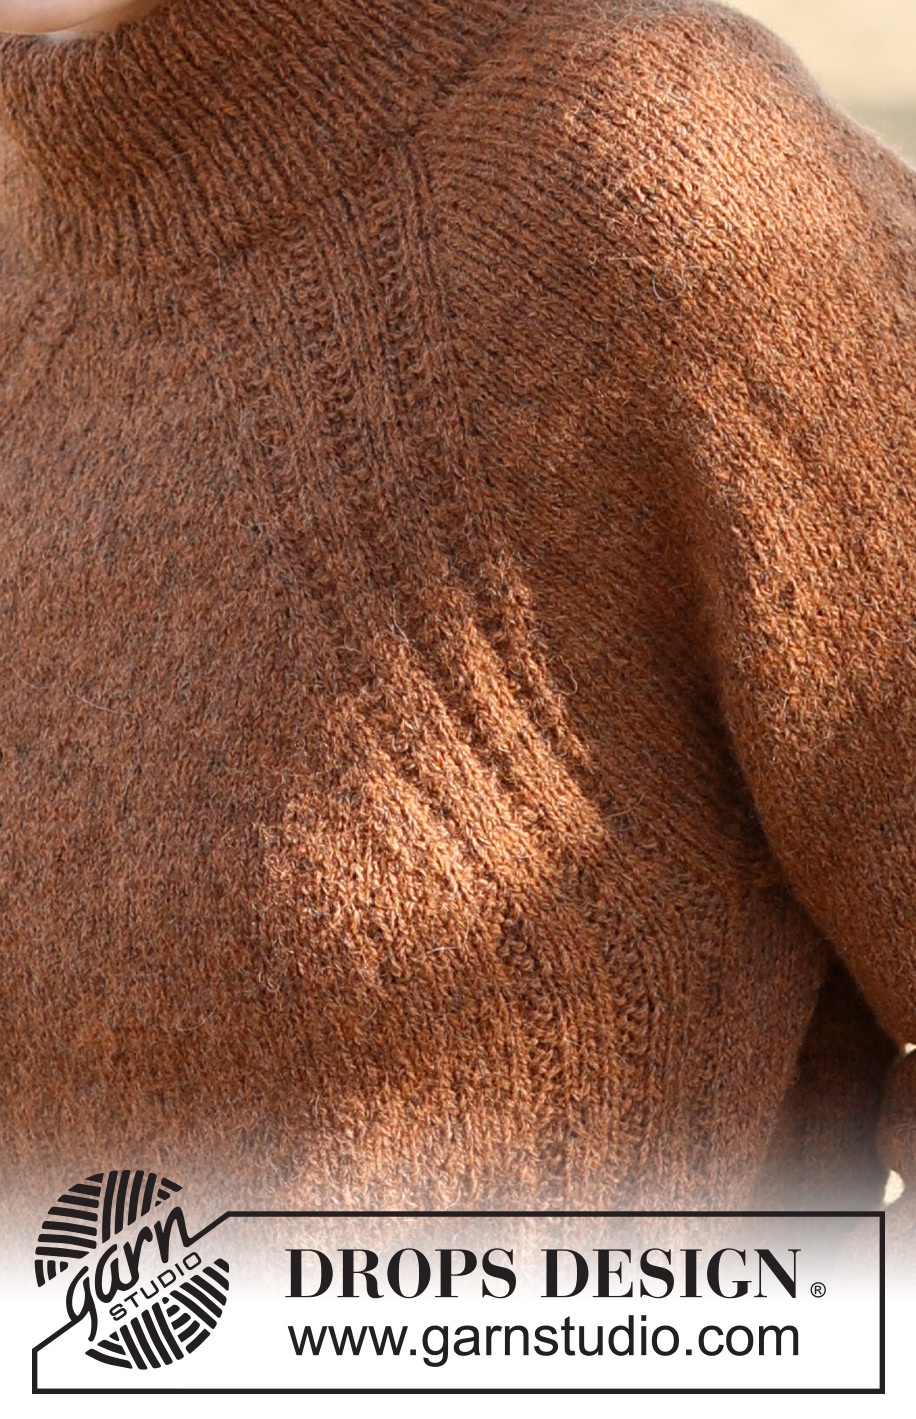
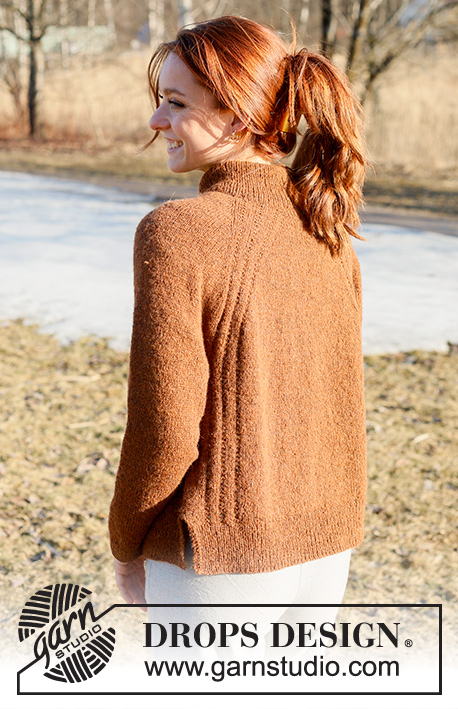
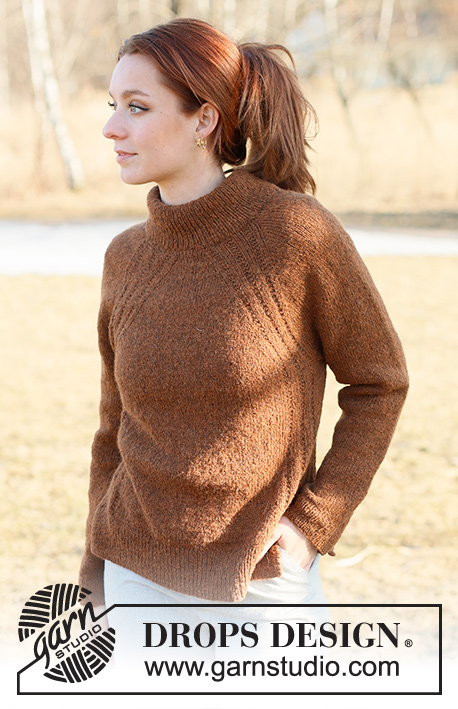
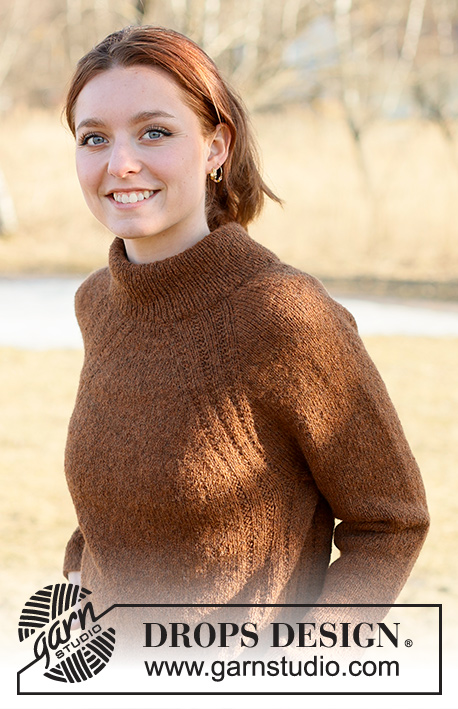
Knitted jumper in DROPS Sky. Piece is knitted top down with raglan, textured pattern and vents in the sides. Size: S - XXXL
DROPS 236-28 |
||||||||||
|
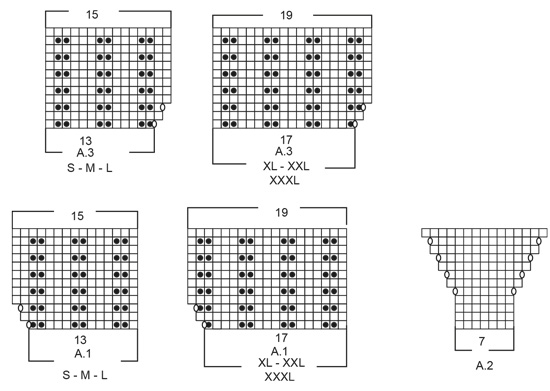
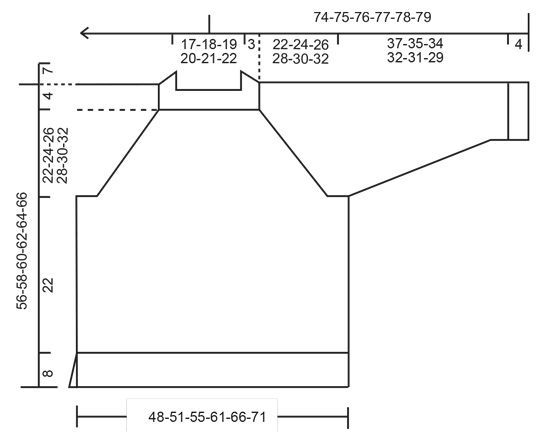
---------------------------------------------------------- EXPLANATION FOR THE PATTERN: ---------------------------------------------------------- GARTER STITCH (back and forth): Knit all rows. 1 ridge vertically = knit 2 rows. PATTERN: See diagrams A.1 to A.3. Choose diagram for your size in A.1 and A.3. RAGLAN: Increase 1 stitch before/after marker threads on sleeves as follows: Work until first marker thread on sleeve stitches (marker thread is here), knit 1, make 1 yarn over, work until 1 stitch before next marker thread, make 1 yarn over, knit 1 (marker thread is here). Repeat on the other sleeve (= 4 stitches increased on sleeves). On next round knit yarn overs twisted to avoid holes. Then work the new stitches in stocking stitch. DECREASE TIP (applies to sleeves): Decrease 1 stitch on each side of marker thread: Work until 3 stitches remain before marker thread and knit 2 together, knit 2 (marker thread is between these 2 stitches), slip 1 stitch knitwise, knit 1, pass slipped stitch over stitch worked. ---------------------------------------------------------- START THE PIECE HERE: ---------------------------------------------------------- JUMPER - SHORT OVERVIEW OF THE PIECE: Double neck edge and yoke are worked in the round on circular needle top down. Work body in the round down to vent in the sides, then finish front piece and back back and forth on circular needle separately. Work sleeves in the round on a short circular needle/double pointed needles. DOUBLE NECK EDGE: Cast on 118-122-128-132-138-142 stitches with DROPS Sky over a short circular needle size 4.5 and a short circular needle size 3.5 mm held together. Pull out circular 4.5 mm and keep stitches on the short circular needle size 3.5 mm (cast is done like this to get an elastic cast-on edge). Knit 1 round, then work rib (knit 1/purl 1). Work rib for 14 cm. Now fold the rib inwards to form a double edge - then work next round in rib as before at the same time work every other stitch together with every other stitch from cast-on edge. You now have a double neck edge. Insert 1 marker in the middle of round (mid front) – measure yoke from this marker. YOKE: Switch to circular needle size 4.5 mm, knit 1 round while decreasing 26-26-28-28-30-30 stitches evenly = 92-96-100-104-108-112 stitches. Then work as follows: * A.1, A.2, A.3, insert 1 marker thread here (back piece/front piece), knit 1, make 1 yarn over, knit 11-13-15-9-11-13, make 1 yarn over, knit 1, insert a marker thread here (sleeve) *, work from *-* 1 more time on round. 1 stitch for RAGLAN has now been increased – read explanation above, in each side of sleeve and 1 stitch has been increased on A.1/A.3 on front piece and back piece = 100-104-108-112-116-120 stitches. REMEMBER THE KNITTING TENSION! Continue in the round with pattern as follows and increase for raglan on sleeves every other round 21-25-26-31-31-30 more times (22-26-27-32-32-31 times in total), AT THE SAME TIME when diagrams have been worked vertically, repeat the last 2 rounds vertically in each diagram vertically 20-23-27-28-33-36 more times (i.e. increase 1 stitch on each side of A.2 until there are 55-61-69-71-81-87 stitches in stocking stitch between A.1 and A.3 on back piece and front piece) = 284-316-340-368-392-404 stitches. Then continue with texture over the 15-15-15-19-19-19 stitches in A.1 and A.3, and stocking stitch over the remaining stitches until piece measures 22-24-26-28-30-32 cm measured from marker and down to mid front. Work next round as follows: Work pattern as before over the first 85-91-99-109-119-125 stitches (back piece), slip the next 57-67-71-75-77-77 stitches on a thread (sleeve), cast on 10-10-10-12-12-16 stitches on needle (in the side under sleeve), work the next 85-91-99-109-119-125 stitches (front piece), slip the next 57-67-71-75-77-77 stitches on a thread (sleeve), cast on 10-10-10-12-12-16 new stitches in the side under sleeve. NOW MEASURE PIECE FROM HERE! BODY: = 190-202-218-242-262-282 stitches. Insert a marker thread in each side on body, in the middle of the new stitches cast-on in the side under the sleeves (= 5-5-5-6-6-8 new stitches on each side of marker thread). Work pattern as before over stitches in A.1 and A.3, work the remaining stitches on round in stocking stitch. When piece measures 22 cm in all sizes, work until marker thread in one side of piece. Then work back and forth over half the stitches on round for front/back piece, so make a vent in each side. BACK PIECE: = 95-101-109-121-131-141 stitches. Knit 1 row from right side while increasing 24-24-28-28-32-38 stitches evenly = 119-125-137-149-163-179 stitches. Switch to circular needle size 3.5 mm. Work rib as follows – from wrong side: 2 edge stitches in GARTER STITCH - read explanation above, * purl 1, knit 1 *, repeat from *-* until 3 stitches remain, purl 1 and 2 edge stitches in garter stitch. When piece measures 8 cm, cast off. Jumper measures approx. 56-58-60-62-64-66 cm from shoulder and down. FRONT PIECE: Work as on back piece. SLEEVE: Slip the 57-67-71-75-77-77 stitches from thread in one side of piece on a short circular needle/double pointed needles size 4.5 mm and pick in addition up 1 stitch in each of the 10-10-10-12-12-16 stitches cast on under sleeve = 67-77-81-87-89-93 stitches. Insert 1 marker thread in the middle of the new stitches under sleeve (= 5-5-5-6-6-8 new stitches on each side of marker thread). Work in stocking stitch in the round. When piece measures 4 cm from division, decrease 2 stitches mid under sleeve - read DECREASE TIP. Decrease like this every 7½-3½-3-2-2-2 cm 5-9-10-12-12-13 times in total. When all decreases are done, there are 57-59-61-63-65-67 stitches on round. Work until sleeve measures 37-35-34-32-31-29 cm from division. Knit 1 round while increasing 11 stitches evenly = 68-70-72-74-76-78 stitches. Switch to double pointed needles size 3.5 mm and work rib = knit 1/purl 1 for 4 cm. Cast off. Sleeve measures approx. 41-39-38-36-35-33 cm from division. Work the other sleeve the same way. |
||||||||||
Diagram explanations |
||||||||||
|
||||||||||
 |
||||||||||
 |
||||||||||
Have you finished this pattern?Tag your pictures with #dropspattern #spicemarketsweater or submit them to the #dropsfan gallery. Do you need help with this pattern?You'll find 29 tutorial videos, a Comments/Questions area and more by visiting the pattern on garnstudio.com. © 1982-2025 DROPS Design A/S. We reserve all rights. This document, including all its sub-sections, has copyrights. Read more about what you can do with our patterns at the bottom of each pattern on our site. |
||||||||||


With over 40 years in knitting and crochet design, DROPS Design offers one of the most extensive collections of free patterns on the internet - translated to 17 languages. As of today we count 320 catalogues and 12094 patterns translated into English (UK/cm). 12094
We work hard to bring you the best knitting and crochet have to offer, inspiration and advice as well as great quality yarns at incredible prices! Would you like to use our patterns for other than personal use? You can read what you are allowed to do in the Copyright text at the bottom of all our patterns. Happy crafting!
Post a comment to pattern DROPS 236-28
We would love to hear what you have to say about this pattern!
If you want to leave a question, please make sure you select the correct category in the form below, to speed up the answering process. Required fields are marked *.