
Looking for a yarn?


Comments / Questions (130)
![]() Kirsten Bjerregaard Nielsen wrote:
Kirsten Bjerregaard Nielsen wrote:
Det vil være rart om der også stod hvad strikkefastheden er i mønster delen, der er jo ingen glatstrik hvor man kan kontrollere om man holder strikkefastheden. Jeg har desuden brugt tid på at lave en side hvor jeg har kopieret diagram i rækkefølge og forklaring dertil, så jeg ikke skulle kikke på 3 forskellige sider, hver gang jeg kom til en ny mønsterdel + lavet et skema 1 til 16 ( 5 stk) hvor jeg sætter en markering hvor A5 skal snoes. Det har gjort mønteret lettere.
05.01.2024 - 14:36
![]() Agnieszka wrote:
Agnieszka wrote:
Dzień dobry, czy istniałaby możliwość dodania do wzoru danych na rozmiar XS?
11.12.2023 - 17:33DROPS Design answered:
Witaj Agnieszko, niestety nie jesteśmy w stanie dopasować naszych wzorów do indywidualnych potrzeb. Zalecam kontakt ze sklepem, w którym zakupiłaś włóczkę, powinien udzielić Ci pomocy. Pozdrawiam!
12.12.2023 - 11:10
![]() Barbara wrote:
Barbara wrote:
Buongiorno, ho difficoltà a capire la parte del collo. Devo lavorare in piano dopo aver finito le diminuzioni del raglan o durante? E finisco il lavoro in piano quando ho fatto le diminuzioni per il collo? E poi come le riprendo le maglie per il collo? Grazie
24.10.2023 - 12:42DROPS Design answered:
Buonasera Barbara, deve iniziare a lavorare il collo all'altezza indicata, iniziando in tondo e poi in piano. Le maglie del collo vengono messe in sospeso e poi riprese. Buon lavoro!
24.10.2023 - 22:33
![]() Chantal wrote:
Chantal wrote:
Bonjour, je ne comprends pas pourquoi vous montez autant de mailles pour les côtes ? d'après le shéma S 96cm = 192m. ( 264m=132cm!) mon échantillon est correct !
01.09.2023 - 15:22DROPS Design answered:
Bonjour Chantal, si votre échantillon est juste, alors vous aurez les bonnes mesures quand le pull sera terminé, notez qu'il faut plus de mailles pour la même largeur quand on tricote en côtes avec les aiguilles et avec les différentes torsades et les points fantaisie avec les aiguilles 4,5 qu'en jersey avec les aiguilles 4,5. Bon tricot!
01.09.2023 - 15:37
![]() Madelaine D wrote:
Madelaine D wrote:
Hej! Detta är kanske en petitess; den breda flätan i A.5 ska enligt mönstret vridas var 6:e varv, men på bilden ser den ut att ha samma frekvens som de mindre flätorna i A.6 (vart 4:e varv). \\r\\nNär man stickar strukturmönstret i sidorna mellan fram/bakstycke (A.4) är det enklast att börja med detta i skarven mot A.5 eller A.8, inte i mitten (dvs i skarven mellan fram- och bakstycke) så som jag tolkar att det står i mönstret att man ska göra.
14.08.2023 - 00:00
![]() Birgit wrote:
Birgit wrote:
Hallo, ich habe schon beim Anschlagen ein Problem. Eigentlich wollte ich Größe M und habe 280 Maschen angeschlagen. Bei einer Maschenprobe von 20M/10 cm ergeben sich 140 cm. In Ihrer Größenzeichnung stehen aber 52 cm (x2) sind das 104 cm. Das würde mir passen. Die 140 cm sind viel zu weit. Wenn ich aber Maschen für 104 cm anschlage, dann bleiben nach Abzug der Zöpfe nur jeweils 9 Maschen für das Muster A4 unter den Ärmeln. Da passt doch das Raglan und auch die Ärmelbreite nicht mehr.
15.06.2023 - 12:05DROPS Design answered:
Liebe Birgit, die Maschenprobe gilt aber für glatt rechts mit grösseren Nadeln, die Maschen schlägt man mit kleineren Nadeln und wegen Bündchen (und dann Zöpfe danach mit grösseren Nadeln) braucht man mehr Maschen für die gleiche Breite; sollte Ihre Maschenprobe stimmen, dann bekommen Sie die gewünschte Maßnahmen wie in der Skizze. Viel Spaß beim stricken!
15.06.2023 - 15:21
![]() Anna Horst wrote:
Anna Horst wrote:
Patroon 226-16: (maat M)ik snap de halsrand niet.Had 98 st, dan 130 st opnemen, meteen er na weer minderen tot 96 st en 1 nld breien en dan weer meerderen tot 120 st. Graag wat uitleg
16.03.2023 - 22:02DROPS Design answered:
Dag Anna,
Ja dat klopt, je neemt veel steken op en mindert gelijk weer. Dit voorkomt dat de hals te breed wordt, maar zorgt er tegelijkertijd voor dat de hals elastisch wordt.
19.03.2023 - 17:00
![]() Sidsel Sande wrote:
Sidsel Sande wrote:
Hei Strikker Snowy trails genser . Hvorfor beskrive vrangborden så komplisert når det lett kan beskrives som : strikk 5 cm 2 rett og 2 vrang ?
02.03.2023 - 18:54DROPS Design answered:
Hei Sidsel. Men om du strikker 5 cm vrangbord med 2 rett og 2 vrang vil du ikke få den pene overgangen med 2 rett maskene i vrangborden som går videre i flettemønstrene. Her er det tenkt/designet helheten, ikke bare vrangbord for seg selv og mønstret for seg selv. mvh DROPS Design
06.03.2023 - 10:14
![]() Lisa wrote:
Lisa wrote:
Om man vill sticka uppifrån och ner, hur gör man med mönstret?
26.02.2023 - 19:51DROPS Design answered:
Hej Lisa, vi kan ikke skrive mønsteret om. Men det kan være du kan følge det bagfra, så du starter nederst i mønsteret... ?
28.02.2023 - 14:46
![]() Ebba wrote:
Ebba wrote:
Hej! I tredje stycket under ÄRM, står det "När arbetet mäter 12-12-12-12-14-11 cm, ökas det med 2 maskor...". Stämmer det verkligen att det ska vara 14 cm för XXL? Ska det inte vara 12 eller 11 cm?
25.02.2023 - 16:36DROPS Design answered:
Hei Ebba. Stemmer med 14 cm i str. XXL. mvh DROPS Design
06.03.2023 - 10:07
|
|||||||||||||||||||||||||||||||
Snowy Trails#snowytrailssweater |
|||||||||||||||||||||||||||||||
 |
 |
||||||||||||||||||||||||||||||
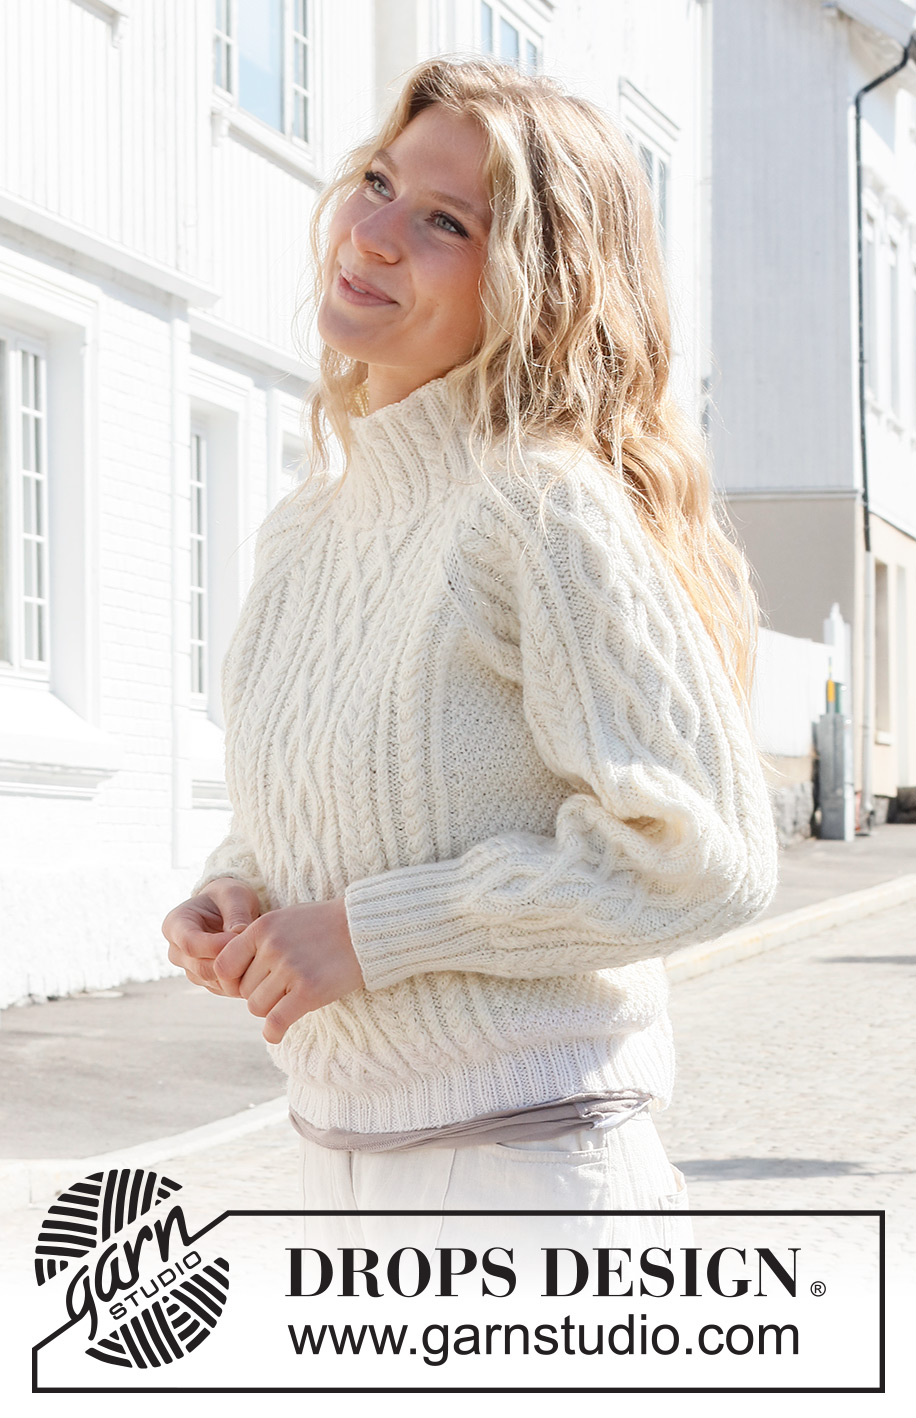
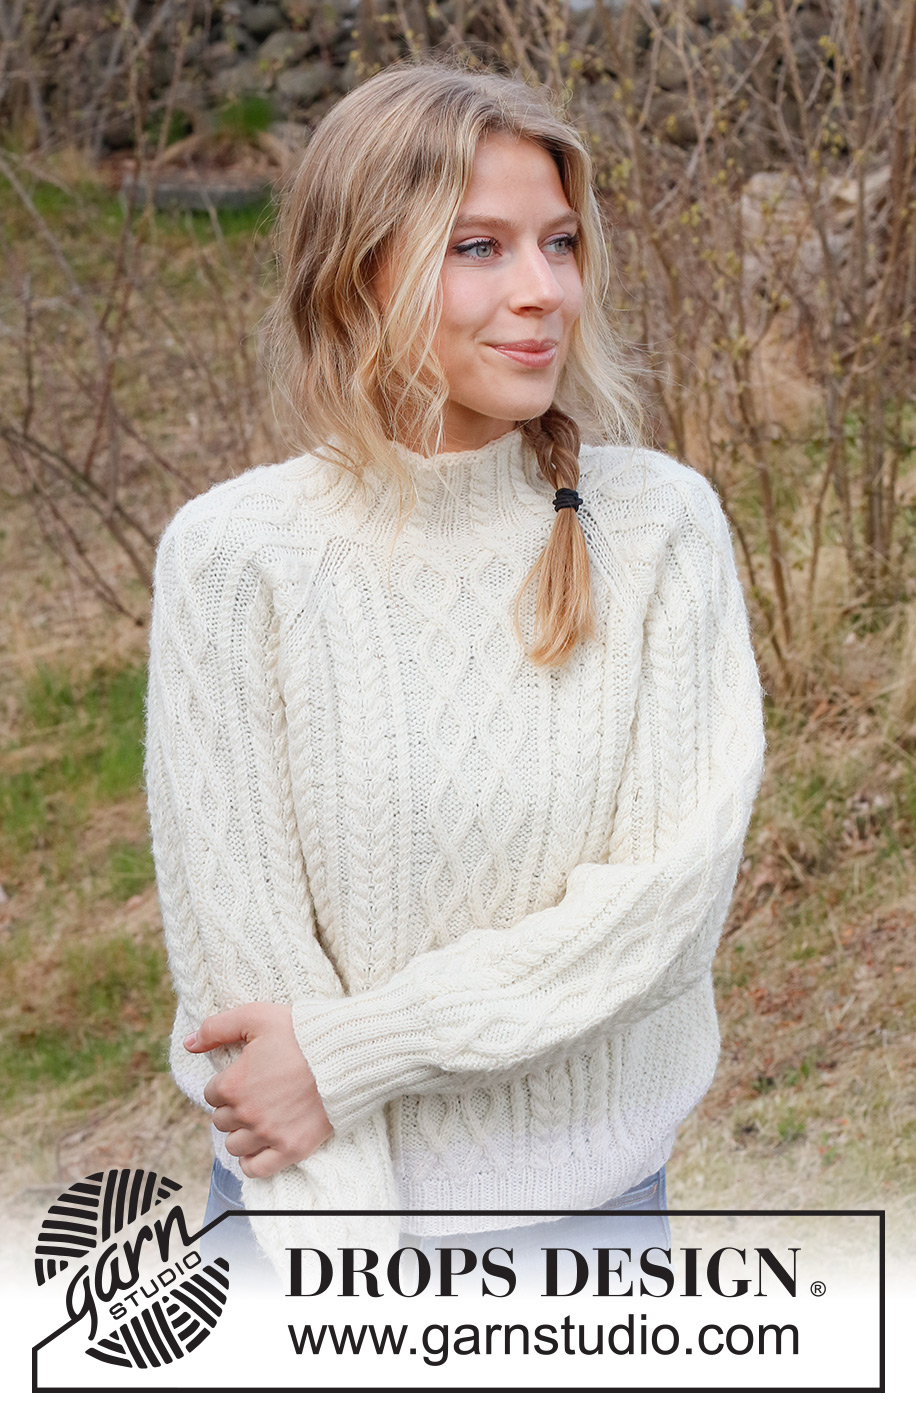
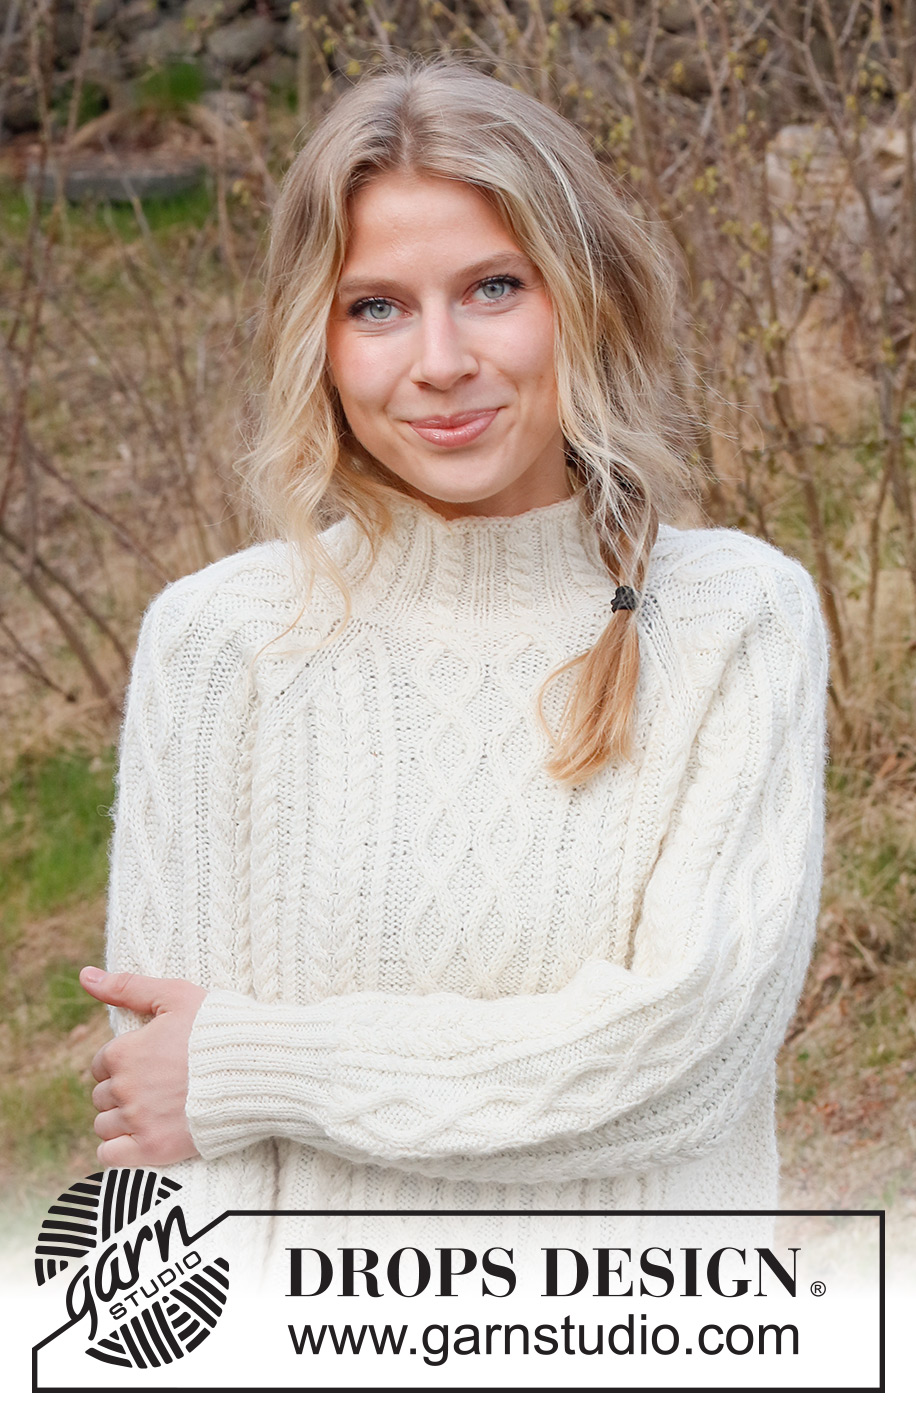
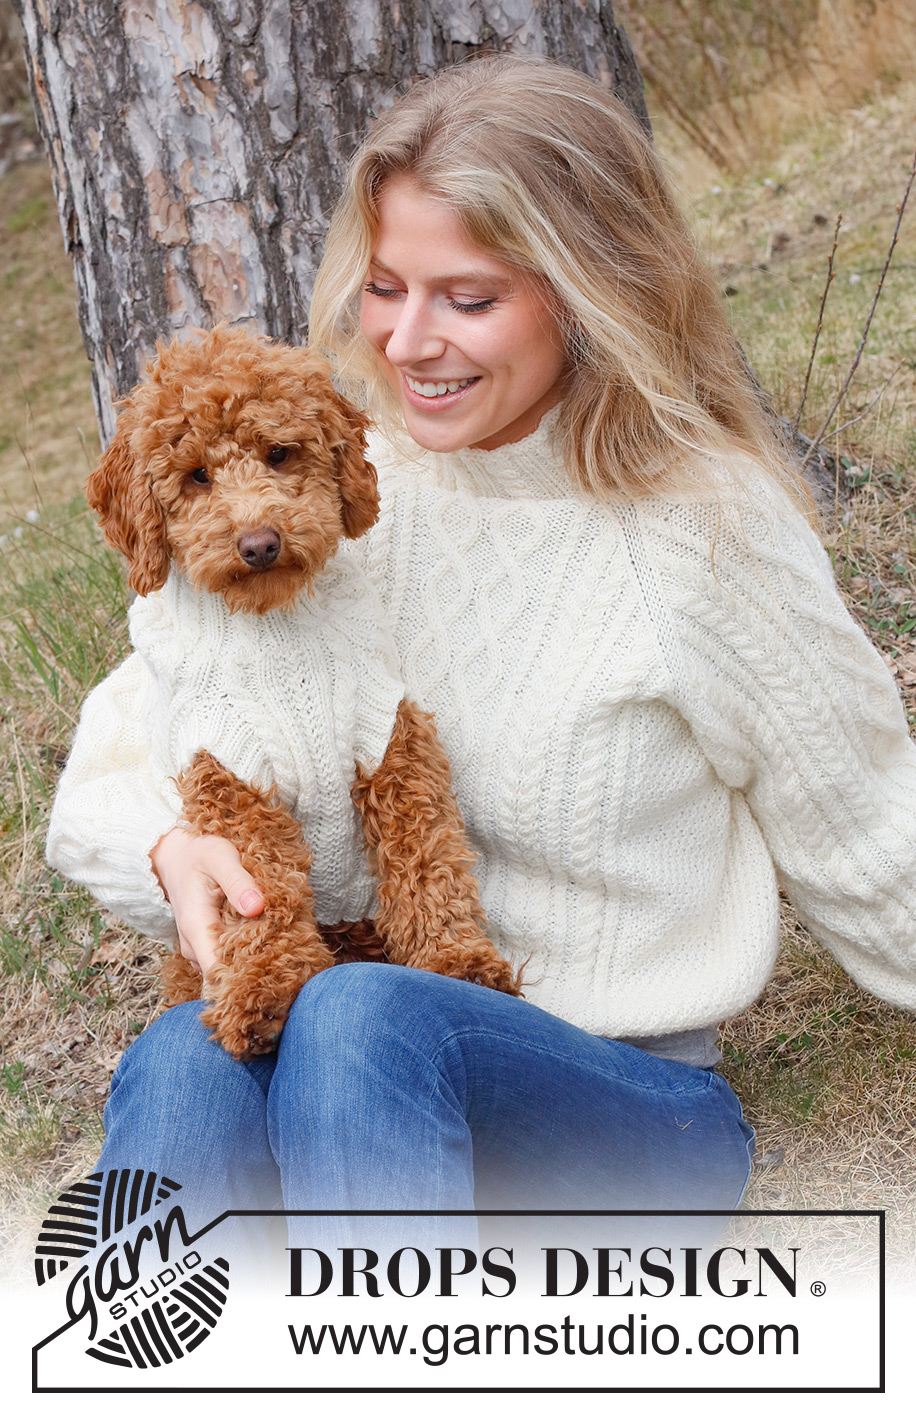
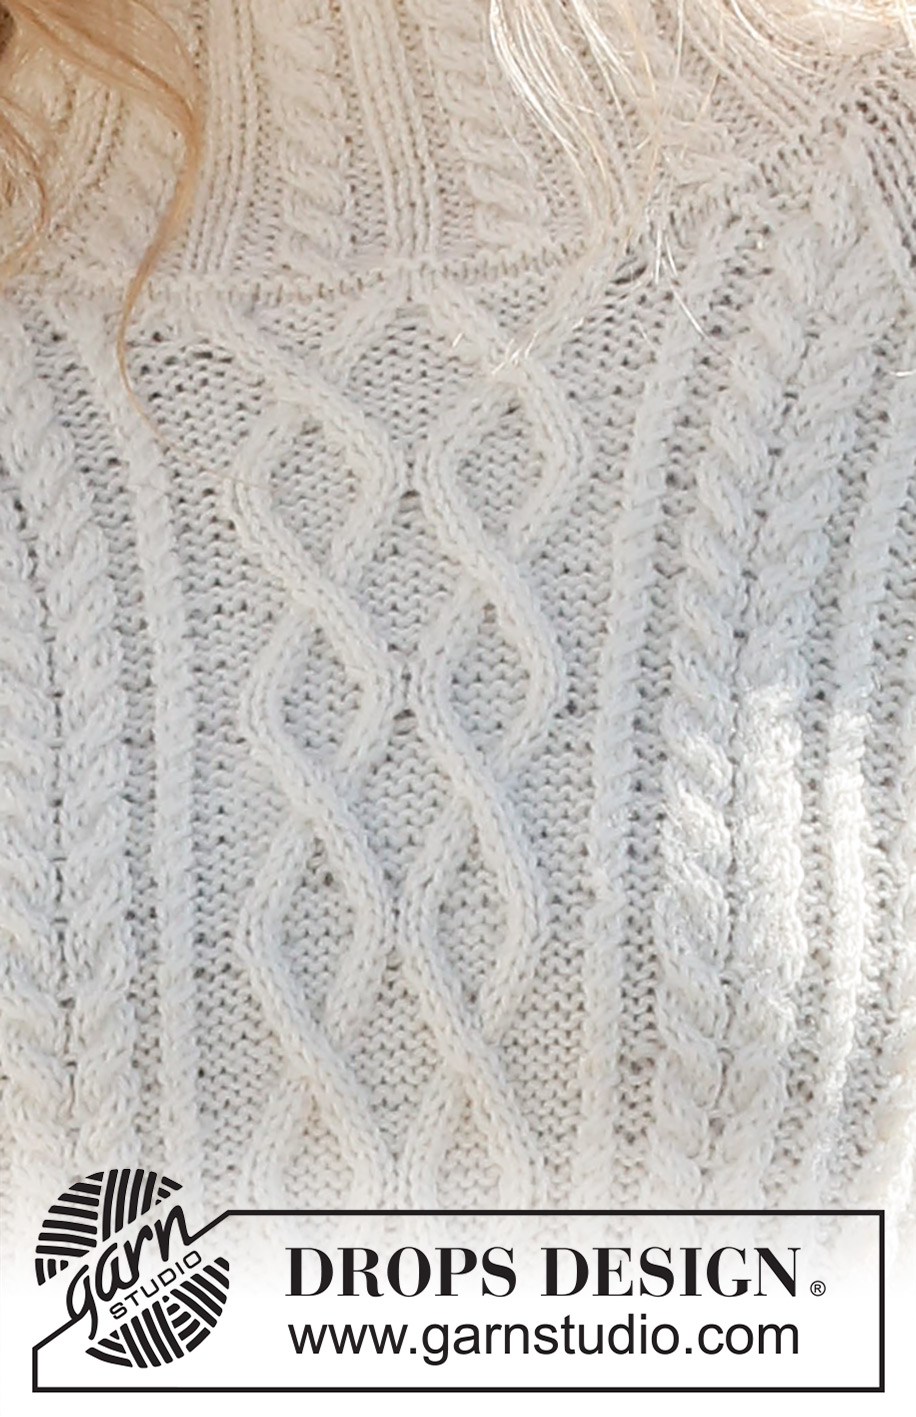
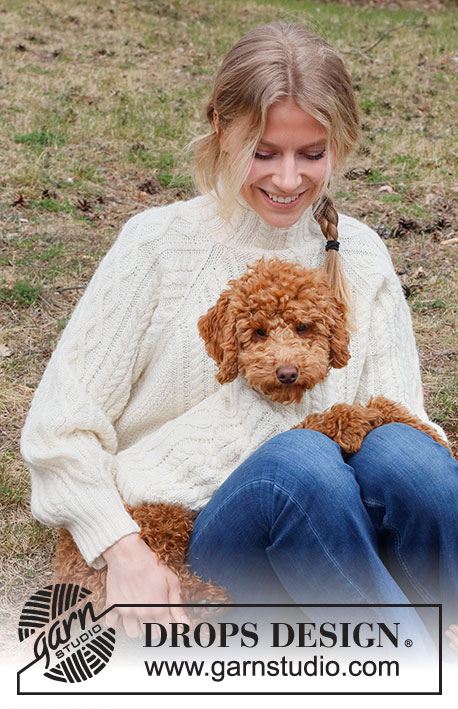
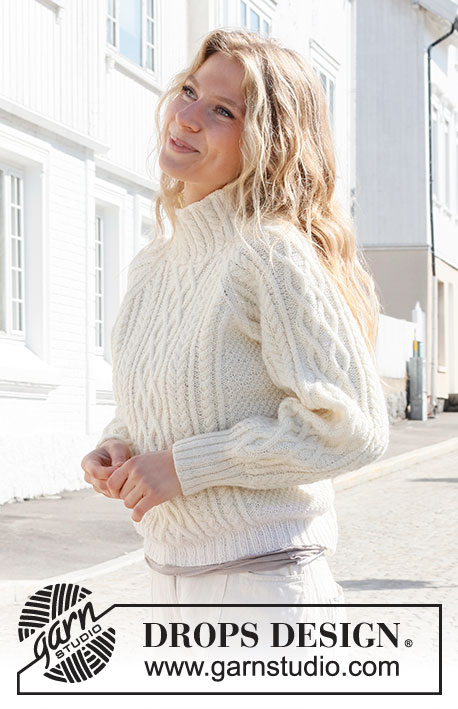
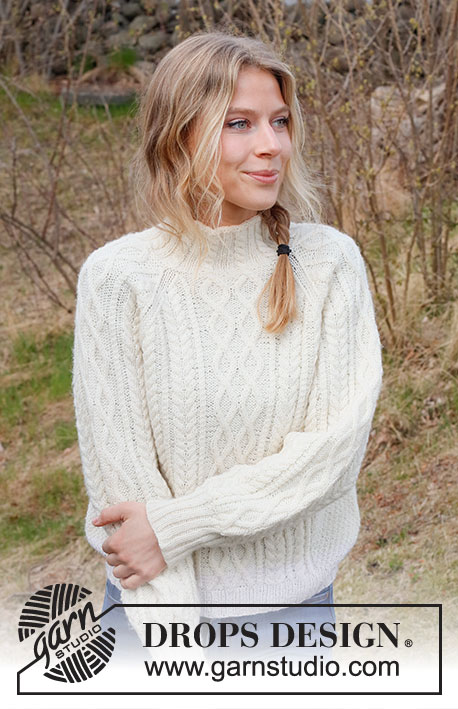
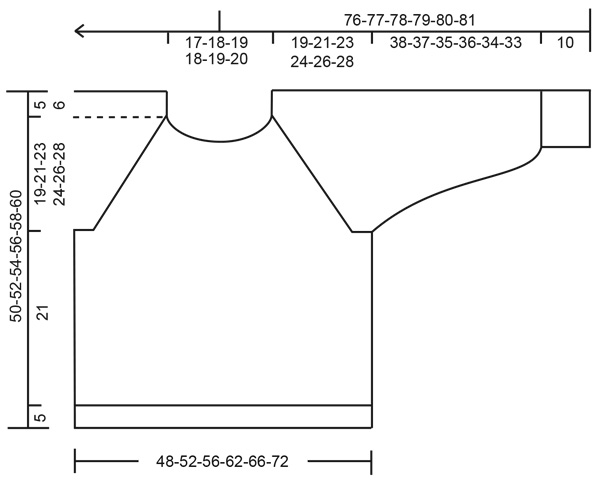
Knitted jumper in DROPS Karisma or DROPS Daisy. Piece is knitted with raglan, cables and moss stitch. Size: S - XXXL
DROPS 226-16 |
|||||||||||||||||||||||||||||||
|
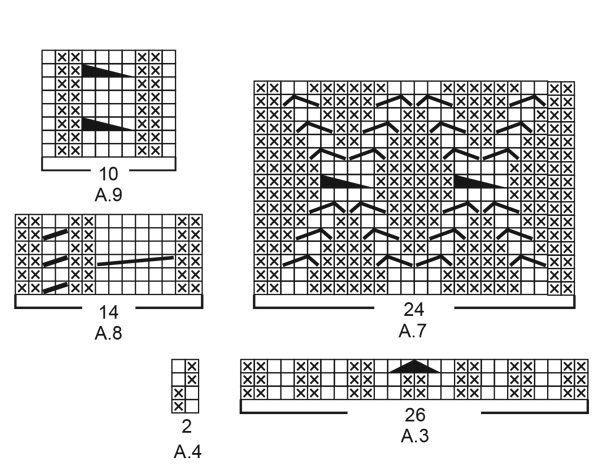
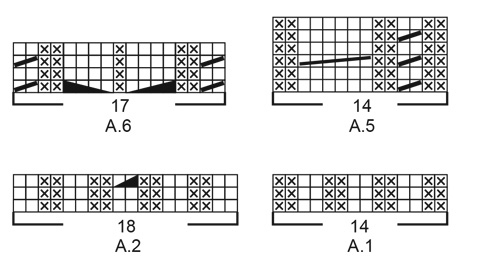
---------------------------------------------------------- EXPLANATION FOR THE PATTERN: ---------------------------------------------------------- KNITTING TIP: In sizes XL, XXL and XXXL, there will be 4 purl stitches next to each other when A.1 is worked 2 times in width. So the rib will match under A.5/A.8, which is worked after the rib. PATTERN: See diagrams A.1 to A.7. Diagrams show all rows in pattern seen from the right side. DECREASE/INCREASE TIP (evenly): To calculate how to decrease/increase evenly, use the total number of stitches to be decreased/increased over (e.g. 21 stitches) and divide stitches by number of decreases/increases to be done (e.g. 4) = 5.3. In this example decrease by knitting approx. every 4th and 5th stitch together. When increasing make in this example 1 yarn over after approx. every 5th stitch. On next round work yarn overs twisted to avoid holes. INCREASE TIP (applies to mid under sleeve): Increase 2 stitches by making 1 yarn over on each side of stitch with marker mid under sleeve. Work as follows from beginning of round: Work 1 stitch (work this stitch always like the first stitch in A.4), make 1 yarn over, pattern as before until stitch with marker, make 1 yarn over (= 2 stitches increased). On next round work yarn overs twisted to avoid holes. Then work the increased stitches in A.4. RAGLAN: Decrease for raglan on each side of marker thread in every transition between sleeves and front/back piece as explained below. In the largest sizes decrease unevenly on front/back piece and sleeves - this is explained in pattern. FROM RIGHT SIDE: DECREASE AS FOLLOWS AFTER MARKER THREAD: Knit 1, slip 1 stitch knitwise, knit 1, pass slipped stitch over stitch worked (= 1 stitch decreased) DECREASE AS FOLLOWS BEFORE MARKER THREAD: Work until 3 stitches remain before marker thread, knit the next 2 together, knit 1 (= 1 stitch decreased) FROM WRONG SIDE: DECREASE AS FOLLOWS AFTER MARKER THREAD: Purl 1, purl 2 together (= 1 stitch decreased) DECREASE AS FOLLOWS BEFORE MARKER THREAD: Work until 3 stitches remain before marker thread, purl 2 twisted together, purl 1 (= 1 stitch decreased) ---------------------------------------------------------- START THE PIECE HERE: ---------------------------------------------------------- JUMPER - SHORT OVERVIEW OF THE PIECE: Work body in the round on circular needle from the bottom and up to armholes. Sleeves are worked in the round on double pointed needles/a short circular needle, from the bottom and up to armholes. Then slip sleeves on to same circular needle as body where stitches for armholes where cast off. Work yoke in the round up to neck line. Cast off stitches for neck mid front. Then work the rest of yoke back and forth on circular needle until finished measurements. Finish with a neck edge in rib and cables. BODY: Cast on 264-280-296-336-352-384 stitches on circular needle size 3.5 mm with DROPS Karisma. Knit 1 round. Then work rib as follows: Knit 1, * purl 2, knit 2 *, work from *-* over the next 20-24-28-24-28-36 stitches, work A.1 over the next 14-14-14-28-28-28 stitches (= 1-1-1-2-2-2 repetitions of 14 stitches – read KNITTING TIP), work A.2 (= 18 stitches), work A.3 (= 26 stitches), work A.2 (= 18 stitches), Work A.1 over the next 14-14-14-28-28-28 stitches (= 1-1-1-2-2-2 repetitions of 14 stitches – read KNITTING TIP), * knit 2, purl 2 *, work from *-* over the next 40-48-56-48-56-72 stitches, knit 2, work A.1 over the next 14-14-14-28-28-28 stitches (= 1-1-1-2-2-2 repetitions of 14 stitches – remember KNITTING TIP), work A.2 (= 18 stitches), work A.3 (= 26 stitches), work A.2 (= 18 stitches), work A.1 over the next 14-14-14-28-28-28 stitches (= 1-1-1-2-2-2 repetitions of 14 stitches – remember KNITTING TIP), * knit 2, purl 2 *, work from *-* over the next 20-24-28-24-28-36 stitches, and finish with knit 1. Continue rib like this– NOTE: In diagram A.2 and A.3 repeat only the 2 first rounds vertically. When 1 round remains before piece measures 5 cm, decrease stitches in rib - this is done as follows: Work in stocking stitch over the first 21-25-29-25-29-37 stitches and decrease at the same time 4-4-4-4-4-6 stitches evenly over these 21-25-29-25-29-37 stitches – read DECREASE/INCREASE TIP, work A.1 as before over the next 14-14-14-28-28-28 stitches, work last round in A.2 (= 18 stitches and 1 stitch decreased), work last round in A.3 (= 26 stitches and 2 stitches decreased), work last round in A.2 (= 18 stitches and 1 stitch decreased), work A.1 as before over the next 14-14-14-28-28-28 stitches, work in stocking stitch over the next 42-50-58-50-58-74 stitches and decrease at the same time 9-9-9-9-9-13 stitches evenly over these 42-50-58-50-58-74 stitches, work A.1 as before over the next 14-14-14-28-28-28 stitches, work last round in A.2 (= 18 stitches and 1 stitch decreased), work last round in A.3 (= 26 stitches and 2 stitches decreased), work last round in A.2 (= 18 stitches and 1 stitch decreased), work A.1 as before over the next 14-14-14-28-28-28 stitches, work in stocking stitch over the last 21-25-29-25-29-37 stitches and decrease at the same time 5-5-5-5-5-7 stitches evenly over these 21-25-29-25-29-37 stitches = 238-254-270-310-326-350 stitches. Rib is now done. Insert 1 marker in first stitch and 1 marker in the 120th-128th-136th-156th-164th-176th stitch on round (= in the side on body). Move markers upwards when working. Cast off stitches for armholes later on each side of these markers. Switch to circular needle size 4.5 mm. Pattern begins and first round is worked as follows: Work A.4 over the first 17-21-25-21-25-31 stitches, work A.5 over the next 14-14-14-28-28-28 stitches (= 1-1-1-2-2-2 repetitions of 14 stitches, work A.6 (= 17 stitches), work A.7 (= 24 stitches), work A.6 (= 17 stitches), work A.8 over the next 14-14-14-28-28-28 stitches (= 1-1-1-2-2-2 repetitions of 14 stitches), work A.4 over the next 33-41-49-41-49-61 stitches (marker in the side is in the middle of these stitches), work A.5 over the next 14-14-14-28-28-28 stitches (= 1-1-1-2-2-2 repetitions of 14 stitches), work A.6 (= 17 stitches), work A.7 (= 24 stitches), work A.6 (= 17 stitches), work A.8 over the next 14-14-14-28-28-28 stitches (= 1-1-1-2-2-2 repetitions of 14 stitches), and work A.4 over the last 16-20-24-20-24-30 stitches. Continue this pattern. REMEMBER THE KNITTING TENSION! When piece measures 26 cm in all sizes, cast off stitches for armholes as explained below - read DECREASE TIP. Approx. 24-26-28-30-32-34 cm remain until finished measurements Adjust so that next round is an odd number of rows in the diagrams and cast off as follows: Cast off 6-6-7-7-8-8 stitches for armhole, continue pattern as before until 5-5-6-6-7-7 stitches remain before next stitch with marker, cast off 11-11-13-13-15-15 stitches for armhole, work as before until 5-5-6-6-7-7 stitches remain on round, and cast off the last 5-5-6-6-7-7 stitches = 108-116-122-142-148-160 stitches remain for front piece and 108-116-122-142-148-160 stitches remain for back piece. Cut the yarn. Put piece aside, and work the sleeves. SLEEVE: Cast on 60-60-64-64-68-68 stitches on double pointed needles size 3.5 mm with DROPS Karisma or DROPS Daisy. Knit 1 round. Then work rib in the round (= knit 2/purl 2) for 10 cm. Knit 1 round while increasing 27-27-25-25-23-23 stitches evenly - remember DECREASE/INCREASE TIP = 87-87-89-89-91-91 stitches. Insert 1 marker in first stitch on round - move marker upwards when working. Use marker later when increasing mid under sleeve. Switch to double pointed needles size 4.5 mm. Pattern begins and first round is worked as follows: Work A.4 over the first 1-1-2-2-3-3 stitches (marker is in first stitch), work A.5 (= 14 stitches), work A.6 (= 17 stitches), work A.7 (= 24 stitches), work A.6 (= 17 stitches), work A.8 (= 14 stitches), and finish with A.4 over the last 0-0-1-1-2-2 stitches. Continue this pattern. When piece measures 12-12-12-12-14-11 cm, increase 2 stitches mid under sleeve – read INCREASE TIP. Increase like this every 6½-3½-3-2½-2-2 cm 6-10-11-13-14-16 times in total = 99-107-111-115-119-123 stitches. Continue until sleeve measures approx.. 48-47-45-45-44-43 cm (shorter measurements in the larger sizes because of wider neck and longer yoke). Try the sleeve and work to desired length. Adjust so that next round is an odd number of rows in the diagrams. On next round cast off stitches for armhole as follows: Cast off 6-6-7-7-8-8 stitches, work as before until 5-5-6-6-7-7 stitches remain on round, and cast off the last 5-5-6-6-7-7 stitches = 88-96-98-102-104-108 stitches. Cut the yarn. Work the other sleeve the same way. YOKE: Slip sleeves on to same circular needle size 4.5 mm as body where armholes were cast off (without working the stitches first) = 392-424-440-488-504-536 stitches on needle. Insert a marker thread in all transitions between front/back piece and sleeves = 4 marker threads. Move marker threads upwards when working. Use marker threads when decreasing for raglan. Begin round in transition between back piece and left sleeve - insert a marker here to mark the beginning of round. Continue the pattern upwards as before, but work stitch on each side of all the 4 marker threads in stocking stitch (= 2 stitches in stocking stitch in every transition between front/back piece and sleeves). Work 1 round with pattern in the round over all stitches. OVERVIEW OF NEXT SECTION: On next round begin decrease for raglan. In the largest sizes decrease unevenly for body and sleeves. Cast in addition off stitch for neck mid front, and work the last rows back and forth from mid front. When there is not enough stitches for cables, work in stocking stitch over these stitches. Read section RAGLAN and NECK before continuing. RAGLAN – SIZE S, M and L: Decrease for RAGLAN on each side of the 4 markers - read explanation above. Decrease every other round 15-19-21 times in total, and then every round 18-17-17 times in total. RAGLAN – SIZE XL, XXL and XXXL:: Decrease for RAGLAN before/after the 4 markers - read explanation above. EVERY OTHER ROUND: In each side on sleeves: Decrease 25-29-32 times in total. In each side on front and back piece: Decrease 13-17-16 times in total. EVERY ROUND: In each side on sleeves: Decrease 12-9-8 times in total. In each side on front and back piece: Decrease 35-33-40 times in total. NECK (applies to all sizes): When piece measures 47-49-51-53-55-57 cm (adjust so that next round is an uneven round in diagram), decrease 6 stitches evenly over the middle 24 stitches (= A.7) – remember DECREASE/INCREASE TIP. Then slip the middle 20-22-24-24-26-26 stitches on front piece on 1 stitch holder for neck. Continue until beginning of round. Cut the yarn. Begin from wrong side at the neck and continue pattern back and forth. AT THE SAME TIME cast off for neck at the beginning of every row from neck as follows: Cast off 2 stitches 2 times and 1 stitch 1 time in each side. After all decreases for raglan and neck, 92-98-96-108-110-110 stitches remain. Cut the yarn. Work neck edge as explained below. NECK EDGE: Begin mid back and pick up approx. 122-130-130-142-146-146 stitches around the neck (including stitches on stitch holders at the front) on a short circular needle size 3.5 mm. On next round decrease evenly to avoid a wide neck - knit 1 round and decrease at the same time evenly to 92-96-100-104-108-112 stitches. Purl 1 round. On next round increase stitches to avoid the pattern to be worked from contracting - knit 1 round and increase at the same time 28-24-30-26-32-28 stitches evenly = 120-120-130-130-140-140 stitches. Work A.9 in the round (= 12-12-13-13-14-14 repetitions of 10 stitches). Work until neck edge measures approx. approx. 8-8-8-10-10-10 cm or desired length. On next round decrease 1 stitch over each cable = 108-108-117-117-126-126 stitches remain. Then cast off stitches with knit over knit and purl over purl. ASSEMBLY: Sew the openings under the sleeves tog. |
|||||||||||||||||||||||||||||||
Diagram explanations |
|||||||||||||||||||||||||||||||
|
|||||||||||||||||||||||||||||||
 |
|||||||||||||||||||||||||||||||
 |
|||||||||||||||||||||||||||||||
 |
|||||||||||||||||||||||||||||||
Have you finished this pattern?Tag your pictures with #dropspattern #snowytrailssweater or submit them to the #dropsfan gallery. Do you need help with this pattern?You'll find 28 tutorial videos, a Comments/Questions area and more by visiting the pattern on garnstudio.com. © 1982-2025 DROPS Design A/S. We reserve all rights. This document, including all its sub-sections, has copyrights. Read more about what you can do with our patterns at the bottom of each pattern on our site. |
|||||||||||||||||||||||||||||||


With over 40 years in knitting and crochet design, DROPS Design offers one of the most extensive collections of free patterns on the internet - translated to 17 languages. As of today we count 320 catalogues and 12094 patterns translated into English (UK/cm). 12094
We work hard to bring you the best knitting and crochet have to offer, inspiration and advice as well as great quality yarns at incredible prices! Would you like to use our patterns for other than personal use? You can read what you are allowed to do in the Copyright text at the bottom of all our patterns. Happy crafting!
Post a comment to pattern DROPS 226-16
We would love to hear what you have to say about this pattern!
If you want to leave a question, please make sure you select the correct category in the form below, to speed up the answering process. Required fields are marked *.