
Popular categories
Looking for a yarn?


|
|||||||||||||||||||||||||||||||
Snowy Trails |
|||||||||||||||||||||||||||||||
 |
 |
||||||||||||||||||||||||||||||
Knitted jumper in DROPS Karisma or DROPS Daisy. Piece is knitted with raglan, cables and moss stitch. Size: S - XXXL
DROPS 226-16 |
|||||||||||||||||||||||||||||||
|
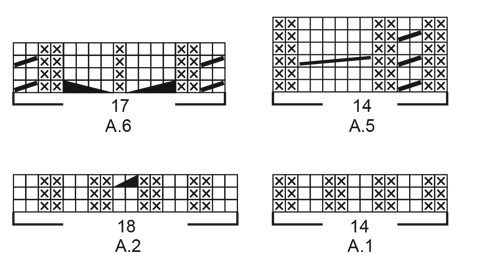
---------------------------------------------------------- EXPLANATION FOR THE PATTERN: ---------------------------------------------------------- PATTERN: See diagrams A.1 to A.7. Diagrams show all rows in pattern seen from the right side. DECREASE/INCREASE TIP (evenly): To calculate how to decrease/increase evenly, use the total number of stitches to be decreased/increased over (e.g. 21 stitches) and divide stitches by number of decreases/increases to be done (e.g. 4) = 5.3. In this example decrease by knitting approx. every 4th and 5th stitch together. When increasing make in this example 1 yarn over after approx. every 5th stitch. On next round work yarn overs twisted to avoid holes. INCREASE TIP (applies to mid under sleeve): Increase 2 stitches by making 1 yarn over on each side of stitch with marker mid under sleeve. Work as follows from beginning of round: Work 1 stitch (work this stitch always like the first stitch in A.4), make 1 yarn over, pattern as before until stitch with marker, make 1 yarn over (= 2 stitches increased). On next round work yarn overs twisted to avoid holes. Then work the increased stitches in A.4. RAGLAN: Decrease for raglan on each side of marker thread in every transition between sleeves and front/back piece as explained below. In the largest sizes decrease unevenly on front/back piece and sleeves - this is explained in pattern. FROM RIGHT SIDE: DECREASE AS FOLLOWS AFTER MARKER THREAD: Knit 1, slip 1 stitch knitwise, knit 1, pass slipped stitch over stitch worked (= 1 stitch decreased) DECREASE AS FOLLOWS BEFORE MARKER THREAD: Work until 3 stitches remain before marker thread, knit the next 2 together, knit 1 (= 1 stitch decreased) FROM WRONG SIDE: DECREASE AS FOLLOWS AFTER MARKER THREAD: Purl 1, purl 2 together (= 1 stitch decreased) DECREASE AS FOLLOWS BEFORE MARKER THREAD: Work until 3 stitches remain before marker thread, purl 2 twisted together, purl 1 (= 1 stitch decreased) ---------------------------------------------------------- START THE PIECE HERE: ---------------------------------------------------------- JUMPER - SHORT OVERVIEW OF THE PIECE: Work body in the round on circular needle from the bottom and up to armholes. Sleeves are worked in the round on double pointed needles/a short circular needle, from the bottom and up to armholes. Then slip sleeves on to same circular needle as body where stitches for armholes where cast off. Work yoke in the round up to neck line. Cast off stitches for neck mid front. Then work the rest of yoke back and forth on circular needle until finished measurements. Finish with a neck edge in rib and cables. BODY: Cast on 264-280-296-336-352-384 stitches on circular needle size 3.5 mm with DROPS Karisma or DROPS Daisy. Knit 1 round. Then work rib as follows: Knit 1, * purl 2, knit 2 *, work from *-* over the next 20-24-28-24-28-36 stitches, work A.1 over the next 14-14-14-28-28-28 stitches (= 1-1-1-2-2-2 repetitions of 14 stitches), work A.2 (= 18 stitches), work A.3 (= 26 stitches), work A.2 (= 18 stitches), Work A.1 over the next 14-14-14-28-28-28 stitches (= 1-1-1-2-2-2 repetitions of 14 stitches), * knit 2, purl 2 *, work from *-* over the next 40-48-56-48-56-72 stitches, knit 2, work A.1 over the next 14-14-14-28-28-28 stitches (= 1-1-1-2-2-2 repetitions of 14 stitches), work A.2 (= 18 stitches), work A.3 (= 26 stitches), work A.2 (= 18 stitches), work A.1 over the next 14-14-14-28-28-28 stitches (= 1-1-1-2-2-2 repetitions of 14 stitches), * knit 2, purl 2 *, work from *-* over the next 20-24-28-24-28-36 stitches, and finish with knit 1. Continue rib like this– NOTE: In diagram A.2 and A.3 repeat only the 2 first rounds vertically. When 1 round remains before piece measures 5 cm, decrease stitches in rib - this is done as follows: Work in stocking stitch over the first 21-25-29-25-29-37 stitches and decrease at the same time 4-4-4-4-4-6 stitches evenly over these 21-25-29-25-29-37 stitches – read DECREASE/INCREASE TIP, work A.1 as before over the next 14-14-14-28-28-28 stitches, work last round in A.2 (= 18 stitches and 1 stitch decreased), work last round in A.3 (= 26 stitches and 2 stitches decreased), work last round in A.2 (= 18 stitches and 1 stitch decreased), work A.1 as before over the next 14-14-14-28-28-28 stitches, work in stocking stitch over the next 42-50-58-50-58-74 stitches and decrease at the same time 9-9-9-9-9-13 stitches evenly over these 42-50-58-50-58-74 stitches, work A.1 as before over the next 14-14-14-28-28-28 stitches, work last round in A.2 (= 18 stitches and 1 stitch decreased), work last round in A.3 (= 26 stitches and 2 stitches decreased), work last round in A.2 (= 18 stitches and 1 stitch decreased), work A.1 as before over the next 14-14-14-28-28-28 stitches, work in stocking stitch over the last 21-25-29-25-29-37 stitches and decrease at the same time 5-5-5-5-5-7 stitches evenly over these 21-25-29-25-29-37 stitches = 238-254-270-310-326-350 stitches. Rib is now done. Insert 1 marker in first stitch and 1 marker in the 120th-128th-136th-156th-164th-176th stitch on round (= in the side on body). Move markers upwards when working. Cast off stitches for armholes later on each side of these markers. Switch to circular needle size 4.5 mm. Pattern begins and first round is worked as follows: Work A.4 over the first 17-21-25-21-25-31 stitches, work A.5 over the next 14-14-14-28-28-28 stitches (= 1-1-1-2-2-2 repetitions of 14 stitches, work A.6 (= 17 stitches), work A.7 (= 24 stitches), work A.6 (= 17 stitches), work A.8 over the next 14-14-14-28-28-28 stitches (= 1-1-1-2-2-2 repetitions of 14 stitches), work A.4 over the next 33-41-49-41-49-61 stitches (marker in the side is in the middle of these stitches), work A.5 over the next 14-14-14-28-28-28 stitches (= 1-1-1-2-2-2 repetitions of 14 stitches), work A.6 (= 17 stitches), work A.7 (= 24 stitches), work A.6 (= 17 stitches), work A.8 over the next 14-14-14-28-28-28 stitches (= 1-1-1-2-2-2 repetitions of 14 stitches), and work A.4 over the last 16-20-24-20-24-30 stitches. Continue this pattern. REMEMBER THE KNITTING TENSION! When piece measures 26 cm in all sizes, cast off stitches for armholes as explained below - read DECREASE TIP. Approx. 24-26-28-30-32-34 cm remain until finished measurements Adjust so that next round is an odd number of rows in the diagrams and cast off as follows: Cast off 6-6-7-7-8-8 stitches for armhole, continue pattern as before until 5-5-6-6-7-7 stitches remain before next stitch with marker, cast off 11-11-13-13-15-15 stitches for armhole, work as before until 5-5-6-6-7-7 stitches remain on round, and cast off the last 5-5-6-6-7-7 stitches = 108-116-122-142-148-160 stitches remain for front piece and 108-116-122-142-148-160 stitches remain for back piece. Cut the yarn. Put piece aside, and work the sleeves. SLEEVE: Cast on 60-60-64-64-68-68 stitches on double pointed needles size 3.5 mm with DROPS Karisma or DROPS Daisy. Knit 1 round. Then work rib in the round (= knit 2/purl 2) for 10 cm. Knit 1 round while increasing 27-27-25-25-23-23 stitches evenly - remember DECREASE/INCREASE TIP = 87-87-89-89-91-91 stitches. Insert 1 marker in first stitch on round - move marker upwards when working. Use marker later when increasing mid under sleeve. Switch to double pointed needles size 4.5 mm. Pattern begins and first round is worked as follows: Work A.4 over the first 1-1-2-2-3-3 stitches (marker is in first stitch), work A.5 (= 14 stitches), work A.6 (= 17 stitches), work A.7 (= 24 stitches), work A.6 (= 17 stitches), work A.8 (= 14 stitches), and finish with A.4 over the last 0-0-1-1-2-2 stitches. Continue this pattern. When piece measures 12-12-12-12-14-11 cm, increase 2 stitches mid under sleeve – read INCREASE TIP. Increase like this every 6½-3½-3-2½-2-2 cm 6-10-11-13-14-16 times in total = 99-107-111-115-119-123 stitches. Continue until sleeve measures approx.. 48-47-45-45-44-43 cm (shorter measurements in the larger sizes because of wider neck and longer yoke). Try the sleeve and work to desired length. Adjust so that next round is an odd number of rows in the diagrams. On next round cast off stitches for armhole as follows: Cast off 6-6-7-7-8-8 stitches, work as before until 5-5-6-6-7-7 stitches remain on round, and cast off the last 5-5-6-6-7-7 stitches = 88-96-98-102-104-108 stitches. Cut the yarn. Work the other sleeve the same way. YOKE: Slip sleeves on to same circular needle size 4.5 mm as body where armholes were cast off (without working the stitches first) = 392-424-440-488-504-536 stitches on needle. Insert a marker thread in all transitions between front/back piece and sleeves = 4 marker threads. Move marker threads upwards when working. Use marker threads when decreasing for raglan. Begin round in transition between back piece and left sleeve - insert a marker here to mark the beginning of round. Continue the pattern upwards as before, but work stitch on each side of all the 4 marker threads in stocking stitch (= 2 stitches in stocking stitch in every transition between front/back piece and sleeves). Work 1 round with pattern in the round over all stitches. OVERVIEW OF NEXT SECTION: On next round begin decrease for raglan. In the largest sizes decrease unevenly for body and sleeves. Cast in addition off stitch for neck mid front, and work the last rows back and forth from mid front. When there is not enough stitches for cables, work in stocking stitch over these stitches. Read section RAGLAN and NECK before continuing. RAGLAN – SIZE S, M and L: Decrease for RAGLAN on each side of the 4 markers - read explanation above. Decrease every other round 15-19-21 times in total, and then every round 18-17-17 times in total. RAGLAN – SIZE XL, XXL and XXXL:: Decrease for RAGLAN before/after the 4 markers - read explanation above. EVERY OTHER ROUND: In each side on sleeves: Decrease 25-29-32 times in total. In each side on front and back piece: Decrease 13-17-16 times in total. EVERY ROUND: In each side on sleeves: Decrease 12-9-8 times in total. In each side on front and back piece: Decrease 35-33-40 times in total. NECK (applies to all sizes): When piece measures 47-49-51-53-55-57 cm (adjust so that next round is an uneven round in diagram), decrease 6 stitches evenly over the middle 24 stitches (= A.7) – remember DECREASE/INCREASE TIP. Then slip the middle 20-22-24-24-26-26 stitches on front piece on 1 stitch holder for neck. Continue until beginning of round. Cut the yarn. Begin from wrong side at the neck and continue pattern back and forth. AT THE SAME TIME cast off for neck at the beginning of every row from neck as follows: Cast off 2 stitches 2 times and 1 stitch 1 time in each side. After all decreases for raglan and neck, 92-98-96-108-110-110 stitches remain. Cut the yarn. Work neck edge as explained below. NECK EDGE: Begin mid back and pick up approx. 122-130-130-142-146-146 stitches around the neck (including stitches on stitch holders at the front) on a short circular needle size 3.5 mm. On next round decrease evenly to avoid a wide neck - knit 1 round and decrease at the same time evenly to 92-96-100-104-108-112 stitches. Purl 1 round. On next round increase stitches to avoid the pattern to be worked from contracting - knit 1 round and increase at the same time 28-24-20-26-32-28 stitches evenly = 120-120-130-130-140-140 stitches. Work A.9 in the round (= 12-12-13-13-14-14 repetitions of 10 stitches). Work until neck edge measures approx. approx. 8-8-8-10-10-10 cm or desired length. On next round decrease 1 stitch over each cable = 108-108-117-117-126-126 stitches remain. Then cast off stitches with knit over knit and purl over purl. ASSEMBLY: Sew the openings under the sleeves tog. |
|||||||||||||||||||||||||||||||
Diagram explanations |
|||||||||||||||||||||||||||||||
|
|||||||||||||||||||||||||||||||

|
|||||||||||||||||||||||||||||||
|
|||||||||||||||||||||||||||||||

|
|||||||||||||||||||||||||||||||
|
Have you made this or any other of our designs? Tag your pictures in social media with #dropsdesign so we can see them! Do you need help with this pattern?You'll find tutorial videos, a Comments/Questions area and more by visiting the pattern on garnstudio.com. © 1982-2024 DROPS Design A/S. We reserve all rights. This document, including all its sub-sections, has copyrights. Read more about what you can do with our patterns at the bottom of each pattern on our site. |
|||||||||||||||||||||||||||||||


With over 40 years in knitting and crochet design, DROPS Design offers one of the most extensive collections of free patterns on the internet - translated to 17 languages. As of today we count 304 catalogues and 11422 patterns - 11422 of which are translated into English (UK/cm).
We work hard to bring you the best knitting and crochet have to offer, inspiration and advice as well as great quality yarns at incredible prices! Would you like to use our patterns for other than personal use? You can read what you are allowed to do in the Copyright text at the bottom of all our patterns. Happy crafting!
Comments / Questions (77)
Is there a video for the neck? I'm so confused at the neck instructions
18.03.2024 - 11:10DROPS Design answered:
Dear Mrs Adeel, starting on mid back you will pick up the stitches around neckline, including the stitches from thread on front piece, then knit 1 round decreasing evenly to 92-112 sts, then purl 1 round, knit 1 round increasing evenly to 120-140 sts (decreasing/increasing let the neckedge looking nicer); and now work A.9 in the round. Happy knitting!
18.03.2024 - 15:11Hei Jeg forstår ikke helt raglanfellingen i str xxl. Skal jeg felle annenhver omg først, og så på hver omg, eller er det ment at jeg skal felle ulikt hele veien fra start til slutt, ulikt. Veldig forvirrende skrevet i oppskriften, og ønsker en tydeliggjøring på hva som skal gjøres her. Snowy trails. Mvh Wenche
01.03.2024 - 12:42DROPS Design answered:
Hei Wenche, Du feller annenhver omgang 29 ganger på ermene og 17 ganger på bolen. Når du er ferdig med de annenhver på bolen, fortsetter du med annenhver på ermene til riktig antall, men feller hver omgang på bolen 33 ganger. Når du er ferdig med annenhver på ermene, feller du hver omgang 9 ganger. Håper det hjelper og god fornøyelse!
04.03.2024 - 11:22Dank voor dit mooie patroon. Een vraag: er staat bij maat S dat de hals start als het lijf 48 cm meet. Zou dit niet 43 cm moeten zijn? Met 5 cm boord, 26 cm lijf, 19 cm pas en 5 cm halsboord kom ik volgens het patroon uit op 50 cm totale lengte, maar dan zouden de halsminderingen in de boord plaats moeten vinden.
25.02.2024 - 08:12DROPS Design answered:
Dag Elina,
De totale hoogte vanaf de boord aan de onderkant tot de schouder is 50 cm, dit is als je het werk plat neerlegt en exclusief de halsboord. Ik denkt dat de getallen dan wel kloppen, want je moet na de 48 cm nog een paar naalden heen en weer breien en dan kom je ongeveer op 50 cm.
25.02.2024 - 10:24Jeg strikker trøjen i størrelse small og er nået til halsen. Jeg har sat de 20 forreste masker på en snor og har strikket hen til starten. Jeg er nu nået til: SAMTIDIG lukkes der af til hals på begyndelsen af hver pind fra halsen således: Luk 2 masker af 2 gange og 1 maske 1 gang i hver side. Jeg forstår simpelthen ikke hvad jeg skal. Kan I hjælpe med at forklare det?
13.02.2024 - 13:39J ai un souci avec les marqueurs en utilisant les chiffres indiqués les marqueurs se situe au milieu du dos et pas au niveau des côtés du pull, pouvez vous m aider ?
11.02.2024 - 15:34DROPS Design answered:
Bonjour Mme Cambazard, vous devez bien avoir le bon nombre de mailles de chaque côté des 2 marqueurs, soit 1 maille avec 1 marqueur, puis 118-126-134-154-162-174 m, 1 maille avec 1 marqueur (= la 120ème-128ème-136ème-156ème-164ème-176ème maille du tour), et 118-126-134-154-162-174 m jusqu'à la fin du tour soit un total de 238-254-270-310-326-350 m. Bon tricot!
12.02.2024 - 08:32Jeg forstår ikke indtagningerne i ribben. Skal maskerne forskydes når man tager ind i A2 række 3? Og i forklaringen står, at der er taget 2 m. ind ved 3. række i A.3, men ifølge diagrammet skal man strikke 2 gange ved siden af hinanden. Hvor kommer indtagningerne ind?
08.02.2024 - 10:14DROPS Design answered:
Hei Tine. I diagram A.2 og A.3 gentages kun de 2 første omgange i højden, altså indtagningerne i A.2 og A.3 strikkes kun siste gang diagrammene strikkes. Og da vil vrangborden stemme med mønstret / diagrammene som skal strikkes etter vrangborden. mvh DROPS Design
16.02.2024 - 10:35Nie wiem kto opracowuje te wzory ale takiego dziadostwa dawno nie widziałam.Wzory wydają się bardzo proste a po przeczytaniu opisu nie wiem od czego zacząć.
20.01.2024 - 11:40DROPS Design answered:
Witaj Ewo, zachęcam do zapoznania się z kursem jak czytać nasze wzory TUTAJ. Proszę napisz jaki konkretnie masz problem, a postaramy się pomóc. Pozdrawiamy!
22.01.2024 - 08:59Det vil være rart om der også stod hvad strikkefastheden er i mønster delen, der er jo ingen glatstrik hvor man kan kontrollere om man holder strikkefastheden. Jeg har desuden brugt tid på at lave en side hvor jeg har kopieret diagram i rækkefølge og forklaring dertil, så jeg ikke skulle kikke på 3 forskellige sider, hver gang jeg kom til en ny mønsterdel + lavet et skema 1 til 16 ( 5 stk) hvor jeg sætter en markering hvor A5 skal snoes. Det har gjort mønteret lettere.
05.01.2024 - 14:36Dzień dobry, czy istniałaby możliwość dodania do wzoru danych na rozmiar XS?
11.12.2023 - 17:33DROPS Design answered:
Witaj Agnieszko, niestety nie jesteśmy w stanie dopasować naszych wzorów do indywidualnych potrzeb. Zalecam kontakt ze sklepem, w którym zakupiłaś włóczkę, powinien udzielić Ci pomocy. Pozdrawiam!
12.12.2023 - 11:10Buongiorno, ho difficoltà a capire la parte del collo. Devo lavorare in piano dopo aver finito le diminuzioni del raglan o durante? E finisco il lavoro in piano quando ho fatto le diminuzioni per il collo? E poi come le riprendo le maglie per il collo? Grazie
24.10.2023 - 12:42DROPS Design answered:
Buonasera Barbara, deve iniziare a lavorare il collo all'altezza indicata, iniziando in tondo e poi in piano. Le maglie del collo vengono messe in sospeso e poi riprese. Buon lavoro!
24.10.2023 - 22:33