
Looking for a yarn?


Comments / Questions (130)
![]() Ebba wrote:
Ebba wrote:
Är det meningen att det ska vara 4 avig på rad när det ska stickas A1 á 2 rapporter? Alltså 28 maskor? Samma fråga igen när A5 sa stickas om två gånger.
14.09.2025 - 16:18DROPS Design answered:
Hei Ebba. Oppskriften er oversendt til Design avd. slik at de kan ta en dobbeltsjekk og evnt komme med en rettelse. mvh DROPS Design
29.09.2025 - 12:50
![]() Anne Ursin wrote:
Anne Ursin wrote:
Förstår inte riktigt raglanminskningen. (Str XL) Skall jag först minska vartannat, sedan varje varv ? MVH Anne
07.09.2025 - 21:39DROPS Design answered:
Hei Anne. Ja, det felles ulikt på forstykke/bakstykke og ermene. I str XL og ved ermene felles det på hver 2. omgang 25 ganger, deretter på hver omgang 12 ganger. Samtidlig felles det ved forstykke/bakstykke først på hver 2. omgang 13 ganger, deretter på hver omgang 35 ganger. Husk også fellinger til hals. mvh DROPS Design
22.09.2025 - 09:11
![]() Rebecca wrote:
Rebecca wrote:
Hello, I was confused about casting off on both sides of the stitch marker. Do you cast off the said stitches using the working yarn and slip all the rest of the stitches?
30.07.2025 - 16:10DROPS Design answered:
Dear Rebecca, you mean for body? Then right, you work the cast off round as explained, casting off the first 6-7-8 sts (see size,) work as before until 5-6-7 sts remain before the stitch with the marker, then cast off the next 11-13-15 sts, work as before until 5-6-7 sts remain before end of the round and cast off these stitches, cut the yarn an slip all stitches aside, you will then work them later slipping stitches of sleeves over the stitches cast off for armholes and work yoke. Happy knitting!
31.07.2025 - 09:11
![]() Bibi wrote:
Bibi wrote:
Bonjour, je ne comprends pas pour le col pourquoi il faut augmenter puis diminuer pratiquement le même nombre de mailles
13.07.2025 - 22:28DROPS Design answered:
Bonjour Bibi, c'est a cause de torsades. Bon tricot!
14.07.2025 - 07:13
![]() Block Karin wrote:
Block Karin wrote:
Bonjour Je ne comprends pas le raglan j'ai fini mes diminution mais il me manque encore 5 cm pour avoir la hauteur est ce normal? D'autre part pour le col pourquoi augmenter puis diminuer pratiquement le même nombre de mailles
09.07.2025 - 10:59DROPS Design answered:
Bonjour Karin, cela pourrait arriver si votre echantillon n'etait pas correct en hauteur. Le blocage peut aider. 2eme question concernant le col - c'est a cause de torsades. Bon tricot!
19.07.2025 - 22:54
![]() Wilma wrote:
Wilma wrote:
Vielen Dank nochmals für die Hilfe! Ich habe jeweils am Anfang und Ende der Hin- und Rückreihen abgekettet, wie in der Anleitung ja steht. Jetzt habe ich aber quasi ein Loch zwischen den mittleren Maschen und dem Rest an beiden Seiten, wenn ich weiterstricke. Hätte man also doch zwei Maschen zusammen stricken sollen statt abzuketten? Oder muss ich diese Lücke dann unauffällig innen zusammennähen?
20.06.2025 - 12:31DROPS Design answered:
Liebe Willma, die mittleren Maschen, die stillgelegt wurden, werden später für die Halsblende aufgefassen / gestrickt, so wenn alle Abnahmen fertig sind, sind es noch Maschen auf der Rundnadel (Passe) + die stillgelegten Maschen an der Mitte Vorderteil + die abgkettenen Maschen beidseig von den stillgelegten Maschen (zwischen stillgelgten Maschen und Maschen der Passe). Kann das Ihnen helfen?
20.06.2025 - 16:06
![]() Wilma wrote:
Wilma wrote:
Vielen Dank für die Antwort! Das beantwortet noch nicht meine Frage, ob in den Hin- und Rückreihen in Muster wie bisher oder bereits in Halsblendenmuster gestrickt wird. Und auch nicht wie oft noch an den Rändern abgenommen wird (Größe M), also wie viele Reihen hin- und her gestrickt wird.
19.06.2025 - 16:21DROPS Design answered:
Liebe Wilma, also die restlichen Maschen stricken Sie genauso wie zuvor im Muster bis alle Abnahmen (Raglan+Halsausschnitt) fertig sind, wenn Sie nicht genügend Maschen für ein Zopf haben, dann stricken Sie rechts oder links genauso wie zuvor. Bündchen stricken Sie erst wenn Sie die Maschen um herum den ganzen Halsausschnitt aufgefassen haben - siehe unter HALSBLENDE. Viel Spaß beim Stricken!
19.06.2025 - 17:24
![]() Wilma wrote:
Wilma wrote:
Was ich nun überhaupt nicht verstehe ist der Übergang von Raglanabnahmen zur Halsblende. Ich verstehe nicht wie ich beim vorderen Mittelteil 6 Maschen gleichmäßig verteilt abnehmen soll. Das zerstört doch vollkommen das Zopfmuster! Und wie soll man noch den Rest der Passe im Muster stricken in Hin- und Rückreihen? Oder beginnt man dort dann bereits mit dem Ripp- und Zopfmuster für die Halsblende? Und wie viele Reihen strickt man überhaupt hin- und zurück?
17.06.2025 - 12:33DROPS Design answered:
Liebe Wilma, die mittleren Maschen werden danach für den Hals stillgelegt, so braucht man kein Zopf mehr über diese Masche, so nehmen Sie regelmäßig verteilt 6 Maschen über die mittleren 24 Maschen, dann legen Sie die mittleren 20-26 M still, die Arbeit wird jetzt in Hin- und Rückreihen weiter gestrickt (ab Halsausschnitt), gleichzeitig wird man für Raglan wie zuvor abnehmen und Maschen für den Hals am Anfang jeder Reihe beidseitig abketten. Viel Spaß beim Stricken!
18.06.2025 - 07:11
![]() Marion wrote:
Marion wrote:
Bonjour. Pour l'échantillon, avec quelle taille d'aiguilles est-il réalisé ? Ce n'est pas indiqué. Merci pour votre aide. Marion
07.06.2025 - 09:10DROPS Design answered:
Bonjour Marion, l'echantillon est realise sur les aiguilles 4,5, les aiguilles 3,5 sont pour les cotes. Bon tricot!
09.06.2025 - 08:50
![]() Gabriele Elvira McGregor wrote:
Gabriele Elvira McGregor wrote:
Hi, ich bin in der 3. Reihe vom Bund und bin ein bischen irritiert. Da heißt es ich muss 2 Maschen rechts zusammenstricken in A2. Stricke ich dann in der fogenden Reihe 1 Rechte und in der 6 Reihe wieder 2 rechts zusammen?
29.05.2025 - 08:16DROPS Design answered:
Liebe Frau McGregor, ganz am Anfang wird man zuerst nur die 2 ersten Reihen A.2 und A.3 stricken (wiederholen) bis die Arbeit 5 cm misst, dann wird man regelmäßig verteilt (die Maschen A.1) + wie bei der 2. Reihe A.2 und A.3 abnehmen. Viel Spaß beim Stricken!
30.05.2025 - 08:44
|
|||||||||||||||||||||||||||||||
Snowy Trails#snowytrailssweater |
|||||||||||||||||||||||||||||||
 |
 |
||||||||||||||||||||||||||||||
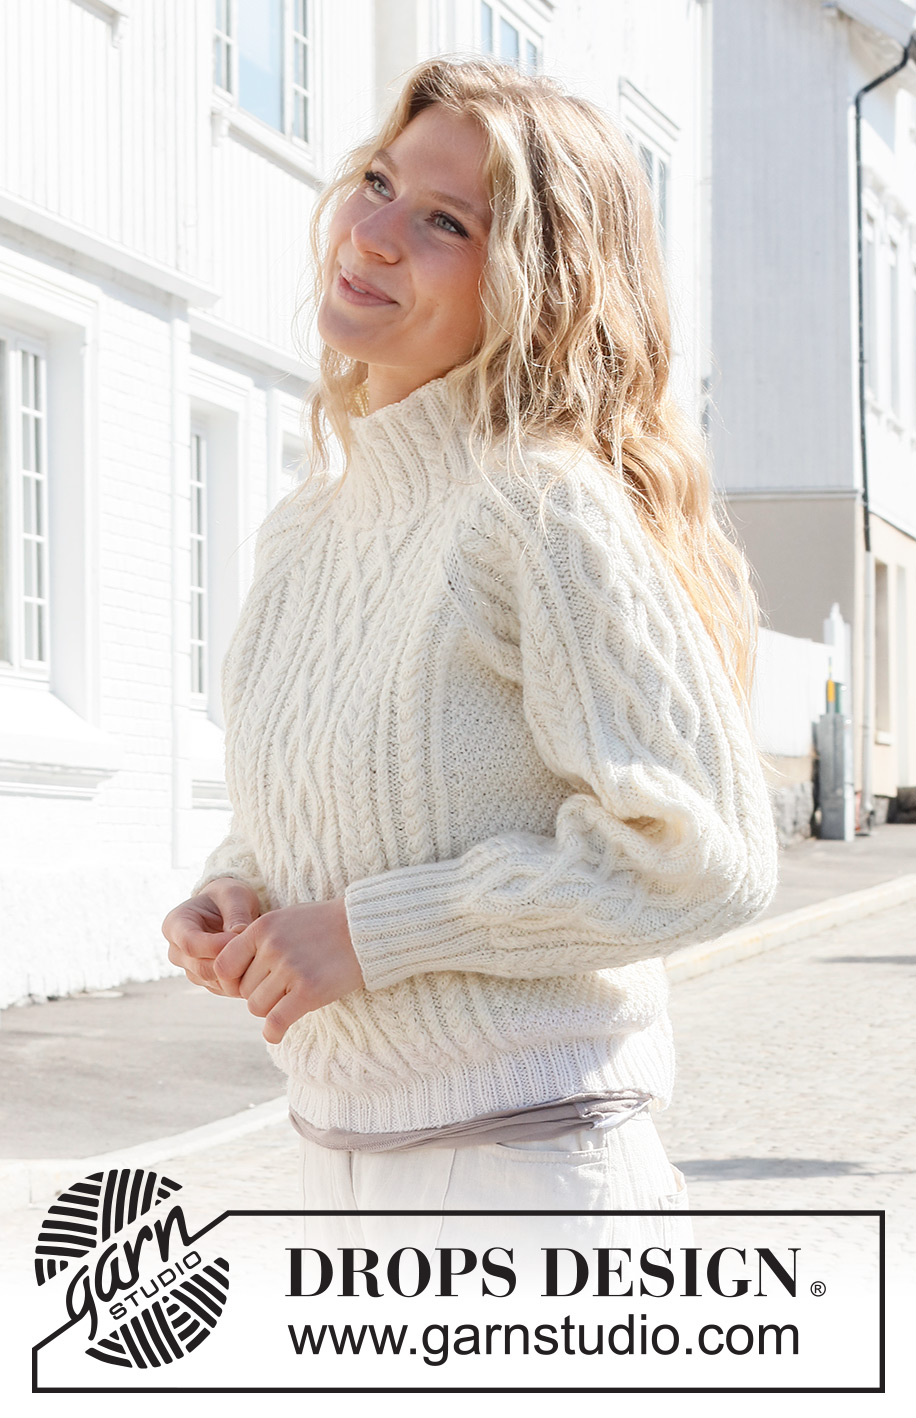
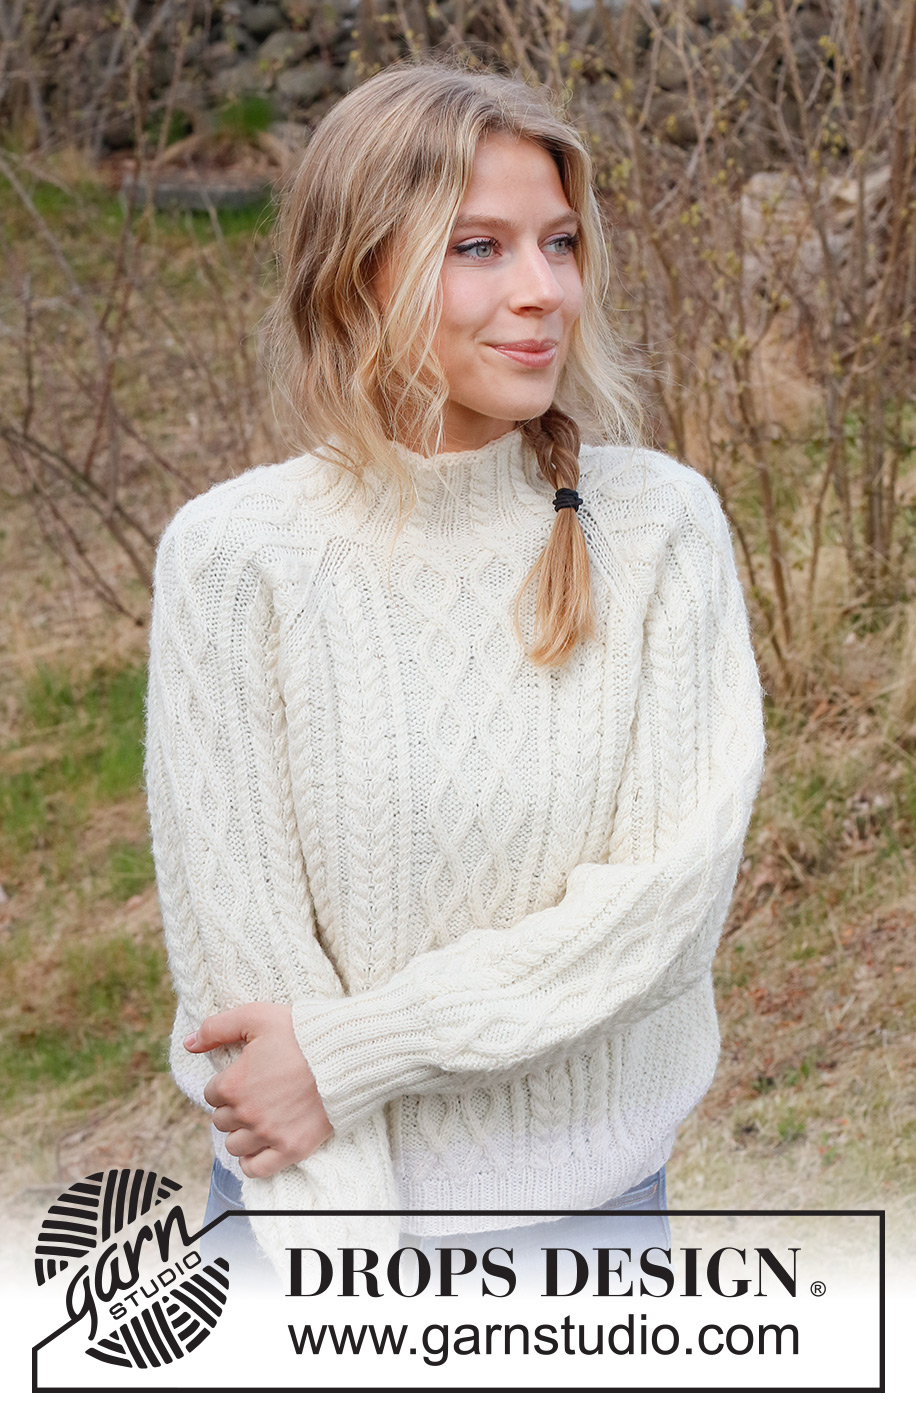
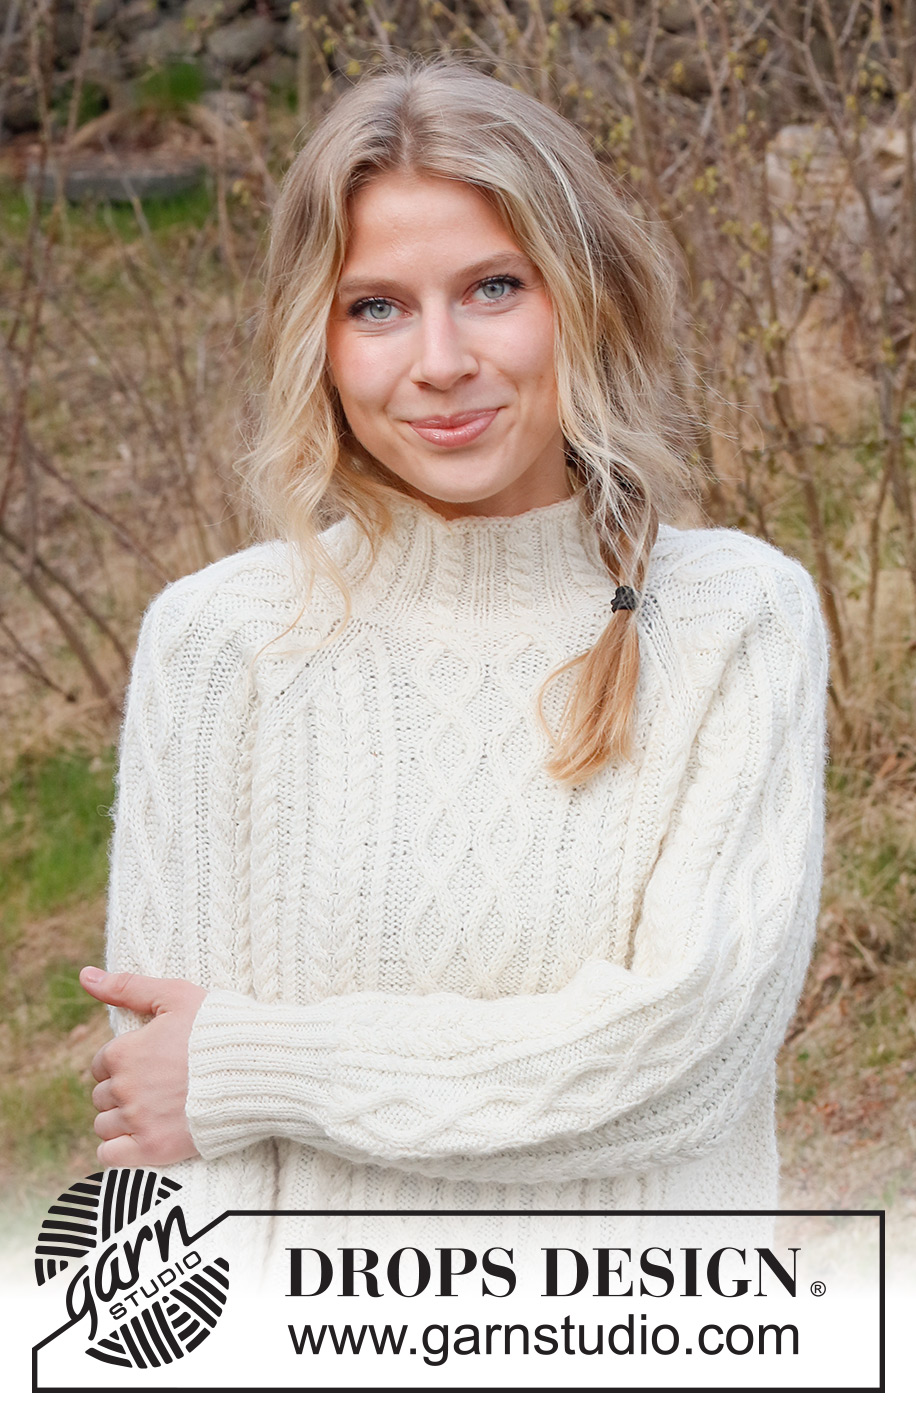
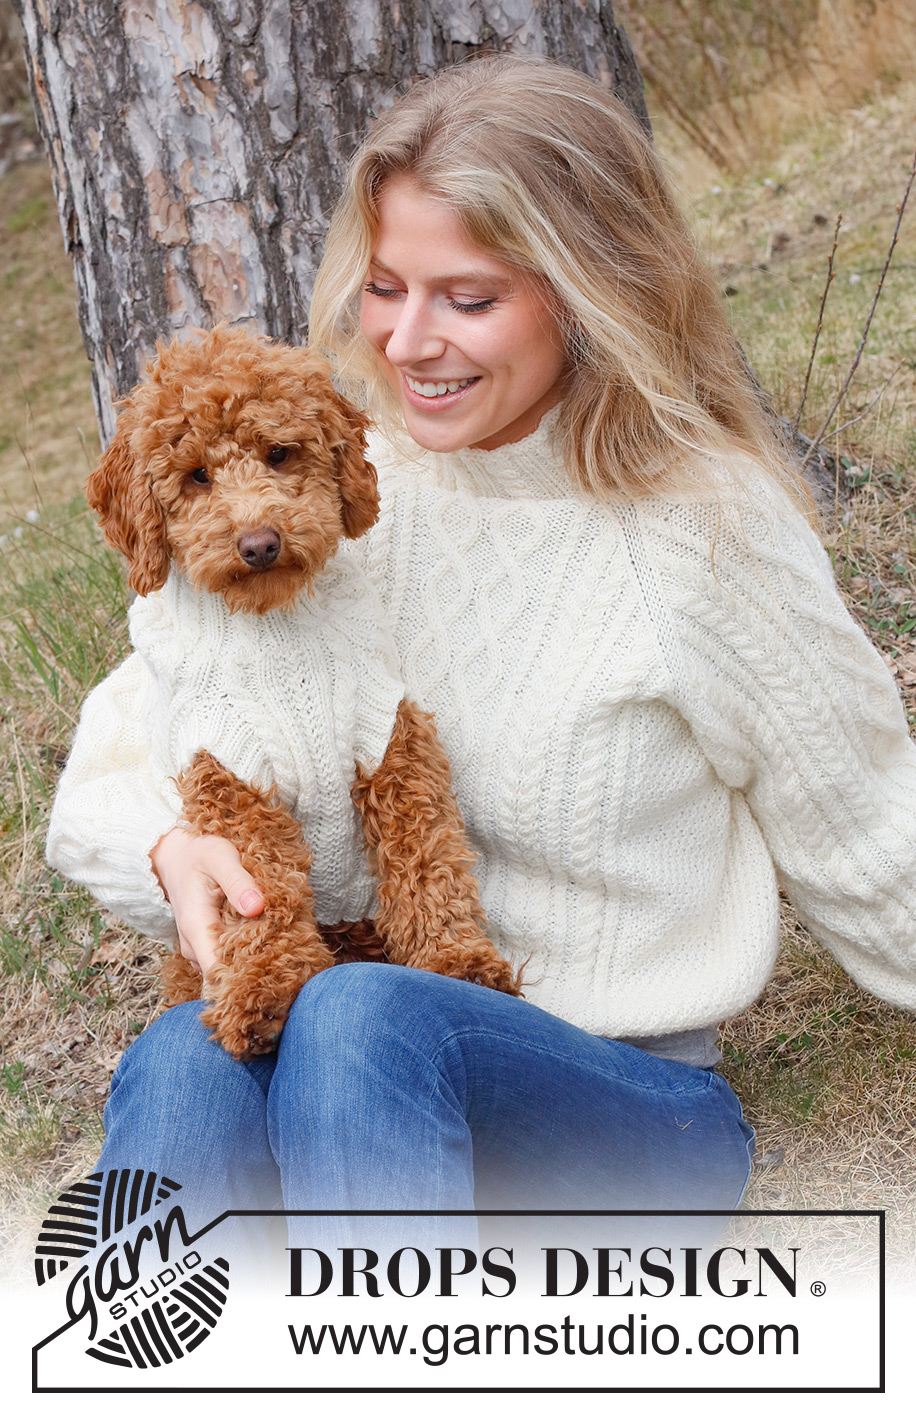
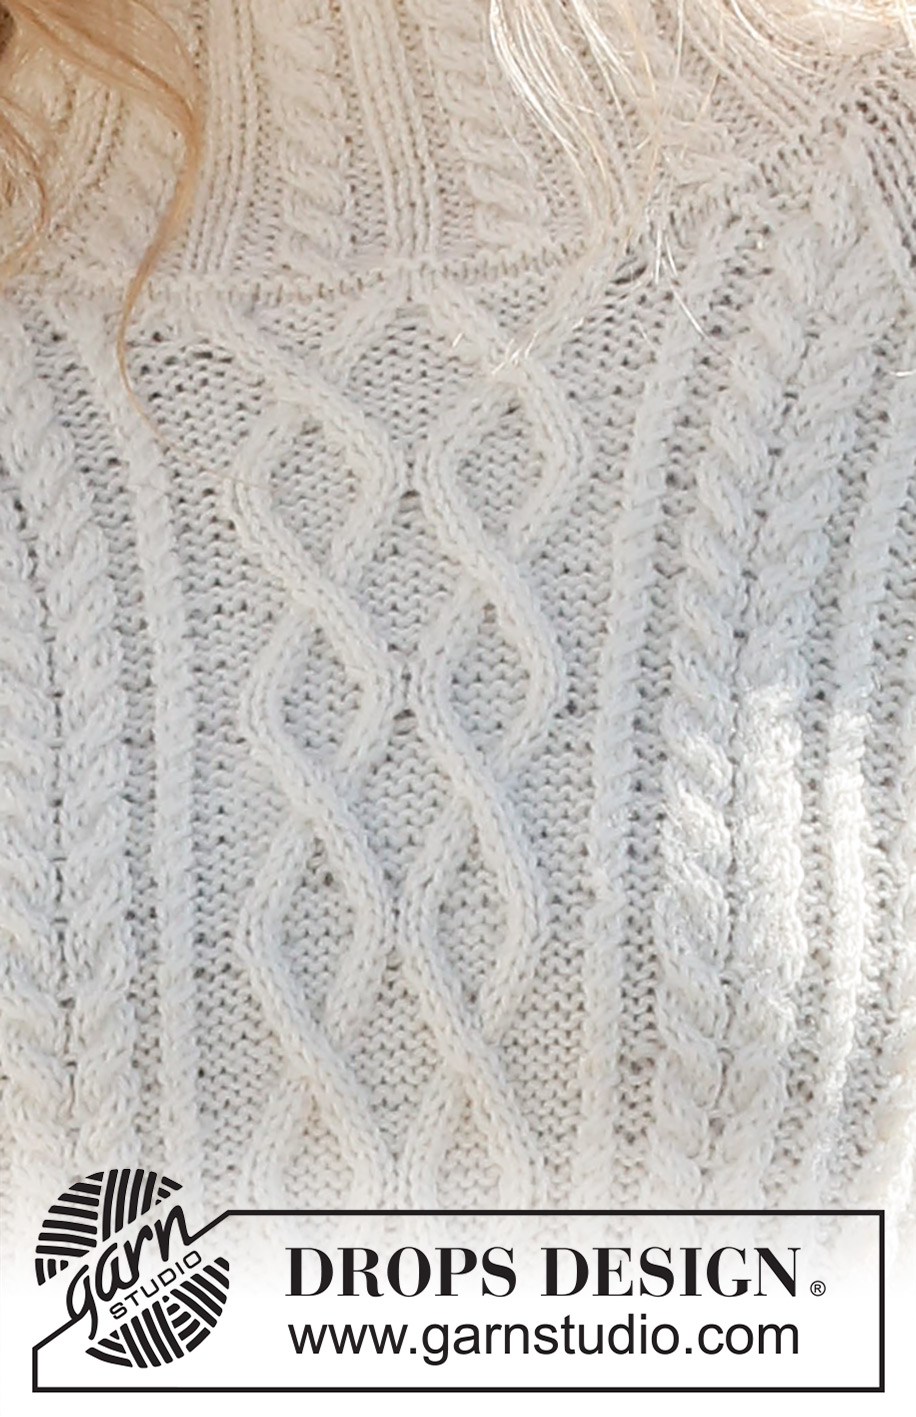
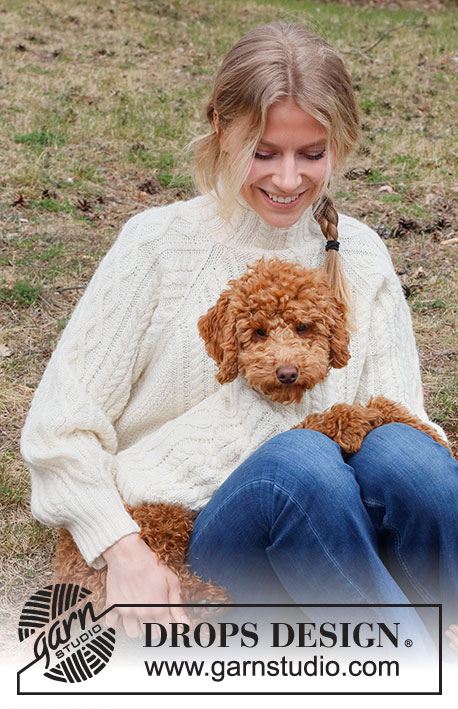
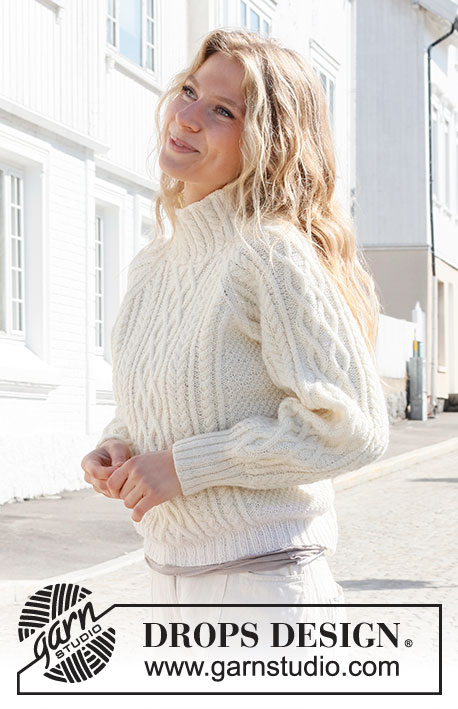
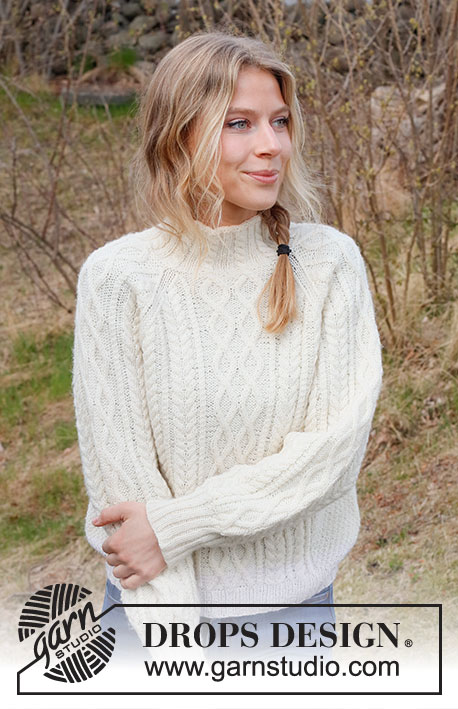
Knitted jumper in DROPS Karisma or DROPS Daisy. Piece is knitted with raglan, cables and moss stitch. Size: S - XXXL
DROPS 226-16 |
|||||||||||||||||||||||||||||||
|
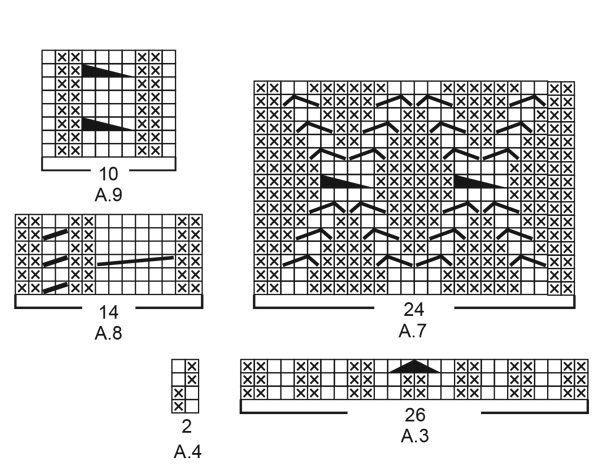
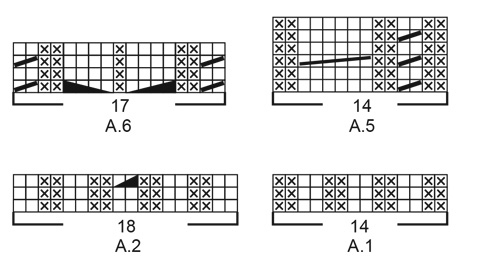
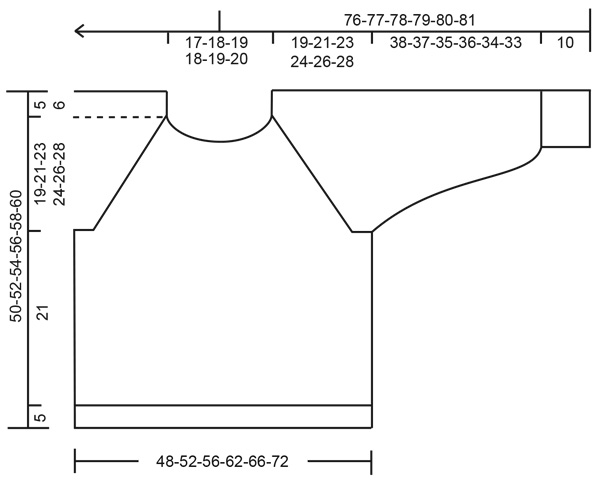
---------------------------------------------------------- EXPLANATION FOR THE PATTERN: ---------------------------------------------------------- KNITTING TIP: In sizes XL, XXL and XXXL, there will be 4 purl stitches next to each other when A.1 is worked 2 times in width. So the rib will match under A.5/A.8, which is worked after the rib. PATTERN: See diagrams A.1 to A.7. Diagrams show all rows in pattern seen from the right side. DECREASE/INCREASE TIP (evenly): To calculate how to decrease/increase evenly, use the total number of stitches to be decreased/increased over (e.g. 21 stitches) and divide stitches by number of decreases/increases to be done (e.g. 4) = 5.3. In this example decrease by knitting approx. every 4th and 5th stitch together. When increasing make in this example 1 yarn over after approx. every 5th stitch. On next round work yarn overs twisted to avoid holes. INCREASE TIP (applies to mid under sleeve): Increase 2 stitches by making 1 yarn over on each side of stitch with marker mid under sleeve. Work as follows from beginning of round: Work 1 stitch (work this stitch always like the first stitch in A.4), make 1 yarn over, pattern as before until stitch with marker, make 1 yarn over (= 2 stitches increased). On next round work yarn overs twisted to avoid holes. Then work the increased stitches in A.4. RAGLAN: Decrease for raglan on each side of marker thread in every transition between sleeves and front/back piece as explained below. In the largest sizes decrease unevenly on front/back piece and sleeves - this is explained in pattern. FROM RIGHT SIDE: DECREASE AS FOLLOWS AFTER MARKER THREAD: Knit 1, slip 1 stitch knitwise, knit 1, pass slipped stitch over stitch worked (= 1 stitch decreased) DECREASE AS FOLLOWS BEFORE MARKER THREAD: Work until 3 stitches remain before marker thread, knit the next 2 together, knit 1 (= 1 stitch decreased) FROM WRONG SIDE: DECREASE AS FOLLOWS AFTER MARKER THREAD: Purl 1, purl 2 together (= 1 stitch decreased) DECREASE AS FOLLOWS BEFORE MARKER THREAD: Work until 3 stitches remain before marker thread, purl 2 twisted together, purl 1 (= 1 stitch decreased) ---------------------------------------------------------- START THE PIECE HERE: ---------------------------------------------------------- JUMPER - SHORT OVERVIEW OF THE PIECE: Work body in the round on circular needle from the bottom and up to armholes. Sleeves are worked in the round on double pointed needles/a short circular needle, from the bottom and up to armholes. Then slip sleeves on to same circular needle as body where stitches for armholes where cast off. Work yoke in the round up to neck line. Cast off stitches for neck mid front. Then work the rest of yoke back and forth on circular needle until finished measurements. Finish with a neck edge in rib and cables. BODY: Cast on 264-280-296-336-352-384 stitches on circular needle size 3.5 mm with DROPS Karisma. Knit 1 round. Then work rib as follows: Knit 1, * purl 2, knit 2 *, work from *-* over the next 20-24-28-24-28-36 stitches, work A.1 over the next 14-14-14-28-28-28 stitches (= 1-1-1-2-2-2 repetitions of 14 stitches – read KNITTING TIP), work A.2 (= 18 stitches), work A.3 (= 26 stitches), work A.2 (= 18 stitches), Work A.1 over the next 14-14-14-28-28-28 stitches (= 1-1-1-2-2-2 repetitions of 14 stitches – read KNITTING TIP), * knit 2, purl 2 *, work from *-* over the next 40-48-56-48-56-72 stitches, knit 2, work A.1 over the next 14-14-14-28-28-28 stitches (= 1-1-1-2-2-2 repetitions of 14 stitches – remember KNITTING TIP), work A.2 (= 18 stitches), work A.3 (= 26 stitches), work A.2 (= 18 stitches), work A.1 over the next 14-14-14-28-28-28 stitches (= 1-1-1-2-2-2 repetitions of 14 stitches – remember KNITTING TIP), * knit 2, purl 2 *, work from *-* over the next 20-24-28-24-28-36 stitches, and finish with knit 1. Continue rib like this– NOTE: In diagram A.2 and A.3 repeat only the 2 first rounds vertically. When 1 round remains before piece measures 5 cm, decrease stitches in rib - this is done as follows: Work in stocking stitch over the first 21-25-29-25-29-37 stitches and decrease at the same time 4-4-4-4-4-6 stitches evenly over these 21-25-29-25-29-37 stitches – read DECREASE/INCREASE TIP, work A.1 as before over the next 14-14-14-28-28-28 stitches, work last round in A.2 (= 18 stitches and 1 stitch decreased), work last round in A.3 (= 26 stitches and 2 stitches decreased), work last round in A.2 (= 18 stitches and 1 stitch decreased), work A.1 as before over the next 14-14-14-28-28-28 stitches, work in stocking stitch over the next 42-50-58-50-58-74 stitches and decrease at the same time 9-9-9-9-9-13 stitches evenly over these 42-50-58-50-58-74 stitches, work A.1 as before over the next 14-14-14-28-28-28 stitches, work last round in A.2 (= 18 stitches and 1 stitch decreased), work last round in A.3 (= 26 stitches and 2 stitches decreased), work last round in A.2 (= 18 stitches and 1 stitch decreased), work A.1 as before over the next 14-14-14-28-28-28 stitches, work in stocking stitch over the last 21-25-29-25-29-37 stitches and decrease at the same time 5-5-5-5-5-7 stitches evenly over these 21-25-29-25-29-37 stitches = 238-254-270-310-326-350 stitches. Rib is now done. Insert 1 marker in first stitch and 1 marker in the 120th-128th-136th-156th-164th-176th stitch on round (= in the side on body). Move markers upwards when working. Cast off stitches for armholes later on each side of these markers. Switch to circular needle size 4.5 mm. Pattern begins and first round is worked as follows: Work A.4 over the first 17-21-25-21-25-31 stitches, work A.5 over the next 14-14-14-28-28-28 stitches (= 1-1-1-2-2-2 repetitions of 14 stitches, work A.6 (= 17 stitches), work A.7 (= 24 stitches), work A.6 (= 17 stitches), work A.8 over the next 14-14-14-28-28-28 stitches (= 1-1-1-2-2-2 repetitions of 14 stitches), work A.4 over the next 33-41-49-41-49-61 stitches (marker in the side is in the middle of these stitches), work A.5 over the next 14-14-14-28-28-28 stitches (= 1-1-1-2-2-2 repetitions of 14 stitches), work A.6 (= 17 stitches), work A.7 (= 24 stitches), work A.6 (= 17 stitches), work A.8 over the next 14-14-14-28-28-28 stitches (= 1-1-1-2-2-2 repetitions of 14 stitches), and work A.4 over the last 16-20-24-20-24-30 stitches. Continue this pattern. REMEMBER THE KNITTING TENSION! When piece measures 26 cm in all sizes, cast off stitches for armholes as explained below - read DECREASE TIP. Approx. 24-26-28-30-32-34 cm remain until finished measurements Adjust so that next round is an odd number of rows in the diagrams and cast off as follows: Cast off 6-6-7-7-8-8 stitches for armhole, continue pattern as before until 5-5-6-6-7-7 stitches remain before next stitch with marker, cast off 11-11-13-13-15-15 stitches for armhole, work as before until 5-5-6-6-7-7 stitches remain on round, and cast off the last 5-5-6-6-7-7 stitches = 108-116-122-142-148-160 stitches remain for front piece and 108-116-122-142-148-160 stitches remain for back piece. Cut the yarn. Put piece aside, and work the sleeves. SLEEVE: Cast on 60-60-64-64-68-68 stitches on double pointed needles size 3.5 mm with DROPS Karisma or DROPS Daisy. Knit 1 round. Then work rib in the round (= knit 2/purl 2) for 10 cm. Knit 1 round while increasing 27-27-25-25-23-23 stitches evenly - remember DECREASE/INCREASE TIP = 87-87-89-89-91-91 stitches. Insert 1 marker in first stitch on round - move marker upwards when working. Use marker later when increasing mid under sleeve. Switch to double pointed needles size 4.5 mm. Pattern begins and first round is worked as follows: Work A.4 over the first 1-1-2-2-3-3 stitches (marker is in first stitch), work A.5 (= 14 stitches), work A.6 (= 17 stitches), work A.7 (= 24 stitches), work A.6 (= 17 stitches), work A.8 (= 14 stitches), and finish with A.4 over the last 0-0-1-1-2-2 stitches. Continue this pattern. When piece measures 12-12-12-12-14-11 cm, increase 2 stitches mid under sleeve – read INCREASE TIP. Increase like this every 6½-3½-3-2½-2-2 cm 6-10-11-13-14-16 times in total = 99-107-111-115-119-123 stitches. Continue until sleeve measures approx.. 48-47-45-45-44-43 cm (shorter measurements in the larger sizes because of wider neck and longer yoke). Try the sleeve and work to desired length. Adjust so that next round is an odd number of rows in the diagrams. On next round cast off stitches for armhole as follows: Cast off 6-6-7-7-8-8 stitches, work as before until 5-5-6-6-7-7 stitches remain on round, and cast off the last 5-5-6-6-7-7 stitches = 88-96-98-102-104-108 stitches. Cut the yarn. Work the other sleeve the same way. YOKE: Slip sleeves on to same circular needle size 4.5 mm as body where armholes were cast off (without working the stitches first) = 392-424-440-488-504-536 stitches on needle. Insert a marker thread in all transitions between front/back piece and sleeves = 4 marker threads. Move marker threads upwards when working. Use marker threads when decreasing for raglan. Begin round in transition between back piece and left sleeve - insert a marker here to mark the beginning of round. Continue the pattern upwards as before, but work stitch on each side of all the 4 marker threads in stocking stitch (= 2 stitches in stocking stitch in every transition between front/back piece and sleeves). Work 1 round with pattern in the round over all stitches. OVERVIEW OF NEXT SECTION: On next round begin decrease for raglan. In the largest sizes decrease unevenly for body and sleeves. Cast in addition off stitch for neck mid front, and work the last rows back and forth from mid front. When there is not enough stitches for cables, work in stocking stitch over these stitches. Read section RAGLAN and NECK before continuing. RAGLAN – SIZE S, M and L: Decrease for RAGLAN on each side of the 4 markers - read explanation above. Decrease every other round 15-19-21 times in total, and then every round 18-17-17 times in total. RAGLAN – SIZE XL, XXL and XXXL:: Decrease for RAGLAN before/after the 4 markers - read explanation above. EVERY OTHER ROUND: In each side on sleeves: Decrease 25-29-32 times in total. In each side on front and back piece: Decrease 13-17-16 times in total. EVERY ROUND: In each side on sleeves: Decrease 12-9-8 times in total. In each side on front and back piece: Decrease 35-33-40 times in total. NECK (applies to all sizes): When piece measures 47-49-51-53-55-57 cm (adjust so that next round is an uneven round in diagram), decrease 6 stitches evenly over the middle 24 stitches (= A.7) – remember DECREASE/INCREASE TIP. Then slip the middle 20-22-24-24-26-26 stitches on front piece on 1 stitch holder for neck. Continue until beginning of round. Cut the yarn. Begin from wrong side at the neck and continue pattern back and forth. AT THE SAME TIME cast off for neck at the beginning of every row from neck as follows: Cast off 2 stitches 2 times and 1 stitch 1 time in each side. After all decreases for raglan and neck, 92-98-96-108-110-110 stitches remain. Cut the yarn. Work neck edge as explained below. NECK EDGE: Begin mid back and pick up approx. 122-130-130-142-146-146 stitches around the neck (including stitches on stitch holders at the front) on a short circular needle size 3.5 mm. On next round decrease evenly to avoid a wide neck - knit 1 round and decrease at the same time evenly to 92-96-100-104-108-112 stitches. Purl 1 round. On next round increase stitches to avoid the pattern to be worked from contracting - knit 1 round and increase at the same time 28-24-30-26-32-28 stitches evenly = 120-120-130-130-140-140 stitches. Work A.9 in the round (= 12-12-13-13-14-14 repetitions of 10 stitches). Work until neck edge measures approx. approx. 8-8-8-10-10-10 cm or desired length. On next round decrease 1 stitch over each cable = 108-108-117-117-126-126 stitches remain. Then cast off stitches with knit over knit and purl over purl. ASSEMBLY: Sew the openings under the sleeves tog. |
|||||||||||||||||||||||||||||||
Diagram explanations |
|||||||||||||||||||||||||||||||
|
|||||||||||||||||||||||||||||||
 |
|||||||||||||||||||||||||||||||
 |
|||||||||||||||||||||||||||||||
 |
|||||||||||||||||||||||||||||||
Have you finished this pattern?Tag your pictures with #dropspattern #snowytrailssweater or submit them to the #dropsfan gallery. Do you need help with this pattern?You'll find 28 tutorial videos, a Comments/Questions area and more by visiting the pattern on garnstudio.com. © 1982-2025 DROPS Design A/S. We reserve all rights. This document, including all its sub-sections, has copyrights. Read more about what you can do with our patterns at the bottom of each pattern on our site. |
|||||||||||||||||||||||||||||||


With over 40 years in knitting and crochet design, DROPS Design offers one of the most extensive collections of free patterns on the internet - translated to 17 languages. As of today we count 320 catalogues and 12094 patterns translated into English (UK/cm). 12094
We work hard to bring you the best knitting and crochet have to offer, inspiration and advice as well as great quality yarns at incredible prices! Would you like to use our patterns for other than personal use? You can read what you are allowed to do in the Copyright text at the bottom of all our patterns. Happy crafting!
Post a comment to pattern DROPS 226-16
We would love to hear what you have to say about this pattern!
If you want to leave a question, please make sure you select the correct category in the form below, to speed up the answering process. Required fields are marked *.