
Looking for a yarn?


Comments / Questions (116)
![]() Marine wrote:
Marine wrote:
Bonjour, je voudrais savoir s'il y avait un tableau des tailles pour nous aider dans la taille du modèle à choisir en fonction de nos mesures. Merci
22.03.2023 - 14:17DROPS Design answered:
Bonjour Marine, pour trouver votre taille, mesurez un pull que vous avez et dont vous aimez la forme et comparez ces mesures à celles du schéma, vous trouverez ainsi la taille adéquate. Retrouvez plus d'infos ici. Bon tricot!
22.03.2023 - 16:14
![]() Annette Nielsen wrote:
Annette Nielsen wrote:
Hej drops hvordan laver jeg hulmønstret på denne bluse. Syntes ikke det ser rigtig ud det jeg laver.
23.02.2023 - 15:33DROPS Design answered:
Hej Annette, du starter nederst til højre i diagrammet. Når du følger diagrammet tager du automatisk ud til det antal masker du ser i diagrammet. Det er vigtigt at du sætter et mærke imellem hver rapport, så du får alle masker med i hver rapport :)
24.02.2023 - 15:23
![]() HOUDAYER Martine wrote:
HOUDAYER Martine wrote:
Bonjour, Dans l’explication des symboles , concernant le jeté , vous indiquez « tricoter le jeté à l’envers/a l’endroit comme indiqué sur le diagramme pour former un trou « , mais sur le diagramme je ne vois que des jetés endroit , je ne comprends pas … Merci pour votre réponse. Martine
11.02.2023 - 21:14DROPS Design answered:
Bonjour Martine, le pull se tricote en rond, et les jetés vont se tricoter soit à l'endroit, soit à l'envers, autrement dit, si on prend le 4ème rang de A.2 par ex; vous allez tricoter les 7 m centrales du diagramme ainsi: 2 m end (le 1er jeté + la diminution du tour précédent), 1 m env (le 2ème jeté du tour précédent), 1 m end, 1 m env (le 3ème jeté du tour précédent), 2 m end (la diminution + le 4ème jeté du tour précédent). Bon tricot!
13.02.2023 - 09:21
![]() Minacori Marion wrote:
Minacori Marion wrote:
Quand on reprend les mailles pour la Manche il est marqué prélevé une maille dans les 12 montées faut-il en prendre une seule ou une sur deux ? Je ne comprends pas comment procéder.merci Cordialement
07.01.2023 - 18:35DROPS Design answered:
Bonjour Mme Minacori, il faut relever 1 maille dans chacune des 12 mailles montées sous la manche lors de la division, cette leçon montre, à la photo 18B comment relever ces mailles. Bon tricot!
09.01.2023 - 09:24
![]() Louise De Jong wrote:
Louise De Jong wrote:
Ik heb een vraag over het meerderen met de omslag; hierbij staat dat de omslag in de volgende toer averecht gebreid dient te worden. Als ik echter de patroontekening volg, staat regelmatig dat de een omslag in de volgende toer met een recht steek gebreid moet worden. Hoe zit dit? Volg ik de aanwijzing van averecht breien of volg ik de patroontekening waarbij ik dus soms een averechte steek brei van de omslag en soms een recht steek?
11.11.2022 - 19:24DROPS Design answered:
Dag Louise,
Je hebt inderdaad gelijk; op verschillende plekken in het telpatroon moet de omslag recht gebreid worden op de volgende naald. De beschrijving van het symbool is nu aangepast.
14.11.2022 - 20:57
![]() Automn Werath Genser wrote:
Automn Werath Genser wrote:
Hei. Jeg får ikke opp rettelsene i diagram A2. Det diagrammet som ligger ute er feil, da det har feil antall masker. Mvh Sigrid
26.10.2022 - 12:42DROPS Design answered:
Hej, jo det er opdateret, så det er rigtigt diagram som ligger her i opskriften :)
26.10.2022 - 13:55
![]() Claudia Thierry wrote:
Claudia Thierry wrote:
I love this very feminine pattern. The directions are clear and it was a pleasure to knit.
12.09.2022 - 16:03
![]() Iris wrote:
Iris wrote:
Hallo, ik ben deze mooie trui aan het breien maar ik loopt vast bij het stukje "Brei nu a2 over A1", moet ik dan beginnen met diagram a2 en daarna verder met a1?.
06.09.2022 - 23:06DROPS Design answered:
Dag Iris,
Daar waar je eerst A.1 breide, brei je nu A.2 over die steken op je naald.
08.09.2022 - 16:59
![]() Martina Rumposch wrote:
Martina Rumposch wrote:
Hallo, ich habe den Pulli mit Drops Paris gestrickt. Er ist sehr schön geworden. Habe mich gefreut. Nun wurde er gewaschen bei 30 Grad. Aus der ehemals L ist eine nicht einmal S geworden. Was ist hier schief gelaufen? Der Pulli ist auch ganz hart.
28.08.2022 - 11:58DROPS Design answered:
Liebe Frau Rumposch, es tut uns leid sowas zu lesen, wenden Sie sich bitte an Ihrem DROPS Laden und erklären Sie dort Ihre Erfahrung, sie werden mal Ihnen weiter helfen. Danke im voraus.
29.08.2022 - 09:12
![]() Hélène wrote:
Hélène wrote:
Au 2e rang, je comprends plutôt 1 envers, 1 endroit, 2 envers, 1 endroit, 1 envers, 1 endroit, 2 envers et 1 endroit. J'espère bien comprendre le diagramme avant de commencer ce beau chandail. Merci de m'aider encore une fois.
18.05.2022 - 01:43DROPS Design answered:
Bonjour Hélène, vous avez raison, désolée; effectivement vous avez: *1 m env, 1 m end, 2 m env, 1 m end, 1 m env, 1 m end, 2 m env, 1 m end*. Bonne continuation!
18.05.2022 - 08:26
|
|||||||||||||||||||||||||
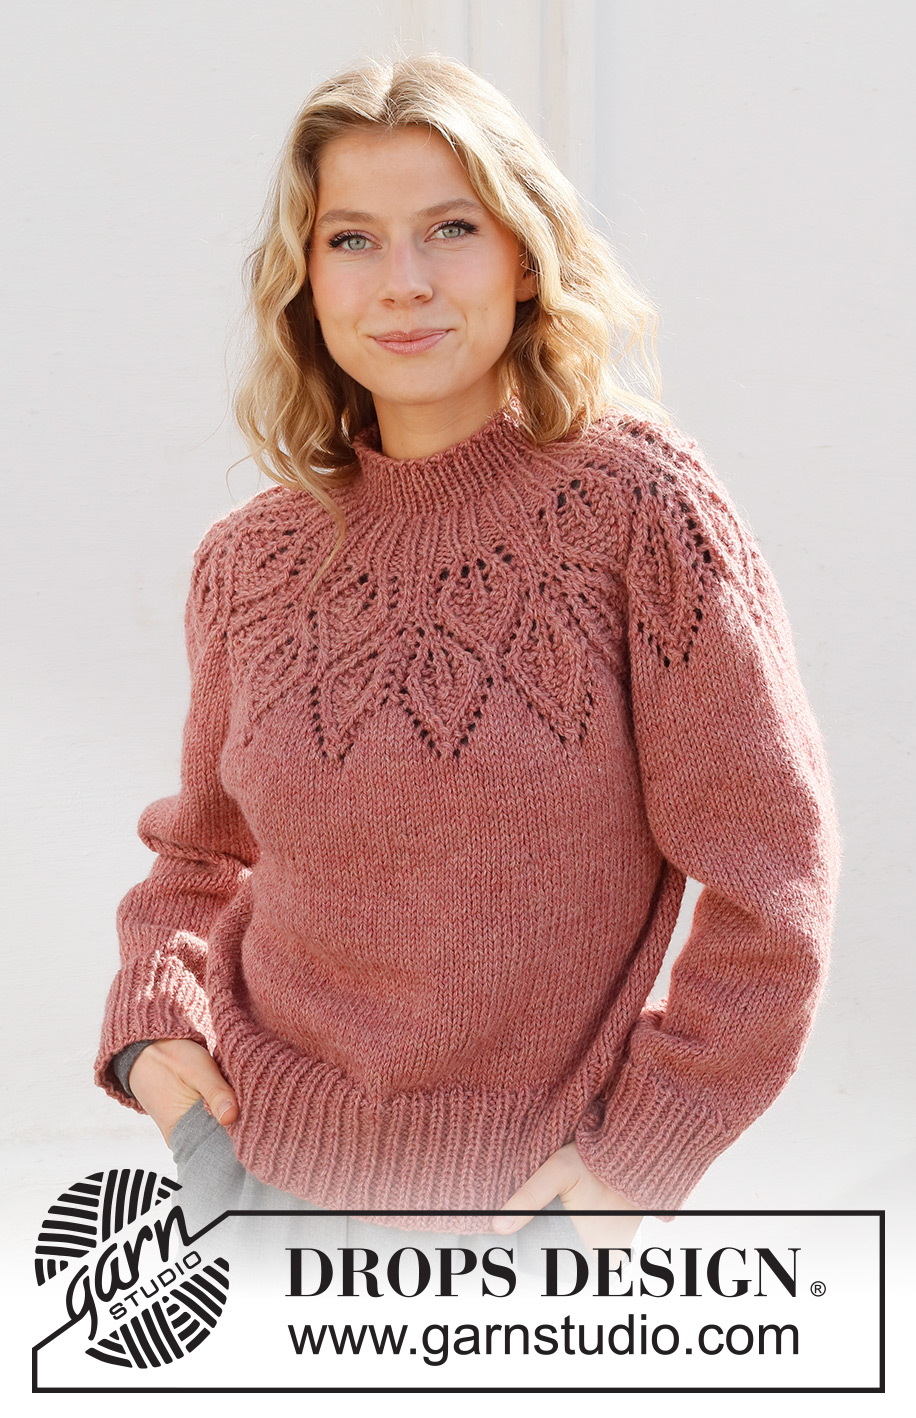
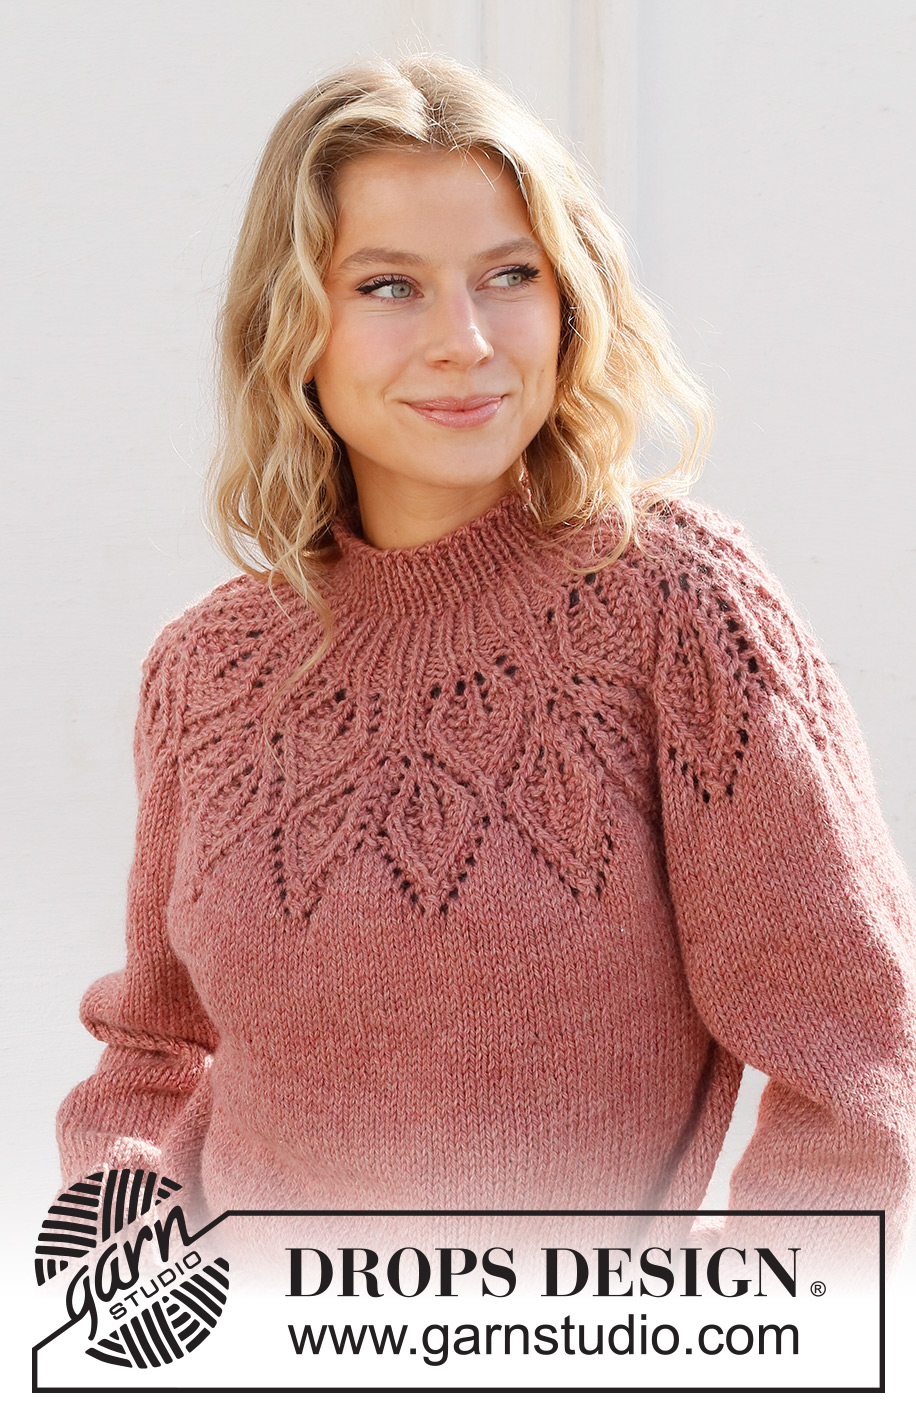
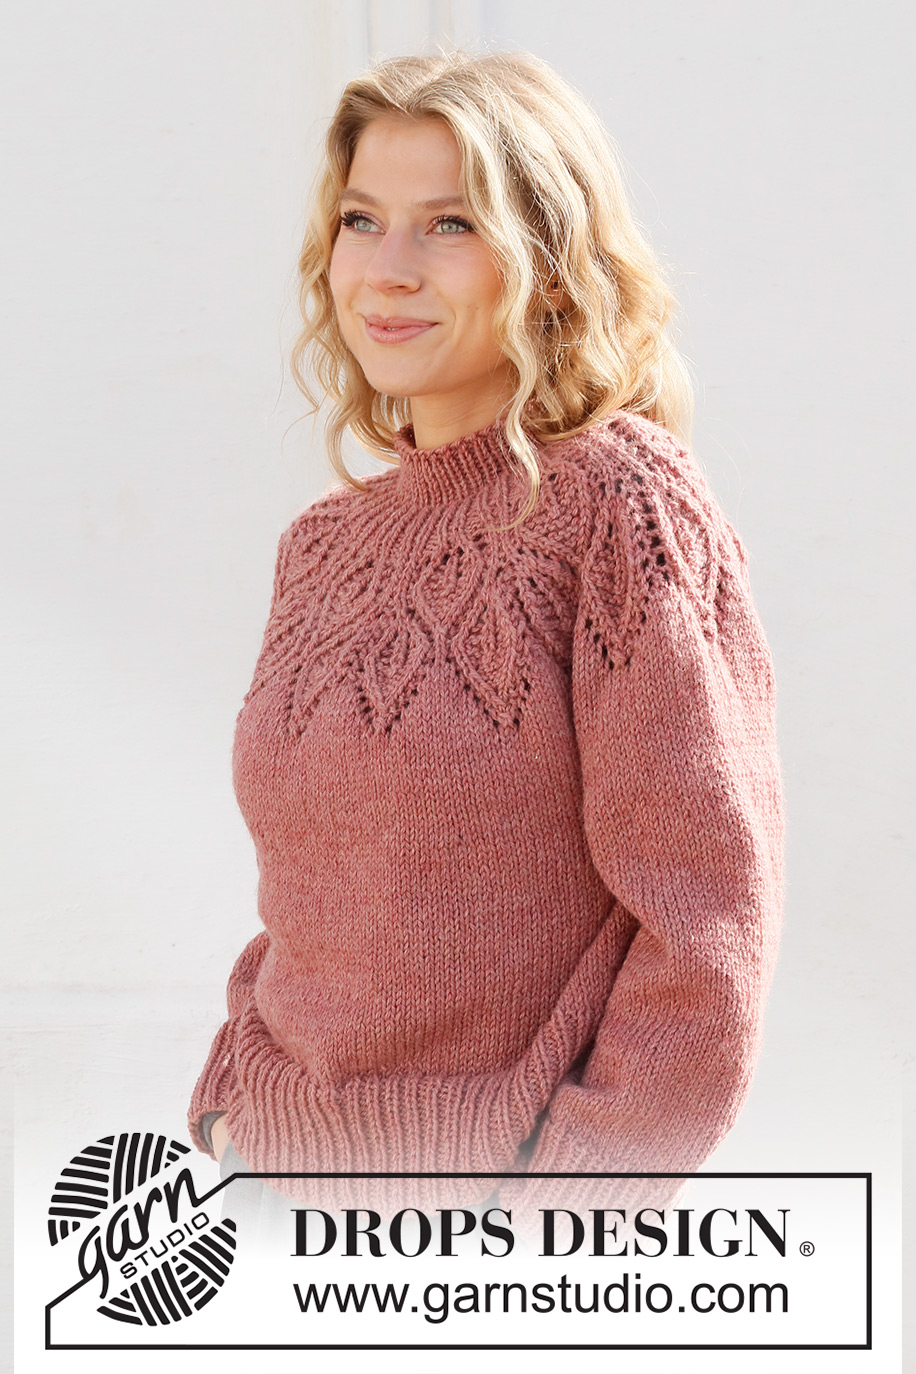
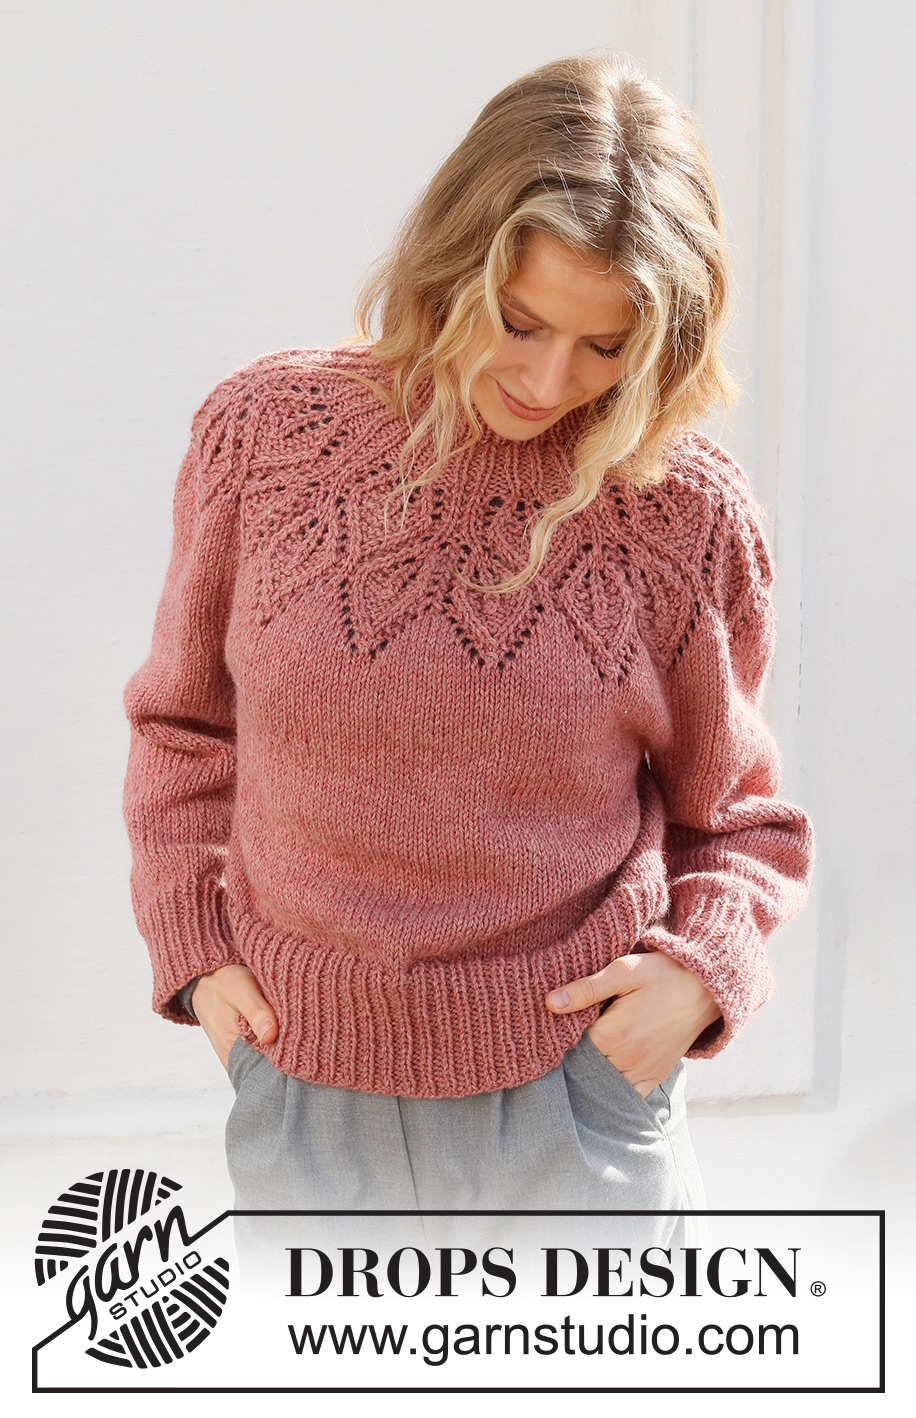
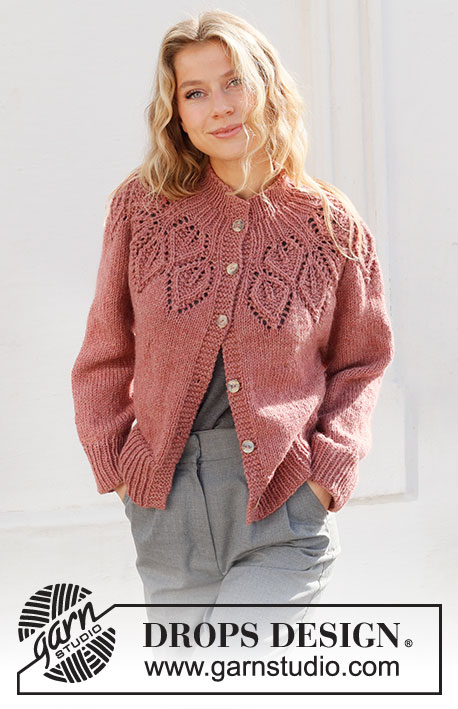
Autumn Wreath#autumnwreathsweater |
|||||||||||||||||||||||||
 |
 |
||||||||||||||||||||||||
Knitted jumper in DROPS Nepal. The piece is worked top down, with round yoke and leaf pattern. Sizes S - XXXL.
DROPS 228-1 |
|||||||||||||||||||||||||
|
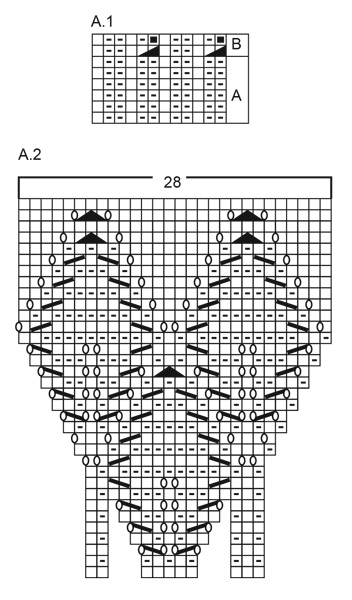
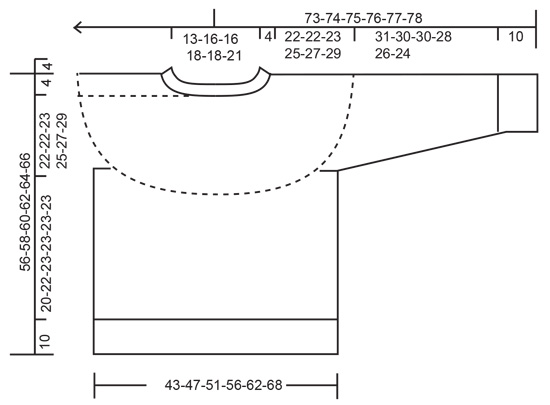
EXPLANATIONS FOR THE PATTERN: ------------------------------------------------------- PATTERN: See diagrams A.1 and A.2. INCREASE TIP (evenly spaced): To work out how to increase evenly, count the total number of stitches on the needle (e.g. 64 stitches) and divide by the number of increases to be made (e.g. 20) = 3.2. In this example, increase by making 1 yarn over after approx. each 3rd stitch. DECREASE TIP (for sleeves): Decrease 1 stitch on either side of the marker thread as follows: Work until there are 3 stitches left before the marker thread, knit 2 together, knit 2 (marker thread sits between these 2 stitches), slip 1 stitch as if to knit, knit 1 and pass the slipped stitch over the knitted stitch (2 stitches decreased). CASTING-OFF TIP: To avoid the cast-off edge being tight you can cast off with a larger size needle. If the edge is still tight, make 1 yarn over after approx. each 6th stitch at the same time as casting off; the yarn overs are cast off as normal stitches. ------------------------------------------------------- START THE PIECE HERE: ------------------------------------------------------- JUMPER – SHORT OVERVIEW OF THE PIECE: The neck and yoke are worked in the round with circular needle, from mid back and top down. The yoke is divided for body and sleeves and the body is continued in the round with circular needle. The sleeves are worked in the round with double pointed needles/short circular needle, top down. NECK: Cast on 64-68-72-76-80-84 stitches with short circular needle size 4.5 mm and DROPS Nepal. Knit 1 round, then work rib (knit 1, purl 1) for 4 cm. Knit 1 round where you increase 20-28-24-32-28-36 stitches evenly spaced – read INCREASE TIP = 84-96-96-108-108-120 stitches. Insert 1 marker in the round; the yoke is measured from this marker. YOKE: Work A.1A over all stitches (= 7-8-8-9-9-10 repeats of 12 stitches) for 4 cm, then work A.1B (= 2 rounds). There are now 70-80-80-90-90-100 stitches. Change to circular needle size 5.5 mm. Now work A.2 over A.1 (= 7-8-8-9-9-10 repeats of 10 stitches). REMEMBER THE KNITTING TENSION! When A.2 has been completed in height there are 196-224-224-252-252-280 stitches and the piece measures approx. 20 cm from the marker. Knit 1 round where you increase 18-11-27-27-47-42 stitches evenly spaced = 214-235-251-279-299-322 stitches. Continue with stocking stitch until the piece measures 22-22-23-25-27-29 cm. Now divide for the body and sleeves on the next round as follows: Work the first 30-33-35-39-43-48 stitches (= half back piece), place the next 46-50-54-60-62-64 stitches on a thread for the sleeve, cast on 8-8-10-10-12-12 stitches (= in side under sleeve), work the next 62-69-73-81-89-98 stitches (= front piece), place the next 46-50-54-60-62-64 stitches on a thread for the sleeve, cast on 8-8-10-10-12-12 stitches (= in side under sleeve), work the last 30-33-35-39-43-48 stitches (= half back piece). The body and sleeves are finished separately. THE PIECE IS NOW MEASURED FROM HERE. BODY: = 138-151-163-179-199-218 stitches. Continue with stocking stitch in the round until the piece measures 20-22-23-23-23-23 cm. There is approx. 10 cm left to finished length; try the jumper on and work to desired length. To avoid the following rib being tight, knit 1 round where you increase 24-26-29-31-35-37 stitches evenly spaced = 162-177-192-210-234-255 stitches. Change to circular needle size 4.5 mm and work rib (knit 1, purl 2) for 10 cm. Cast off with knit over knit and purl over purl - read CASTING-OFF TIP. The jumper measures approx. 56-58-60-62-64-66 cm from the shoulder down. SLEEVES: Place the 46-50-54-60-62-64 stitches from the thread on the one side of the piece on double pointed needles/short circular needle size 5.5 mm and knit up 1 stitch in each of the 8-8-10-10-12-12 stitches cast on under the sleeve = 54-58-64-70-74-76 stitches. Insert a marker thread in the middle of the new stitches under the sleeve and start the round at the marker thread. Work stocking stitch in the round for 4 cm, then decrease 1 stitch on each side of the marker thread – read DECREASE TIP. Decrease like this every 3½-3-2-1½-1½-1 cm a total of 8-9-11-13-15-15 times = 38-40-42-44-44-46 stitches. Continue with stocking stitch until the sleeve measures 31-30-30-28-26-24 cm. NOTE: Shorter measurements in larger sizes due to wider neck and longer yoke. Increase 4-5-6-7-7-8 stitches evenly spaced = 42-45-48-51-51-54 stitches. Change to double pointed needles size 4.5 mm and work rib (knit 1, purl 2) for 10 cm. Cast off with knit over knit and purl over purl - remember CASTING-OFF TIP. The sleeve measures approx. 41-40-40-38-36-34 cm from the division. Work the other sleeve in the same way. |
|||||||||||||||||||||||||
Diagram explanations |
|||||||||||||||||||||||||
|
|||||||||||||||||||||||||
 |
|||||||||||||||||||||||||
 |
|||||||||||||||||||||||||
Have you finished this pattern?Tag your pictures with #dropspattern #autumnwreathsweater or submit them to the #dropsfan gallery. Do you need help with this pattern?You'll find 27 tutorial videos, a Comments/Questions area and more by visiting the pattern on garnstudio.com. © 1982-2025 DROPS Design A/S. We reserve all rights. This document, including all its sub-sections, has copyrights. Read more about what you can do with our patterns at the bottom of each pattern on our site. |
|||||||||||||||||||||||||


With over 40 years in knitting and crochet design, DROPS Design offers one of the most extensive collections of free patterns on the internet - translated to 17 languages. As of today we count 320 catalogues and 12094 patterns translated into English (UK/cm). 12094
We work hard to bring you the best knitting and crochet have to offer, inspiration and advice as well as great quality yarns at incredible prices! Would you like to use our patterns for other than personal use? You can read what you are allowed to do in the Copyright text at the bottom of all our patterns. Happy crafting!
Post a comment to pattern DROPS 228-1
We would love to hear what you have to say about this pattern!
If you want to leave a question, please make sure you select the correct category in the form below, to speed up the answering process. Required fields are marked *.